
Luminar AI Crash
Easy Fix to the Application Crash on Startup
Luminar AI is a popular photo editing software that provides a wide range of features for users to edit and enhance their photos. However, some users have reported that the software crashes every time they launch it. This can be a frustrating experience, especially if you have important photos that you need to edit. Fortunately, there is a simple fix that can help you get rid of this problem. In this blog post, we will discuss how to hold down the Option key when launching Luminar AI to change the Catalog and fix the crash issue.
What is the Option Key?
Before we discuss how to fix the Luminar AI crash issue, it is essential to understand what the Option key is. The Option key is a modifier key that is present on Mac keyboards. It is also known as the Alt key on Windows keyboards. The Option key can be used to access additional features and options in various software applications.
How to Fix the Luminar AI Crash Issue
If Luminar AI crashes every time you launch it, you can fix the issue by holding down the Option key when launching the software. This will give you the option to choose a different Catalog. When you hold down the Option key and launch Luminar AI, a window will appear, giving you the option to create a new Catalog or choose an existing one. You can select a different Catalog than the one that was causing the crash. This should help you fix the crash issue and allow you to use Luminar AI without any problems.

Luminar AI Dialog
Why I Was Opening Luminar AI
I was trying to open Luminar AI because I was looking for ways to add Augmented Sky to an image. The augmented sky is not available in Luminar Neo. It turns out that since Luminar Neo has more layer controls, you don't need to have a tool to add Augmented Sky.
Conclusion
Luminar AI is a powerful photo editing software that can help you edit and enhance your photos. However, if you are experiencing a crash issue when launching the software, you can fix it by holding down the Option key and choosing a different Catalog. This is a simple fix that can help you get back to editing your photos in no time. We hope this blog post has been helpful in resolving your Luminar AI crash issue.
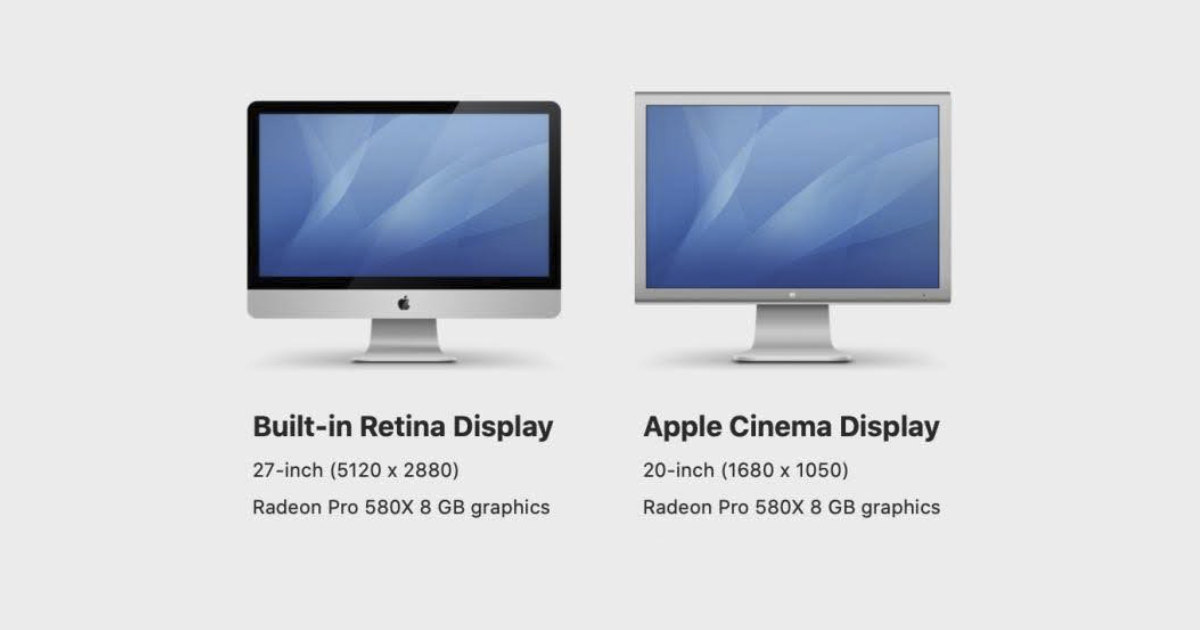
PermalinkExternal Monitor for iMac
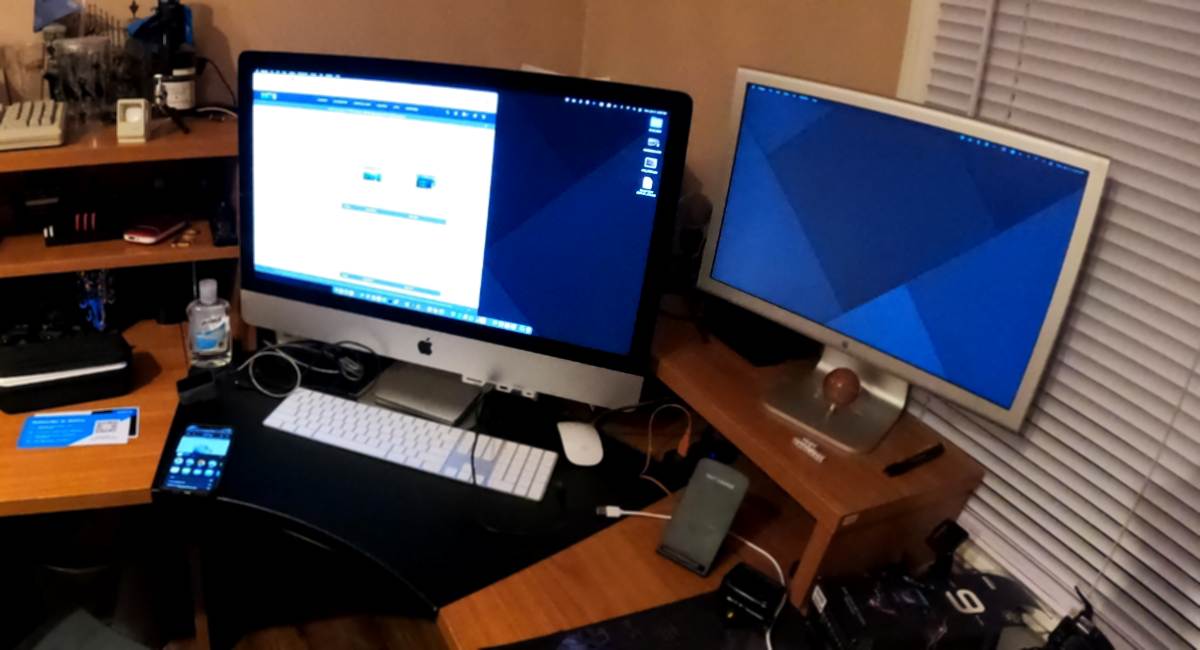
My Home iMac Setup
As technology progresses, so does our desire for seamless connectivity and enhanced productivity. However, sometimes we encounter compatibility challenges when attempting to connect older devices with newer ones. One such example is using an Apple Cinema Display with an iMac, which relies on the newer USB-C ports. In this blog post, we'll explore the solution of using a USB-C to DVI adapter to bridge the gap between the two, while acknowledging the trade-off of utilizing one of the precious USB-C ports on the iMac.
Understanding the Challenge
Apple's Cinema Display is a renowned monitor known for its exceptional color accuracy, vibrant visuals, and sleek design. However, the newer generation of iMacs has transitioned to versatile USB-C ports, leaving many Cinema Display owners seeking a solution to connect their beloved monitors to the updated iMac models.
The USB-C to DVI Adapter
To address this compatibility issue, an effective solution lies in the form of a USB-C to DVI adapter. This adapter acts as a bridge between the USB-C port on the iMac and the DVI input on the Cinema Display, allowing users to enjoy the benefits of both devices without investing in a new monitor or compromising on the computing power of their iMac.
For my setup I have been using the Benfei USB C to DVI Adapter, Type-C to DVI Adapter for 3-years with no issues.
Benefits of the USB-C to DVI Adapter
Cost-effective Solution: Purchasing a new monitor can be a substantial investment. By utilizing a USB-C to DVI adapter, users can extend the life of their Apple Cinema Display and avoid unnecessary expenses.
Uncompromised Visual Quality: The DVI standard supports high-resolution displays, ensuring that your Apple Cinema Display retains its exceptional visual quality when connected to an iMac using the adapter. This means that you can continue to experience the vibrant colors, sharp details, and immersive visuals that the Cinema Display is known for.
Versatile Connectivity: In addition to connecting your Cinema Display to an iMac, the USB-C to DVI adapter can also be used to connect other devices equipped with a USB-C port to DVI monitors, projectors, or even televisions. This versatility allows you to maximize the use of your adapter across multiple devices and scenarios.
Drawbacks of Utilizing a USB-C Port
While the USB-C to DVI adapter provides a solution to connect your Apple Cinema Display to an iMac, it's important to acknowledge the downsides of using one of the USB-C ports on your iMac:
Reduced USB-C Port Availability: iMacs typically feature a limited number of USB-C ports. By utilizing one of these ports for the adapter, you may have fewer available ports for other peripherals or accessories. This limitation could impact your ability to connect additional devices, such as external hard drives, smartphones, or USB-C hubs.
Potential Dongle Clutter: Depending on your specific setup, using a USB-C to DVI adapter might contribute to a slightly cluttered workspace due to the presence of additional cables and adapters. While this may not be a significant issue, it's worth considering the aesthetics and tidiness of your workspace.
Conclusion
The USB-C to DVI adapter offers a viable solution for connecting an Apple Cinema Display to an iMac, allowing you to leverage the exceptional visual quality of the monitor without the need for a new display. Despite the drawbacks of utilizing one of the limited USB-C ports on your iMac, the benefits of retaining your Cinema Display's excellence and avoiding unnecessary expenses make this solution appealing to many users.
Before making a decision, consider your specific needs, the available USB-C ports on your iMac, and how this solution aligns with your overall workflow. By thoughtfully weighing the pros and cons, you can make an informed choice.
PermalinkiCloud Storage
You should be careful what you store in iCloud
With the emergence of cloud storage technology, gone are the days of carrying around USB drives or external hard drives to store files. One such cloud storage solution is Apple's iCloud Drive, which allows users to store documents, pictures, and videos. However, many users have reported that iCloud Drive uses up a significant amount of local disk space. In this blog post, we will explore why this happens and how it differs from other cloud storage solutions like Microsoft One Drive.

Why Apple iCloud Drive Uses So Much Local Disk Space
Apple iCloud Drive is not an offline storage repository like Microsoft One Drive. Instead, it is designed to store files and documents in the cloud and sync them across multiple devices. When you enable iCloud Drive, it automatically creates a folder on your local machine where files and documents are stored and synced with the cloud. This folder is called the iCloud Drive folder, and it resides on your local machine. As a result, any document, file, or folder that you save to iCloud Drive using any device, including your Mac, iPhone, or iPad, is automatically synced and stored on your local machine, occupying significant local disk space.
Use iCloud to keep only the files you want to be accessed across multiple computers - not the ones you don't use often.
File stored in iCloud still uses space on your computer.
How iCloud Drive Differs from Other Cloud Storage Solutions
Microsoft One Drive is an excellent example of an offline storage repository. When you save files to your One Drive, they are stored in the cloud, and you can access them from anywhere. However, they are not automatically synced to your local machine. Instead, you can choose to download specific files or folders to your local machine, and they will occupy local disk space only when downloaded. In contrast, iCloud Drive was designed to make syncing files and documents across Apple devices easier, but this comes at the cost of occupying significant local disk space.
How to Manage iCloud Drive's Local Disk Space Usage
If you are running out of local disk space on your Mac, iCloud Drive's storage can be a significant culprit. One way to manage this is to turn off the Desktop and Documents Folders option in iCloud Drive settings. This will stop syncing files and documents from your Desktop and Documents folder to iCloud Drive and save significant local disk space. Additionally, you can selectively choose which files and folders to sync to iCloud Drive, which will help reduce the overall local disk space usage.
Conclusion
In summary, Apple iCloud Drive uses up significant local disk space because it is designed to sync files and documents across multiple Apple devices. Unlike other cloud storage solutions like Microsoft One Drive, iCloud Drive creates a folder on your local machine, which occupies significant local disk space. However, by selectively choosing which files and folders to sync and disabling the Desktop and Documents Folders option, you can manage iCloud Drive's local disk space usage and free up space on your Mac.
PermalinkGarageband
Garageband is a powerful tool to create music
Apple's Garageband is a powerful digital audio workstation that is often overlooked by music enthusiasts. Many people are unaware of the extensive capabilities of the software, and as a result, they tend to underestimate its potential. In this blog post, we will discuss the frequently underestimated abilities of Garageband and how it can be used to create professional-quality music.
The Capabilities of Garageband
Garageband is a versatile tool that can be used by musicians, producers, and audio engineers alike. It is designed to make music creation accessible to everyone, regardless of their experience or technical expertise. The software comes with a host of features that allow the user to record, edit, and mix music with ease. Some of the most notable features include:
Virtual Instruments
Garageband has an extensive library of virtual instruments that can be used to create a wide range of sounds. From guitars and drums to synthesizers and orchestral instruments, Garageband has it all. These virtual instruments are designed to sound realistic, and they can be easily customized to suit the user's needs.
Audio Effects
In addition to virtual instruments, Garageband also has a vast collection of audio effects. These effects can be used to enhance the sound of recorded instruments or vocals. The software comes with a variety of EQs, compressors, reverbs, and delays, among others. These effects can be combined to create a unique sound that is tailored to the user's preferences.
Music Lessons
Garageband also offers interactive music lessons that are designed to teach users how to play various instruments. These lessons are perfect for beginners who are looking to learn how to play an instrument without hiring a teacher. The lessons are easy to follow, and they are led by world-class musicians who offer valuable tips and insights.
Learn The Basics
Having trouble using GarageBand? Check out the GarageBand Tutorial at soundwave.com.
 https://www.soundswow.com/garageband-tutorials/
SoundsWow is a website that provides tutorials on how to use GarageBand. It is an excellent option for beginners to utilize when learning to write, record, and produce music. Even though GarageBand is geared for beginners and free, it still offers many tools and features you can use to create amazing music projects. The website provides a beginner's guide to GarageBand which touches on all of the essential functions and features of the app to get you pointed in the right direction as you begin your musical creation journey.
PermalinkTilt-shift
PhotoScape X has the best functionality

Tilt-shift is a technique that can make real-life scenes appear like miniatures. This effect can be achieved through the manipulation of focus and depth of field. In the past, tilt-shift was only possible through the use of specialized lenses. Nowadays, however, many photo editing software programs offer tilt-shift features that can produce the same effect. In this blog post, we will focus on how to use tilt-shift in Pixelmator, Affinity Photo, and PhotoScape X.
![]()
Pixelmator Pro
Pixelmator Pro is a popular photo editing software for Mac users. To apply the tilt-shift effect in Pixelmator, you need to select the "Tilt-Shift" tool from the Effect menu. Select Blur and you'll see "Tilt-Shift" on the bottom row. Once you have selected, you can adjust the size and position of the focus area. Pixelmator also allows you to adjust the blur intensity, making it easy to create a realistic tilt-shift effect.
My Thought: Seems simple enough. This would be something I would use if I wanted to quickly add a Tilt-Shift. I like the location, but it does take some "digging" around to get to the "Add Effect."
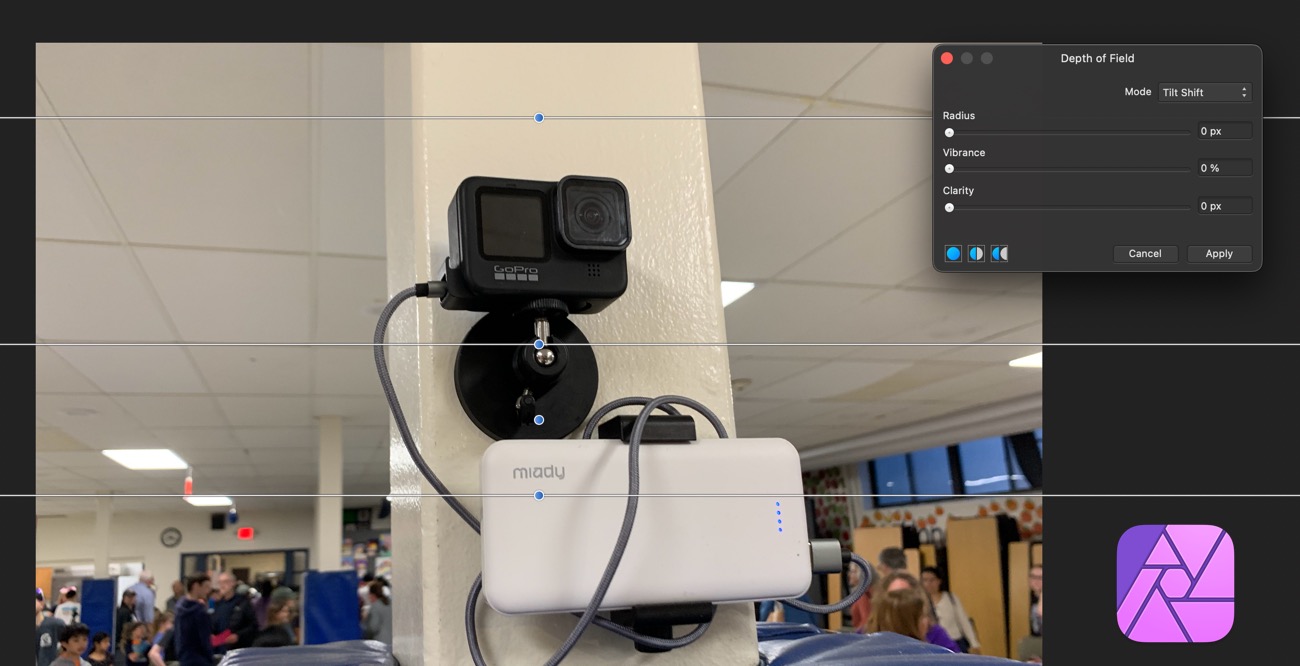
Affinity Photo
Affinity Photo is another popular photo editing software that offers tilt-shift capabilities. To apply the tilt-shift effect in Affinity Photo, select the "Blue" option from the "Filters" menu. and then select Depth of Field Blur. You can then choose between Depth of Field and tilt-shift. Affinity Photo allows you to adjust the size and position of the focus area, as well as the amount of blur. One advantage of Affinity Photo is that it offers a live preview of the effect, making it easier to fine-tune your adjustments.
My Thought: When it comes to adding a Tilt Shift effect, I would not use Affinity Photo. The tilt shift feature just seems to be useful compared to other apps that I have.

PhotoScape X
PhotoScape X is a comprehensive photo editing software that offers a wide range of features, including tilt-shift life effects which they call miniature. Unlike Pixelmator and Affinity Photo, PhotoScape X offers several tilt-shift features, including miniature, small planet, and fisheye. The miniature option allows you to adjust the focus of a rectangular area, while the small planet option creates a spherical distortion effect. The fisheye option, on the other hand, creates a convex distortion effect. PhotoScape X also allows you to adjust the size and position of the focus area, as well as the intensity of the blur.
My Thought:A real winner here! This is easy to get to and there are lots of ways to make the Tilt Shift work. This will be my "go-to" application for tilt-shift.
Conclusion
In conclusion, tilt-shift is a fun and creative technique and a widely used way to add a unique look to your photos. This technique allows for the creation of a miniature effect, where the subjects in the photo appear to be on a smaller scale, similar to a dollhouse. It can also be used to create a selective focus, where only a specific part of the photo is in focus while the rest is blurred, drawing attention to the subject. Tilt-shift can be applied to various types of photography, from landscape to portrait, giving each one a distinctive twist. By experimenting with different angles, settings, and subjects, you can achieve a wide range of results and take your photography to the next level.
While all three software programs discussed in this blog post offer tilt-shift capabilities, PhotoScape X stands out for its variety of options. Whether you are a professional photographer or an amateur, tilt-shift can be a fun way to experiment with your photos and take your editing skills to the next level.
PermalinkCofeShow Video Slideshow
Limited Features and No Update in Two Years
CofeShow is a video slideshow maker for Macintosh computers. It is easy to use and has a variety of features, but it has not been updated in two years and has some limitations.
I first blogged about CodeShow Video SlideShow Maker back in July 2018. A lot of things learned still hold today.

Some Themes in Cofe slideshow
Pros
- Easy to use: CofeShow is very easy to use. You can create a slideshow in just a few minutes by importing your photos and music, selecting a theme, and adjusting the settings.
- Variety of features: CofeShow has a variety of features that allow you to customize your slideshows. You can choose from a variety of themes, and add text, transitions, and effects.
- Lots of Themes: There are 24 designs to choose from, including Chalkboard which is perfect for end-of-school-year videos.
- Affordable: CofeShow is very affordable. You can try it out for free, and the premium version is only $29.99 lifetime or you can purchase a yearly subscription for $15. There is a monthly plan for $7.
Cons
- Not updated in two years: CofeShow has not been updated in two years. The App works fine, but when I quit it "crashes" and I have to force quit to close out of the app. With no update in 2-years, has this project been abandoned?
- Limited controls: CofeShow has limitations. For example, you cannot change the duration of each slide or import HEIC images - you need to convert these to JPG images. Also, you can't have video clips in your slide show.
Overall
CofeShow is a mixed bag of features. It is easy to use and has a variety of features, but it has not been updated in two years and has some limitations. If you are looking for a simple and affordable slideshow maker, CofeShow is a good option. However, if you are looking for a more powerful and versatile slideshow maker, you may want to consider a different option.
Looking for alternatives to CofeShow?
- Final Cut Pro: If you use Final Cut Pro, check out the Flying Clip Plugin and Stacker Plugins from FCPEffects.
- Apple Photos: Apple Photos has some great slideshow features. They are easy to create and offer some settings.
- Graphic Converter: You can easily create video slideshows using Graphic Converter. Videos can be touched up in iMovie or Final Cut Pro. You can add music and set the duration of the slides. There is only one style - so it's pretty limited if you want something fancy.
Viagkiki USB 3.0 Switch
Use a USB Headphone Between 2 Computers
The Viagkiki USB 3.0 Switch is a great option for anyone who needs a way to use their Sennheiser SC60 USB Headset with both an iMac and a MacBook. The switch is available on Amazon.com for $16, and it is a simple and affordable way to connect your headset to two computers.
To use the Viagkiki USB 3.0 Switch with your Sennheiser SC60 USB Headset, simply follow these steps:
- Connect the Viagkiki USB 3.0 Switch to both your iMac and your MacBook.
- Connect your Sennheiser SC60 USB Headset to the Viagkiki USB 3.0 Switch.
- On your iMac and your MacBook, open the Sound Preferences window.
- In the Output tab, select the Sennheiser SC60 USB Headset as the audio output device.
- To switch between your iMac and your MacBook, simply use the buttons on the Viagkiki USB 3.0 Switch.
The Viagkiki USB 3.0 Switch is a great way to use your Sennheiser SC60 USB Headset with both an iMac and a MacBook. It is a simple, affordable, and effective solution.
Here are some of the features of the Viagkiki USB 3.0 Switch:
- Supports two computers: The Viagkiki USB 3.0 Switch can be used to connect two computers to a single USB device. This means that you can use your Sennheiser SC60 USB Headset with both your iMac and your MacBook.
- Easy to use: The Viagkiki USB 3.0 Switch is very easy to use. Simply connect it to your computers and your headset, and then select the headset as the audio output device in your Sound Preferences window.
- Affordable: The Viagkiki USB 3.0 Switch is very affordable. It is available on Amazon.com for just $16.
If you are looking for a way to use your Sennheiser SC60 USB Headset with both an iMac and a MacBook, the Viagkiki USB 3.0 Switch is a great option. It is a simple, affordable, and effective solution.
PermalinkPowerbook Startup Issues
Might be the Battery
When it comes to our trusty computers, we rely on them to power up smoothly and efficiently. However, even the most reliable machines can encounter hiccups along the way. One common issue that can hinder the startup process of a Powerbook G4 is old and deteriorated rechargeable battery. In this article, we will delve into the symptoms, causes, and the best solution to resolve this problem and get your Powerbook G4 back up and running.
As a result, you may find that your old Powerbook is really not dead. You may have a battery that is preventing it from starting up.

Understanding the Issue
The Powerbook G4, a classic Apple laptop, came equipped with a rechargeable battery that provided essential power when not connected to an external power source. Over time, batteries naturally degrade due to age, usage, and environmental factors. As the battery deteriorates, it can create hindrances during the startup process, preventing the computer from booting up.
Symptoms of an Old Battery
- Inability to power on: The most apparent symptom is the computer's failure to start up, even when connected to a power source.
- Intermittent power loss: If the battery is severely degraded, the Powerbook G4 might experience sudden power loss during use or fail to hold a charge for an extended period.
- Unusual behavior: The laptop may exhibit erratic behavior, such as unexpected shutdowns or inconsistent power levels displayed on the battery indicator.
Causes of the Problem
The primary cause of a Powerbook G4's failure to boot up when an old battery is installed is the battery's diminished capacity to supply adequate power. Over time, the battery's ability to hold a charge decreases, resulting in insufficient power delivery to support the startup process. This lack of power can prevent the computer from initiating its normal boot sequence.
The Solution
To resolve the issue and get your Powerbook G4 up and running, the best solution is to remove the old battery. This may sound counterintuitive, as we often rely on the battery for portable power. However, when the battery is old and causing startup problems, removing it will allow the laptop to boot up using the external power source directly.
Follow these steps to remove the battery:
- Ensure the Powerbook G4 is turned off and disconnected from any power sources.
- Locate the battery release latch on the bottom of the laptop.
- Slide the latch to the unlock position and hold it.
- While holding the latch, simultaneously lift the battery away from the laptop.
- Once the battery is removed, release the latch.
By removing the old battery, the Powerbook G4 will bypass its reliance on the degraded power source and start-up directly using the external power supply. However, it's essential to note that without a battery, the laptop will no longer be portable and will need to be connected to a power source at all times.
Battery Replacement Options
If you still require the portability of your Powerbook G4, consider replacing the old battery with a new one. Look for compatible replacement batteries available online or consult an authorized Apple service center for assistance. Remember, it's crucial to purchase a battery from a reliable source to ensure quality and compatibility with your Powerbook G4.
A new Powerbook G4 battery is expensive - around $75 - so you need to decide if it's really worth the portability power.
PermalinkSennheiser SC60 Headset
Great Headset for Work
Sennheiser is a well-known brand when it comes to audio equipment, and the SC60 headset is one of their popular products. The headset is designed for use in offices and call centers, but it can also be used for personal use. In this blog post, we will be discussing how to use the Sennheiser SC60 headset on macOS.
Sennheiser SC60 Headset is what I use on my work computer and it works great on Team and Slack calls.

Setting Up the Sennheiser SC60 Headset on macOS
Setting up the Sennheiser SC60 headset on macOS is a simple process. First, connect the USB cable of the headset to your Mac. Once connected, macOS will automatically detect the headset and set it as the default audio input and output device.
To check if the headset is correctly set up, go to the Apple menu and select System Preferences. In System Preferences, click on the Sound icon and select the Input tab. You should see the Sennheiser SC60 headset listed as the default input device. Similarly, select the Output tab to verify that the headset is selected as the default output device.
Configuring the Sennheiser SC60 Headset on macOS
By default, the Sennheiser SC60 headset should work seamlessly on macOS. However, if you want to configure the settings of the headset, you can do so by installing the Sennheiser HeadSetup Pro software. The software is available for free download from the Sennheiser website.
Once installed, the HeadSetup Pro software allows you to configure various settings of the headset, such as the equalizer, noise cancellation, and microphone sensitivity. You can also update the firmware of the headset using the software.
Troubleshooting the Sennheiser SC60 Headset on macOS
If you encounter any issues with the Sennheiser SC60 headset on macOS, there are a few troubleshooting steps you can try. First, ensure that the headset is correctly connected to your Mac. You can try disconnecting and reconnecting the USB cable to see if that resolves the issue.
If the issue persists, try restarting your Mac and reconnecting the headset. If that doesn't work, try resetting the SMC (System Management Controller) on your Mac. To do so, shut down your Mac, then press and hold the Shift + Control + Option keys and the power button simultaneously for 10 seconds. Release the keys and power button, then turn on your Mac and try reconnecting the headset.
Conclusion
The Sennheiser SC60 headset is a great choice for those who need a high-quality headset for office or personal use. Setting up the headset on macOS is a straightforward process, and the HeadSetup Pro software allows you to configure the settings of the headset to your liking. If you encounter any issues with the headset, the troubleshooting steps mentioned above should help you resolve them.
PermalinkiTerm Tips and Tricks
Useful Tools for Your Command Line Needs
If you're a developer or power user of the terminal, then you know the importance of a good terminal emulator. iTerm2 is one of the most popular terminal emulators for Mac users and is known for its advanced features and customization options. In this blog post, we'll explore some tips and tricks for using iTerm2 to help you become a more efficient and productive terminal user.
Split Window Horizontally to get more done. This allows you to view two different terminal sessions side-by-side, which can be very helpful for tasks such as comparing files or running multiple commands at the same time.
To split a window horizontally in iTerm2, press Cmd+D. This will create a new pane that is half the width of the original window. The current pane will be on the left side of the new pane, and the new pane will be on the right side. You can then switch between the two panes by pressing Cmd+Opt+Left or Cmd+Opt+Right.
You can also resize the panes by dragging the border between them. To maximize the current pane, press Cmd+Shift+Enter. To restore the hidden panes, press the shortcut again.
Split windows can be a very helpful way to work in iTerm2. They allow you to view multiple terminal sessions at the same time, which can save you a lot of time and hassle.
- Snippets! Use Snippets to save common commands and use them over and over. Save snippets appear in the Toolbelt and in the Edit menu under Snippets. Some sample Snippets to add:
- Path to a folder that you access the most (httpd root)
- tail -f /var/log/testudinal/server/debug.log (Some Common Log file)
- date "+%b, %d, %Y" (May 12, 2023)
- date "+%b, %d, %Y"
- curl wttr.in/~Boston (Latest Weather Report)
Use Composer to prep your complex commands. - Composer is a dialog box that allows users to insert a complex command line command. This can be helpful for users who need to run a command that is too long to type on the command line, or for users who want to save a command for later use.
To use Composer, simply press Cmd+Shift+.. This will open the Composer dialog box. In the Composer dialog box, you can type the command you want to run. You can also use the autocomplete feature to help you type the command. Once you have typed the command, you can click the "Run" button to run the command.
Composer is a very useful feature for users who need to run complex command line commands. It is also a great way to save commands for later use.
In conclusion, iTerm2 is a powerful terminal emulator that offers advanced features and customization options to help you become a more efficient and productive terminal user. With the tips and tricks outlined in this blog post, you can take your iTerm2 skills to the next level and improve your workflow in the terminal.
PermalinkAbout
As someone who has worked on Macs since 1989, I will use my experience to share tips and tricks with you on Fridays. As a Mac user since 1989, I have seen the evolution of Mac software and hardware, and I know how Mac computers work. I also know how to troubleshoot and fix Mac problems that can arise.
Check out all the blog posts.
Schedule
| Saturday | Internet Tools |
| Sunday | Open Topic |
| Monday | Media Monday |
| Tuesday | QA |
| Wednesday | New England |
| Thursday | Gluten Free |
| Friday | Macintosh |
Other Posts
- Macintosh HFS Disk Format
- Cheat Sheet Application
- Macintoshman Song
- imageSnap
- Chalkboard in Art Text
- Irish Icons from Xicons.com
- Removing Color in Affinity Photo
- Use PhotoScape to Fix GoPro Images
- Location Base Smart Albums in iPhoto
- Archey
- EDUCORP Catalog
- Rotate Images in the Finder
- Luminar 2018
- Path Finder 9
- iTerm2 Shortcuts