
Page Curl in Graphic Converter
I wasn't able to find any information about Graphic Converter Page Curl Effect, so I thought I write a blog post on how to use the functionality.
Core Image Filters
The 'Core Image Filters' actually filter that is provided in Apple Swift 3. They are available for any Developer to use. The Core Image Filter Reference has information for developers. This is not really useful for consumers since the functionality can change per app.
Apple description:
Core Image is an image processing and analysis technology that provides high-performance processing for still and video images. Use the many built-in image filters to process images, and build complex effects by chaining filters. For details, see Core Image Filter Reference.
Graphic Converter Implementation
You can find the Core Image as the first pullout menu item under the Filter menu. Graphic Converter includes all the effects in the Apple's Core Image library- which is very cool.
You can apply the effect to the whole image, or use the Selection Tool to pick an area on the image that you want to transform.
Simply start with one effect and the Core Image dialog box opens. Now you can easily move to a different one. It's kind of neat to see how each effect transforms your image.
Check out all the Tile effects that can be made out of your image. This is a creative way to come up with some background ideas. The Distortion Effects are pretty cool too.
Nothing gets applied until you click on the 'Apply' button.
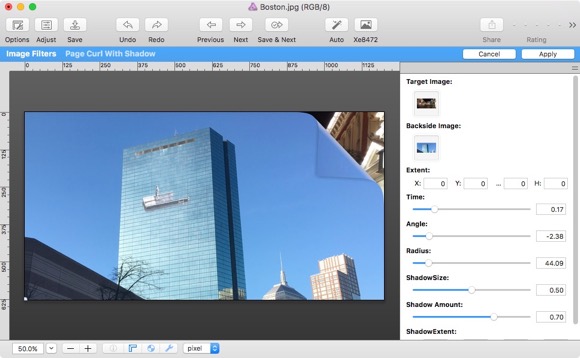
Using the Page Curl Effect
In the Transition section is the Page Curl effect, which is a pretty cool tool. It does take a bit of understanding.
To make the Target Image and Backside Image to work you need to "Drag and Drop" an image to the icon below the text. (It took me a long time to figure out how this worked!)
Simply find an image and then drag it to the preview box under the text.
Other Tips:
- Target Image is the image that you see on the other side of the Curl. (Think of Page 3 in a book)
- The Backside image is the backside of the main image. Usually, it would be the same existing image, but you can change it up to create a cool effect. (This would be page 2 in a book)
- To be effective, both the Target Image and Backside image should be the same dimension as the front image. If it's too small then you will see a checkerboard to indicate areas where it will be transparent.
- There is no way to alter or align the images. That is you can't adjust the position of the Target or Backside image. Your best bet is to do that in another GraphicConverter window. Save then 'Drag Drop' to refresh the results.
- Time is how much of a page curl that you want to apply
- Angle is which corner that you want to apply. First set the time, then move the angle to where you want to corner to appear. For the top right, it should be '-2.57' for the top left the value should be around '-0.69'
- I haven't played with the ShadowSize and Shadow Amount values much just kept the default values.