How to Scan to Evernote on a Mac
If you do a search around the internet for instructions on scanning documents directly to Evernote on a Macintosh, you'll find that many are out of date. You may think it's no longer possible. Well it still is...and it's very easy to set up.

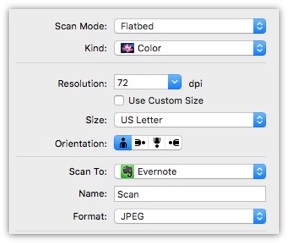
Here's my simple instructions on how to capture scan images and put them directly into Evernote using Image Capture version 6.7 (OS X El Capitan)
- Open Image Capture
- Click on the "Show Details" button on the bottom right window
- On the pull down menu next to the "Scan To: text, Select "Other..."
- Select the 'Applications' Folder and then find 'Evernote'
- Click 'Open'
- You'll see the EverNote now appears in the pull down menu
Scan file items will appear as individual notes in Evernote. Immediately after the scan, you will have an opportunity to make some notes. This is a good time to comment on why you scan the item.
Evernote recommends to use Color as the "Kind:" and to scan at 72 dpi resolution. (See the example screenshot)
If you have Evernote Premium, the text in the scan items will be searchable. This includes photos. This means if you have a photo with an inspirational quote, you can search for it.
Note: This is backward compatible, which means that if you upgrade to Premium today, anything that you already have in Evernote account will be searchable. Make sure to give Evernote some time to scan and index all your document and photos after you upgrade.
