This past weekend, I had the privilege of filming the Easter Vigil at my church. It was a beautiful service, and I'm happy to report the video turned out well! However, there's always room for improvement, and this experience definitely provided some valuable lessons. Here are five key takeaways that will help me level up my videography game for future events:
1. Double-check your gear. This one stings a bit. In the excitement leading up to the service, I accidentally left my GoPro at home. Having that extra wide-angle option would have been fantastic for capturing certain shots! Lesson learned: Make a checklist and double-check it before heading out to any filming session.
2. Don't forget the adapters. I was using an external microphone to capture the speaker's voice, but I had a great idea during the service. It would have been amazing to use my iPhone as a secondary audio source for some close-up moments. Unfortunately, I lacked the proper adapter. Lesson learned: Pack all the necessary adapters to ensure flexibility during filming.
3. Consistency is key. This one bit me in the editing room. My iPhone 14 Pro Max was recording in stunning 4k, while my Canon camera was capturing footage in 1080p. The difference in bitrate caused a painfully long render time. There was simply no need for that discrepancy. Lesson learned: Ensure all cameras are set to the same video format beforehand to save yourself editing headaches later.
4. Embrace the darkness. The Easter Vigil starts with the church plunged in darkness, a beautiful metaphor for the waiting before the light of Christ's resurrection. While my iPhone 14 Pro Max did a decent job, I wasn't entirely sure which camera would perform best in low-light conditions. Lesson learned: Research beforehand which camera in your arsenal handles low-light situations best and have it readily available.
5. Pen and paper: your silent allies. In the heat of the moment, brilliant ideas can pop into your head. During filming, I realized I needed a way to jot down notes - reminders to bring certain equipment next time, or specific shots to use for certain moments. Trying to use my iPhone while filming wasn't an option. Lesson learned: A simple notebook is a lifesaver. Don't underestimate the power of pen and paper for capturing those on-the-fly filmmaking insights.
Filming the Easter Vigil was a rewarding experience, and these lessons will undoubtedly elevate my future projects. Remember, even successful outings can offer valuable takeaways. So, the next time you head out with your camera, embrace the learning process and capture not just beautiful footage, but valuable knowledge as well!
Bootstrap is a popular open-source front-end framework that simplifies web development. It provides a set of pre-designed components, styles, and utilities, making it easier for developers to create responsive and visually appealing websites.
The Bootstrap CheatSheet
The Bootstrap CheatSheet is a concise reference guide that summarizes essential Bootstrap classes, variables, and mixins. Whether you're a beginner or an experienced developer, this cheatsheet is a valuable resource. Let's explore some key features:
Search and Find: Looking for a specific class or variable? The cheatsheet allows you to quickly search and locate what you need. No more digging through lengthy documentation!
Bootstrap 4 vs. Bootstrap 5: It highlights the differences between Bootstrap 4 and Bootstrap 5 classes. Stay up-to-date with the latest version and make informed choices.
Live Preview: See how Bootstrap components look in real-time. The cheatsheet provides a live preview of HTML snippets, so you can visualize the effects instantly.
Update on the Go: Need to tweak your code? The cheatsheet lets you modify code snippets directly. No need to switch back and forth between tabs.
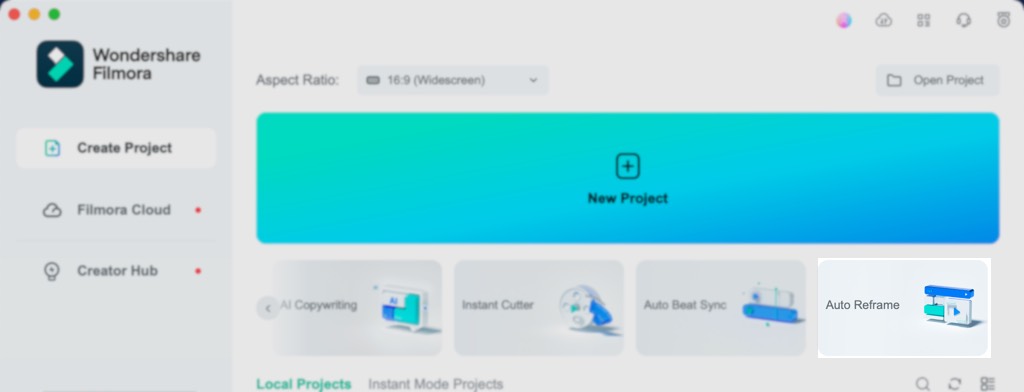
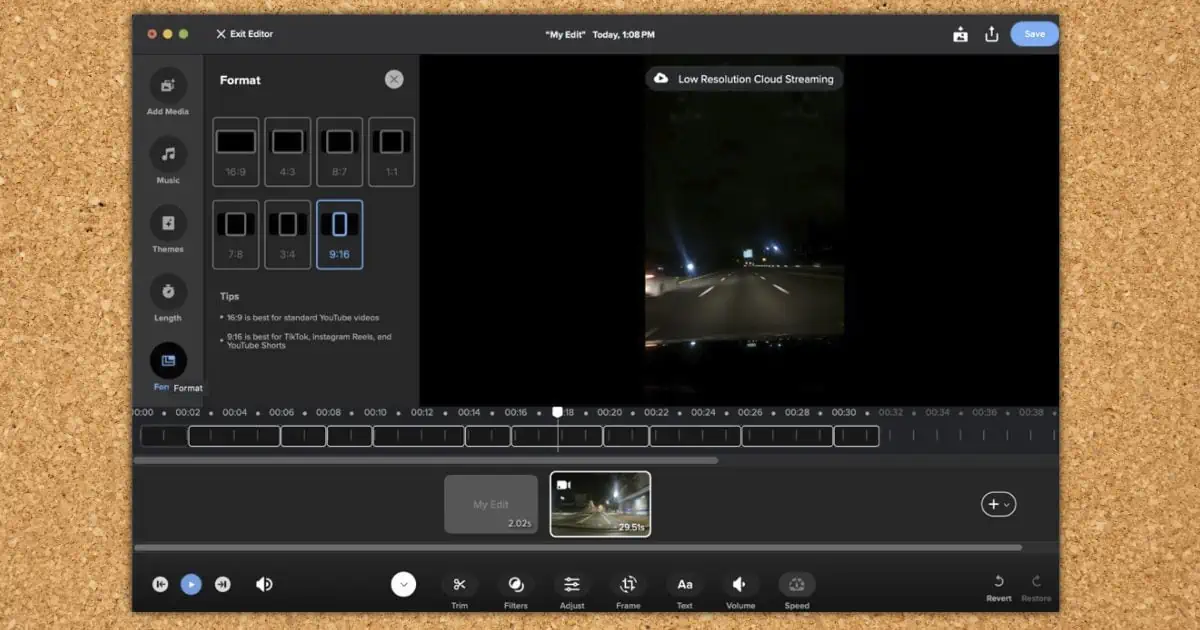
The rise of social media platforms like TikTok and Instagram Reels has made vertical video a must-have for any content creator. But repurposing horizontal footage for these spaces can be a tedious task. Thankfully, video editing software is stepping up with intelligent cropping tools. In this post, we'll be diving into Wondershare Filmora's Auto Reframe and comparing it to Final Cut Pro's Smart Conform, highlighting why Filmora reigns supreme for vertical video reframing.
Auto Reframe: Smart Cropping Made Simple
Filmora's Auto Reframe is a breeze to use. With a dedicated workspace, you simply import your video, choose your desired aspect ratio (including popular options like 9:16 for Instagram Reels), and click analyze. Filmora's AI takes care of the rest, intelligently cropping your video to keep the most important subjects in frame throughout, even during scene changes. This is a massive time-saver compared to manual cropping, which can be finicky and error-prone, especially for longer videos.
Smart Conform: Designed for Different Workflows
Final Cut Pro's Smart Conform offers a more flexible approach. It allows you to choose specific crop regions within your frame and apply them throughout your video. While this offers greater control for experienced editors, it can be cumbersome for quick social media edits. Additionally, Smart Conform sometimes struggles with fast-moving content, occasionally cropping out crucial elements.
The Vertical Video Verdict
When it comes to specifically repurposing horizontal footage for vertical video, Wondershare Filmora's Auto Reframe shines. Its AI-powered approach ensures your subject stays in focus, even during scene changes, making it ideal for social media content creation. While Final Cut Pro's Smart Conform offers a more customizable workflow, it requires more user input and can be less effective for fast-paced vertical video reframing.
So, if you're looking for a user-friendly and efficient way to adapt your videos for the ever-growing world of vertical content, Wondershare Filmora's Auto Reframe is the clear winner.
AutoReframe Dialog box. Basically you set the ratio and let Filmora do the magic.
Additional Considerations
It's important to note that no automatic cropping tool is perfect. Depending on the complexity of your video, you might need to make minor adjustments after Auto Reframe does its work. However, Filmora offers intuitive manual cropping tools within the editing interface for these situations.
If you're a professional editor working with complex projects, Final Cut Pro's Smart Conform might be a better fit for its granular control. But for most creators looking to effortlessly repurpose footage for vertical platforms, Wondershare Filmora's Auto Reframe is the smarter choice.
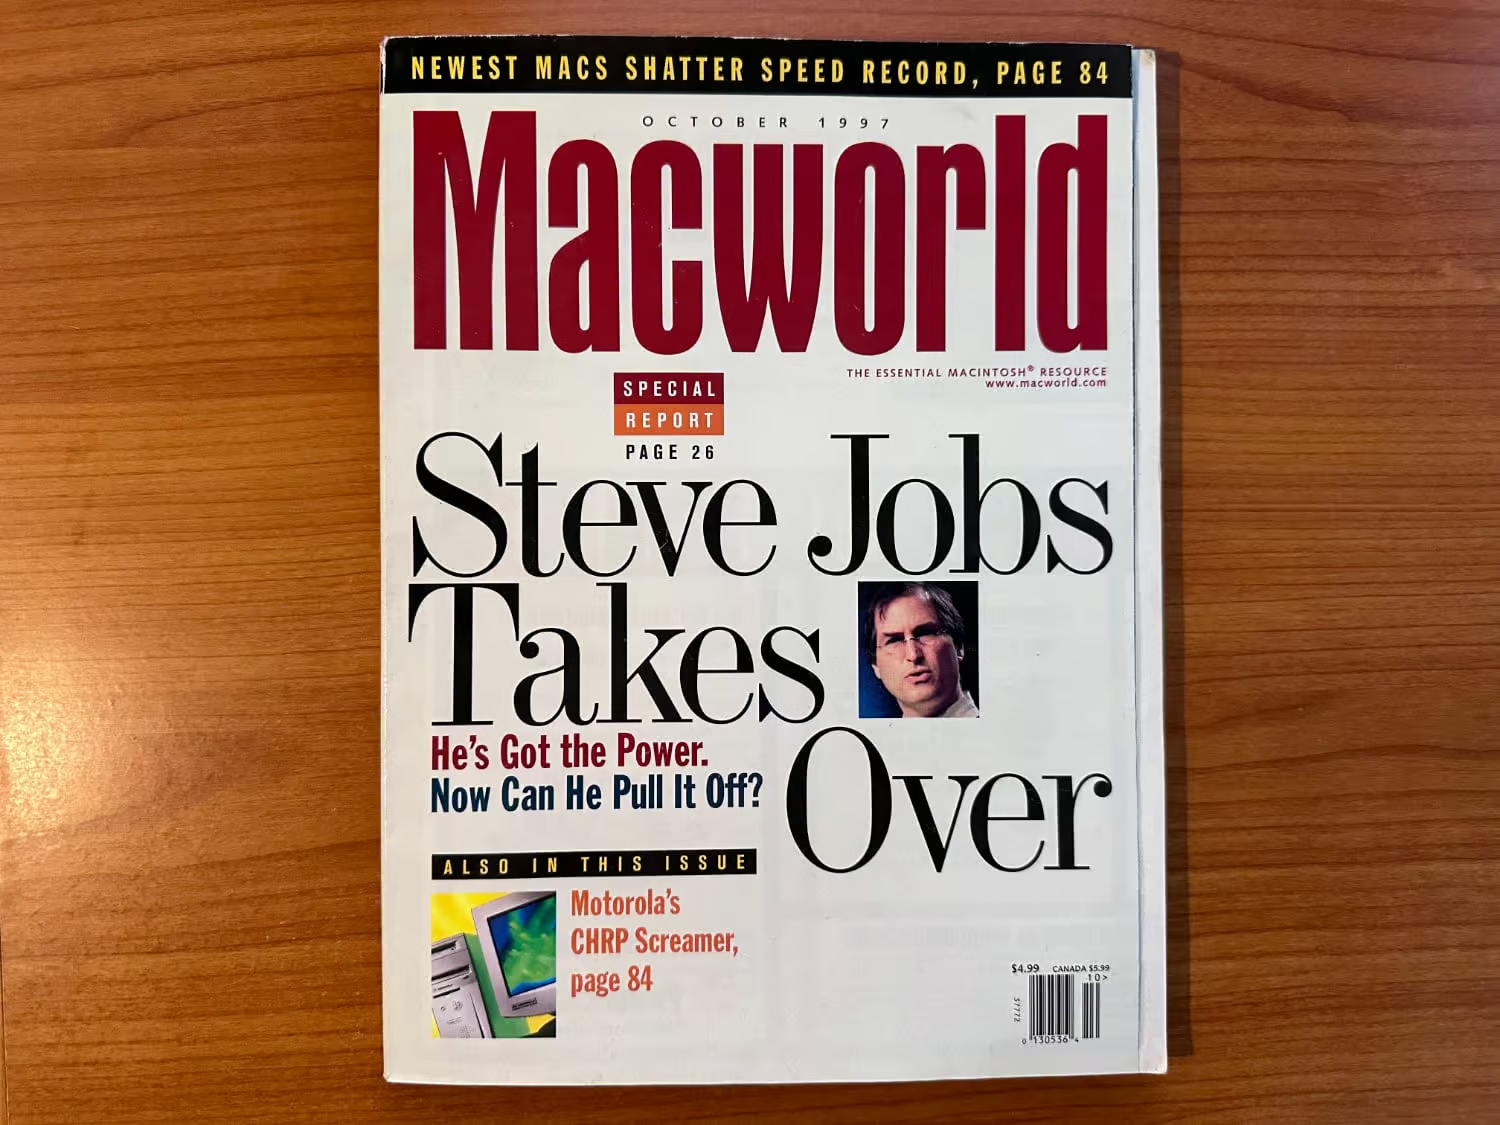
There's a certain magic to magazine covers. The best ones capture a moment, a feeling, an entire era in a single image and a handful of words. For Apple fans of a certain age, few covers hold the weight of Macworld's 1997 edition. It's a cover I revisit often, because like your own favorite, it represents a time of immense transition for Apple, a company teetering between past and future, with Steve Jobs as its enigmatic leader.
The cover itself is bold. It's the text that truly sets the stage: "Steve Jobs Takes Over. He got the power, Now can he pull it off?" Those words are heavy with questions. Jobs, the prodigal son, had returned to Apple after a long exile. He was armed with a vision, a plan, and the undeniable charisma that had made him a tech icon. But Apple, in 1997, was a company struggling. Market share was shrinking, its products adrift in a sea of beige PC clones.
The cover perfectly captures this uncertainty. Was Jobs the hero Apple needed? Or was his return a gamble, a chance encounter with destiny or a desperate lunge into the unknown?
Only time would tell. But for Mac enthusiasts, that 1997 Macworld cover was more than just a magazine. It was a symbol of hope, a promise of change, and a reminder that the future of Apple, once again, rested on the shoulders of Steve Jobs.
Looking back, we know the answer, of course. The Jobs-led Apple went on to revolutionize the tech industry with the iMac, iPod, iPhone, and iPad. But that 1997 cover serves as a valuable reminder: even the most iconic journeys begin with a single, uncertain step.
I have the magazine on my bookcase a simple reminder of the big turn around at Apple.
BBEdit, the leading professional HTML and text editor for macOS, boasts a multitude of features designed to enhance productivity and efficiency. Among these is the Select Column feature, a powerful tool that allows users to select and edit columns of text, which is particularly useful in data manipulation and code editing.
What is the Select Column Feature?
The Select Column feature enables users to create a rectangular selection in their text document, spanning across multiple lines. This is especially handy when dealing with tabular data or when you need to edit multiple lines of code at once.
How Does it Work?
To use the Select Column feature in BBEdit, you simply click and drag your mouse pointer while holding down the Option key on your keyboard. This creates a rectangular text selection. You can then type, delete, or drag text to manipulate the selected columns.
Practical Examples
Example 1: Data Alignment
Imagine you have a list of items with their prices, but the prices are not aligned, making the list difficult to read. With the Select Column feature, you can quickly select the column where the prices are and add spaces or tabs to align them perfectly.
Item          Price
Bananas       $1.00
Apples        $1.50
Oranges       $2.00
Example 2: Code Refactoring
When refactoring code, you might need to add a specific piece of code to multiple lines. For instance, if you're adding a logging function to several lines of a script, you can select the column where you want to insert the function and type it once, applying it to all selected lines.
console.log('Function A start');functionA();console.log('Function A end');console.log('Function B start');functionB();console.log('Function B end');
In conclusion, BBEdit's Select Column feature is a testament to the editor's commitment to efficiency and precision. Whether you're a programmer, a data analyst, or someone who appreciates the value of streamlined text editing, this feature is sure to become an indispensable part of your toolkit.
This past weekend, we ventured to Wendy's to try the new Orange Dreamsicle Frosty, a popular trend on TikTok. Since it's gluten-free, it was a safe option for my daughter, who (to our surprise!) had never been to Wendy's before. This sparked her curiosity about other gluten-free options on the menu, so we decided to explore those as well.
We had an unusual encounter that we thought we share.
Quick Trip Transcript
My daughter did a quick TikTok of the incident moments after it happened, here's the audio transcript:
Juliana:
So we went to the Wendy's right near us. I don't want to say since I come in public and I know I. Have people here. That don't in my school, but someone near us. And I have celiac. I've had it for. It's going to be 10 years next year. Yeah, 10 years this year.
Daddy:
Yeah.
Juliana:
It's just crazy to think that because I got diagnosed in 2015.
Daddy:
15 Yeah, 2015.
Juliana:
Diagnosed with celiac disease for nine years now, I hadn't been to Wendy's in ages. Unsure if they had gluten-free options, I asked my dad, "Should I check?"
We approached the counter, and I explained my dietary restrictions. The server paused was confused and consulted the manager - who happened to be standing nearby.
"Look at the board," the manager replied.
Confused, I said, "It's okay, but I don't see a board with allergen information." The server didn't offer further guidance, which was frustrating. It would have been helpful if they could have pointed out the menu or explained the options directly.
Daddy:
Yep.
Juliana:
Especially because I feel. Like they have such a small menu.
Daddy:
Yeah. So I ordered my Fries, and you ordered the Orange Dreamsicle Frosty.
Juliana:
The server prepared my drink while my dad's fries were already bagged. The person that took our order made my drink and overfilled it and spill a little and started to clean up the mess on the cup.
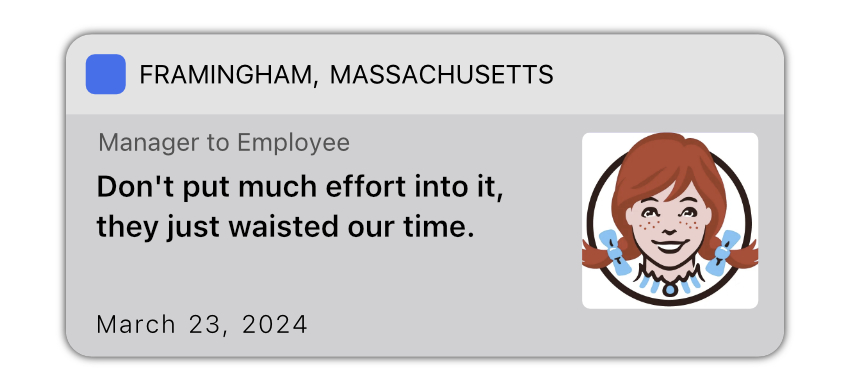
The manager walked over to the guy, I could visibly hear this, and said that guy that was working on cleaning the mess - Don't even put your effort into it. They wasted our time. Just made me mad. I could not wait for my drink to get out of there. So we will not be making another trip to the Wendy's.
Daddy:
Not that one.
Juliana:
We'll definitely be getting this drink 100 times. This is like my new favorite drink, but I would just wish that Wendy... I don't know if it's all Wendy's, if it was just that Wendy's, Wendy's. I hope you see this, I'll tag. I think you need to work on your Customer service a little bit or talk to the manager there because I do not appreciate that.
Daddy:
Yes. Especially if they don't know, first of all, from an allergy perspective. If they don't know what what's available for.
Juliana:
Right. Like if there's nothing, that's fine. Just say there is nothing. I don't care. Thank you. But I think for. Just. For future assurances, just watch out. I will. I guess I will. I kind of have to say. Where? It is, but it's the one in Framingham in Massachusetts, on Route 9 near the Mass Pike. So just watch out.
Don't put much effort into it, they just waisted our time.
At the End of the Day...
Restaurants should do a better job in helping customers with allergies. We were willing to spend more money but instead met with bad service - for no reason.
Certainly not an experience we would expect to have from a manager - First no help on food options and then to tell an employee that "Don't even put your effort into it. They wasted our time." So that my daughter could hear it.
We ended up at SmashBurger in Natick for lunch. We enjoyed our burgers and fries. That part was a good experience.
TIkTok Video
Here's a later version of the video Juliana posted:
First impressions matter, and that applies to your videos too! A polished intro and outro can elevate your content from homemade to professional, grabbing viewers' attention and leaving a lasting impact. But crafting these elements from scratch can be daunting, especially if you're short on time or design skills.
That's where FlexClip's Intro and Outro templates come in! This online video editor offers a treasure trove of pre-made templates that are both stylish and customizable. Here's why FlexClip's templates are a game-changer for video creators:
Easy to Use, Fast Results
FlexClip boasts a user-friendly interface that makes creating professional-looking intros and outros a breeze. No design experience is necessary! Simply browse the extensive library of templates, choose one that aligns with your video's theme and style, and customize it to your liking.
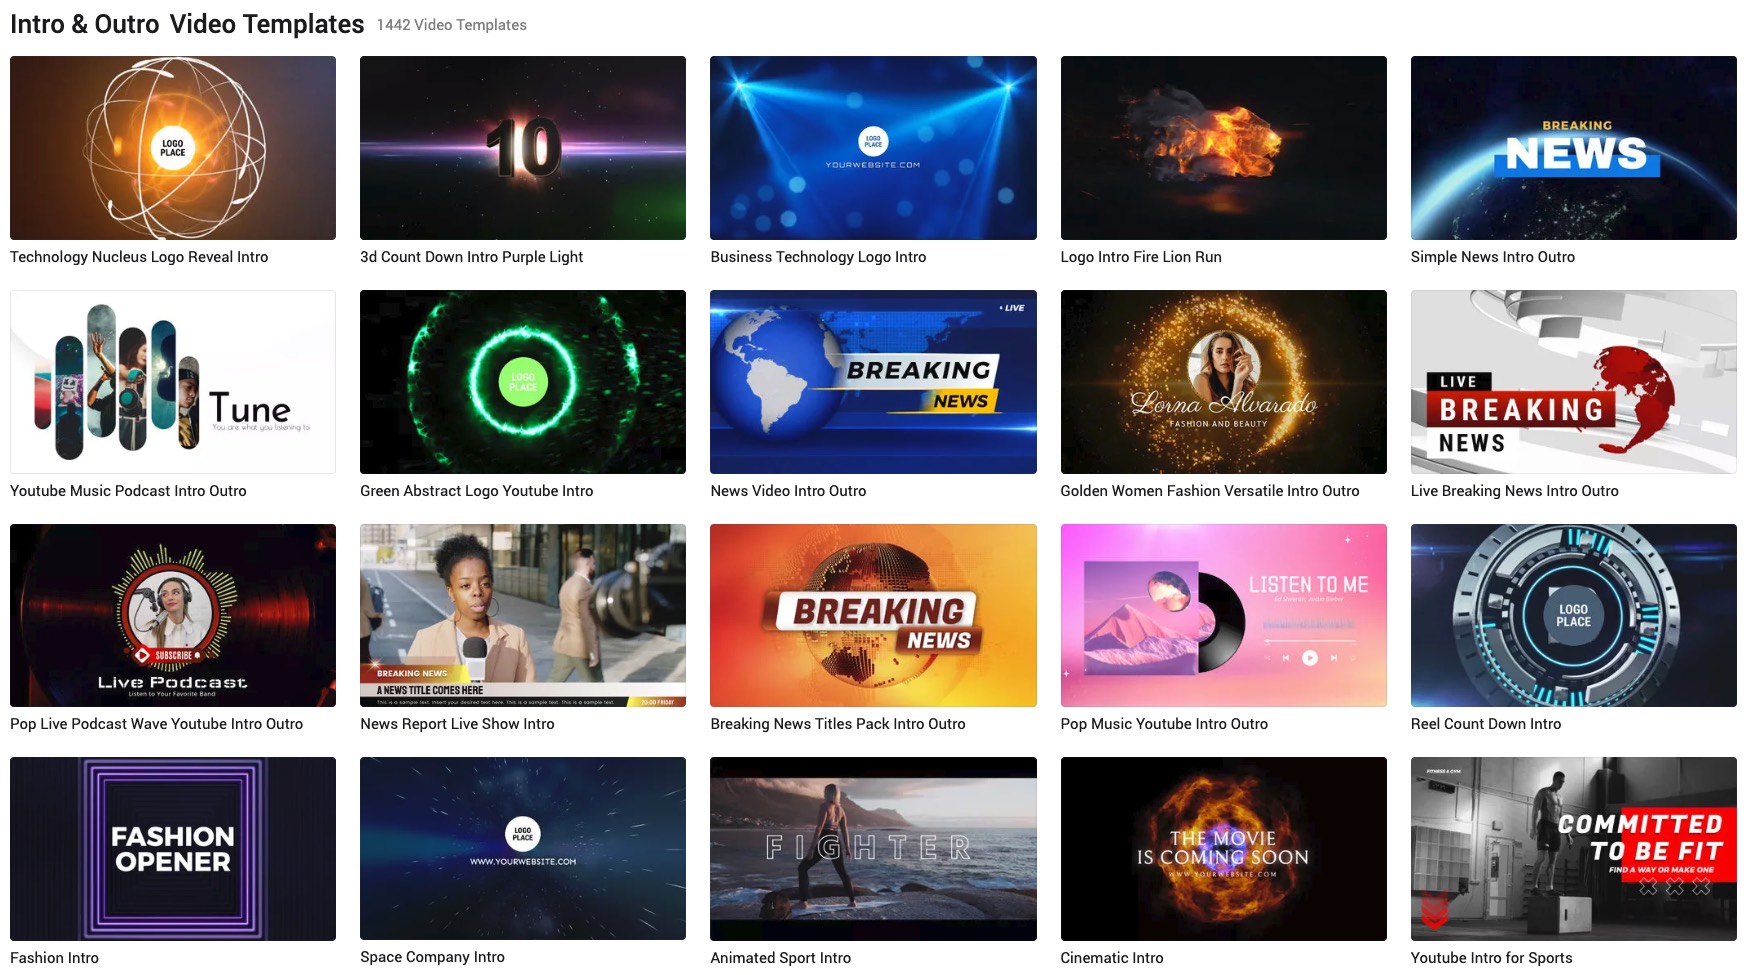
Just some of the 1,418 available!
Variety is the Spice of Life
FlexClip offers a vast collection of intro and outro templates to suit any need. From dynamic and flashy to clean and minimal, there's a template to perfectly complement your video content. Whether you're a tech reviewer, a fashionista, a gamer, or anything in between, you'll find the perfect template to match your brand.
Make it Yours: Effortless Customization
Don't be fooled by the term "template" - FlexClip empowers you to personalize your chosen intro or outro to truly make it your own. Change the colors, add your logo, and incorporate text to showcase your channel name or video title. You can even swap out media within the template, using your own video clips or images.
Five Things I Learned
There are 1,442 different Intro/Outro templates available - many of them generic to apply to any types of content.
Some templates can work for Portraits and Landscape formats. There are 932 Portrait video templates. There are 1,418 Landscape Templates. There are 914 Square templates.
Users can customize the templates including images and placements of some objects. This gives you the ability to make the template unique to your content.
Some of the Intro/Outro includes audio. Many Intro/Outro that you can get from other services do not include the audio by default - if you want them they are additional costs. FlexClip has a large audio effect library. You'll certainly find the audio that works for you.
Once your satisfied with the design you can save it as "My Template" so that you can reuse it in future videos.
Leave a Lasting Impression
A strong outro leaves viewers wanting more and encourages them to subscribe to your channel. FlexClip's outro templates can help you craft a call to action that's both informative and visually appealing. Remind viewers to like your video, subscribe to your channel, or check out your social media pages - all within a stylish and cohesive outro.
FlexClip: Your One-Stop Shop for Polished Videos
FlexClip's Intro and Outro templates are more than just eye candy - they're a valuable tool for saving time and creating professional-looking videos. So ditch the blank canvas anxiety and explore the creative possibilities FlexClip has to offer. With a diverse template library and intuitive editing features, FlexClip empowers you to make stunning intros and outros that will leave a lasting impression on your viewers.
I'm excited to announce some changes to the blog content, all aimed at bringing you even better reads! These changes are effective immediately.
Here's a quick rundown of the new schedule:
Sunday: Anything goes! Open forum for discussion.
Monday: FlexClip - We'll be diving into this online video editing app and exploring its features.
Tuesday:Gluten-Free Tuesdays - Dedicated content on gluten-free living in New England, featuring original recipes and experiences.
Wednesday:BBEdit Power-Ups - A series of posts showcasing cool tricks to boost your productivity within the BBEdit text editor.
Thursday:Classic Macintosh Thursdays - A nostalgic look back at the "good old days" of Apple Macintosh, featuring hardware, software, and news from yesteryear.
Friday:Macintosh Tips & Tricks - Your usual dose of helpful hints for getting the most out of your Apple Macintosh.
Saturday: Open Topic - We're taking a break from "cool internet tools" for a while, but the day remains open for a variety of content, including internet tools, if they fit the theme.
On Hiatus: New England, Media, and QA topics will be taking a temporary break. We'll brainstorm some fresh ideas to bring them back soon!
I hope you enjoy this refresh! Feel free to share your feedback in the comments below.
In today's fast-paced world, it's often helpful to have a countdown timer at hand. Whether you're tracking down a deadline, monitoring your cooking time, or counting down to a special event, a countdown timer can help you stay focused and on track.
If you're looking for a simple and customizable countdown timer, then FlipClock is a great option. This website-based timer allows you to set the time in either 12-hour or 24-hour mode, and you can also choose to show or hide the seconds.
One of the things that makes FlipClock so user-friendly is its simplicity. The website has a clean and uncluttered interface, with just a few buttons that allow you to set the time and start the timer. Once the timer is running, you can easily see how much time is remaining in either hours, minutes, or seconds.
Another advantage of FlipClock is its customizability. You can choose to display the timer in either 12-hour or 24-hour mode, depending on your preference. You can also choose to show or hide the seconds, which can be helpful if you're only interested in tracking down to the minute.
Overall, FlipClock is a great choice for anyone who needs a simple and customizable countdown timer. With its easy-to-use interface and wide range of features, FlipClock is sure to help you stay on track and meet your deadlines.
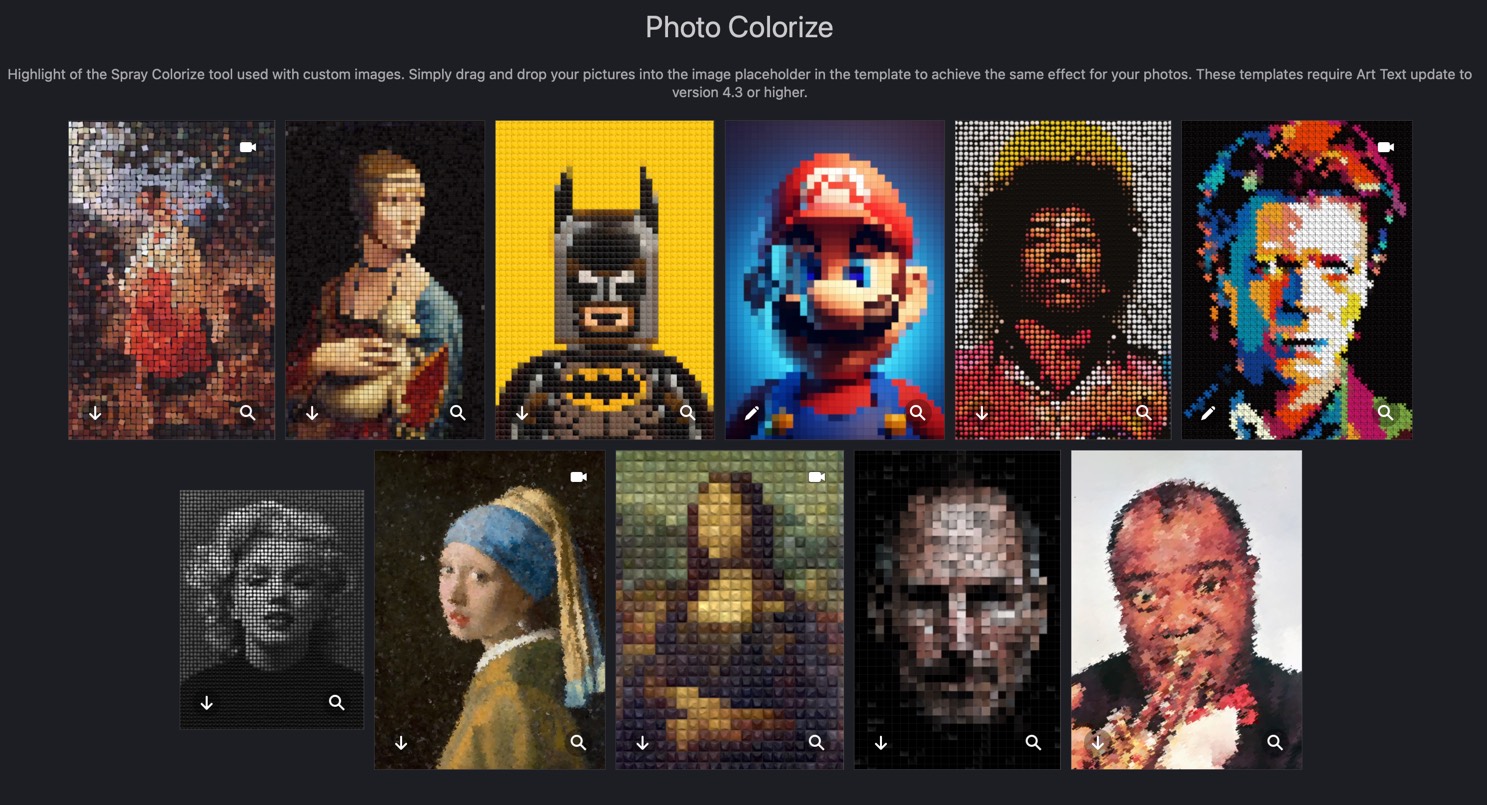
In the latest update, Art Text 4 included a new tool to make images look like art. This is done by using the Spray Tool to match the color of the image. It's a cool way to make an ordinary image to stand out.
BeLight Software includes 11 different Photo Colorized designs in the Typography Templates in Art Text 4 and in Letters. Simply select the style you like and then replace the image with your own.
How to Change the Colorize Image
Select a Photo Colorize Template from the template gallery
Select the Image and in the RIght Menu click on fill
Scroll down and click on the Gear next to Colorize
Click on the Placeholder Image
Choose the folder that has the image you want to use, for example Desktop.
In Art Text 4, you can may all sorts of changes to the Density, Size and Angle. Each change creates a different effect.
Boston's Back Bay in a nice Colorized image. This looks like something you would see on the wall at a T-station.
Five Things I Learned About the new Colorize Tool
Available in Letters and Art Text 4. Art Text 4 is better because there are a lot more configurations. Letters just has some basic setup.
There's not much documentation on how to use the Colorize fill to make your own design from scratch. I found that it's best to use the templates that are provided as a base.
After you replace the image, you can resize the Colorized image. This is useful if you have a landscape photo or wanted a smaller version of the portrait.
Once I was done with the image, I selected the image and copied the image to the clipboard and pasted it in Photoscape X to resize it and compress for the Internet.
Art Text tool is a tool to make text look awesome. This isn't a image editor, so the spray tools may look limited - but that's what I would expect from a Text Tool. I checked other applications, Affinity Photo, Photoscape X, Graphic Converter, and Inkscape and couldn't duplicated the functionality that Art tool provided.
Calling all gluten-free friends on the Cape! Are you tired of missing out on the joy of a delicious donut? Well, fret no more! Duke's Donut Worx in Mashpee Commons has got you covered. While they may not advertise a huge selection of gluten-free options, they do strive to accommodate requests whenever possible.
Here's what you need to know about scoring a gluten-free treat at Duke's Donut Worx:
Limited Availability: Since they specialize in traditional wheat-based donuts, gluten-free options aren't always readily available. However, they can make them upon request.
Call Ahead: Your best bet is to call Duke's Donut Worx at (774) 228-2873 in advance to inquire about gluten-free donut availability. This way, they can prepare a delicious gluten-free option just for you!
Freshness is Key: Given their focus on fresh-baked goodness, gluten-free donuts may not be on display alongside their regular donuts. But don't be discouraged! Calling ahead ensures you get the freshest possible gluten-free treat.
While specifics on the gluten-free donuts themselves are unavailable online, their commitment to using high-quality ingredients shines through in all their creations. So, you can expect a delicious and satisfying gluten-free donut experience.
Pro-Tip: If you're looking for other gluten-free options at Mashpee Commons, there are several restaurants that cater to dietary restrictions. Do some research beforehand to plan your sweet and savory adventure!
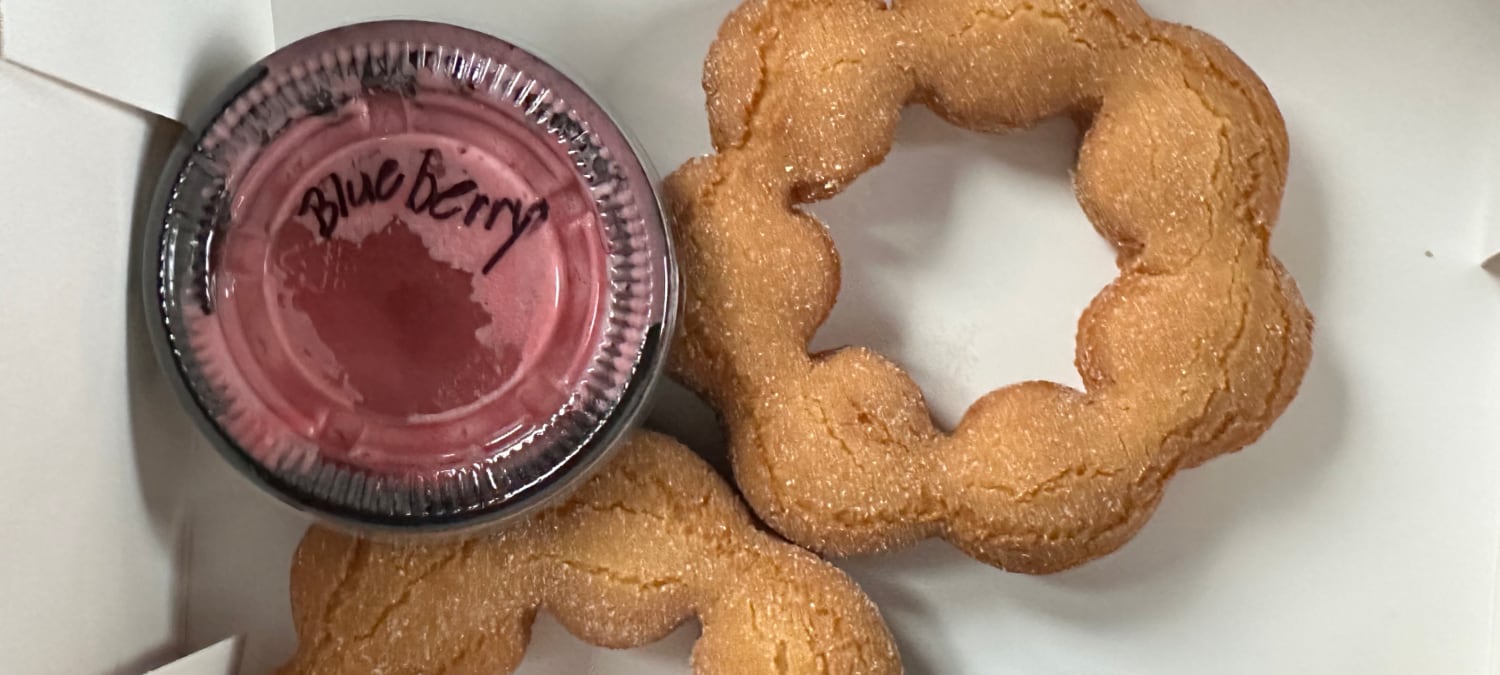
Gluten Free Mochi donut with dipping sauce!
Remember: Calling ahead is key to securing your gluten-free donut at Duke's Donut Worx. So grab the phone, and get ready to indulge in a delicious and worry-free donut dream come true!
Looking for a taste of New England charm on your travels? Look no further than Kimball Farm in Westford, Massachusetts! While it won't rival the thrills of Knott's Berry Farm, Kimball Farm offers a delightful afternoon (or day!) filled with delicious homemade ice cream, a sprinkle of nostalgia, and some classic summer fun.
Creamy Cones and Family Fun
Kimball Farm's legacy stretches back to 1939, when it began as a simple ice cream parlor. Today, it's a beloved local spot boasting over 50 flavors of handcrafted ice cream. From the classic favorites like maple walnut and peppermint stick to more adventurous options, there's a scoop to satisfy every craving.
The fun doesn't stop at the ice cream counter. Kimball Farm offers a range of activities that are perfect for families and groups. Challenge your friends to a round of mini-golf, get soaked on the bumper boats, or unleash your inner slugger at the batting cages. There's even a charming Country Store & Cafe, where you can grab a coffee and browse unique gifts.
A New England Gem
Kimball Farm might not have the roller coasters of a major theme park, but its charm lies in its simplicity. It's a place to slow down, savor a delicious ice cream cone, and create memories with loved ones. The friendly atmosphere and nostalgic vibe are quintessential New England, making it a perfect stop for tourists exploring the region.
Planning Your Visit
Kimball Farm is located in Westford, Massachusetts, a convenient distance from MetroWest Boston. Keep in mind that most of the outdoor activities are seasonal, so be sure to check their website for current hours and pricing before your visit.
So, ditch the crowds and theme park lines, and head to Kimball Farm for a delightful taste of New England summer. With its rich history, delicious treats, and outdoor fun, Kimball Farm is a hidden gem waiting to be explored.
What a great way to end a fun summer day in MetroWest.
Parking tickets are a universal pain, but Dennis Hart took his frustration to a whole new level. In a case that landed him on The Tonight Show Starring Johnny Carson, Hart challenged the very notion of "12:00 pm" - and in turn, the validity of his parking ticket.
The Midnight of the Matter
Hart received a parking violation for exceeding the time limit on a sign that clearly stated "No Parking After 12:00 PM." However, Hart took a rather...unique approach to interpreting the time limit. He argued that since there is no such thing as "12:00 pm," the sign was invalid, and therefore, his parking ticket shouldn't stand.
His reasoning? Hart believed that "noon" referred solely to the moment the clock strikes twelve midday, a fleeting point in time that doesn't actually exist. Think of it as the blink of an eye - it happens, but it's gone so fast you can barely perceive it.
Taking it to Carson
Determined to fight the ticket, Hart landed himself on The Tonight Show. Now, Johnny Carson wasn't exactly known for legal expertise, but he sure knew how to make entertainment out of absurdity.
To settle the timey-wimey debate, The Tonight Show producers reached out to Professor Stuart Malin in Greenwich, England. Professor Malin, bless his academic heart, likely had a good chuckle before confirming the existence of both 12:00 am (midnight) and 12:00 pm (noon) - widely accepted concepts for the past, well, forever.
Nowadays, the role of artificial intelligence in modern SEO is significant. AI-powered tools are revolutionizing how businesses optimize their online presence, driving higher search engine rankings and increased organic traffic. By harnessing the power of AI algorithms, marketers gain valuable insights into user behavior, enabling them to tailor their strategies for maximum effectiveness. So, as technology continues to evolve, understanding and leveraging these advantages in SEO becomes crucial for staying competitive.
A closer look at artificial intelligence in modern SEO
Understanding AI-powered SEO tools is a necessity for modern digital marketers. These tools effectively use advanced algorithms to analyze incredibly large amounts of data. By generating actionable insights, they aid in optimizing search engine rankings. So, by leveraging them correctly, it becomes possible to perform previous unfeasible tasks. That includes analyzing incredible amounts of data or even collecting them in the first place. Naturally, this makes the role of artificial intelligence in modern SEO incredibly important, and it will only continue to grow.
Content creation and optimization
When it comes to content creation and optimization, leveraging AI can significantly enhance your website's conversion rates. Tools like MarketMuse and BrightEdge assist in generating relevant topics and crafting compelling meta descriptions, improving your content's effectiveness. After all, by optimizing content for keywords and user intent, AI ensures that your website resonates with your target audience. That, in turn, easily leads to higher conversion rates. Finally, AI further helps structure your content for better readability and engagement, boosting conversion potential even more.
On-page SEO enhancements
Enhancing on-page SEO improves your website's visibility and search engine rankings. AI algorithms greatly optimize key elements such as title tags, headings, and meta descriptions, ensuring they align with search intent and keywords. Utilizing insights obtained this way can enhance user experience and increase the likelihood of your content being discovered by potential customers.
Of course, if you're not an SEO specialist, using AI algorithms is usually not enough. Instead, you should consider hiring experts to optimize and better guide your marketing and SEO efforts. Relying on the expert help from Digital Dot, a comprehensive digital marketing agency that offers a wide range of services designed to enhance online presence and drive business growth, gives businesses a chance to make the most of their on-page SEO efforts. They provide solutions, including SEO, PPC, social media marketing, and web development, tailored to meet the unique needs of each client. With a focus on delivering measurable results and leveraging the latest digital marketing strategies, Digital Dot aims to help businesses of all sizes achieve their marketing objectives and maximize their online potential.
Voice search optimization
Voice search optimization is becoming increasingly important. With the rise of virtual assistants like Siri, Alexa, and Google Assistant, optimizing your content for voice queries is essential to stay ahead in search rankings. AI plays a significant role in understanding and optimizing for voice search queries by analyzing natural language patterns and user intent. By leveraging its potential insights, you can tailor your content to match the conversational tone of voice searches. That will increase the likelihood of you being featured in voice search results!
Structured data markup and AI
Structured data markup and AI technology are improving how websites communicate with search engines. AI-powered tools analyze structured data to understand web pages' content and context better. That allows search engines to display more relevant and rich snippets in search results, enhancing visibility and click-through rates. Structured data markup and AI synergize seamlessly, enabling websites to stand out in search results and drive organic traffic effectively!
User experience (UX) optimization
Optimizing user experience (UX) is integral to improving website performance and retaining visitors. Thankfully, AI-driven tools analyze user behavior and preferences to enhance website usability and navigation, ensuring a seamless browsing experience! By leveraging the insights they offer, businesses can tailor their websites to meet the specific needs of their target audience, ultimately increasing engagement and conversion rates. That is especially impactful when combined with the usefulness of CRM data, which provides valuable insights into customer preferences and behaviors. By integrating CRM data with UX optimization techniques, businesses can create personalized experiences that resonate with their audience on a much deeper level.
Predictive analytics for SEO
Predictive analytics plays a big role in shaping effective SEO strategies for businesses. As such, by analyzing vast amounts of data, AI algorithms can forecast future trends and user behavior, providing valuable insights for proactive SEO planning. As a result, they enable businesses to anticipate changes in search engine algorithms and adjust their strategies accordingly, staying ahead of the curve. Furthermore, predictive analytics allows marketers to identify emerging keywords, optimize content, and effectively target niche markets.
Local SEO and AI solutions
Local SEO is helpful for businesses looking to attract customers in specific geographic areas. AI-powered solutions revolutionize local SEO efforts by providing insights into local search trends and consumer behavior. By analyzing data such as location-based keywords and user preferences, AI helps businesses effectively tailor their content and listings to target local audiences. As such, this targeted approach increases visibility and drives more foot traffic to brick-and-mortar stores. Additionally, AI assists in managing local citations and monitoring online reviews, enhancing a business's reputation in the local community.
Link building with AI assistance
Link building is an important aspect of SEO, and AI assistance has revolutionized this process. After all, AI algorithms analyze vast amounts of data to identify quality backlink opportunities, helping businesses build a robust link profile. Therefore, by utilizing AI-driven insights, businesses can target relevant websites and secure high-quality backlinks that boost their search engine rankings. In fact, the results of countless businesses have shown that integrating AI into link-building strategies significantly improves organic traffic and domain authority!
SEO performance tracking and reporting
SEO performance tracking and reporting are needed to evaluate the effectiveness of your marketing efforts. With AI-powered analytics platforms, businesses can gain valuable insights into their SEO performance. That includes keyword rankings, organic traffic, and conversion rates. These platforms also provide comprehensive reports that highlight strengths and areas for improvement. As such, businesses can make data-driven decisions to optimize their SEO strategies! So, by leveraging AI-driven insights, businesses can identify trends, patterns, and opportunities to enhance their online visibility and drive more traffic to their websites. Moreover, with detailed reporting, you can learn how to improve your marketing strategies and allocate resources more effectively!
Driving a meaningful impact online
In conclusion, the role of artificial intelligence in modern SEO is considerable. By embracing the relevant tools and strategies, businesses can unlock new opportunities for growth and success. From content optimization to predictive analytics, this empowers marketers to make smarter decisions and stay ahead of the competition! And as technology advances, this will only gain prominence for achieving sustainable results and driving meaningful impact online.
Image optimization is the process of reducing the file size of an image without sacrificing too much quality. This can be done by using a variety of techniques, such as compression and conversion.
Benefits of Image Optimization
There are many benefits to optimizing your images, including:
Faster loading times: Optimized images will load faster, which will improve your website's speed and user experience.
Increased SEO: Search engines favor websites that load quickly.
Reduced bandwidth usage: Optimized images will use less bandwidth, which can save you money on your hosting costs.
Optimize Images Online
The website Optimize Images is a free online tool that allows you to optimize your images. It supports JPG, PNG, GIF, SVG, AVIF and WEBP formats. You can upload multiple images or scan a website to find images that need optimization. The tool offers different compression methods, allowing you to choose between lower file size and higher quality.
Website Description
Online image optimization tools provide an easy-to-use platform to compress and convert images without compromising quality. Supported formats include PNG, JPG, GIF, SVG, AVIF, and WebP, catering to a wide range of needs.
GoPro has shaken things up with an update to their subscription offerings. They've introduced a new tier called "GoPro Premium" that replaces the older subscription plan. This new premium plan offers a more comprehensive feature set, including valuable benefits for both GoPro camera owners and users with footage from other sources.
What's New with GoPro Premium?
The key perk for GoPro Quik for Mac users is that the application is now bundled with the GoPro Premium subscription. This means that if you subscribe to GoPro Premium, you'll gain access to the full functionality of GoPro Quik for Mac as part of the package.
But the benefits extend beyond just desktop editing. GoPro Premium also unlocks unlimited cloud storage for all your GoPro footage, ensuring your action-packed memories are securely backed up. On top of that, GoPro Premium throws in an additional 25GB of cloud storage for videos captured with cameras or devices other than GoPros. This makes it a handy option for creators who want a centralized location for all their video projects, regardless of their source.
This week I played around with GoPro Quik for Mac. Here are some things I learned.
GoPro Quik for Mac offers a user-friendly platform to transform your GoPro footage into shareable social media snippets. Here's a closer look at what it offers and where it falls short:
Subscription Holds the Key to Saving
Before diving into edits, be aware that saving your creations requires a subscription. The price is $4.99/month through Apple (check for potential variations on other platforms). This subscription unlocks a valuable perk: unlimited cloud storage for all your GoPro creations. It even throws in an additional 25GB for videos captured outside your GoPro.
Editing: Focused on Speed, Not Surgical Precision
While GoPro Quik excels at creating short, engaging clips, it doesn't cater to in-depth editing needs. Here's what you might find limiting:
Interface Hiccups: Editing longer videos can be a bumpy ride. The app sometimes prioritizes opening the preview window instead of the editing tools, leading to frustration.
Limited Text Options: Craving fancy intros or detailed captions? You might be disappointed. Text effect options are scarce.
Cropping and Transitions Left Out: GoPro Quik keeps things simple and doesn't offer control over how your video is cropped for different platforms or the transitions used between clips.
Where GoPro Quik Shines: Speed and Creative Themes
Despite the editing limitations, GoPro Quik holds its own in specific areas:
Swift Snippet Creation: Quickly transform lengthy GoPro videos into bite-sized content ideal for platforms like TikTok or YouTube Shorts.
Theme Library for Inspiration: Breathe life into your videos with a selection of 15 pre-made themes. These themes can add polish and a touch of creative flair to your social media clips.
The Verdict: Ideal for Effortless Social Media Content, Not a Replacement for Advanced Editing
If your goal is to create quick, shareable content to promote longer videos or showcase GoPro highlights on social media, GoPro Quik is a solid choice. However, if you require granular editing control over every aspect of your video, you might need a more robust editing software solution.
In the world of school fundraising, finding innovative and inclusive ideas can be a challenge. Traditional bake sales and car washes are always popular, but what if you could offer something unique that appeals to everyone? Enter Kona Ice - a refreshing twist on fundraising that not only delights taste buds but also addresses common concerns like gluten allergies.
The Kona Ice Difference
Kona Ice isn't your average snow cone stand. With its vibrant truck and customizable flavors, it brings a carnival-like atmosphere right to your school's doorstep. But what sets Kona Ice apart is its commitment to quality and inclusivity.
Gluten-Free Goodness
For many families, navigating dietary restrictions can be a constant concern. Gluten, a protein found in wheat, barley, and rye, poses a challenge for those with celiac disease or gluten sensitivity. Traditional fundraising events often rely on baked goods, which can exclude individuals with gluten concerns. However, Kona Ice offers a refreshing alternative that's entirely gluten-free.
Allergen Awareness
In addition to being gluten-free, Kona Ice is also free from other common allergens like nuts and dairy, making it a safe choice for students with various dietary needs. This inclusivity ensures that no one feels left out during school events, fostering a sense of belonging and community among students and families.
Easy Setup, Big Rewards
Organizing a Kona Ice fundraising event is simple and hassle-free. The Kona Ice team handles everything from setup to cleanup, allowing organizers to focus on promoting the event and rallying support. With a portion of the proceeds going directly to the school, Kona Ice offers a lucrative fundraising opportunity that benefits everyone involved.
Five Cool Facts I Learned About Kona Ice
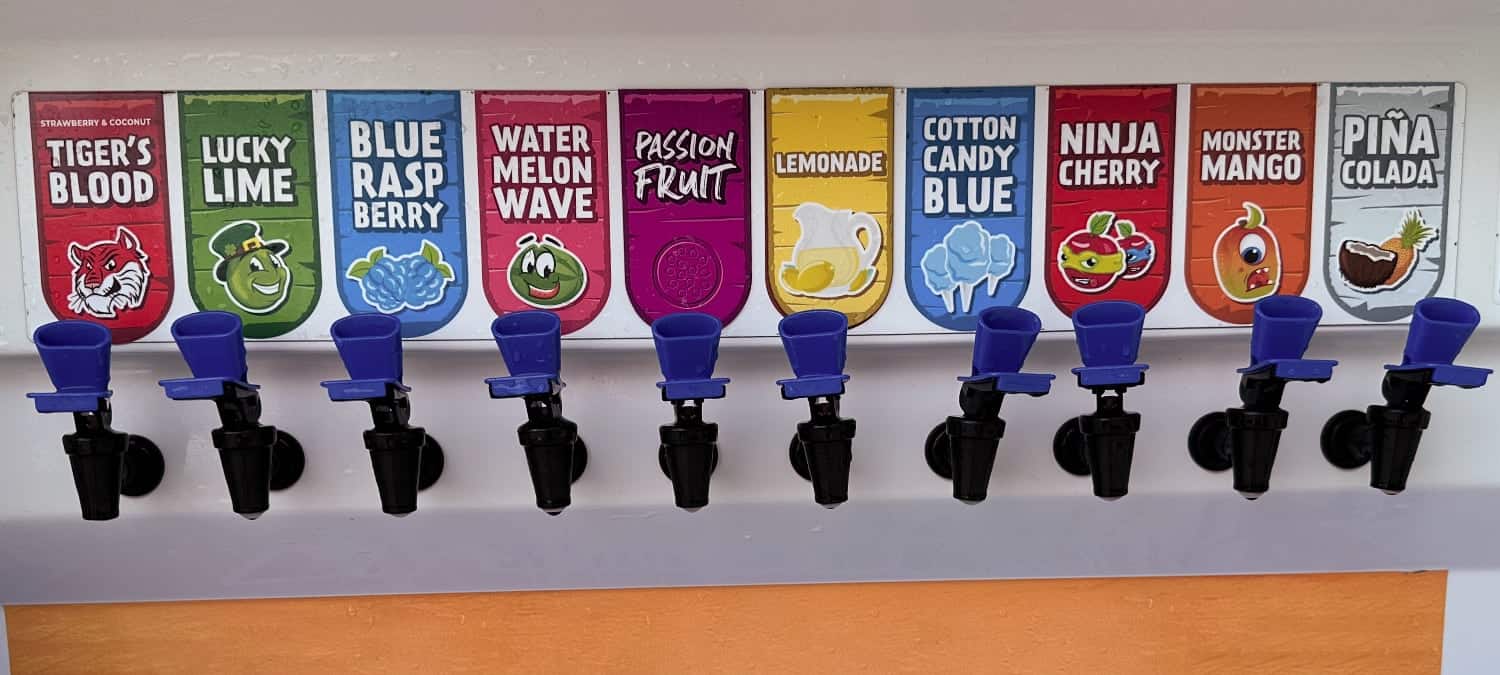
Flavor Fusion Fun: Unleash your inner taste buds! Kona Ice offers ten delicious flavors, from classics like Tiger's Blood (strawberry and coconut) and Blue Raspberry to exciting options like Watermelon Wave and Passion Fruit. You can create any crazy combination you desire!
Endless Flavor Combinations: The fun doesn't stop after your first flavor burst! With Kona Ice, you can revisit the Flavorwave machine and add more flavors throughout your icy experience, ensuring your concoction stays perfectly balanced and delicious.
Allergy-Friendly Treats: Everyone can enjoy Kona Ice! Their treats are completely gluten-free, dairy-free, and shellfish-free, making them a perfect option for people with allergies or dietary restrictions.
Colorful Celebrations: Add a touch of fun to your Kona Ice experience with their color-changing cups! They come in five different colors, making it a fun surprise and a great way to add to the celebratory atmosphere.
Budget-Friendly Fun: Kona Ice is a budget-conscious option compared to other ice cream trucks. Plus, reserving a Kona Ice truck for your events seems to be hassle-free!
Provincetown is a captivating blend of historic charm, vibrant art scene, and quirky delights. But nestled amongst the art galleries and fresh seafood shacks, there's a hidden gem that's been a local favorite for over 60 years: Marine Specialties.
This isn't your average nautical store. Forget rows of shiny new gear. Marine Specialties is an eclectic treasure trove overflowing with salvage, surplus, and one-of-a-kind finds. Imagine a delightful jumble of closeouts, misprints, and just plain odd lots - a place where a vintage military jacket mingles with a hand-knitted scarf and a bag of seashells.
Here's what makes Marine Specialties a must-visit:
Uniqueness Galore: You never know what you'll unearth in the labyrinthine aisles. It's an explorer's paradise, perfect for stumbling upon unexpected treasures like a Soviet military cap, a pristine seashell collection, or a quirky souvenir that screams "Provincetown."
A Local Landmark: For over six decades, Marine Specialties has been a beloved fixture in Provincetown. It's more than a store; it's a piece of the town's history. Chat with the friendly staff, who might share stories about the store's past or hidden gems waiting to be discovered.
A Feast for the Senses: The store itself is an experience. The vibrant mix of colors, textures, and unexpected finds creates a sensory overload in the best way possible. Be prepared to spend some time browsing, getting lost in the delightful chaos.
Something for Everyone: Whether you're a nautical enthusiast, a vintage clothing aficionado, or simply a curious soul, Marine Specialties has something to surprise you. It's the perfect place to find a unique gift, a conversation-starting outfit, or just a memento of your Provincetown adventure.
Pro-Tip: Marine Specialties keeps seasonal hours. During the off-season (roughly November to March) they are open weekends by chance. To ensure you get your treasure-hunting fix, plan your visit during the busier months (April to New Year's) or check their social media for updates.
So, next time you're in Provincetown, ditch the predictable tourist traps and head straight for Marine Specialties. Embrace the delightful disarray, unearth a hidden gem, and experience a piece of Provincetown's unique charm.
Five Discoveries at the Marine Specialties Store in Provincetown
Some things I have learned after visiting the store multiple times over the years:
A Treasure Trove That Never Stales - Each visit to Marine Specialties is a unique adventure. The store has transitioned from military surplus to an eclectic mix of souvenirs, ensuring there's always something new to discover.
The Summer Buzz - During the summer months, the store buzzes with activity. While the front may be bustling, the back offers a quieter shopping experience.
Nautical Knick-Knacks - A whimsical collection of nautical knick-knacks awaits in a large boat display at the front. These charming finds are quintessential to the Marine Specialties experience and are best seen in person.
Jackets for the Breezy Cape Days - Forgot a jacket on a chilly day? Marine Specialties boasts an impressive selection of outerwear to keep you warm and stylish.
Gifts for the Sea-Hearted - Whether it's for a seasoned sailor or a marine enthusiast, the store offers an array of gifts and essentials for life on the water. The friendly staff are always ready to assist and guide you to the perfect item.
Bonus Tip: Don't miss the ceiling! Look up to enjoy an array of marine-themed decorations that add to the store's unique charm.
As a seasoned Quality Assurance (QA) professional, I've witnessed the evolution of numerous tools that have streamlined our testing processes. Today, I'm excited to share insights on a powerful feature of Google Chrome that is often underutilized in QA testing: the headless mode.
What is Headless Mode?
Headless mode is a feature available in Google Chrome that allows you to run the browser without the user interface. This means you can perform all the usual browser tasks from the command line, which is incredibly useful for automated testing.
Why Use Headless Chrome for Screenshots?
Taking screenshots is a fundamental part of QA testing. They help us:
Verify Layouts: Ensure that web pages render correctly across different browser sizes.
Perform Image Comparisons: Detect any deviations from a base image, which could indicate unexpected changes or errors.
How to Take Screenshots with Headless Chrome
Using Google Chrome's headless mode to capture screenshots is straightforward. Here's a quick guide:
Open the Command Line: Access your command prompt or terminal.
Run Chrome in Headless Mode: Use the command google-chrome --headless --disable-gpu --screenshot --url=[your-website-url].
Specify the Output File: By default, Chrome saves the screenshot as screenshot.png in the current directory. You can specify a different path if needed.
Customize the Browser Size: Use the --window-size option to set the dimensions of the browser window, like so: --window-size=width,height.
Practical Example
Let's say we want to take a screenshot of example.com at a resolution of 1280x720 pixels. The command would be:
After running this command, you'll find screenshot.png in your current directory, capturing the website as it would appear in a 1280x720 window.
Another Example:
This example adds some timestamp to the filename:
cd ~/Desktop;
alias chrome="/Applications/Google Chrome.app/Contents/MacOS/Google Chrome";
chrome --headless --timeout=5000 --screenshot="Prod-desktop.png_$(date +%Y-%m-%d_%H-%M-%S).png" --window-size=1315,4030 https://www.cryan.com/;
Conclusion
Headless Chrome is a versatile tool that can significantly enhance your QA testing capabilities. Whether you're conducting routine checks or setting up complex automated tests, the ability to capture screenshots from the command line is an invaluable asset.
Stay tuned for more QA insights and tips in our upcoming posts! Next week we'll cover using Opera browser for QA testing.
Last Sunday, I set up my GoPro at the corner of Paige and Bridget Street in Lowell, Massachusetts (140 Paige Street) to capture a timelapse of the everyday hustle and bustle. The GoPro Hero 9 camera was set to record for 6 hours.
While there might not be heart-stopping action, the video offers a calming glimpse into the rhythm of the city. You'll see cars navigate the intersection, and pedestrians making their way across the street.
Take a look and see Lowell come alive in this timelapse:
This past weekend, we had an exhilarating dance competition at the Lowell Memorial Auditorium in Lowell, Massachusetts. The event showcased a multitude of talented dancers, and amidst the excitement, I picked up several valuable insights.
Here are the top five things I learned:
1. Auditorium Lighting Matters
In previous competitions, I would score along with the judges, jotting down my thoughts on each performance. However, this time, I faced an unexpected challenge - the auditorium lighting was too dim for note-taking. Lesson learned: Always be prepared for varying lighting conditions!
2. Snacks Are Essential
Dance days can be grueling, stretching from morning rehearsals to late-night performances. Despite any restrictions on outside food, sneaking in a few snacks is a smart move. I noticed others discreetly enjoying their Dunkin' Ice Coffee, bypassing the watchful eyes at the Lowell Auditorium entrance. After all, a well-timed snack can keep your energy levels up during those intense routines.
3. The Pricey Snack Bar
The onsite snack bar at the Lowell Auditorium surprised me with its steep prices. A 20-ounce soda set me back a whopping $5! My advice? Scout out nearby local shops. Familiarize yourself with their hours of operation--you might need to dash out for a quick meal if the awards ceremony runs late into Sunday evening. Proper meal planning ensures a smoother weekend experience for everyone.
4. Hotel Dining Dilemmas
When staying overnight, researching nearby restaurants is crucial. While delivery services like DoorDash and UberEats are convenient, they can also be pricey and occasionally unreliable. Our recent Chipotle order via DoorDash fell short--we didn't receive all the chips we'd requested. Was it DoorDash's fault or Chipotle's? Unclear. Lesson: Consider dining options beyond delivery apps.
5. Parking Predicaments
The closest town parking lot to the Lowell Auditorium charges a hefty $15 for special events. Yes, it's conveniently located for lugging those oversized dance bags, but you're paying a premium for proximity. Fear not! Two other lots offer better rates and are just a short walk away from the Lowell Memorial Auditorium.
Lower Locks Parking Facility is located on 90 Warren Street and Joseph M. Downes, Sr. Facility on 75 John Street. Both of these large garages offer 24-hour parking for $11 or 6-hour parking for $9. These are great lots to park when your only going to the auditorium to watch a couple of dances. Both of these lots are within a 7-minute walk to the Lowell Memorial Auditorium.
Remember, every dance competition brings its own set of lessons--both onstage and off. Whether it's mastering a routine or navigating logistics, each experience contributes to our growth as dancers and event attendees.
The TEC-IT Barcode Generator is a powerful online tool that allows you to create various types of barcodes effortlessly. Whether you're a developer, business owner, or just curious about barcodes, this free generator is here to simplify the process.
How Does It Work?
Choose Your Barcode Type: The generator supports a wide range of barcode formats, including linear barcodes, 2D codes, GS1 DataBar, and postal barcodes. You can select the one that best suits your needs.
Customize Your Barcode: Input your data, adjust settings, and explore options. You can generate barcodes for product labels, inventory management, shipping, and more.
Instant Results: Once you've configured your barcode, hit the "Generate" button. Voilà! Your barcode is ready for download or printing.
Supported Barcode Types
EAN and UPC: Commonly used for retail products.
Code-128: Ideal for inventory and shipping labels.
QR Code®: Perfect for linking to websites, sharing contact information, or providing Wi-Fi access.
Data Matrix: Compact 2D codes for data storage.
PDF417: Used in applications like driver's licenses and boarding passes.
Postal Codes: Generate barcodes for mail and packages.
ISBN: For books and publications.
Website Description
Linear Barcodes, 2D Codes, GS1 DataBar, Postal Barcodes and many more!
This online barcode generator demonstrates the capabilities of the TBarCode SDK barcode components. TBarCode simplifies bar code creation in your application - e.g. in C# .NET, VB .NET, Microsoft® ASP.NET, ASP, PHP, Delphi and other programming languages. Test this online barcode-generator without any software installation (Terms of Service) and generate your barcodes right now: EAN, UPC, GS1 DataBar, Code-128, QR Code®, Data Matrix, PDF417, Postal Codes, ISBN, etc.
As a seasoned Macintosh enthusiast, I'm always on the lookout for peripherals that enhance my daily workflow. This week, let's dive into the Logitech H30 USB Headset, a versatile audio companion that promises excellent sound quality but comes with a caveat.
The Good: Sound Quality That Hits the Right Notes
The Logitech USB Headset doesn't disappoint when it comes to audio performance. Here are some highlights:
Rich Sound Profile: Slip these headphones on, and you'll be greeted by a warm and well-balanced sound. Whether you're listening to your favorite tunes, editing audio files, or participating in virtual meetings, the headset delivers clear highs, punchy mids, and satisfying bass.
Comfortable Fit: The over-ear design ensures a snug fit without causing discomfort during extended use. The plush ear cushions and adjustable headband make it suitable for those marathon work sessions.
USB Simplicity: Plug-and-play convenience is a Mac user's dream. The USB connection ensures seamless compatibility with your Mac, and you won't need to fiddle with drivers or complicated setup procedures.
Noise Isolation: The closed-back design effectively blocks out ambient noise, allowing you to focus on your tasks without distractions.
The Not-So-Good: Microphone Blues
Now, let's address the elephant in the room - the microphone. While the Logitech USB Headset shines in sound quality, the microphone isn't without quirks:
Strong Noise Compression: The microphone's noise compression can be a double-edged sword. On one hand, it minimizes background noise, ensuring your voice comes through clearly. However, it can also make your voice sound slightly robotic or overly processed.
Microsoft Teams Compatibility: Ah, the eternal struggle! Getting the headset to play nicely with Microsoft Teams can be a bit finicky. Some users report issues with recognition or configuration. Fear not - I've got a workaround for you.
Microphone on the Left: The microphone has to be on the left ear. This may not be a deal break for some people, but I am use to having the microphone on the right.
Tips for Taming the Microphone Beast in Microsoft Teams
Adjust Microphone Sensitivity: In Teams, navigate to your audio settings. Tweak the microphone sensitivity to find the sweet spot. Sometimes a slight adjustment can make a world of difference.
Test Different USB Ports: Sometimes, the port matters. Try connecting the headset to different USB ports on your Mac. You might stumble upon the magic combination.
Firmware Updates: Check if Logitech offers any firmware updates for your headset. These updates often address compatibility issues.
Fallback to Computer Microphone: If all else fails, stick with your Mac's built-in microphone for Teams calls. It's not ideal, but it gets the job done.
In Conclusion
The Logitech USB Headset strikes a balance between sound quality and microphone quirks. If you're primarily using it for music, podcasts, or video editing, it's a solid choice. For Teams calls, keep experimenting until you find the right setup. And remember, even Mac pros like us encounter a few bumps in the road - just consider them part of the adventure!
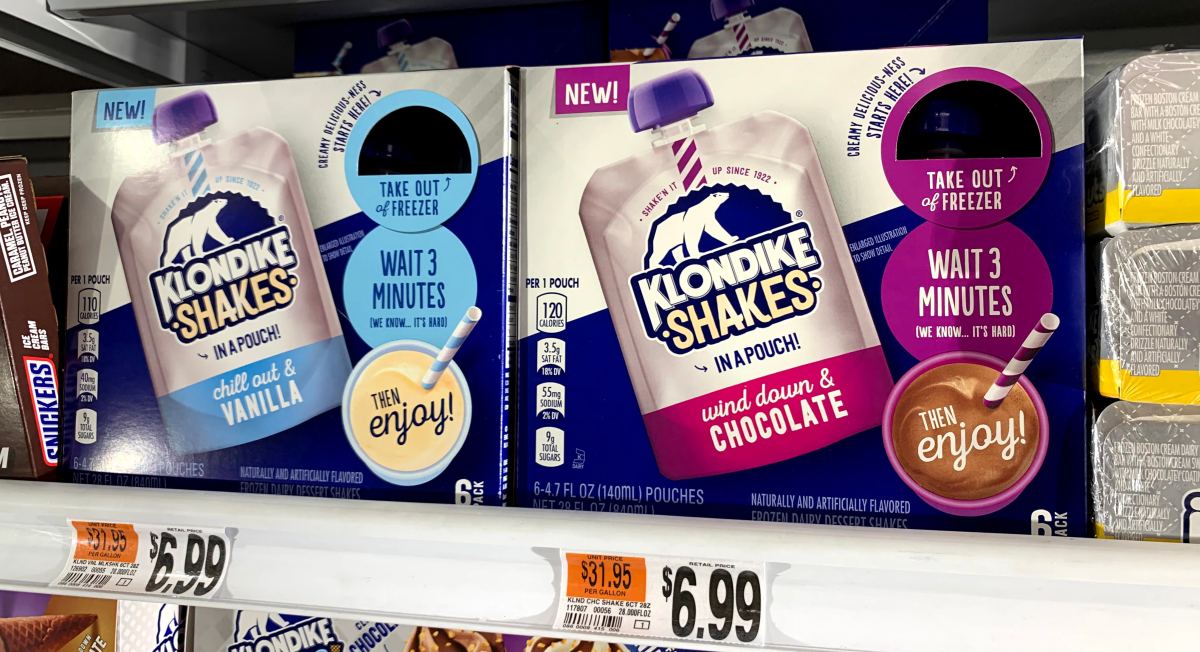
As a food enthusiast and a parent of a 13-year-old daughter named Juliana, I'm always on the lookout for delicious and safe treats for her. As a dancer, she often craves a refreshing snack after a long day of rehearsals or competitions. That's where the Klondike Shake comes into play!
What is the Klondike Shake?
The Klondike Shake is a delightful frozen treat that combines the best of both worlds: a creamy milkshake and a classic ice cream bar. It's like having a dance party in your mouth!
Why is it Perfect for Dancers with Celiac?
Gluten-Free Goodness: The Klondike Shake is entirely gluten-free, making it a safe option for dancers like Juliana who need to avoid wheat-based products. No need to worry about cross-contamination or hidden gluten here!
Portable and Convenient: After a rigorous dance performance or competition, dancers often find themselves hungry and tired. The Klondike Shake comes in a handy single-serve package, perfect for enjoying on the ride home. No mess, no fuss - just pure indulgence.
Creamy and Refreshing: Imagine sipping on a thick, velvety milkshake with chunks of chocolate-coated goodness. The Klondike Shake delivers that creamy satisfaction dancers crave, whether they're pirouetting across the stage or sitting in the backseat of a car.
Variety of Flavors: Klondike offers a range of flavors, from classic chocolate to mint chocolate chip. Dancers can choose their favorite, and each flavor promises a delightful experience.
How to Enjoy the Klondike Shake
Unwrap and Sip: Tear open the wrapper, revealing the frosty goodness inside. Take a sip and let the creamy shake coat your taste buds.
Savor the Chocolate: The Klondike Shake is generously studded with chocolate chunks. Whether you're a dark chocolate devotee or a milk chocolate fan, these little surprises will make your snack time extra special.
Share the Joy: If you're carpooling with fellow dancers, consider sharing the Klondike Shake love. Pass it around, and watch everyone's eyes light up with delight.
Where to Find Klondike Shakes
You can find Klondike Shakes at most grocery stores, convenience stores, and even some dance studio vending machines. Look for the iconic Klondike packaging, and you're in for a treat!
Conclusion
Next time you're driving home from a dance competition, treat yourself (and your gluten-free dancer) to a Klondike Shake. It's more than a snack; it's a celebration of movement, flavor, and joy. Juliana gives it a standing ovation, and I'm sure your taste buds will too!
Nestled on Franklin Street in Needham, Massachusetts, lies a time capsule of technological history - You Do It Electronics. This local gem has been around for a whopping 75 years, weathering the ever-changing tide of the electronics industry. While the sprawling aisles that once brimmed with cutting-edge gadgets might seem a little sparse these days, You Do It Electronics retains a unique charm that's well worth a visit.
Step inside, and prepare to be transported back in time. Gone are the sleek displays and standardized layouts of modern electronics stores. Here, you'll find shelves brimming with an eclectic mix of electronic odds and ends - a testament to the store's long and storied past. You might stumble upon a box of vintage resistors next to a high-definition antenna, or a dusty package of floppy disks sharing space with a modern phone case.
The limited inventory might leave the tech-savvy wanting, but that's precisely what makes You Do It Electronics such a fun place to browse. It's a treasure trove for tinkerers, hobbyists, and anyone who appreciates a good dose of nostalgia. You never know what hidden gem you might unearth - a rare component for a forgotten project, a quirky gadget that sparks a childhood memory, or simply a conversation starter with a fellow tech enthusiast.
Some bare shelves can be found in this Technology Store.
The knowledgeable staff, some of whom have been with the store for decades, add another layer of charm to the experience. They're a wealth of information on the history of electronics and can offer a glimpse into how far (and sometimes not so far) technology has come.
You Do It Electronics in Needham is more than just a store; it's a testament to the enduring human fascination with technology. It's a place to revel in the past, appreciate the present, and maybe even spark an idea for the future. So next time you're in the area, take a step back in time and explore this unique piece of technological history. You might just be surprised by what you find.
Visit In-Person
Located less than 20 miles from Boston, You-Do-It Electronics Center is conveniently situated off RT128/I-95. Whether you're a seasoned electronics guru or a curious beginner, their friendly staff will guide you through the aisles of possibilities.
Address: 40 Franklin St, Needham Heights, MA 02494 Phone: (781) 449-1005 Hours: Monday to Saturday, 9:00 AM - 7:00 PM
As Quality Assurance professionals, we know that meticulous testing is the backbone of delivering high-quality software. One crucial aspect of our work involves validating CSS selectors to ensure they accurately target the desired elements on a web page. In this blog post, we'll explore how to validate CSS selectors using the Google Chrome Dev Console.
Why Validate CSS Selectors?
CSS selectors allow us to create triggers for various actions, such as tracking clicks, form submissions, or interactions with specific UI elements. However, relying on selectors without proper validation can lead to unexpected behavior or false positives. Let's dive into the process of validating selectors step by step.
Step 1: Inspect the Element
Right-Click and Inspect:
Begin by right-clicking on the element you want to examine (e.g., a button).
Select "Inspect" from the context menu.
The Elements panel will open, displaying the HTML and CSS related to the selected element.
Step 2: Access the Chrome Dev Console
Open the Dev Console:
If you already have the Dev Console open, click on the "Console" tab (located to the right of the "Elements" tab).
If not, open the Dev Console by clicking the three dots in the top-right corner of your Chrome browser, then selecting "More Tools" and "Developer Tools".
Step 3: Evaluate the Selector
Type in the Console:
In the Console, type the following line: $$('.your-selector')
Replace '.your-selector' with the actual CSS selector you want to test.
For example, if you're checking how many buttons on the page have the class "button", use: $$('.button')
View the Results:
The Console will display a NodeList with the matching elements.
If there are multiple elements with the same selector, you'll see a count (e.g., "(2)").
Expand the NodeList to see all the elements that match your selector.
Hover over each one to highlight it on the page.
Step 4: Refine Your Selector
Be More Specific:
To narrow down to a specific element, be more specific in your selector.
For instance, to target only buttons with class "button" within a specific div, adjust your selector accordingly.
Conclusion
Validating CSS selectors using the Chrome Dev Console ensures that our triggers and tracking accurately reflect the intended behavior. Remember to test thoroughly, be specific, and avoid assumptions about uniqueness. Happy testing!
This video features a compilation of commercials from 1998. The commercials advertise various products and services, including Sprint's dime rate plan, Taco Bell's Nachos Bell Grande, and Jack in the Box's Ultimate Cheeseburger.
The first commercial is for Sprint's dime rate plan. The commercial starts with a woman who is suddenly promoted to boss. She decides to take the day off and go shopping. She tries on clothes and feels great about how they look on her. Later, at the salon, she meets Candice Bergen, who tells her that she got up to 200 minutes of free long distance for signing up for Sprint's dime rate plan. The commercial ends with a call to action, encouraging viewers to sign up for Sprint's dime rate plan for 10 cents a minute and get up to 200 minutes free.
The second commercial is for Taco Bell's Nachos Bell Grande. The commercial features a brief announcement about Taco Bell's Nachos Bell Grande, which was available for just 99 cents when you buy a large drink in 1998.
The third commercial is for Jack in the Box's Ultimate Cheeseburger. The commercial features men discussing the Ultimate Cheeseburger. One man likes the fact that the cheeseburger is just meat and cheese, and doesn't have a bun. Jack questions why the cheeseburger needs a bun if it's just meat and cheese. The commercial ends with the two men agreeing to look into the bun issue.
Overall, this video provides a glimpse into advertising from the late 1990s. The commercials feature catchy slogans, celebrity endorsements, and a focus on value. They also reflect the popular culture of the time, such as the rise of mobile phones and the popularity of fast food.
As technology evolves, so does the way we communicate in the workplace. With the rise of remote work and distributed teams, having effective communication tools is more important than ever. Microsoft Teams and Slack are two prominent platforms in this arena, each with its own set of features and functionalities. But what happens when you're accustomed to one and then find yourself using the other?
Recently, I started a new job where the company uses Microsoft Teams for their chat and communication services. Having been an avid Slack user for about five years prior, I couldn't help but notice some differences and, dare I say, missed features that I had grown accustomed to.
Four Things I Missed in Slack
Let's take a closer look at what I found myself missing from Slack while using Microsoft Teams:
Conversation Threads: One feature that I sorely missed from Slack was conversation threads. In Slack, threads are a convenient way to keep the main chat channels clutter-free while allowing discussions to branch off naturally. It's easy to follow conversations and maintain context, something I found lacking in Microsoft Teams.
Custom Emoji: Expressing oneself in chat goes beyond mere text. Custom emoji in Slack allowed for personalization and added a touch of fun to conversations. While Microsoft Teams offers a range of emojis, the ability to create and use custom ones was sorely missed.
Collapse Preview: Image previews in chat can sometimes be distracting, especially in a busy channel. Slack's ability to collapse image previews provided a neat solution to this problem, allowing users to focus on the conversation without unnecessary distractions.
Reminders: Setting up personal and group reminders was another feature I found myself missing in Microsoft Teams. Whether it's reminding myself of a task or notifying the team about an upcoming event, Slack's reminder feature was a handy tool for staying organized and on top of things.
In Summary
While Microsoft Teams certainly has its own strengths and advantages, the transition from Slack wasn't without its challenges. However, it's worth noting that both platforms have been continuously evolving, with Microsoft Teams gradually introducing new features and improvements to bridge the gap between the two.
In conclusion, the choice between Microsoft Teams and Slack ultimately boils down to personal preference and the specific needs of your team or organization. While I may reminisce about the "good old days" of using Slack, I've come to appreciate the capabilities of Microsoft Teams and its role in facilitating effective communication and collaboration within the workplace.
Have you ever wanted to see yourself or your loved ones in a cartoon? Now you can with Vidnoz's AI-powered cartoon generator! This free tool lets you upload any photo and instantly create a cartoon version of it.
How it Works
Using Vidnoz's cartoon generator is easy. Just follow these steps:
Visit the Vidnoz website and click on the "AI Cartoon Generator" link.
Upload the photo you want to turn into a cartoon.
Click the "Generate" button.
That's it! Your cartoon will be generated in seconds.
Benefits of Using an AI Cartoon Generator
There are many benefits to using an AI cartoon generator like Vidnoz. Here are just a few:
It's fun! Seeing yourself or your loved ones in a cartoon can be a lot of fun. It's a great way to add a touch of whimsy to your photos.
It's easy to use. Even if you're not tech-savvy, you can use Vidnoz's cartoon generator. The process is simple and straightforward.
It's free! There are no fees to use Vidnoz's cartoon generator. You can create as many cartoons as you want for free.
It makes your photos more private. If you're concerned about privacy, you can use Vidnoz's cartoon generator to create versions of your photos that don't show your face.
Website Description
Convert photo to cartoon online effortlessly. 100% free. Simply apply the cartoon filters to your photos and our image-to-cartoon generator will help you get a batch of cartoon photos in one click.
As a avid Macintosh user, I've accumulated quite a collection of apps. Over time, my Launchpad has become a bustling metropolis of icons, making it challenging to find the right app when I need it. If you're in the same boat, fear not! Let's roll up our sleeves and declutter that Launchpad.
Why Organize?
Before we dive into the nitty-gritty, let's talk about why organizing your Launchpad matters:
Efficiency: When you're in the zone, you don't want to waste time hunting for an app. Organized folders will speed up your workflow.
Task-Based Access: Imagine having a "Video Editing" folder with all your video-related apps neatly tucked inside. No more guessing which app to use!
Spring Cleaning: It's like tidying up your digital house. You'll rediscover apps you forgot existed and maybe even uninstall some you no longer need.
Step 1: Assess Your Apps
First, take a deep breath and open your Launchpad. Scroll through the chaos and mentally categorize your apps. Here are some functional categories to consider:
Now that you've mentally sorted your apps, let's create folders. Here's how:
Click and Hold: Click and hold any app icon until they all start jiggling (like they're doing a little dance).
Drag and Drop: Drag one app onto another to create a folder. Name it something descriptive that means something to YOU. (e.g., "Home Productivity").
Add More Apps: Drag related apps into the folder. Repeat for other categories.
Step 3: Refine Your Categories
Don't be afraid to tweak your folders. Maybe you realize you have too many note-taking apps. Combine them into a single "Notes" folder. Or perhaps you're a photography enthusiast--create a "Photography" folder for all your editing tools.
Step 4: Spring Cleaning
Now that your Launchpad is organized, take a moment to evaluate each app:
Use Frequency: When was the last time you opened that app? If it's been years, consider saying goodbye.
Duplicates: Do you have three PDF readers? Keep the best one and bid adieu to the rest.
Uninstall: If you're sure you won't need an app again, uninstall it. Your hard drive will thank you.
Conclusion
By organizing your Launchpad, you're not only making your life easier but also gaining a sense of accomplishment. Plus, the next time someone asks, "What app do I use for video editing?"--you'll have the answer at your fingertips. Happy organizing!
Welcome to cryan.com's main blog page! Here you'll find a diverse collection of informative posts covering topics ranging from technology and lifestyle to career advice. There's something here for everyone.
We are committed to delivering the highest quality content, ensuring you have access to the most current and reliable information.