Every year, the April Blogging from A to Z Challenge attracts a diverse group of bloggers eager to take on the exciting task of writing posts corresponding to each letter of the alphabet. While I've considered joining in the past and even felt a surge of excitement about the idea, I've ultimately decided not to participate this year.
The challenge, as enticing as it may seem, requires a significant investment of time and creative energy. Coming up with topics that fit the alphabetical constraint while also being engaging and valuable to readers is no small feat. I've found that the effort required to adhere to this structure often detracts from the organic flow of ideas and the natural rhythm of blogging.
Moreover, my experience has shown that readers are more drawn to the content itself rather than the format in which it's presented. They seek out blogs for the quality of the writing, the depth of the insights, and the relevance of the topics. The challenge, while fun and stimulating in its own right, can sometimes feel like an artificial constraint that doesn't necessarily enhance the blogging experience for either the writer or the reader.
That being said, I'm not abandoning blogging in April by any means. Instead, I'll continue to share my thoughts and insights on a variety of subjects that I believe will resonate with my audience. I'll stick to my usual approach of letting the ideas that naturally come to mind guide my posts. This way, I can maintain the authenticity and spontaneity that I feel are essential to creating meaningful connections with my readers.
So, while I won't be joining the April Blogging from A to Z Challenge, I'll still be here, writing and sharing. I encourage you to explore the challenge if it interests you, but also to remember that there's no one-size-fits-all approach to blogging. Whether you choose to participate in the challenge or not, the most important thing is to keep writing and sharing your unique voice with the world.
If you?ve ever needed a quick, reliable way to generate random data, look no further than RandomGenerator.pro. This sleek, user-friendly website is a treasure trove for anyone seeking randomness in a variety of forms, whether for creative projects, testing, or just pure curiosity.
At its core, RandomGenerator.pro offers a range of tools to generate random numbers, letters, colors, and more. The interface is clean and intuitive, making it accessible to users of all levels. Need a random number for a raffle or a unique string for a coding project? The site delivers with just a few clicks. One standout feature is its ability to customize parameters, allowing you to set ranges or specific criteria for your random outputs, which adds a layer of flexibility that?s hard to beat.
What sets RandomGenerator.pro apart is its simplicity paired with utility. There?s no unnecessary clutter?just straightforward tools that work efficiently. It?s perfect for developers, educators, or anyone who needs a dash of randomness in their work or play. Plus, it?s free to use, which is always a bonus.
Whether you?re brainstorming, prototyping, or simply exploring, RandomGenerator.pro is a handy resource worth bookmarking. Give it a spin next time you need a random spark?it?s a small but mighty tool that delivers every time!
Website Description
Find the ultimate set of free random generators intended to inspire, teach, and entertain. Our inclusive platform has more than 30 distinct generators across various categories, ranging from animals and entertainment to food and nature. Whether you are a creative professional needing inspiration, an educator in need of teaching materials, a student completing projects, or merely someone new to discovering interesting things, our random generators offer unlimited means of exploration and creativity.
Random Generator Pro is the web's most extensive and accessible collection of random generators. Every generator has been hand-developed to present precise, high-quality information in each generation. Our website fuses high-performance random generation engines with huge databases to yield first-rate, targeted results for all categories. Ideal for art, education, choices, amusement, and many other applications - absolutely free and fully accessible without joining.
When working with audio in Audacity, achieving consistent loudness is crucial. You'll often encounter two powerful tools: Normalize and Loudness Normalization. While both aim to adjust audio levels, they operate on fundamentally different principles. Understanding their distinctions is key to making the right choice for your audio projects.
Normalize: Peak-Based Adjustment
Normalize works by finding the highest peak (the loudest point) in your selected audio and adjusting the entire waveform proportionally. You specify a target peak level (usually in dBFS - decibels relative to full scale), and Audacity scales the audio so that the highest peak reaches that target.
Peak-Based: Focuses solely on the loudest point.
Simple and Fast: Relatively quick processing.
Ignores Perceived Loudness: Doesn't consider how loud the audio sounds to human ears.
Can Create Inconsistent Perceived Loudness: Peaks may be normalized, but overall loudness may still be inconsistent.
Useful for aligning peak levels of similar audio files or preparing audio for further processing.
Loudness Normalization considers the perceived loudness of the audio, aligning it with how humans hear. It uses algorithms that analyze the audio?s overall loudness over time, rather than just the peaks. It targets a specific Integrated Loudness value, typically measured in LUFS (Loudness Units relative to Full Scale).
Perceived Loudness-Based: Considers the average loudness over time.
More Complex Processing: Takes longer than Normalize.
Creates Consistent Perceived Loudness: Results in a more uniform and balanced listening experience.
Uses LUFS and True Peak values.
Better for broadcast, streaming, and podcasting where consistent loudness is essential.
Follows industry standards like ITU-R BS.1770.
Which One is "Better" for Making Audio Louder?
The answer depends on your goal:
For simply raising the peak level without considering perceived loudness, use Normalize.
For achieving a consistent and balanced listening experience, use Loudness Normalization.
Why Loudness Normalization is Often Preferred:
Human hearing doesn?t perceive loudness linearly. A short, very loud peak might not sound as loud as a sustained, moderately loud sound. Loudness Normalization accounts for this by analyzing the audio?s overall energy over time. This results in audio that sounds more consistent and comfortable to listen to.
Practical Example:
Imagine you have a podcast recording with a few loud coughs and otherwise quiet speech.
Normalize: If you normalize to -1 dBFS, the coughs will reach -1 dBFS, but the speech might still be very quiet. This would result in an inconsistent listening experience.
Loudness Normalization: If you loudness normalize to -16 LUFS, the overall perceived loudness of the podcast will be consistent. The coughs will be brought down, and the speech will be raised to a more balanced level.
While Normalize has its uses, Loudness Normalization is generally the superior choice for achieving consistent and professional-sounding audio. By understanding the differences between these two tools, you can make informed decisions and elevate the quality of your audio projects. Choose Loudness Normalization when you want to create a listening experience that is both loud and consistent.
Pytest has solidified its position as a go-to testing framework for Python developers due to its simplicity, extensibility, and powerful features. In this blog post, we'll dive deep into using Pytest, specifically focusing on its integration with Playwright for browser automation, and explore how to capture screenshots during fixture teardown for enhanced debugging and result analysis.
Capturing Screenshots in Fixture Teardown
To capture a screenshot before the browser closes, we can modify the page fixture to include a teardown phase. This will help make debugging a bit easier and a chance to look at automation to see if there's any weirdness.
Any code in the Fixture that appears after "yield page" will run at the conclusion of the test.
After running the tests, you'll find screenshots in the screenshots directory. These screenshots will help you understand the state of the browser at the end of each test, especially during failures.
Benefits of Screenshot Capture
Debugging: Quickly identify issues by visually inspecting the browser state. Reporting: Include screenshots in test reports for better documentation. Visual Validation: Verify UI elements and layout.
As QA teams grow and evolve, they often find themselves at a crossroads: Are they focusing on rigid, dogmatic practices, or are they embracing a more fluid, karmic approach that adapts to the moment? Let's dive into this philosophical tug-of-war and explore what it means for your QA team - and your software.
Dogma: The Comfort of the Rulebook
Dogma in QA is the strict adherence to predefined processes, checklists, and methodologies, no matter the context. It's the "we've always done it this way" mindset. Think of the team that insists on running a full regression test suite for every minor bug fix, even when a targeted test would suffice. Or the insistence on manual testing for every feature because automation "can't be trusted."
There's a certain comfort in dogma. It provides structure, predictability, and a clear path forward. For new QA engineers, a dogmatic framework can be a lifeline - a set of rules to follow when the chaos of software development feels overwhelming. And in highly regulated industries like healthcare or finance, dogmatic adherence to standards can be a legal necessity.
But here's the catch: Dogma can calcify into inefficiency. When a team clings to outdated practices - like refusing to adopt modern tools because "the old way works" - they risk missing out on innovation. Worse, they might alienate developers and stakeholders who see the process as a bottleneck rather than a value-add. Dogma, unchecked, turns QA into a gatekeeper rather than a collaborator.
Karma: The Flow of Cause and Effect
On the flip side, a karmic approach to QA is all about adaptability and consequences. It's the belief that good testing practices today lead to better outcomes tomorrow - less technical debt, happier users, and a smoother development cycle. A karmic QA team doesn't blindly follow a script; they assess the situation, weigh the risks, and adjust their strategy accordingly.
Imagine a team facing a tight deadline. Instead of dogmatically running every test in the book, they prioritize high-risk areas based on code changes and user impact. Or consider a team that invests in automation not because it's trendy, but because they've seen how manual repetition burns out testers and delays releases. This is karma in action: thoughtful decisions that ripple outward in positive ways.
The beauty of a karmic approach is its flexibility. It embraces new tools, techniques, and feedback loops. It's less about "the process" and more about the result - delivering quality software that meets real-world needs. But there's a downside: Without some structure, karma can devolve into chaos. Teams might skip critical steps in the name of agility, only to face a flood of bugs post-release. Karma requires discipline and judgment, not just good intentions.
Striking the Balance
So, is your QA team following dogma or karma? The truth is, neither is inherently "right" or "wrong" - it's about finding the sweet spot between the two.
Audit Your Dogma: Take a hard look at your current processes. Are there sacred cows that no one's questioned in years? Maybe that 50-page test plan made sense for a legacy system but not for your new microservices architecture. Challenge the status quo and ditch what doesn't serve the goal of quality.
Embrace Karmic Wisdom: Encourage your team to think critically about cause and effect. If a process feels like busywork, ask: What's the payoff? If a new tool could save hours, why not try it? Build a culture where decisions are tied to outcomes, not just tradition.
Blend the Best of Both: Use dogma as a foundation - standardized bug reporting, compliance checks, or a core set of tests that never get skipped. Then layer on karmic flexibility - tailoring efforts to the project's unique risks and timelines.
A Real-World Example
I heard of a QA team that swore by their exhaustive manual test suite. Every release, they'd spend two weeks clicking through the UI, even for tiny updates. Dogma ruled. Then a new lead joined, pushing for automation in high-traffic areas. The team resisted - until they saw the karma: faster releases, fewer late-night bug hunts, less late night testing, and happier devs. They didn't abandon manual testing entirely; they just redirected it where human intuition mattered most. The result? A hybrid approach that delivered quality without the grind.
The QA Crossroads
Your QA team's philosophy shapes more than just your testing - it influences your entire product lifecycle. Dogma offers stability but can stifle progress. Karma promises agility but demands discernment. The best teams don't pick a side; they dance between the two, guided by one question: Does this help us build better software? So, take a moment to reflect. Is your QA team stuck in the past, or are they sowing seeds for a better future? The answer might just determine whether your next release is a triumph - or a lesson in what could've been.
The flexibility of remote working is leading to greater employee satisfaction, better performance outcomes and improved engagement, qualities that reinforce all Forbes magazine's observation that the hybrid model is the 'key productivity strategy' for the 2020s workplace. For this accolade to be maintained, hybrid workers need to be able to seamlessly transfer between remote locations and their formal workplace without the change of setting compromising efficiency and security. As a result, the work of hybrid employees is highly dependent on company issued equipment that is not only safely delivered but that also remains compliant, secure and well maintained. By taking practical steps to closely monitor the movement of equipment, upgrade devices as soon as necessary and control risks throughout a product's life cycle, businesses can keep their remote workers safely connected, while at the same time avoid unnecessary downtime caused by IT issues and ensure high levels of productivity are maintained.
Safely Delivering Company-Owned Technology
Most businesses prefer to provide hybrid employees with company-owned equipment as, when it is well supported, it can enhance security and encourage productivity. While ensuring compliance, protecting sensitive data and providing effective IT support is enabled with company supplied equipment, the safe delivery, maintenance and tracking of valuable devices across different locations can prove to be difficult, especially for larger companies with extensive networks of hybrid and remote workers. A robust device management system is essential for the management of company-supplied equipment and can address these issues with clear processes for monitoring devices and providing regular updates on their location. It can also oversee the safe return of equipment when it is no longer needed and, if a device is lost or stolen, allow the remote wiping of data to ensure company-wide cybersecurity.
Replacing Old and Outdated Devices
While managing the safe deployment of equipment, productivity can still suffer if equipment for hybrid workers is not regularly updated. Aging devices are slower to run, cause unnecessary downtime and require more technical support. However, even though older PCs and outdated laptops can have an impact on productivity, at least 40 percent of small and medium-sized businesses are failing to implement or follow a PC refresh policy. Keeping a record of the age and condition of company supplied devices allows managers to see when they are due to be upgraded. Even when IT budgets are stretched, continuing the issue and maintenance of out of date hardware is a false economy. To ensure cybersecurity and compatibility with new software, promptly upgrading devices will improve overall efficiency and worker productivity in the longer term.
Ensuring Secure Remote Access
Now that 38% of US employees are working remotely at least some of the time, finding ways to safely access off prem devices can also be a problem. While many workers are concerned about being monitored when working from home, their employer has the right to track their activity if they are using technology provided by the company. IT support teams also need access to their colleagues' computers in order to reconfigure settings, update files and provide help with technical issues but this open remote access can compromise cybersecurity. Log in systems that use a cloud directory with multi factor authentication can help to safely connect users, while a VPN can be used to securely deploy software to remote equipment. A good time to schedule software updates or the transfer of sensitive data is when hybrid workers are visiting the office. Raising cybersecurity awareness among workers is crucial for any company with hybrid workers, and when robust security protocols are introduced and followed, workflow and productivity remains high as computer updates are seamlessly introduced and system disruptions due to technical issues are minimized.
As hybrid working remains a popular choice for many employees, ensuring they are able to work efficiently and safely off prem is a growing concern for many businesses. By carefully managing the deployment and return of devices, upgrading equipment when necessary and implementing company-wide cybersecurity protocols, businesses can keep their hybrid workers connected and well supported. This in turn increases employee satisfaction and productivity levels, even when workers are located remotely.
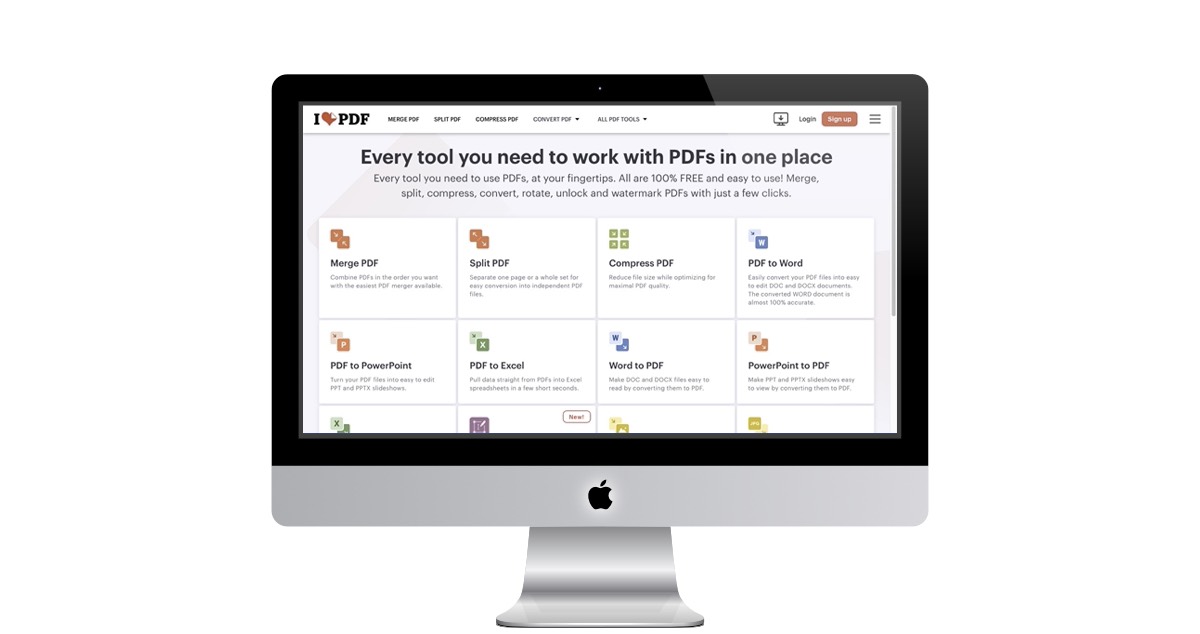
If you do any work with PDFs, the site ilovepdf.com is for you!
This is your one stop source for anything you could ever want to do with PDFs:
Merge PDF - Combine PDFs in the order you want with the easiest PDF merger available.
Split PDF- Separate one page or a whole set for easy conversion into independent PDF files.
Compress PDF - Reduce file size while optimizing for maximal PDF quality.
PDF to Word - Easily convert your PDF files into easy to edit DOC and DOCX documents. The converted WORD document is almost 100% accurate.
PDF to PowerPoint - Turn your PDF files into easy to edit PPT and PPTX slideshows.
PDF to Excel - Pull data straight from PDFs into Excel spreadsheets in a few short seconds.
Word to PDF - Make DOC and DOCX files easy to read by converting them to PDF.
PowerPoint to PDF - Make PPT and PPTX slideshows easy to view by converting them to PDF.
Excel to PDF - Make EXCEL spreadsheets easy to read by converting them to PDF.
Edit PDF - Add text, images, shapes or freehand annotations to a PDF document. Edit the size, font, and color of the added content.
PDF to JPG - Convert each PDF page into a JPG or extract all images contained in a PDF.
JPG to PDF - Convert JPG images to PDF in seconds. Easily adjust orientation and margins.
and 14 more tools!
Website Description
Every tool you need to use PDFs, at your fingertips. All are 100% FREE and easy to use! Merge, split, compress, convert, rotate, unlock and watermark PDFs with just a few clicks.
In 2019, I purchased a new iMac. The computer is now six years old. I was thinking if I got a new MacBook pro would there be a significant difference?
I put the question to the test to Grok3, and was surprised to find out that I would notice a big difference. Basically I should see a significant difference. The only downside would be missing the larger screen.
This information is useful for anyone that purchased a computer in the pre-Apple chip days.
2019 iMac
The 2019 iMac came in 21.5-inch and 27-inch variants with Intel processors. For a balanced comparison, let's take a mid-to-high-end model: the 27-inch iMac with a 3.7 GHz 6-core Intel Core i5 (9th-gen Coffee Lake, Turbo Boost up to 4.6 GHz). It typically shipped with 8 GB of DDR4 RAM (upgradable to 64 GB), a Radeon Pro 580X GPU with 8 GB VRAM, and a 1 TB Fusion Drive or optional SSD. Geekbench 5 scores for this model are roughly 1,100?1,200 single-core and 5,500?6,000 multi-core, based on historical data for similar 9th-gen Intel chips. Storage speeds for the Fusion Drive were around 50?100 MB/s for the HDD component and up to 500 MB/s for the SSD portion, while a full SSD option hit ~1,500 MB/s read/write.
Today's MacBook (2025)
As of March 8, 2025, current MacBooks include the MacBook Air (M4) and MacBook Pro (M4, M4 Pro, M4 Max). For a fair comparison, let's use the base MacBook Air M4: a 10-core CPU (4 performance, 6 efficiency cores), 10-core GPU, 16 GB unified memory, and a 256 GB SSD with read/write speeds of ~3,000?5,000 MB/s. Geekbench 6 scores for the M4 are approximately 3,200 single-core and 12,500 multi-core, reflecting Apple's claims of incremental gains over the M3 and real-world tests of early M4 models. The unified memory architecture provides 120 GB/s bandwidth, far outpacing traditional RAM setups.
Speed Comparison
CPU Performance:
Single-Core: 2019 iMac (~1,150 Geekbench 5) vs.?MacBook Air M4 (~3,200 Geekbench 6). Adjusting for benchmark differences (Geekbench 6 scores are ~10?15% higher than Geekbench 5 for the same hardware), the M4 is roughly 2.5?3x faster in single-threaded tasks. This reflects better architecture (ARM vs.?x86) and higher efficiency.
Multi-Core: 2019 iMac (~5,750 Geekbench 5) vs.?MacBook Air M4 (~12,500 Geekbench 6). The M4 is ~2?2.5x faster, thanks to its 10 cores (vs.?6) and optimized design for parallel workloads.
Memory:
2019 iMac: 8 GB DDR4 at ~2,666 MHz (~20?30 GB/s bandwidth), upgradable but still separate from the CPU/GPU.
MacBook Air M4: 16 GB unified memory at 120 GB/s. The M4's memory is ~4?6x faster in bandwidth and integrated, reducing latency. Even with a maxed-out 64 GB iMac config, bandwidth wouldn't approach the M4's.
Storage:
2019 iMac: Fusion Drive (~50?500 MB/s) or SSD (~1,500 MB/s).
MacBook Air M4: SSD (~3,000?5,000 MB/s). The M4's storage is 2?10x faster, depending on the iMac's config, slashing load times and improving file transfers.
Graphics:
2019 iMac: Radeon Pro 580X (~1,200?1,500 GFLOPS, good for 2019 gaming/editing).
MacBook Air M4: 10-core GPU (~4?5 TFLOPS, estimated from M3's ~3 TFLOPS and Apple's claims). The M4's GPU is ~3?4x faster, with hardware ray tracing and better power efficiency, excelling in modern creative workloads.
Real-World Impact:
Boot/App Launch: The iMac took ~20?30 seconds to boot macOS Mojave; the M4 MacBook boots macOS in <10 seconds. Apps like Photoshop might open in 5?10 seconds on the iMac vs.?<2 seconds on the M4.
Workloads: Video encoding (e.g., 4K H.264) could take 2x longer on the iMac. The M4's Neural Engine and media accelerators further widen the gap for AI/ML tasks or ProRes editing - tasks the iMac struggles with.
Conclusion
The MacBook Air M4 (2025) is dramatically faster than a 2019 iMac - 2?3x in CPU performance, 3?4x in graphics, and up to 10x in storage speed. The gap widens with higher-end MacBook Pro M4 models (e.g., M4 Max with 40 GPU cores and 400 GB/s bandwidth). The 2019 iMac's Intel architecture and older components can't compete with Apple Silicon's efficiency and integration. For everyday tasks, creative work, or even heavy lifting, today's MacBook leaves the 2019 iMac in the dust - think minutes vs.?seconds for complex jobs.
Yesterday, I showed how to use Parametrization in Pytest. Here's an example of how you would run that same code in PlayWright with TypeScript:
This code checks to make sure the four websites are up and running. This is just a quick sanity test, it doesn't do any critical path testing.
import{ test, expect }from'@playwright/test';// List of websites to test
const WEBSITES =["https://www.company.com","https://qa1.company.com","https://qa2.company.com","https://stage.company.com",];// Configure Playwright to run in headless mode globally
test.use({ headless: true });
test(`Check Websites Status`,async({ page })=>{// Iterate over websites to create a test for each
for(const website of WEBSITES){
test(`Check if ${website}is up and running`,async({ page })=>{try{// Attempt to load the website
await page.goto(website,{ waitUntil:'domcontentloaded'});// Check if page title exists andisnot empty
const title =await page.title();
expect(title).not.toBe('');// Check if body element exists
const body = page.locator('body');await expect(body).toBeVisible();// Log success
console.log(`? ${website}is up and running (Title: ${title})`);} catch (error){// Oh the Horror: Fail the test with a detailed message
throw new Error(`Website ${website} failed: ${error.message}`);}});}})
Parametrization in Pytest allows you to run the same test function multiple times with different inputs. Instead of writing separate test functions for each set of data, you can define a single test and provide various argument sets using the @pytest.mark.parametrize decorator. This approach is especially useful for testing functions that need to handle a variety of inputs, edge cases, or data types.
Why Use Parametrization?
Code Reusability: Write one test function and reuse it for multiple test cases.
Efficiency: Reduce boilerplate code and make your test suite easier to maintain.
Clarity: Clearly define the inputs and expected outputs for each test case.
Comprehensive Testing: Easily test a wide range of scenarios without extra effort.
Code Example
This code will check to see if various internal sites are up and running. I ran similar code in the past. This was done so that I could see if there are any issues before the morning standup.
If I didn't use parametrization here, there would be multiple test cases which could cause overhead issues if changes needed to be done.
import pytest
from selenium import webdriver
from selenium.webdriver.chrome.options import Options
from selenium.webdriver.common.by import By
from selenium.common.exceptions import WebDriverException
# List of websites to test
WEBSITES =["https://www.company.com","https://qa1.company.com","https://qa2.company.com","https://stage.company.com"]@pytest.fixturedefchrome_driver():"""Fixture to set up and tear down Chrome WebDriver"""# Set up Chrome options
chrome_options = Options()
chrome_options.add_argument("--headless")# Run in headless mode
chrome_options.add_argument("--no-sandbox")
chrome_options.add_argument("--disable-dev-shm-usage")# Initialize driver
driver = webdriver.Chrome(options=chrome_options)
driver.set_page_load_timeout(30)# Set timeout to 30 secondsyield driver
# Teardown
driver.quit()@pytest.mark.parametrize("website", WEBSITES)deftest_website_is_up(chrome_driver, website):"""
Test if a website loads successfully by checking:
1. Page loads without timeout
2. HTTP status is 200 (implicitly checked via successful load)
3. Page title is not empty
"""try:# Attempt to load the website
chrome_driver.get(website)# Check if page title exists and is not empty
title = chrome_driver.title
assert title,f"Website {website} loaded but has no title"# Optional: Check if body element exists
body = chrome_driver.find_element(By.TAG_NAME,"body")assert body isnotNone,f"Website {website} has no body content"print(f"? {website} is up and running (Title: {title})")except WebDriverException as e:
pytest.fail(f"Website {website} failed to load: {str(e)}")except AssertionError as e:
pytest.fail(f"Website {website} loaded but content check failed: {str(e)}")if __name__ =="__main__":
pytest.main(["-v"])
Life, much like a marathon, is a test of endurance, grit, and the ability to push through setbacks. In the world of software testing, Playwright automation has become my long-distance race of choice - a powerful tool for running browser-based tests with speed and precision. But as any runner will tell you, even the most prestigious marathons come with stumbles, falls, and moments where you question if you'll make it to the finish line. This is a story about my journey with Playwright, the failures I encountered, and how I turned those missteps into victories.
The Starting Line: High Hopes, Hidden Hurdles
When I first adopted Playwright for automating end-to-end tests, I was thrilled by its promise: cross-browser support, and fast execution. My goal was to automate a critical path for an e-commerce website. The script seemed straightforward, and I hit "run" with the confidence of a marathoner at mile one.
Then came the first failure: a weird timeout error. The test couldn't locate the "Add to Cart" button that I knew was on the page. I double-checked the selector - .btn-submit - and it looked fine. Yet Playwright disagreed, leaving me staring at a red error log instead of a triumphant green pass. It was my first taste of defeat, and it stung.
Mile 5: The Flaky Test Trap
Determined to push forward, I dug into the issue. The button was dynamically loaded via JavaScript, and Playwright's default timeout wasn't long enough. I adjusted the script with a waitForSelector call and increased the timeout. Success - at least for a moment. The test passed once, then failed again on the next run. Flakiness had entered the race.
Flaky tests are the headace of automation: small at first, but they'll increase in size you if ignored them. I realized the page's load time varied depending on network conditions, and my hardcoded timeout was a Band-Aid, not a fix. Frustration set in. Was Playwright the problem, or was I missing something fundamental?
Mile 13: Hitting the Wall
The failures piled up. A test that worked in Chrome crashed in Firefox because of a browser-specific rendering quirk. Screenshots showed elements misaligned in Webkit, breaking my locators. And then there was the headless mode debacle - tests that ran perfectly in headed mode failed silently when I switched to testing in CI. I'd hit the marathon "wall," where every step felt heavier than the last.
I considered giving up on Playwright entirely. Maybe Pytest, Selenium or Cypress would be easier. (Even Ghost Inspector looked good!) But just like a champion marathoner doesn't quit during the race, I decided to rethink my approach instead of abandoning it.
The Turnaround: Learning from the Stumbles
The breakthrough came when I stopped blaming the tool and started examining my strategy. Playwright wasn't failing me - I was failing to use it effectively. Here's how I turned things around:
Smarter Waiting: Instead of relying on static timeouts, I used Playwright's waitForLoadState method to ensure the page was fully interactive before proceeding. This eliminated flakiness caused by dynamic content. (Huge Win!)
Robust Selectors: I switched from fragile class-based selectors to data attributes (e.g., [data-test-id="submit"]), which developers added at my request. This made tests more resilient across browsers and layouts.
Debugging Like a Pro: I leaned on Playwright's built-in tools - screenshots, traces, and the headed mode - to diagnose issues. Running npx playwright test --headed became my go-to for spotting visual bugs.
CI Optimization: For headless failures, I added verbose logging and ensured my CI environment matched my local setup (same Node.js version, same dependencies). Playwright's retry option also helped smooth out intermittent network hiccups.
Crossing the Finish Line
With these adjustments, my tests stabilized. The login flow passed consistently across Chrome, Firefox, and Safari. The critical path testing hummed along, and the user login - a notorious failure point - became a reliable win. I even added a celebratory console.log("Victory!") to the end of the suite, because every marathon deserves a cheer at the finish. (Cool little Easter Egg!)
The failures didn't disappear entirely - automation is a living process, after all - but they became manageable. Each stumble taught me something new about Playwright's quirks, my app's behavior, and my own habits as a tester. Like a marathoner who learns to pace themselves, I found my rhythm.
The Medal: Resilience and Results
Looking back, those early failures weren't losses - they were mile markers on the road to learning Playwright capabilities. Playwright didn't just help me automate tests; it taught me resilience, problem-solving, and the value of persistence. Today, my test suite runs like a well-trained runner: steady, strong, and ready for the next race.
So, to anyone struggling with automation failures - whether in Playwright or elsewhere - keep going. The finish line isn't about avoiding falls; it's about getting back up and crossing it anyway. That's the true marathon memory worth keeping.
Remember the late-night infomercials of the early 2000s? One that stands out is Larry Anderson's "JawDroppers." This series of instructional videos promised to teach anyone the secrets of performing mind-boggling magic tricks with everyday items.
In September 2000, these infomercials were in their prime, captivating viewers with the promise of mastering the art of illusion. Larry Anderson, a seasoned magician and Hollywood magic consultant, presented a friendly and accessible approach to learning magic. The appeal of "JawDroppers" lay in its focus on practical, easy-to-learn tricks that could be performed in any social setting.
Here's what made the "JawDroppers" infomercial memorable:
Everyday Magic: The emphasis was on using ordinary objects, making the tricks relatable and achievable.
Clear Instruction: Larry Anderson's teaching style was clear and concise, breaking down each trick into easy-to-follow steps.
The Infomercial Vibe: The classic infomercial format, with its enthusiastic presentation and audience reactions, added to the entertainment value.
Essentially, it was a way for people to learn some really fun party tricks.
If, like me, your last visit to Main Street, U.S.A. at Magic Kingdom was back in February 2017, you're in for some delightful surprises when you return in June 2025! A lot has happened in the heart of Walt Disney World, and Main Street has seen its fair share of updates and enhancements. Let's take a stroll down memory lane and preview what awaits you.
Main Street USA - February 4, 2017
A Nostalgic Look Back: February 2017
Think back to your last visit. In 2017, Main Street was still basking in the glow of the 2016 holiday season. The Citizens of Main Street were entertaining guests, the Dapper Dans were harmonizing, and the classic charm was as strong as ever. But time marches on, even in the Magic Kingdom.
What's New on Main Street, U.S.A.?
Since 2017, Disney has been continuously enhancing the Main Street experience. Here are some of the key changes you'll notice:
Enhanced Entertainment
While the Dapper Dans and Citizens of Main Street remain, keep an eye out for updated character interactions and performances. Disney is always evolving its entertainment offerings to keep things fresh.
Look for the newer cavalcades that are more frequent than the full parades of the past. These offer a more spontaneous feel, and allow for more character appearances throughout the day.
Window Updates
The iconic windows of Main Street are a tribute to the Imagineers and key figures who shaped Disney. While it's tough to pinpoint every single window change without a comprehensive list, Disney does update them periodically.
Keep a close eye out for new names, especially those honoring recent Imagineering contributions. It's a fun game to try and spot the new additions.
Refurbishments and Enhancements
Main Street is a living, breathing part of the park. Regular refurbishments keep it looking its best. Expect to see fresh paint, updated facades, and meticulous attention to detail.
The train station has seen a large amount of updates, and looks better than ever.
Food and Merchandise
While the core dining experiences remain, keep an eye out for seasonal treats and updated menus at places like Casey's Corner and the Plaza Ice Cream Parlor.
The Main Street Confectionery has been re-imagined. It is now a much more open and interactive experience.
The Emporium is always changing its merchandise, so expect to see new items that reflect the latest Disney trends.
Technological Integrations
Disney has been integrating technology into the park experience. Expect to see enhanced lighting, sound, and potentially new interactive elements.
The use of the My Disney Experience app has become even more important.
What to Look For in 2025
Pay attention to the details: Main Street is all about the little things. Look for hidden Mickeys, listen to the background music, and soak in the atmosphere.
Enjoy the entertainment: Take time to watch the cavalcades, listen to the Dapper Dans, and interact with the Citizens of Main Street.
Explore the shops: Browse the Emporium, check out the Confectionery, and find unique souvenirs.
Capture the memories: Take plenty of photos and videos to document your visit.
Use the My Disney Experience App: This app will be your best friend for show times, wait times, and mobile ordering.
Looking Ahead to June 2025
By the time you arrive in June 2025, Disney will likely have introduced even more exciting changes. Keep an eye on official Disney announcements and fan blogs for the latest updates.
Main Street, U.S.A. is a timeless treasure, but it's also a place that evolves with the times. We're excited for you to experience the magic and see the changes for yourself!
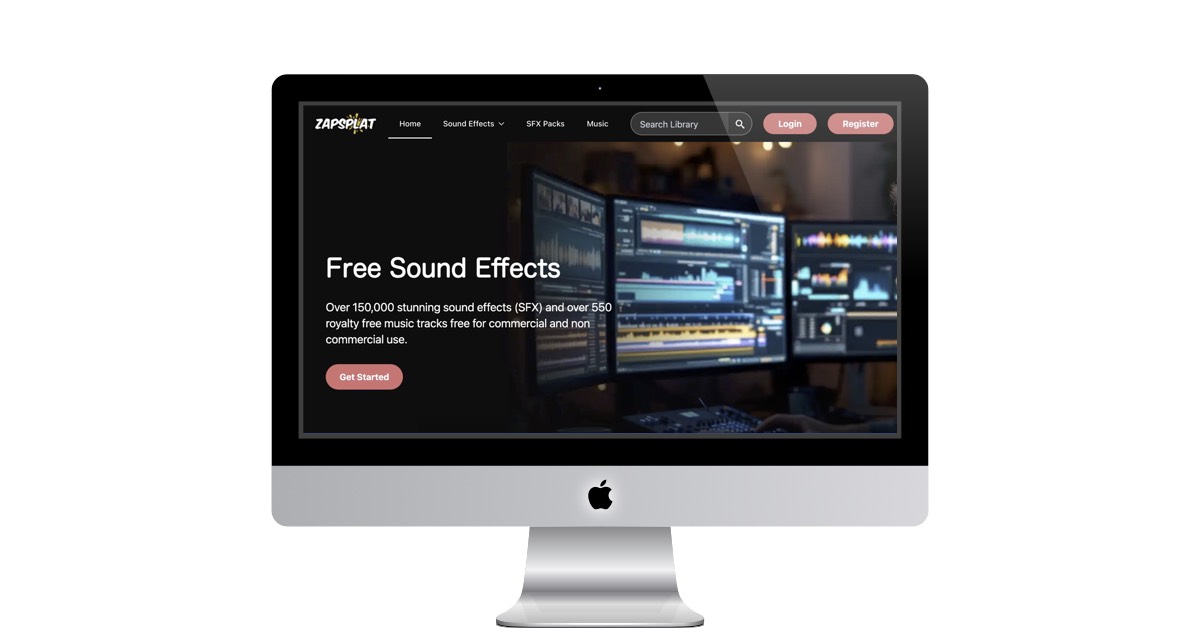
You can never have enough Sound Effects. There's always that one laugh track that you need that would fit the mood, or a Cartoon effect that would make the situation more perfect.
ZapSplat is a great tool to add to your collection. There are over 150,000 unique sound effects and 550 royalty free music to make your sound production better.
The Basic Plan gives you a large section of audio to pick from. If you like the choices, you can sign up for the Monthly Premium Access which gives you a larger selectio to choose from. For about $7 a month it seems reasonable price to get full access to the large library.
Website Description
Over 150,000 stunning sound effects (SFX) and over 550 royalty free music tracks free for commercial and non commercial use.
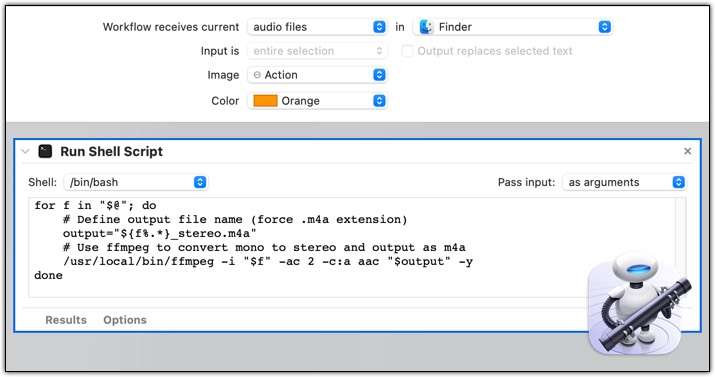
Here's a simple Automator to Convert Mono Audio to a "Stereo" audio.
Why Convert a Mono File?
Wider Soundstage: Stereo files can create a wider soundstage, making the audio feel more immersive and engaging.
Improved Depth: Stereo audio can provide a sense of depth, with sounds appearing to come from different distances. Especially when listening to the audio in a car or on airpods.
Keep in mind that simply converting a mono file to stereo won't magically create a true stereo image. The original recording's limitations will still be present. However, conversion can be a useful step in audio post-production, especially when working with archival or legacy content.
Automator Steps
This will create a new action, so when you right click an audio file in the finder, you can just select "Convert Mono to Stereo."
To do this action, I had to use ffmpeg. There's another blog that I wrote on how to install it. It's a cool media utility to install and it's free!
Open Automator (Finder > Applications > Automator).
Click New Document, then select Quick Action and click Choose.
In the Workflow receives current dropdown, select Audio Files in Finder.
From the Library on the left, search for Run Shell Script and drag it into the workflow area.
In the Shell: command select /bin/bash
In the Pass input: use "as arguments"
Add the Bash Code below.
Save the file as "Convert Mono to Stereo"
Automator Action ScreenShot
Bash Code Used
for f in "$@"; do
    # Define output file name (force .m4a extension)
    output="${f%.*}_stereo.m4a"
    # Use ffmpeg to convert mono to stereo and output as m4a
    /usr/local/bin/ffmpeg -i "$f" -ac 2 -c:a aac "$output" -y
done
In PlayWright, you can easily get the contents of a file to include in a form. This is the getRandomLineFromFile function that I use to open up a local file and get a random line:
asyncfunctiongetRandomLineFromFile(filePath: string): Promise {try{// Read file content and split into linesconst fileContent =await fs.readFile(filePath,'utf8');const lines = fileContent.split('n').filter(line=> line.trim()!=='');// Remove empty linesif(lines.length ===0){thrownewError('File is empty');}// Get random lineconst randomIndex = Math.floor(Math.random()* lines.length);return lines[randomIndex].trim();}catch(error){
console.error(`Error reading file: ${error}`);throw error;}}
I would use this to open up a file that has a random sentence to fill in a feedback form. Here's an example PlayWright with TypeScript entry that I would use:
Testing interactions with external services or complex internal functions can be tricky. You want to ensure your website behaves correctly without relying on the actual implementation, which might be slow, unreliable, or have side effects. That's where pytest-mock's spy comes in!
What is mocker.spy?
mocker.spy lets you wrap any callable (function, method, etc.) and record its calls. You can then assert how many times it was called, what arguments it received, and what values it returned. This is incredibly useful for verifying interactions without actually mocking the underlying implementation.
Why is it cool for website testing?
Imagine you have a website that:
Logs user activity to an external analytics service.
Sends emails for password resets.
Interacts with a third-party API for data retrieval.
Instead of actually sending data to analytics, sending real emails, or hitting the live API, you can use mocker.spy to verify that these interactions occurred as expected.
A Practical Example: Tracking Analytics Events
Let's say your website has a function that logs user interactions to an analytics service:
By incorporating mocker.spy into your website testing strategy, you can create robust and reliable tests that give you confidence in your website's functionality. Happy testing!
In the world of medical device development, risk management is not just a regulatory requirement - it's a critical component of ensuring patient safety. ISO 14971, the international standard for risk management in medical devices, provides a structured approach to identifying, evaluating, and controlling risks throughout the product lifecycle. While traditionally applied to hardware, this standard is equally essential in Software Quality Assurance (SQA), especially as medical devices become increasingly software-driven.
In this blog post, we'll explore the key principles of ISO 14971, how it applies to software development, and why integrating risk management into SQA is crucial for compliance and safety.
Understanding ISO 14971 in Medical Device Development
ISO 14971 provides a systematic framework for manufacturers to identify hazards, estimate risks, implement risk control measures, and monitor residual risks throughout the medical device lifecycle. The standard is recognized by regulatory bodies like the FDA (U.S.) and MDR (EU) as the primary guideline for medical device risk management.
The core steps of ISO 14971 include:
Risk Analysis - Identifying potential hazards associated with the device (including software).
Risk Evaluation - Assessing the severity and probability of each identified risk.
Risk Control - Implementing measures to reduce risks to an acceptable level.
Residual Risk Assessment - Evaluating the remaining risks after controls are applied.
Risk-Benefit Analysis - Determining if the device's benefits outweigh the residual risks.
Production & Post-Market Monitoring - Continuously assessing risks after product deployment.
Since software plays an increasingly vital role in medical devices, ISO 14971 explicitly requires manufacturers to evaluate software-related risks, making it an essential part of Software Quality Assurance (SQA).
How ISO 14971 Relates to Software Quality Assurance
Software Quality Assurance (SQA) focuses on ensuring that medical device software meets regulatory and safety standards while minimizing errors and failures. Because software failures can directly impact patient safety, ISO 14971's risk-based approach is crucial in SQA.
Key Ways ISO 14971 Supports SQA in Medical Devices
1. Identifying Software-Related Risks
Software in medical devices can present unique risks, including:
- Incorrect data processing leading to wrong diagnoses or treatments
- Software crashes that disable critical functions
- Cybersecurity vulnerabilities leading to data breaches or device manipulation
Using ISO 14971's risk assessment methods, SQA teams can identify these hazards early in development.
2. Integrating Risk-Based Testing in SQA
ISO 14971 emphasizes risk reduction, which aligns with risk-based testing (RBT) in SQA. Instead of treating all software components equally, RBT prioritizes high-risk areas (e.g., critical safety functions) for more rigorous testing.
For example, a software bug in an infusion pump that miscalculates dosage could have life-threatening consequences, requiring extensive validation and verification.
3. Risk Control Measures in Software Development
ISO 14971 recommends implementing risk control measures, which in software development may include:
- Fail-safe mechanisms (e.g., automatic shutdown on error detection)
- Redundancy (e.g., backup systems for critical functions)
- User alerts and warnings (e.g., error messages guiding corrective actions)
4. Regulatory Compliance & Documentation
Regulatory agencies require comprehensive documentation to prove compliance with ISO 14971. For software, this includes:
- Software Hazard Analysis Reports
- Traceability Matrices (linking risks to design & testing)
- Verification & Validation (V&V) Evidence
SQA teams must ensure every risk-related software decision is documented, making audits and approvals smoother.
5. Post-Market Software Risk Management
Software risks don't end at release - ISO 14971 mandates continuous monitoring. SQA teams must establish:
- Bug tracking & risk assessment updates
- Incident reporting mechanisms
- Software patches & cybersecurity updates
By aligning with ISO 14971, software teams can proactively address risks throughout the product's lifecycle, reducing regulatory and safety concerns.
Final Thoughts: ISO 14971 and the Future of Software Quality Assurance
As medical devices become more software-dependent, ISO 14971's risk management framework is essential for ensuring software safety and reliability. By integrating risk-based testing, robust control measures, and continuous monitoring, SQA teams can align with international regulations and safeguard patient health.
For medical device manufacturers, embracing ISO 14971 in software quality assurance isn't just about compliance - it's about building safer, more reliable medical technologies.
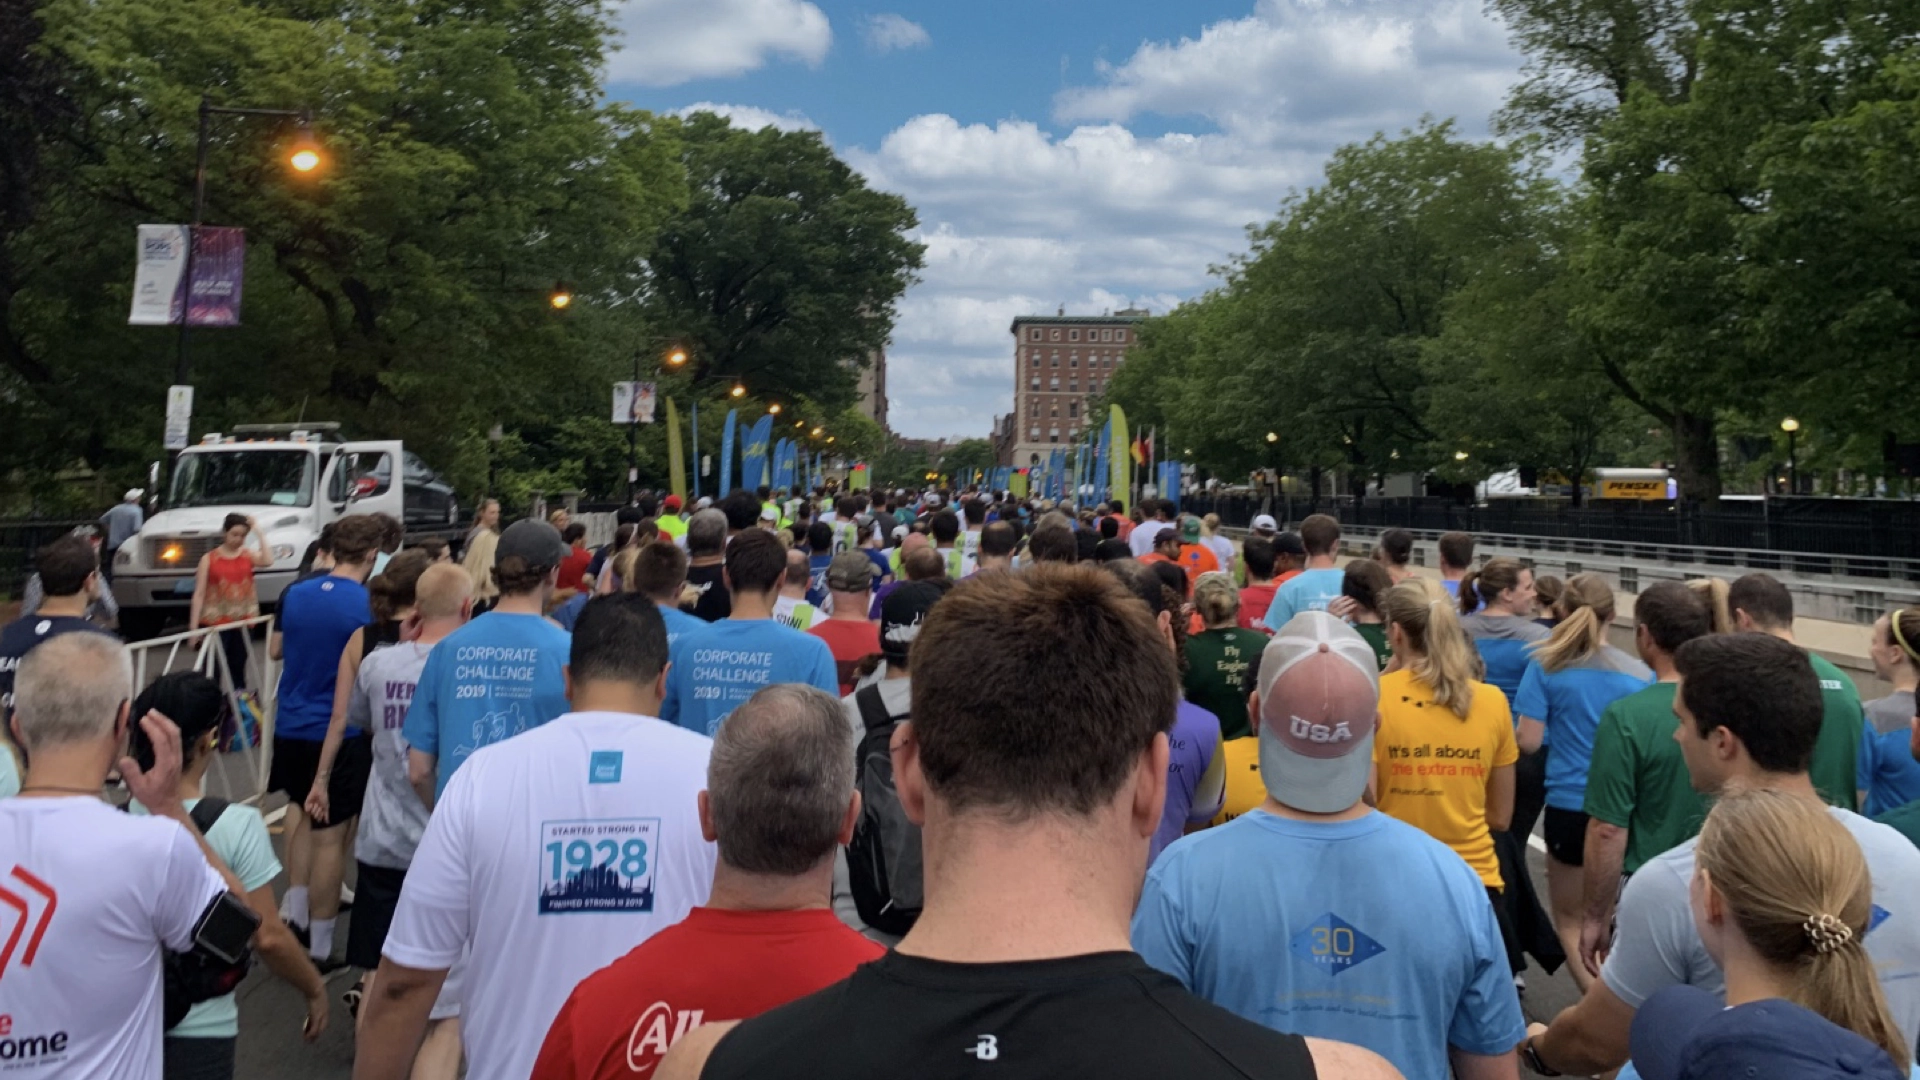
This past weekend, the 2025 competition season kicked off at the DCU Center in Worcester, Massachusetts. If there's one thing I've learned from years of attending dance competitions, it's that preparation is everything - from snagging the best seats to knowing where to find snacks after a long day. Here are some key takeaways from the weekend.
Food Rules? More Like Suggestions.
The DCU Center has a strict no outside food or drinks policy - likely to boost vendor sales. But at $6.25 for a bottle of water, you can't blame people for sneaking in their own supplies. While staff were stationed at the doors, they weren't checking bags, so dancers (wisely) packed their own snacks. The real impact of this rule? It mainly prevented outside food delivery.
Pro tip: Bring snacks for the ride home - you'll thank yourself later when exhaustion hits and everything is closed.
The Best Seats Came With an Unexpected Obstacle
Arriving early paid off, and we grabbed front-row seats. A massive photographer's stand plopped right in the middle of the first three rows. Not ideal for spectators hoping for an unobstructed view, but hey, at least the pictures probably turned out great. Getting early helps get the best spot. IF your dancers dance later in the day, simply arrive early so that you can slowly move up front.
Let There Be Light? or Not
The seating area was dark - so dark that trying to keep track of scores felt like a scene from a spy movie. Scribbling notes blindly wasn't working, so I made a mental note to invest in a light-up pen. (Spoiler alert: Amazon has a ton of great options under $10.) Consider this my pro tip for future competition parents - trust me, you'll need one.
The Elevator Bottleneck and a Smart Exit Strategy
With only one elevator leading to the third floor, getting out at the end of the day was a slow-moving process. To speed things up, I took the dance bag to the car as soon as the final performance wrapped up. This way, everyone else could take the stairs without lugging extra gear, making our exit much smoother.
Final Thoughts
Competitions are long, tiring, and filled with unexpected challenges. But with the right game plan - and maybe a well-timed snack - you can make the day a whole lot easier. Bring your own water (if you dare), grab seats early, invest in a light-up pen, and always have an exit strategy. Here's to a great season ahead!
Royalty-free music is a type of music that can be used in videos, presentations, and other projects without having to pay royalties to the composer. This type of music is often used by businesses and individuals who need to create professional-looking videos or presentations.
There are many different genres and tempos of royalty-free music available. Some of the most popular genres include classical, rock, pop, and jazz. There are also a variety of tempos available, from slow to fast.
Benefits of Using Royalty-Free Music
There are many benefits to using royalty-free music, including:
It is affordable.
It is legal.
It is easy to find.
It is available in a variety of genres and tempos.
If you are looking for high-quality, royalty-free music, I recommend checking out incompetech.com.
Website Description
Large Collection of Music to use in YouTube or Streaming sites.
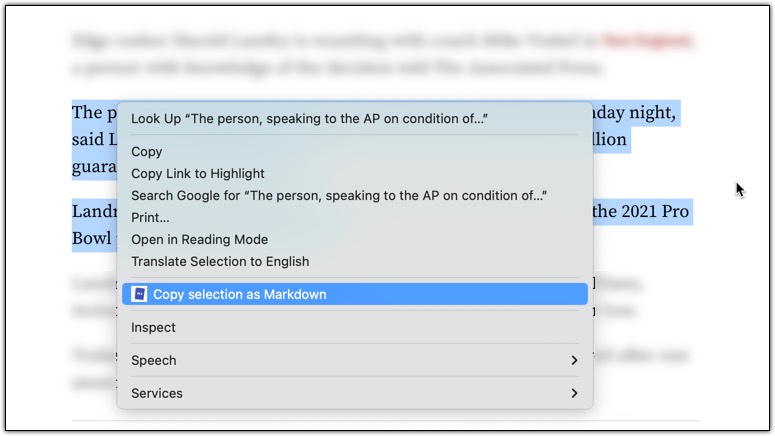
I've noticed that when I paste text from Chrome into DayOne, it strips away formatting like bullet points and headers, leaving the entry looking messy. To address this, I use a Chrome extension called "Copy as Markdown." It simplifies the process by preserving most of the original formatting - think clean bullet lists and bold headers - making my DayOne entries more organized and visually appealing. It's not flawless (it works about 80% of the time), but it's reliable enough to save me effort.
The only drawback is that I have to right-click and select the extension from a menu each time. This extra step can feel tedious, especially when I'm pasting multiple items in a row. Still, for now, it's a solid workaround.
Simply right click to copy the selected content as Markdown.
Extension Info
The extension allows you to copy selected text on a page as Markdown with support for features including the following
Ability to copy links, images, and selected text as Markdown.
Linked images, will have options to individually select link or images.
Formatted text such as Italic, bold, strike-through, and inline code.
Unordered and ordered lists, with task lists support.
Tables, with respect to GFM.
Fenced code blocks, with language detection using info strings.
Note: When copying links and images, Chrome doesn?t let you extract images alt text or anchors text content to be used in Markdown, instead the links themselves are used as link title. Firefox doesn?t have this limitation though.
Playwright page.locator method is designed to find elements dynamically, with built-in support for multiple selector types - including CSS, text, and yes, XPath. While CSS selectors are great for straightforward queries, XPath shines when you need more flexibility or when dealing with complex DOM structures.
Here's why XPath might be your go-to:
Structural Navigation: XPath lets you traverse the DOM based on relationships (e.g., parent, sibling, child) rather than just classes or IDs.
Attribute Precision: Target elements by any attribute, not just class or id.
Text-Based Selection: Easily find elements containing specific text, even partial matches.
Dynamic Pages: XPath can handle scenarios where CSS selectors falter, like when class names are auto-generated or unpredictable.
Playwright's page.locator makes XPath a first-class citizen, so let's see it in action.
Getting Started with page.locator and XPath
The syntax for using XPath in page.locator is simple: prefix your XPath expression with xpath= or use the double-slash shorthand //. Here's the basic structure:
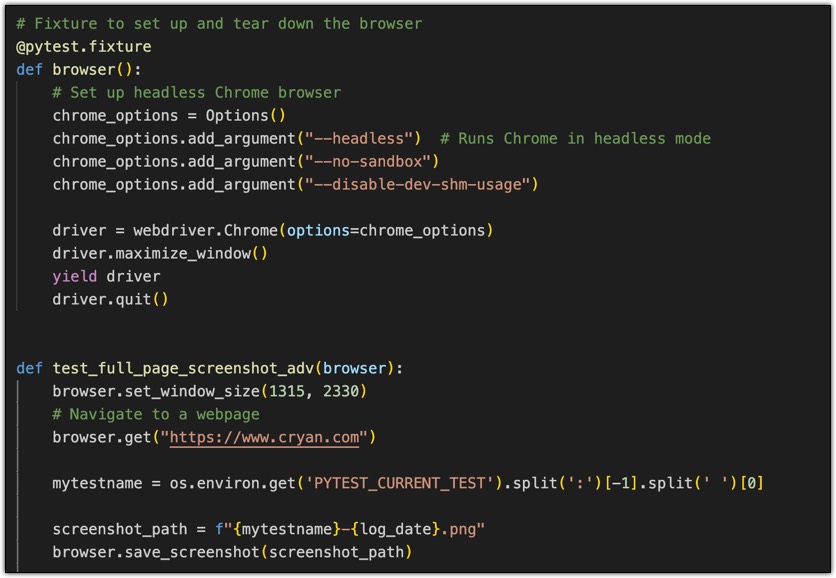
When running UI tests, capturing screenshots can be an invaluable debugging tool. However, managing these screenshots can quickly become chaotic if they are not properly labeled. One effective way to make screenshots easier to organize and track is by incorporating the test name into the filename. This ensures that each screenshot can be traced back to the exact test that generated it.
Capturing the Current Test Name in Pytest
Pytest provides an environment variable called PYTEST_CURRENT_TEST, which contains information about the currently executing test. We can extract the test name from this variable and use it to generate meaningful screenshot filenames.
Here's an example of how to do this in a Selenium-based test:
import os
import time
from datetime import datetime
deftest_full_page_screenshot_adv(browser):
browser.set_window_size(1315,2330)
browser.get("https://www.cryan.com")# Navigate to the test page# Extract the current test name
mytestname = os.environ.get('PYTEST_CURRENT_TEST').split(':')[-1].split(' ')[0]# Create a timestamp for unique filenames
log_date = datetime.now().strftime('%Y-%m-%d-%H-%M')# Define the screenshot path
screenshot_path =f"{mytestname}-{log_date}.png"# Capture and save the screenshot
browser.save_screenshot(screenshot_path)print(f"Screenshot saved as {screenshot_path}")
How It Works
Retrieve the Current Test Name:
The environment variable PYTEST_CURRENT_TEST holds information about the currently running test.
Using .split(':')[-1], we extract the actual test name from the full test path.
Further splitting by spaces (split(' ')[0]) ensures we only get the function name.
Generate a Timestamp:
The datetime.now().strftime('%Y-%m-%d-%H-%M') function creates a timestamp in the format YYYY-MM-DD-HH-MM to ensure unique filenames.
Save the Screenshot:
The test name and timestamp are combined to form a filename.
The screenshot is saved using Selenium's save_screenshot() method.
Why This Matters
Easier Debugging: Knowing which test generated a screenshot makes debugging test failures much simpler.
Organized Test Artifacts: Each screenshot is uniquely named, reducing the chances of overwriting files.
Automated Report Integration: The structured filenames can be linked to test reports, making them more informative.
Final Thoughts
By incorporating the test name into the screenshot filename, you can quickly identify which test generated a particular screenshot. This small tweak can save time when reviewing test results, especially in large automation suites.
Try implementing this in your test framework and see how much easier it becomes to manage your UI test screenshots!
History is full of moments where a lack of communication led to disaster. One of the most infamous? The Boston Massacre of 1770, where a chaotic mix of confusion, fear, and misinterpretation led British soldiers to open fire on a crowd, killing five colonists. While this tragic event changed history, it also serves as a powerful analogy for software quality assurance (QA).
When communication breaks down, whether on the streets of colonial Boston or in a modern software project, the result is chaos. In this post, we'll explore the eerie parallels between the Boston Massacre and software failures caused by poor QA practices - and how you can avoid your own "Massacre Moment."
Miscommunication: The Spark That Lights the Fire
The Boston Massacre began with confusion. Tensions were high between British soldiers and the colonists. A lone sentry was confronted by an angry crowd. Reinforcements arrived, but in the mayhem, someone yelled "Fire!" - whether it was an order or a frightened exclamation is still debated. The result? Gunfire erupted, lives were lost, and history was changed forever.
Now, imagine a software team working with unclear requirements. Developers assume one thing, testers prepare for another, and users expect something else entirely. The result? Bugs, broken features, and angry customers. The digital equivalent of firing into a crowd.
QA Lesson #1: Communicate like your app depends on it - because it does.
Clear requirements are your best defense against project chaos. Make sure expectations are documented, confirmed, and understood by everyone.
Structure Saves the Day
If there had been clearer protocols for handling civil unrest, the Boston Massacre might have been avoided. Similarly, a structured testing process prevents software projects from descending into confusion.
Without test plans, test cases, and well-documented testing strategies, teams rely on gut instinct - just like the soldiers did that night in Boston. That's no way to build stable software.
QA Lesson #2: Structure your QA process.
Write test plans and strategies.
Maintain a test case repository.
Implement a clear defect tracking system.
Without structure, you're one miscommunication away from disaster.
Automation: A Powerful Tool - But Keep It Fresh
Think of test automation like the British Redcoats: powerful, structured, and disciplined. But without proper upkeep and adaptation, automation scripts can become outdated, missing key bugs just like a rigid formation fails in guerrilla warfare.
Just as soldiers had to adapt to colonial resistance tactics, testers must continually update automation scripts to account for new features, changing user behavior, and evolving tech stacks.
QA Lesson #3: Automate smartly, but don't snooze on it.
Automation is only as good as its maintenance. Review and refresh test scripts regularly.
Regression Testing: Your Time-Travel-Proof Safety Net
The aftermath of the Boston Massacre shaped the American Revolution. Its impact didn't end when the gunfire stopped - just as a single software bug can ripple through an entire system long after a release.
Regression testing is your historical safeguard against repeating past mistakes. Just as historians analyze past events to prevent future conflicts, QA teams must re-run critical tests to ensure that today's fixes don't introduce yesterday's bugs.
QA Lesson #4: Regression testing is your insurance policy.
Run automated regression tests with every deployment.
Maintain a historical log of major defects to prevent reoccurrences.
Test like a historian - know what went wrong before to prevent history from repeating itself.
Final Thoughts: Don't Let History Repeat Itself
The Boston Massacre teaches us a critical lesson: miscommunication has consequences - whether in battle or in software. QA isn't just about catching bugs; it's about preventing confusion, ensuring structure, and maintaining order in the software development lifecycle.
So before your project descends into a colonial-style brawl, take a lesson from history: communicate clearly, structure your testing, maintain automation, and never skip regression testing.
Because if you don't, your next release might just be a historical disaster.
I've decided to shake things up a bit with my blog content over the next few months, shifting the focus to provide more value and variety for my readers. Specifically, I'm planning to dive deeper into the world of Software Quality Assurance, sharing practical tips and tricks that I've picked up throughout my career. Here's a detailed breakdown of how I'm restructuring the weekly schedule to keep things fresh, engaging, and informative:
Sunday: Open Topic DayEvery Sunday, I'll let my creativity run wild with an open-topic post. This day is all about flexibility - anything goes! I'll explore intriguing subjects that don't necessarily fit into the structured categories of the rest of the week. My goal is to uncover something unique, thought-provoking, or just plain fun to share with you. Whether it's a random observation, a deep dive into an unexpected idea, or a quirky discovery, Sundays will be a bit of a wild card.
Monday: Media MondayI'm keeping Media Monday as a staple for the foreseeable future. This day has become a favorite for a small but dedicated group of followers, particularly on YouTube, who look forward to my media-related posts. Whether it's a review, a tutorial, or a spotlight on something noteworthy in the media space, I'll ensure there's fresh content to kick off the week. It's a tradition worth preserving, and I'm excited to keep the momentum going.
Tuesday: Quality Assurance TipsTuesdays will be all about Software Quality Assurance, a topic I'm passionate about and eager to explore in greater depth. I'll be sharing bite-sized, practical tips and tricks that can help anyone interested in improving software quality - whether you're a beginner or a seasoned pro. Drawing from my years of experience, I'll cover general insights, common pitfalls, and clever techniques that have proven effective in the field. Expect a mix of foundational advice and creative solutions to everyday QA challenges.
Wednesday: Pytest AutomationMidweek, on Wednesdays, I'll turn my attention to Pytest, a widely-used Python web automation tool. This day will feature actionable tips and tricks to help you get the most out of Pytest for your automation projects. Whether it's streamlining your test scripts, debugging tricky issues, or optimizing workflows, I'll share insights that I've found useful in my own work. If you're a Python enthusiast or just curious about automation, this will be a great spot to pick up some new skills.
Thursday: Playwright AutomationThursdays are reserved for Playwright, another powerful automation tool that I've come to appreciate. I'll be focusing on tips and tricks tailored to this platform, with examples often written in TypeScript - my preferred language for Playwright projects. From setting up efficient test suites to tackling advanced use cases, I'll provide practical guidance to help you harness Playwright's capabilities. Whether you're new to it or looking to refine your approach, there'll be something here for you.
Friday: Macintosh FridayFriday will be all about the Macintosh computer - a topic I enjoy exploring and sharing with fellow Mac users. I'll offer tips and tricks for getting the most out of macOS, from productivity hacks to lesser-known features that can enhance your experience. While I'm not sure if I'll dive into hardware-related content in the next few months, there's plenty of software goodness to cover. Expect a mix of tutorials, shortcuts, and ideas to make your Mac life even better.
Saturday: Internet SaturdayTo wrap up the week, Saturdays will be dedicated to the wonders of the internet. I'll scour the web to find fun, useful, or surprising things to share - think free resources, low-cost tools, or hidden gems that deliver exceptional value. This day is about discovery and delight, offering a lighthearted way to close out the week. Whether it's a cool website, a handy app, or an online oddity, I'll bring something worth checking out.
This revamped schedule reflects my desire to balance consistency with variety, while leaning into my expertise in Software Quality Assurance. I'm excited to see how this unfolds over the coming months and hope you'll join me for the ride! Let me know what you think - or if there's something specific you'd love to see covered.
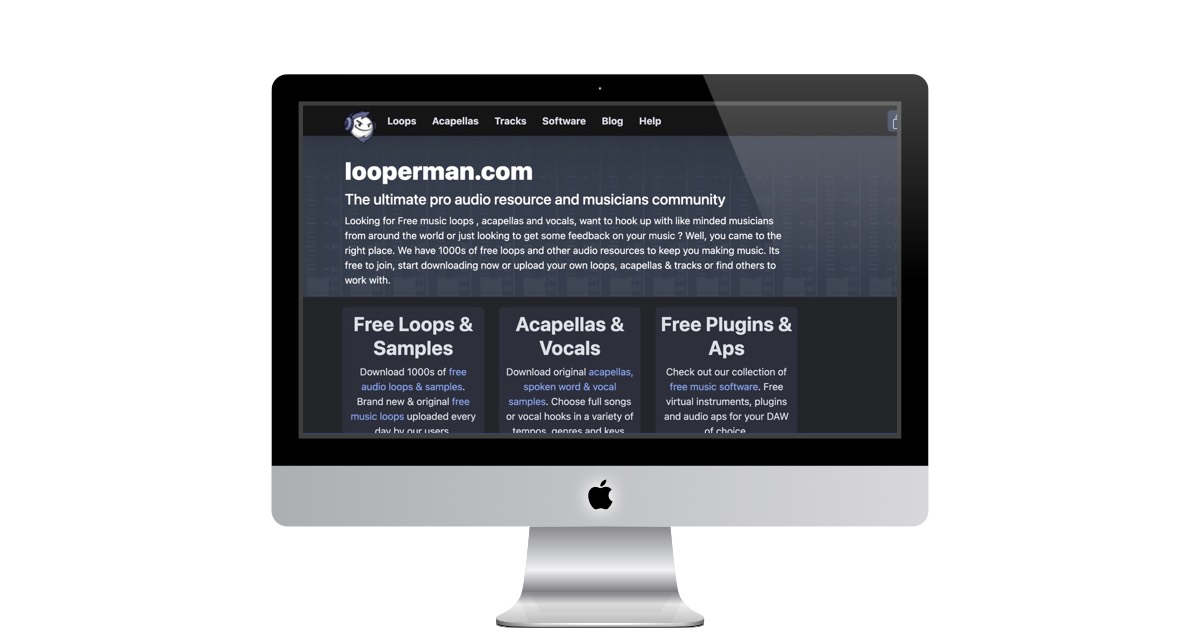
Looperman is a website for musicians that offers a variety of features to help you create and share your music. The website has a large library of loops and samples that you can use in your tracks, as well as a community of users who are always sharing new content.
Features
Looperman Loops: This is the website's main feature. It contains a vast library of loops and samples that you can use in your tracks. The loops are organized by genre, instrument, and tempo, making it easy to find what you need.
Looperman Community: This is a community of musicians who are always sharing new content. You can find forums, blogs, and chat rooms where you can connect with other musicians and get feedback on your work.
Looperman Tools: This section of the website contains a variety of tools that you can use to create and edit your music. These tools include a drum machine, a synthesizer, and a sampler.
Looperman Blog: The blog contains news and reviews about the latest music and technology. It also features interviews with musicians and other industry professionals.
How to Use Looperman
To use Looperman, you first need to create an account. Once you have an account, you can start browsing the library of loops and samples. You can also use the tools to create your own music.
Once you have created a track, you can share it with the Looperman community. You can also submit your tracks to be featured on the Looperman website.
Website Description
Looking for Free music loops , acapellas and vocals, want to hook up with like minded musicians from around the world or just looking to get some feedback on your music ? Well, you came to the right place. We have 1000s of free loops and other audio resources to keep you making music. Its free to join, start downloading now or upload your own loops, acapellas & tracks or find others to work with.
Welcome to cryan.com's main blog page! Here you'll find a diverse collection of informative posts covering topics ranging from technology and lifestyle to career advice. There's something here for everyone.
We are committed to delivering the highest quality content, ensuring you have access to the most current and reliable information.