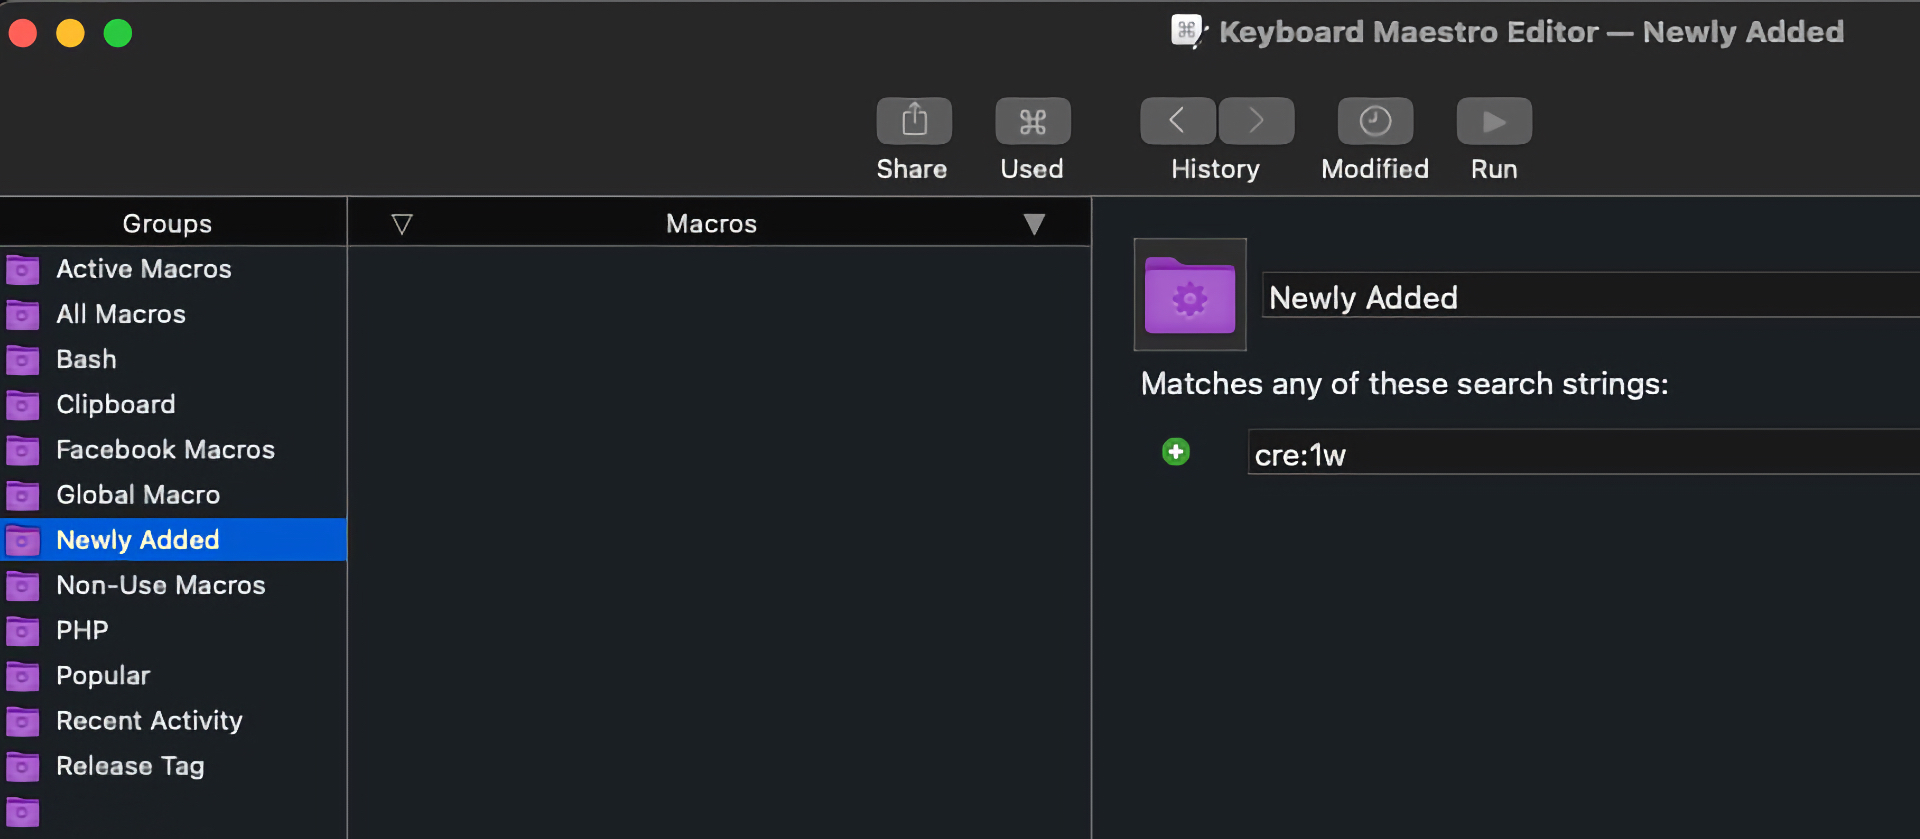
Keyboard Maestro is a powerful tool for automating tasks on your Mac, but with its potential comes a growing library of macros. To help you keep track of your latest creations, let's create a Smart Group to highlight "Newly Added Macros."
Understanding Smart Groups
Before we dive in, let's quickly recap what Smart Groups are in Keyboard Maestro. Essentially, they're dynamic groups of macros that automatically update based on specific criteria. This is where the "cre:" search string comes in handy.
Creating the "Newly Added Macros" Smart Group
Open Keyboard Maestro.
Navigate to the Groups section.
Click the Cog button at the bottom of the Groups column to create a new Smart Group.
Name the group "Newly Added" or any name you prefer.
Defining the Search Criteria
Now, it's time to set up the search criteria for your Smart Group. This is where the "cre:" search string will be used.
In the Smart Group editor, in the search field, type cre: a week. This will include any macro created within the last week. You can adjust the time period as needed (e.g., "cre: 3 days" for macros created in the last three days).
Using Your New Smart Group
Your "Newly Added Macros" Smart Group will now automatically populate with any macros created within the specified timeframe. This is a great way to:
Quickly reference new keystrokes: Often, the hardest part of creating a new macro is remembering the trigger. This Smart Group makes it easy to see what you've created recently.
Review new automation: Use this group to evaluate the effectiveness of your new macros and make adjustments as needed.
Identify potential conflicts: Checking your newly added macros can help prevent conflicts with existing ones.
Additional Tips
Experiment with different timeframes: Depending on your macro creation frequency, you might find different timeframes more useful.
Combine search criteria: You can use additional search strings to further refine your Smart Group (e.g., "cre: a week and tag: Automation").
Create multiple Smart Groups: Consider creating Smart Groups for different categories of macros (e.g., "Newly Added Utilities," "Newly Added System") for better organization.
By leveraging Smart Groups and the "cre:" search string, you can efficiently manage your growing Keyboard Maestro library and ensure that your latest creations are always within reach.
Are you looking for a delicious gluten-free pasta option? Look no further than Le Veneziane from Molino di Ferro. This company, located in a historic mill in Italy, uses traditional methods and high-quality ingredients to produce a variety of gluten-free products, including cornmeal, cookies, and bread substitutes.
Le Veneziane pasta is made from the finest Italian corn, ensuring a delicious and authentic taste. Unlike some gluten-free pastas that can be mushy or flavorless, Le Veneziane pasta retains its shape and texture when cooked, providing a satisfying eating experience.
Molino di Ferro's commitment to quality and tradition extends to all of their products. They use sustainable ingredients and time-honored methods to create delicious and nutritious food options for everyone.
So whether you're following a gluten-free diet or simply looking for a new and flavorful pasta option, Le Veneziane is a great choice. With its commitment to quality and tradition, Molino di Ferro is sure to satisfy your taste buds.
"If you've been in the deepest valley, can you ever know how magnificent it is to be from the highest mountain." - Richard Nixon
This quote, from a man often shrouded in controversy, offers a profound insight into the human experience. It's a statement that transcends politics, resonating with anyone who has faced adversity.
Nixon, a figure who climbed to the pinnacle of power only to fall from grace, perhaps understood the stark contrast between life's extremes better than most. His words suggest a unique perspective, born from the crucible of his own experiences.
The Valley and the Mountain
The metaphor is clear. The "deepest valley" symbolizes life's lowest points – those moments of profound despair, loss, or failure. It's a place where hope can seem distant, and the future bleak. Yet, it's precisely these experiences that can equip us with a profound understanding of human resilience and the capacity for growth.
The "highest mountain," on the other hand, represents the peaks of human achievement, joy, and fulfillment. It's a place of clarity, perspective, and immense satisfaction. But Nixon's point is that the true appreciation for these heights comes from having known the depths.
The Journey, Not the Destination
This quote invites us to consider the journey as much as the destination. It's about recognizing that challenges are not merely obstacles, but opportunities for growth and transformation. It's about finding meaning and purpose in the darkest of times, knowing that these experiences can ultimately lead to a richer, more fulfilling life.
While Nixon's legacy is complex, this particular quote offers a timeless message of hope and perseverance. It's a reminder that even in our lowest moments, there is potential for greatness. And when we do reach the summit, we carry with us a depth of understanding and gratitude that might otherwise be missing.
Objective: The objective of this daily planner is to help you apply strategic principles from "The Art of War" by Sun Tzu to enhance your productivity, achieve your goals, and navigate daily challenges effectively.
Morning Preparation:
Assess the Current Situation:
Identify your goals for the day.
Evaluate potential obstacles or conflicts that may arise.
Understand the strengths and weaknesses you possess.
Know Yourself and Your Enemy:
Analyze your own abilities, skills, and limitations.
Consider the challenges and competition you may encounter.
Understand the environment you'll be operating in.
Set Priorities:
Determine the most important tasks aligned with your goals.
Identify tasks that require immediate attention.
Assign a priority level to each task based on their significance.
Strategize:
Identify potential strategies and approaches to accomplish your goals.
Determine the best course of action for each task.
Anticipate potential obstacles and plan countermeasures.
Daily Plan:
Morning Offensive:
Begin with tasks that require the most focus and energy.
Utilize your strengths to tackle challenging tasks.
Stay flexible and adapt your strategy if needed.
Afternoon Defensive:
Address routine tasks and respond to incoming demands.
Guard against distractions and maintain focus.
Delegate tasks that can be handled by others, if possible.
Maneuver and Adapt:
Continuously assess the progress of your tasks.
Adjust your strategies based on emerging opportunities or challenges.
Make proactive decisions to maintain your advantage.
Take Advantage of Opportunities:
Identify opportunities that arise during the day.
Seize them swiftly and exploit them effectively.
Maintain awareness to spot potential advantages.
Maintain Communication:
Keep open lines of communication with relevant stakeholders.
Collaborate with others to achieve shared goals.
Adapt your communication style to different individuals.
Evening Reflection:
Evaluate the outcomes of your day.
Analyze successes and failures objectively.
Reflect on what you've learned and apply it to future planning.
Rest and Recover:
Ensure sufficient rest to recharge your energy.
Engage in activities that promote relaxation and rejuvenation.
Prepare yourself mentally for the challenges of the next day.
Remember to adapt these strategies to your specific needs and circumstances. The Art of War principles are meant to guide your decision-making process and foster a strategic mindset throughout your daily activities.
In the world of web design and content creation, placeholder text is a necessity. Enter the Lorem Ipsum Generator by Website Planet, a tool designed to simplify the process of generating dummy text. Whether you're a web designer, developer, or content marketer, this tool can be a game-changer.
What is Lorem Ipsum?
Lorem Ipsum is a type of placeholder text that has been used since the 1500s. It originates from the Latin phrase "dolorem ipsum," meaning "pain itself." Instead of repeatedly writing "your content here," Lorem Ipsum provides a semi-normal distribution of words and letters, making it ideal for mockups and design drafts.
Features of the Lorem Ipsum Generator
Ease of Use: The generator allows you to create text with just one click. You can choose the number of paragraphs, sentences, words, or characters you need.
Customization: You can select between standard text, rich text, or HTML format. Additionally, the tool supports both left-to-right and right-to-left text directions.
Free and Accessible: There are no hidden costs, making it a completely free resource for anyone in need of placeholder text.
Why Use a Lorem Ipsum Generator?
Using a Lorem Ipsum generator can save you time and effort, allowing you to focus on other critical aspects of your project. It's especially useful for:
Web Designers: Quickly fill in content areas to visualize the layout and design.
Developers: Test how text will appear in different sections of a website or application.
Content Marketers: Create mockups for presentations or client approvals.
Website Description
Our lorem ipsum tool was created with web designers, webmasters, and content marketers in mind. If you need placeholder text for content that is not yet created, you can utilize this tool, and better yet, there are no hidden costs, it’s completely free. This way, graphic designers, full stack developers…etc. can focus on other core elements, such as creating graphical elements and creating the page layout. Right before the webpage is set to launch, you switch out the lorem ipsum text with the text ready for publication. Without this text, the quality of a webpage cannot be fully realized.
As a seasoned Final Cut Pro user, you might be wondering if there's another video editing software that can match its robust capabilities while offering some fresh, innovative features. Enter Wondershare Filmora 13, a powerful tool that has recently introduced a slew of new features designed to enhance your editing experience. Let's dive into what makes Filmora 13 a compelling choice for Final Cut Pro enthusiasts.
I recently embarked on a digital archaeology expedition through my old floppy disks, and I stumbled upon a treasure trove: an Educorp disk labeled "Mark III Shareware." For those unfamiliar with the term, "shareware" was essentially the early internet, allowing software developers to distribute their creations freely for trial before purchasing.
To decipher the contents of this relic, I had to consult my trusty Educorp catalog. Imagine my surprise when I discovered this single disk housed a whopping 10 applications! The mastermind behind this collection was Andrew Welch, a name that might ring a bell to those familiar with the early Mac scene, as he later founded Ambrosia Software.
This collection is a veritable goldmine for retro Mac enthusiasts. Here's a quick rundown of the software gems I found:
Black Box: A Feature-Packed System Enhancer
Think of Black Box as a Swiss Army knife for your Mac. It added a task strip (a precursor to the Dock), an analog clock, screen saver, and a host of keyboard shortcuts and system enhancements. It was like having a personal assistant for your computer, all packed into a single application.
Clarity: Photo Reduction Made Easy
In the days before digital cameras and high-resolution printers, resizing images was a challenge. Clarity stepped in to save the day, allowing users to easily reduce photo sizes to fit different printers.
Easy Envelopes Plus: Mail Made Simple
This DA (desktop accessory) streamlined the process of creating envelopes. From custom sizes to graphics and return addresses, Easy Envelopes Plus had it all.
FlashWrite: Quick and Dirty Note-Taking
A minimalist text editor that resided in the system, FlashWrite was perfect for jotting down quick notes or editing clipboard content.
Label Manager: Organize Your World
If you needed to print labels but didn't want to invest in a pricey database, Label Manager was your go-to solution. It supported various label sizes, printers, and offered sorting capabilities.
Memoir DA: Keep an Eye on Your Memory
A simple but essential tool, Memoir DA displayed your Mac's available memory, helping you manage resources effectively.
Optical: A Visual Diversion
While not strictly utilitarian, Optical offered a mesmerizing optical illusion to help you relax or simply enjoy a moment of visual intrigue.
ProFont: Crisp and Clear Text
Programmers and anyone working with text from other computers appreciated ProFont, which provided a truly monospaced typeface for consistent character spacing.
QuickCard: Phone Numbers at Your Fingertips
This CDEV (control panel device) made dialing phone numbers a breeze. You could quickly enter and store numbers, and even replay them through the Mac's speaker.
To Do! DA: Stay Organized
A timeless tool, To Do! DA helped you create, manage, and prioritize your tasks efficiently.
Discovering this forgotten treasure trove has been an absolute delight. It's a testament to the ingenuity and creativity of early software developers, and it offers a fascinating glimpse into the evolution of computer software.
Do you have any other old software gems you'd like to share?
Visual Studio Code (VS Code) is a popular Integrated Development Environment (IDE) favored by developers for its flexibility, performance, and extensive customization options. One of the standout features of VS Code is its ability to create and use code snippets. These snippets can significantly boost productivity by allowing developers to quickly insert frequently used code templates, thereby reducing the need for repetitive typing.
However, despite the power and convenience offered by VS Code snippets, there are certain limitations that can restrict their effectiveness. This is where Keyboard Maestro, a powerful macOS automation tool, comes into play. In this blog post, we'll explore how Keyboard Maestro can be used to overcome some of these limitations, allowing you to create a more efficient and customized coding experience.
Limitations of Visual Studio Code Snippets
Before diving into the solutions, let's take a closer look at some of the key limitations of VS Code snippets:
Lack of Logic Execution:
VS Code snippets are primarily static text templates. They don't support executing logic or running scripts as part of the snippet expansion. This can be a limitation when you need to generate code dynamically based on certain conditions or calculations.
Limited Trigger Options:
Snippets in VS Code can only be triggered by typing specific prefixes, which might not be the most efficient method for all use cases. For instance, you might want to trigger a snippet based on specific UI events or keystrokes.
No Interaction with Other Applications:
VS Code snippets can't interact with other applications or system-level features. This means you're limited to the capabilities within the editor and can't leverage macOS-specific functionalities or tools.
Dynamic Content Insertion:
Snippets don't allow for dynamic content, such as inserting the current date, user input, or file names, unless manually programmed within the snippet.
Complex Snippet Structure:
Complex snippet structures, like multi-line or nested code blocks with various levels of indentation, can be cumbersome to create and manage.
Why Use Keyboard Maestro?
Keyboard Maestro is a robust automation tool for macOS that allows you to create macros to automate tasks across various applications. It excels in situations where traditional shortcuts and snippets fall short. Here are some reasons why Keyboard Maestro can be an excellent complement to VS Code snippets:
Conditional Logic:
Keyboard Maestro can execute complex scripts and logical operations, allowing for dynamic code generation based on conditions or user input.
Custom Triggers:
You can trigger macros using a wide range of inputs, including specific keystrokes, mouse clicks, or even system events, providing more flexibility than VS Code's snippet triggers.
Inter-application Automation:
Keyboard Maestro can interact with other applications and system features, enabling cross-application workflows that aren't possible with VS Code snippets alone.
Dynamic Content and Variables:
Easily insert dynamic content like dates, file names, or clipboard contents into your code with the help of variables and conditions.
Complex Code Structures:
Automate the insertion of complex, multi-line code structures without worrying about formatting issues.
Setting Up Keyboard Maestro with Visual Studio Code
Now that we've covered why Keyboard Maestro is beneficial, let's explore how you can set it up to enhance your VS Code experience. Here's a step-by-step guide:
Step 1: Install Keyboard Maestro
If you haven't already, download and install Keyboard Maestro from the official website. Once installed, open the application to start creating your macros.
Step 2: Create a New Macro
Open Keyboard Maestro and click on the + button at the bottom-left corner to create a new macro.
Give your macro a descriptive name, such as "Insert Timestamp in VS Code."
Step 3: Set a Trigger
Click on the "New Trigger" dropdown.
Choose the desired trigger type. For instance, you might select "Hot Key Trigger" to assign a specific key combination.
Step 4: Add Actions
This is where the magic happens. You can add multiple actions to create complex workflows.
We recently had the pleasure of dining at The Capital Grille in Chestnut Hill, Massachusetts, for a special occasion: a 50th birthday celebration. This restaurant is conveniently located directly across from the Chestnut Hill Mall, right off the eastbound side of Route 9. Our dining experience included my 13-year-old daughter, who has celiac disease, making gluten-free dining a priority for us. Here's what we learned from our visit.
About The Capital Grille
The Capital Grille is a renowned upscale steakhouse known for its elegant ambiance, exceptional service, and expertly prepared dishes. From dry-aged steaks to fresh seafood, each menu item is crafted with high-quality ingredients, ensuring a dining experience that caters to the most discerning palates. The sophisticated decor and refined atmosphere make it an ideal spot for celebrating special occasions or enjoying a memorable meal with loved ones.
Four Things We Learned
1. Gluten-Free Bread Options
To our delight, The Capital Grille offers gluten-free bread, which comes as two sandwich slices. This thoughtful touch allows those with gluten sensitivities to enjoy bread alongside their meal, a rare find in fine dining establishments. It's always nice when a restaurant considers the needs of diners with dietary restrictions right from the start.
The Capital Grille Grille Bread
2. Creamed Spinach is Not Gluten-Free
While many items were available for gluten-sensitive diners, we did encounter a hiccup with the Creamed Spinach. Unfortunately, it is not gluten-free, a fact we discovered only when the dish was served. Our waiter informed us of this detail at the table, which was a bit disappointing as it would have been preferable to know when ordering, allowing us to choose a different side dish. This experience serves as a reminder to always double-check specific dish ingredients with your server if you have any dietary concerns.
3. Dry Aged NY Strip
The Dry Aged NY Strip was a highlight of our meal. Our waiter took extra care to ensure that everything in our order was gluten-free, making us feel confident and comfortable with our choices.
The Capital Grille Dry Aged NY Strip
The steak was served at the same time as other dishes, seamlessly blending into the dining experience. In some restaurants, dishes made with dietary considerations are brought out separately by the manager, indicating that the kitchen has taken extra care. While that didn't happen here, the attentiveness of our waiter reassured us of their commitment to a safe dining experience. And most importantly, the steak was excellent, satisfying the most discerning of tastes.
4. Flourless Chocolate Espresso Cake
No meal is complete without dessert, and the Flourless Chocolate Espresso Cake was the perfect ending to our evening. This decadent dessert was absolutely delicious, and my daughter, Juliana, savored every bite. The rich flavors and perfect texture made it a memorable dish that beautifully complemented our celebration.
The Capital Grille Flowerless Cake
Great Meal!
Overall, our impression of The Capital Grille was very positive. Everyone at the table enjoyed their meal, and the attention to gluten-free dining was much appreciated. While The Capital Grille is undoubtedly an upscale and expensive restaurant, it's well worth the price for special occasions. The ambiance, service, and, most importantly, the food make it a dining destination that we'll likely revisit for future celebrations.
Final Thoughts: If you're looking for a place that accommodates gluten-free dining without compromising on taste and quality, The Capital Grille in Chestnut Hill is a fantastic option. Just be sure to ask specific questions about menu items to ensure a seamless dining experience.
We look forward to returning to The Capital Grille for another special occasion. Until then, we'll fondly remember our enjoyable evening celebrating a milestone birthday with delicious food and good company.
Have you ever received a call from someone claiming you were involved in a car accident that you have absolutely no recollection of? If so, you're not alone. These pesky phone scams have been making the rounds, trying to convince unsuspecting people that they are entitled to compensation for accidents that never happened.
I recently had one of these entertaining conversations, and I decided to have a little fun with it. I'll share the story below, along with an audio recording of the call.
The Call That Made Me Laugh
Imagine this: you're going about your day, and suddenly your phone rings. It's an unknown number, but you decide to answer. On the other end is someone with an official-sounding voice, trying to convince you that you were involved in a car accident and that you can claim compensation. Sounds suspicious, right?
The caller started with the usual spiel, insisting that I was involved in a car accident recently. Now, I've had my fair share of mishaps, but nothing like what they were describing. I decided to flip the script and play along.
The Deer Incident
With the most serious tone I could muster, I told the caller that my "accident" involved a deer. Yes, a deer! According to the scammer's logic, I should be able to claim compensation from the deer. Good luck with that, right?
The caller was taken aback, and hung up the phone. (Don't they do any kind of checking before they call-)
Here's the audio recording of that call for your amusement:
Why These Scams Work
The unfortunate truth is that these scams can be convincing and, sadly, effective. Many people fall victim to them because they are caught off guard or fear missing out on potential compensation. Scammers often use aggressive tactics, insisting on the legitimacy of their claims and urging immediate action.
These scammers often target individuals who might not remember every detail of their driving history, especially if they've been in a legitimate accident before. They use vague descriptions and pressure tactics to convince you that you might be owed money.
How to Protect Yourself
Here are a few tips to protect yourself from falling victim to such scams:
Stay Calm and Verify: If you receive a call about an accident you don't remember, stay calm and ask for specifics. Scammers often lack details and will try to keep the conversation vague.
Do Not Share Personal Information: Never give out personal information such as your address, social security number, or financial details over the phone unless you are sure of the caller's identity.
Ask for Documentation: Legitimate claims should be accompanied by official documentation. If they can't provide any, it's likely a scam.
Trust Your Instincts: If something feels off about the call, it probably is. Hang up and do your own research or contact your insurance company directly.
Report the Call: If you suspect a scam, report the call to your local authorities or the Federal Trade Commission (FTC). This helps prevent others from falling victim to the same tactics.
Spread the Word
Scams like these are becoming increasingly common, and it's important to spread awareness. By sharing our stories and staying informed, we can protect ourselves and others from falling prey to such tactics.
I'd love to hear your experiences with phone scams! Have you had a similar call? Did you play along, or did you hang up right away? Let me know in the comments below.
Stay vigilant and keep your sense of humor handy. Sometimes, the best way to deal with scammers is to give them a dose of their own medicine, with a touch of humor.
Ensuring your business is visible online is essential. Business citations, which mention your business name, address, and phone number (NAP) on websites and directories, play a significant role in this visibility. Accurate and consistent citations enhance your local SEO and improve your search engine rankings. This article will guide you on how to audit and update your business citations for better results. Following these unique tips can enhance your online presence and attract more customers.
Understanding Business Citations: The Basics
Business citations are essential for local SEO because they help search engines verify your business information. Search engines are more likely to trust your business when your NAP details are consistent across various platforms. This trust translates into better rankings and increased visibility. Citations can appear on multiple platforms, including business directories, social media profiles, and review sites. Understanding the importance of these citations is the first step toward improving your online presence.
The Role of Professional Citation Services
Companies that provide citation services are essential for businesses looking to manage and optimize their online citations effectively. As a leading professional citation service, azcitationservices.com specializes in maintaining accurate and consistent business information across various platforms, such as Google My Business, Yelp, and other online directories. They offer services that include citation building, citation auditing, and citation cleanup, ensuring that your business's details are correct and up-to-date everywhere they appear. By using advanced tools and industry expertise, their services help improve your local search rankings, boost your online visibility, and attract more customers. Partnering with them saves you time and effort and allows you to focus on other critical aspects of your business while they enhance your online presence for better results.
Use professional citation services to keep your business information consistent and up-to-date across all platform
Tools and Resources for Auditing Citations
Several tools can assist you in conducting a thorough citation audit. Platforms like Moz, BrightLocal, and Yext offer comprehensive solutions for tracking and managing your business citations. These tools can scan the web for mentions of your business and highlight inconsistencies. They also provide options for updating incorrect information directly through their interfaces. While free tools are available, investing in paid resources can offer more detailed insights and greater convenience.
Step-by-Step Guide to Auditing Your Business Citations
Conducting a citation audit involves several steps. First, create a comprehensive list of all existing citations. This list should include directories, social media profiles, and review sites where your business information appears. Next, check each citation for accuracy, ensuring that your NAP details match exactly across all platforms. Document any errors or inconsistencies you find. This documentation will serve as a reference when you update your citations.
Why Regular Audits Are Essential
Regular citation audits are essential for maintaining the accuracy and consistency of your business information. Over time, information can become outdated due to changes in address, phone number, or other business details. Identifying and correcting these discrepancies can prevent potential customers from encountering incorrect information, which can damage your reputation. Further, incorrect citations can confuse search engines, leading to lower rankings. Hence, regular audits ensure your citations remain up-to-date and accurate.
Regularly audit and update your business citations to maintain accuracy and improve your local SEO rankings.
How to Update Your Business Citations
To update your business citations, correct the errors identified during your audit. Contact the directories and platforms where the incorrect information appears and request updates. Many platforms allow you to make these changes directly through your business account. Ensure that your NAP information is consistent and accurate. Consistency is important because even small discrepancies can impact your search engine rankings. Taking the time to update your citations will significantly improve your online visibility.
Ensuring Consistency Across All Platforms
Consistency in your business citations is vital for effective SEO. Inconsistent NAP details can confuse search engines and potential customers. Ensure your business information is uniform across all platforms, including Google My Business, Yelp, and other major directories. Regularly review and update your information to maintain this consistency. Maintaining consistency in your citations may raise your search engine results and establish credibility.
Leveraging New Citation Opportunities
In addition to maintaining existing citations, seek out new citation opportunities. Submitting your business information to new directories can expand your citation network and increase your online visibility. Look for reputable directories k. Submitting accurate and detailed information to these platforms can attract new customers and boost your search engine rankings. Expanding your citation network is a proactive way to enhance your online presence.
Monitoring and Maintaining Your Citations
After updating your business citations, establish a routine for regular monitoring. Set up alerts and notifications to be informed of any changes to your citations. Keeping a record of all updates and changes can help you track your progress and maintain accuracy. Regular maintenance ensures that your citations remain accurate and consistent, contributing to sustained improvements in your search engine rankings.
Set up alerts to be informed of any changes to your citations
Common Mistakes to Avoid
When auditing and updating your business citations, avoid common pitfalls. Duplicate listings can confuse search engines and dilute your SEO efforts. Ensure that each citation is unique and accurate. Also, pay attention to the categorization of your business. Incorrect categorization can affect your visibility in search results. You can optimize the advantages of your citation efforts by clarifying these errors.
The Importance of Accurate Citations for Local SEO
Accurate citations are a cornerstone of effective local SEO. When search engines crawl the web, they use the consistency of your business information to verify your legitimacy and relevance. If your business name, address, and phone number are consistent across multiple trusted sources, search engines are more likely to rank your business higher in local search results. This improved visibility can lead to increased traffic, both online and offline. Further, accurate citations help potential customers find and contact your business easily, enhancing their trust and likelihood to engage with your services. In short, maintaining accurate citations is an essential strategy for boosting your local SEO efforts and growing your business.
Summary
Auditing and updating your business citations is essential for improving your online visibility and search engine rankings. Regular audits, accurate updates, and consistent monitoring are key to maintaining effective citations. Take these steps to regularly audit and update your business citations for better results and a stronger online presence.
Looking for high-quality movie posters for your project?
The Internet Movie Poster Awards website is a great resource. It boasts a massive collection of posters for movies from 1912 to the latest releases. You can easily search for specific films or browse by release date.
This website is a perfect source, especially if you're planning a 70s, 80s, or 90s themed party!
Check out the Internet Movie Poster Awards for all your movie poster needs.
Website Description
Internet Movie Poster Awards - One of the largest collections of movie poster images online.
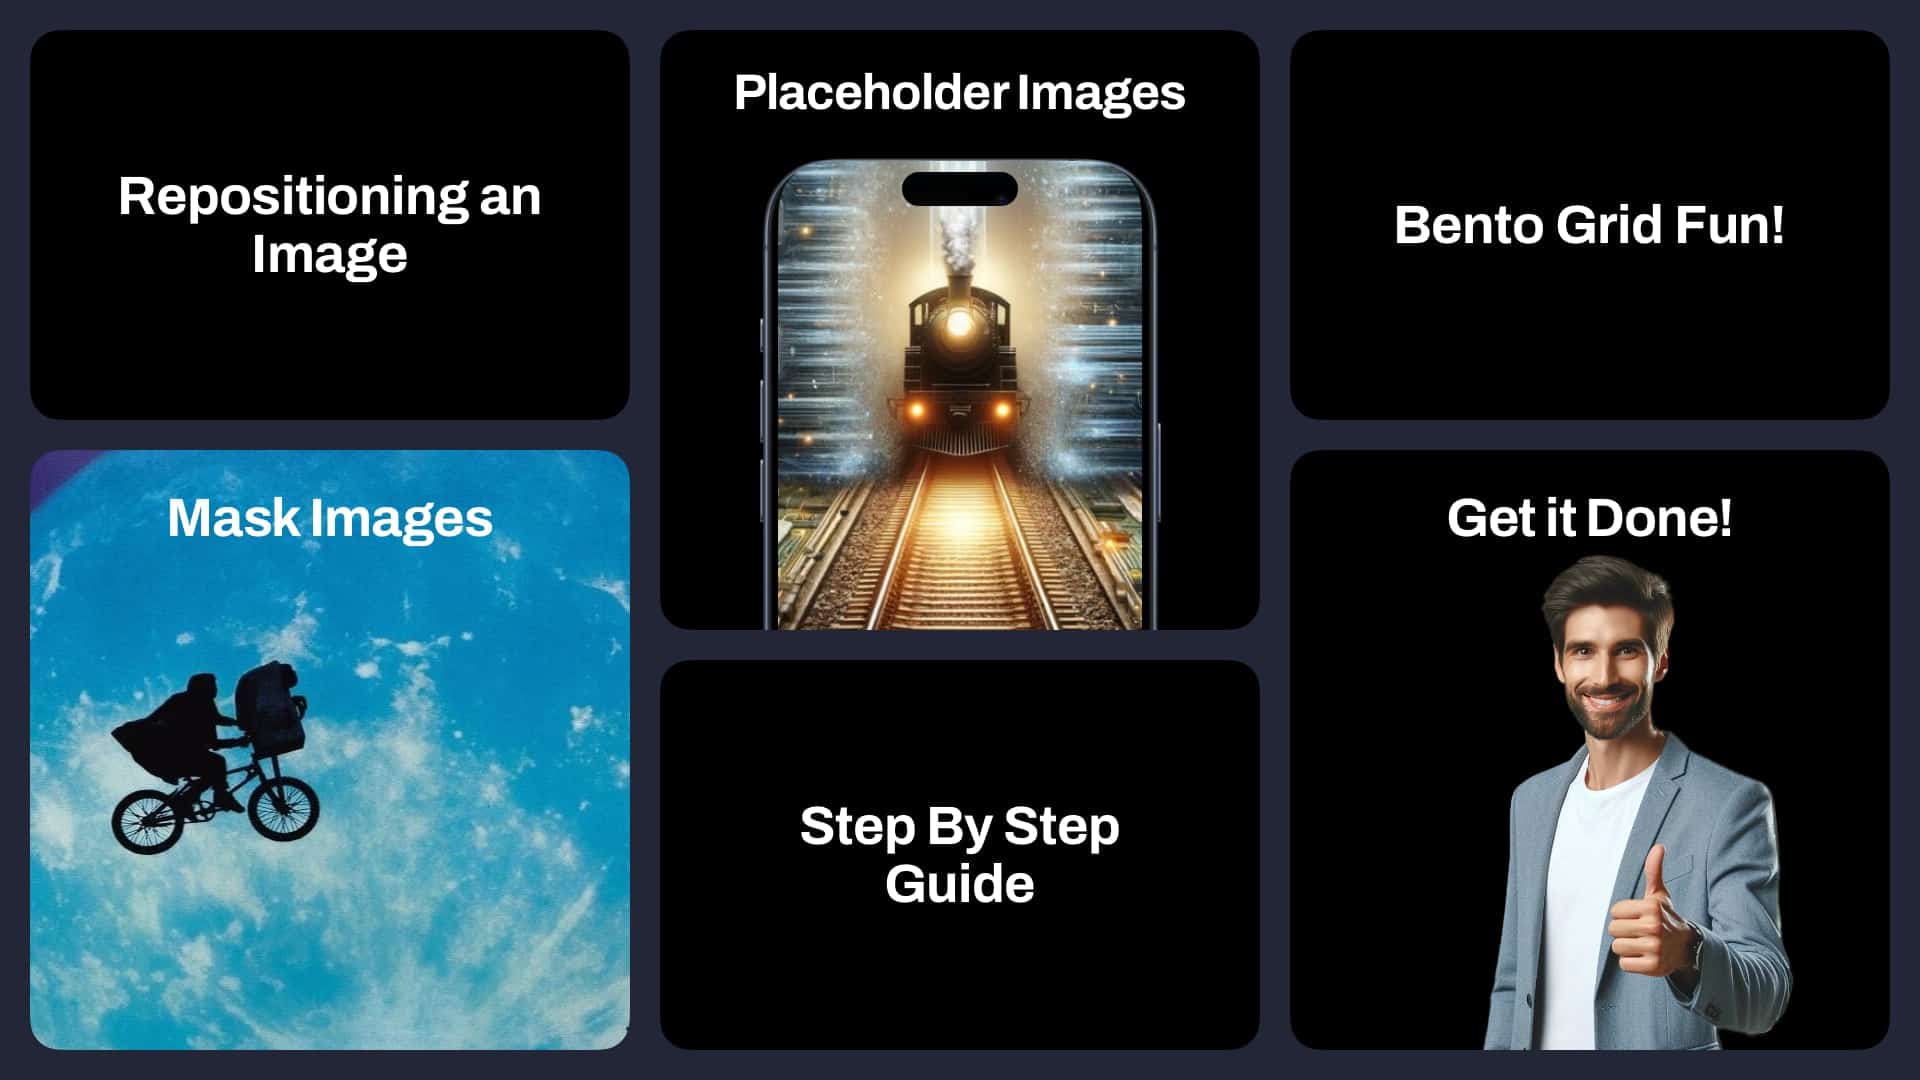
Pixelmator Pro continues to be a versatile tool for creatives, and with the introduction of the Bento Grid template in April, creating visually appealing collage-style images has never been easier. This template mimics the sleek, organized image displays commonly seen in Apple's Keynote presentations.
However, one challenge you might encounter is repositioning an image within a masked placeholder, such as the iPhone Placeholder layer. Attempting to move the image often results in the entire placeholder shifting, which can be frustrating. Fortunately, there's a simple solution to this problem. Here's a step-by-step guide to adding an image to the Bento Grid and repositioning it within a masked layer.
Step-by-Step Guide
Upload an Image
Begin by uploading your image using the '+' button. This adds the image to the placeholder in the Bento Grid.
Navigate to the Appropriate Layer
In the Layers palette, locate Section 3. This section contains the iPhone Placeholder layer where you'll be working. Click on the arrow to expand that section.
Unlink the Mask
Right-click on the 'Display' layer in Section 3 and select "Unlink Mask". This action will allow you to manipulate the image without affecting the mask.
Select the Media Placeholder Layer
Click on the Media Placeholder Layer. This is where your image is positioned within the mask.
Reposition the Image
Using the Arrange Tool, reposition the image within the placeholder until you achieve the desired look. Adjust the image to ensure it fits perfectly and enhances your overall design.
Relink the Mask
Once you're satisfied with the image placement, right-click on the 'Display' layer again and select "Link Mask". This final step ensures the mask is reapplied correctly to your adjusted image.
Unlink the Mask is the key to having the freedom to move the image around.
Conclusion
Repositioning an image within a masked layer in Pixelmator Pro's Bento Grid doesn't have to be a hassle. By unlinking the mask, you gain the flexibility to move your image freely, ensuring it aligns perfectly within your design. This simple technique allows you to create professional, polished visuals with ease.
Experiment with different images and placements to make the most of the Bento Grid template, and enjoy the creative possibilities Pixelmator Pro offers. Happy designing!
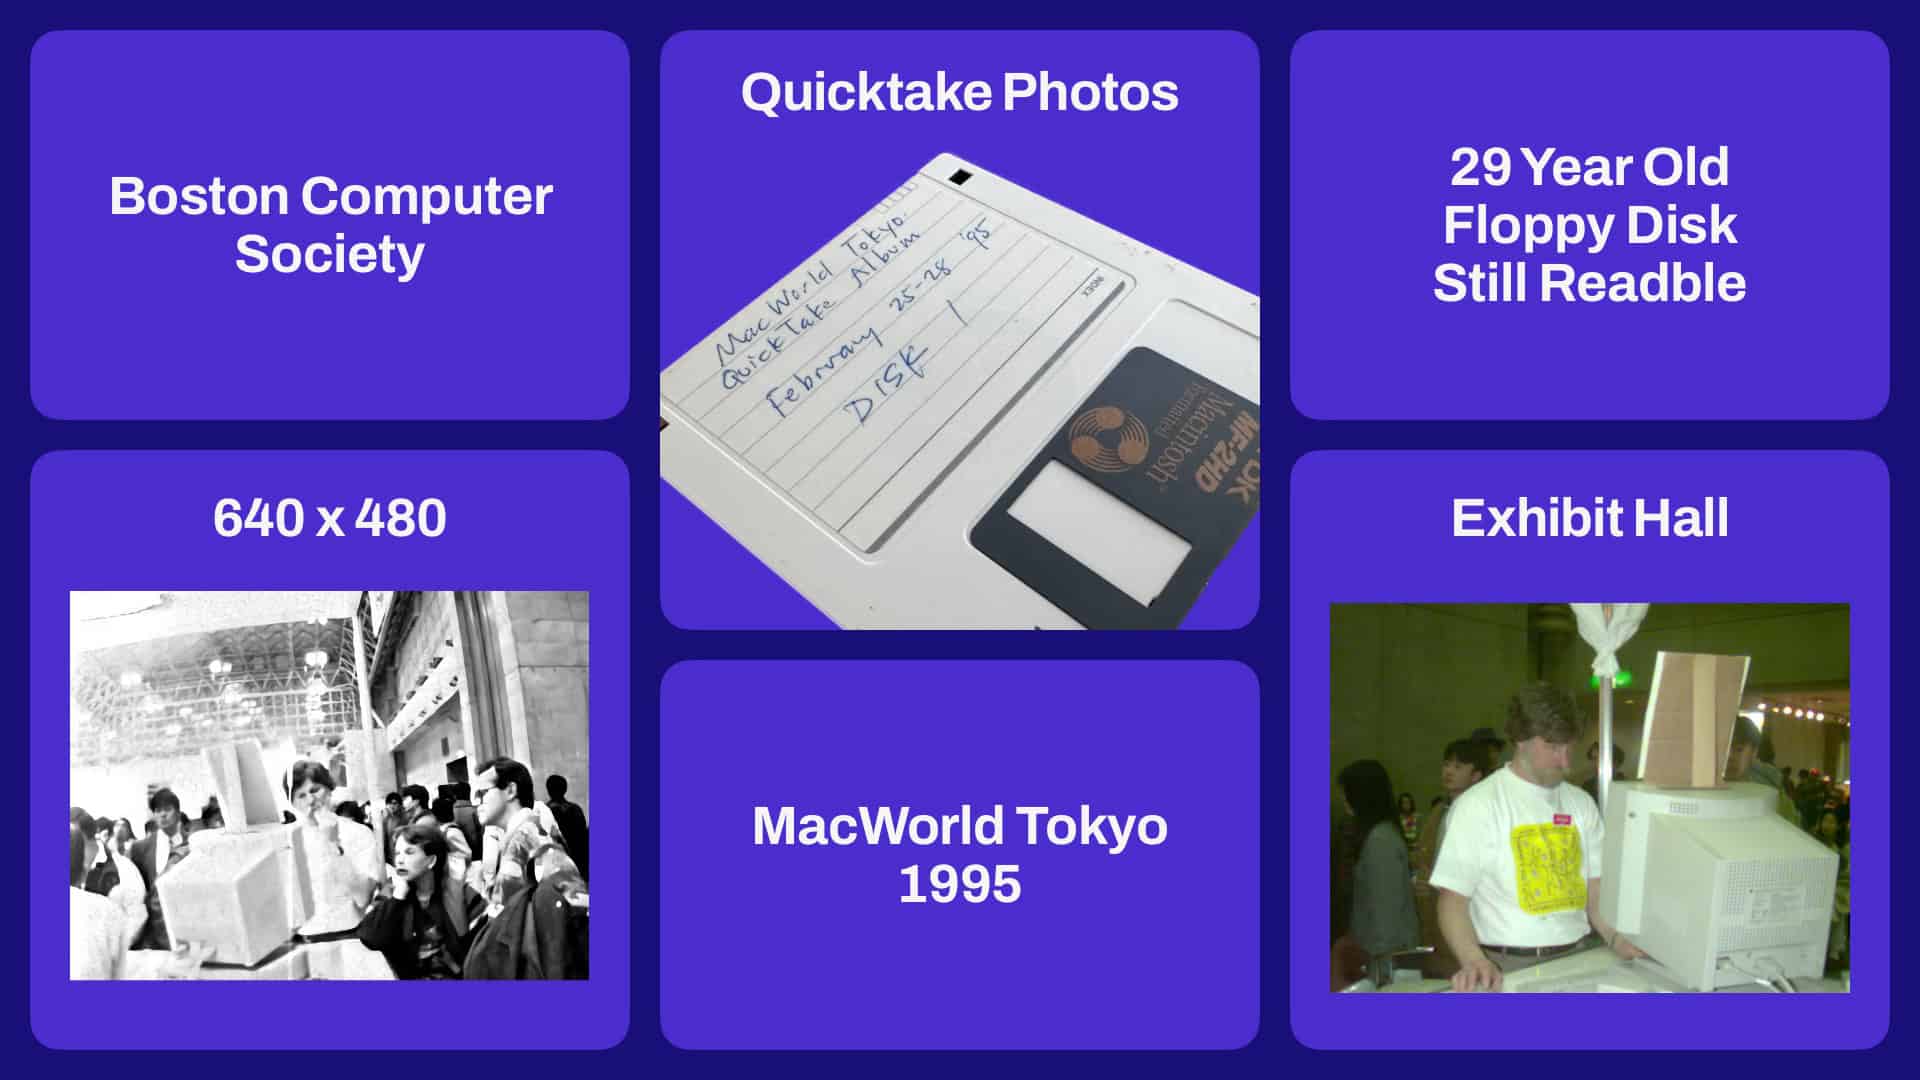
Last month, as I was cleaning up my closet, I stumbled upon a trove of old floppy disks. Among them was a particularly intriguing one given to me many years ago. This disk contains a treasure trove of photos from the 1995 MacWorld show in Tokyo. The photos were taken by a volunteer from the Boston Computer Society, a non-profit organization dedicated to helping people learn about computers. Their booth at MacWorld Tokyo was a hub of excitement, and someone armed with an Apple QuickTake 200 Camera captured the vibrant atmosphere of the exhibit hall.
One of the floppy disks that I found. This just shows how importaint it is to label media files.
Four Things I Learned from This Find
1. The Apple QuickTake 200 Camera
The Apple QuickTake 200, an early digital camera, was used to capture the photos. It produced images with a resolution of 640 x 480 pixels, and each photo was about 121 KB in size. In today's world of multi-megapixel cameras, it's fascinating to see how far technology has come.
2. Converting QuickDraw Format
The photos were stored in QuickDraw format, which isn't easily viewable using modern software like Apple Preview. I had to use Graphic Converter to convert these images into a more accessible format. It's a reminder of how much digital formats have evolved over the years and the importance of preserving old software tools.
3. The Longevity of Floppy Disks
I found three floppy disks from the trade show, and only one of them wasn't working. Considering these disks are 29 years old, it's quite impressive that the other two were still readable. It's a testament to the durability of floppy disks, despite their limited storage capacity by today's standards.
4. A Piece of History: The 1995 MacWorld Expo Tokyo Poster
While exploring this find, I discovered that the 1995 MacWorld Expo Tokyo poster is selling for $95 on eBay. I have a copy, and the backside of the poster features a young Bill Gates, just months before the announcement of Windows 95. This poster is not just a piece of memorabilia; it's a snapshot of a pivotal moment in tech history.
A couple of people that I found on the floppy disk.I used Pixelmator to increase the resolution.
Reflecting on MacWorld Tokyo 1995
MacWorld Tokyo 1995 was a significant event, bringing together tech enthusiasts and industry pioneers from around the world. The Boston Computer Society's presence at the event highlighted the importance of community and education in the rapidly evolving world of technology. The photos I uncovered provide a glimpse into that era, capturing the excitement and innovation that defined the mid-90s tech scene.
Preserving Digital Memories
Finding these photos and being able to convert and view them again was a nostalgic and enlightening experience. It underscores the importance of preserving our digital past, even as we move forward into an increasingly digital future. Each floppy disk, each photo, and each piece of memorabilia from events like MacWorld Tokyo 1995 is a valuable artifact that tells the story of our technological journey.
As I continue to explore and digitize these old floppy disks, I look forward to uncovering more hidden gems and sharing them with you. Stay tuned for more adventures in digital archaeology!
Do you have any memories from MacWorld Tokyo 1995 or similar events? Have you ever stumbled upon old digital media that brought back a flood of memories? Share your stories in the comments below!
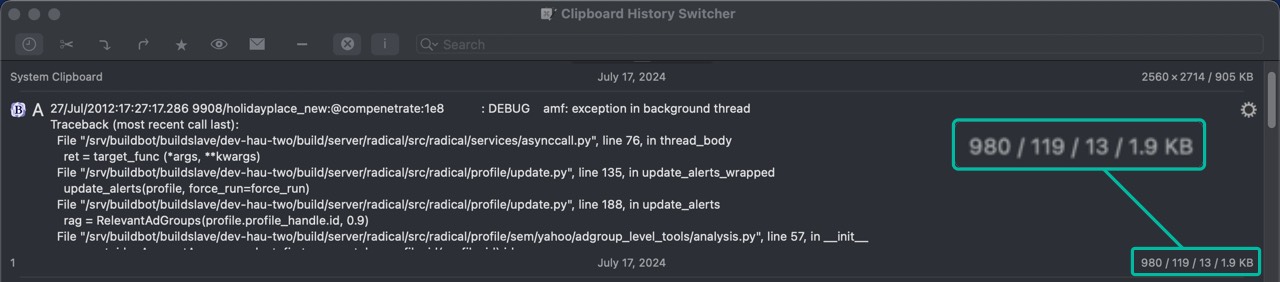
Ever copied something and wished you could analyze it before pasting? Struggling to remember that specific piece of text you copied a while back? Keyboard Maestro's Clipboard History Switcher comes to the rescue, offering a treasure trove of information about your clipboard contents.
More Than Just Pasting: A Peek into Your Clipboard
Sure, the Clipboard History Switcher lets you select and paste previous clipboard items, but that's just the tip of the iceberg. When you activate the switcher (by default, with the Command-Control-Shift-V shortcut), you're presented with a window displaying your clipboard history. But here's the real kicker: for each text snippet, the Clipboard History Switcher provides a wealth of metadata:
Character Count: Instantly see the exact number of characters in your copied text. This is perfect for adhering to character limits in forms, social media posts, or code snippets.
Word Count: Need a quick word count? No problem! The switcher displays the number of words, giving you a sense of the text's length.
Line Count: Working with text that spans multiple lines? The switcher shows the line count, helping you visualize the structure of your copied content.
Clipboard Size: Ever wondered how much space that copied image or text is taking up? The switcher displays the clipboard size, giving you a heads-up on potential memory usage.
Making Informed Pasting Decisions
This information empowers you to make informed decisions about what to paste. Imagine copying a lengthy passage and needing just a specific excerpt. With the character and word count displayed, you can quickly identify the relevant section without manually counting.
Similarly, the line count helps you understand the structure of copied code or formatted text, allowing you to paste it seamlessly into your target destination.
Keyboard Maestro: Your Clipboard Management Powerhouse
The Clipboard History Switcher is just one aspect of Keyboard Maestro's robust clipboard management features. This automation powerhouse lets you not only manage your clipboard history but also manipulate clipboard content in various ways.
So next time you copy something, don't just paste blindly. Use Keyboard Maestro's Clipboard History Switcher to gain valuable insights into your clipboard contents and make informed pasting decisions. It's a simple yet powerful tool that can streamline your workflow and boost your productivity.
Natick, MA - As a parent, finding safe and delicious treats for children with dietary restrictions can often feel like a never-ending quest. But our recent visit to Park Street Ice Cream & Cafe in Natick was a delightful surprise!
My 13-year-old daughter, who has celiac disease, has always faced limitations when it comes to ice cream. However, the moment we stepped into Park Street Ice Cream & Cafe, a wave of excitement washed over her. This beloved Natick institution, known for its delectable slushes and an array of ice cream flavors, proved to be a haven for those with dietary needs.
The staff at Park Street Ice Cream & Cafe was incredibly accommodating. My daughter confidently ordered a scoop of chocolate ice cream, and the staff ensured that the scooper was clean before serving her. This simple gesture made a world of difference and showcased their commitment to serving customers with allergies or dietary restrictions.
The chocolate ice cream itself was a hit! Rich, creamy, and utterly satisfying, it was a moment of pure joy for my daughter. It’s a testament to Park Street Ice Cream & Cafe’s dedication to quality and flavor that they can offer such a delicious treat for those with celiac disease.
Juliana enjoying her ice cream.
Beyond the ice cream, Park Street Ice Cream & Cafe offers a charming atmosphere, perfect for enjoying a sweet treat with family and friends. Its prime location on the Natick Commons makes it a convenient stop after exploring the town or attending an event.
If you’re looking for a place where everyone can indulge in a delicious dessert, Park Street Ice Cream & Cafe is a must-visit. Their commitment to accommodating dietary restrictions, coupled with their fantastic ice cream, makes it a standout spot in Natick.
Have you been to Park Street Ice Cream & Cafe? Share your favorite flavor or experience in the comments below!
### Beware of the Latest Scammer Tactic: Fake Capitol One Fraud Alerts
In today's digital age, scams have evolved to become more sophisticated and convincing. Recently, I encountered a new scam technique that everyone should be aware of. The scam involves receiving a voice message supposedly from the Capitol One fraud unit, alerting you to suspicious activity on your credit card. While this might sound like a helpful warning, it's actually a cleverly disguised phishing attempt. Here's my experience with it and how you can protect yourself.
The Voice Message
I received a voice message from someone claiming to be from the Capitol One fraud unit. The message was alarming: someone had apparently charged $285 at CVS using my Capitol One card. The urgency in the caller's voice made the message seem legitimate, and their intention was clear - they wanted me to call back immediately to resolve the issue.
The Red Flags
Despite the convincing nature of the message, several red flags stood out:
I Don't Have a Capitol One Card: This was the most glaring inconsistency. How could there be a charge on a card I don't even own?
Vague Information: The message didn't include specific details like the last four digits of the card number, which is something legitimate fraud alerts usually provide.
Call Back Urgency: Scammers often create a sense of urgency to prompt immediate action without giving you time to think or verify the information.
How the Scam Works
The goal of this scam is to trick you into calling the provided number. Once you call, the scammer will likely ask for personal information to "verify your identity." This can include your full name, date of birth, Social Security number, and other sensitive details. With this information, they can commit identity theft, open new accounts in your name, or make unauthorized purchases.
Protecting Yourself
Here are some steps to protect yourself from falling victim to such scams:
Check Your Accounts: Regularly monitor your bank and credit card statements for any unauthorized transactions.
Be Skeptical of Urgency: Scammers often create a false sense of urgency. Take your time to verify the information before taking any action.
Report the Scam: Notify your bank and report the scam to the Federal Trade Commission (FTC) or your country's relevant authorities.
Conclusion
Scammers are always coming up with new ways to deceive unsuspecting individuals. By staying vigilant and knowing how to recognize the signs of a scam, you can protect yourself from falling victim to these tactics. Always verify any suspicious messages with your bank directly and never give out personal information to unverified sources.
To see the actual voice message I received, check out the video below. This is a perfect example of how convincing these scams can be, but remember, staying informed and cautious is your best defense.
Who knew a simple GoPro backpack clip could elevate your golf cart experience? I recently discovered a hidden gem that's transformed the way I capture my golfing adventures.
I've always wanted to record the scenic drives around the golf course, the camaraderie with my buddies, and those epic shots from different angles. But finding a secure and versatile mounting solution for my GoPro was always a challenge. That is until I stumbled upon the humble backpack clip.
Why the Backpack Clip Works Brilliantly:
Easy Installation: The clip securely attaches to the top of the golf cart frame, requiring no additional tools or modifications.
Versatility: The clip allows you to adjust the GoPro's angle, giving you the freedom to capture both the course and the occupants of the cart.
Stability: Despite its simplicity, the clip provides surprisingly good stability, even when the cart is traversing bumpy terrain.
Compactness: The clip is lightweight and doesn't obstruct the cart's functionality or your view.
My Vamson Backpack Clip on the Golf Cart at Ocean Edge in Brewster, Massachusetts.
Capture Every Moment:
With the GoPro mounted on the backpack clip, you can effortlessly record:
Stunning Course Views: Capture the beauty of the golf course as you drive around, from lush fairways to breathtaking water hazards.
Hilarious Cart Shenanigans: Record those unforgettable moments with your golfing buddies – from epic celebrations to questionable shot choices.
Swing Analysis (Sort Of): While not a professional setup, you can still get some interesting angles of your swing by positioning the GoPro accordingly.
Tips for Optimal Results:
Experiment with Angles: Try different GoPro angles to find the perfect perspective for your desired shots.
Secure the Clip: Ensure the clip is firmly attached to the cart to prevent accidental drops.
Battery Life: Given the continuous recording, make sure your GoPro has a fully charged battery or consider using a portable charger.
Next time you hit the golf course, give the GoPro backpack clip a try. You might be surprised at the creative and engaging content you can capture. It's a simple yet effective solution that will undoubtedly enhance your golfing experience.
Have you tried using a backpack clip for your GoPro on a golf cart? Share your tips and experiences in the comments below!
Have you ever struggled to convert an image into clean HTML and CSS code? If so, you're not alone. This can be a time-consuming and tedious task. But what if there was a tool that could do it for you in seconds?
That's where img2html comes in. This AI-powered tool is designed to take the hassle out of image-to-code conversion. Simply upload your image, and img2html will generate the corresponding HTML and CSS code for you.
How img2html Works
img2html uses artificial intelligence to analyze an image and identify the different elements it contains. The tool then generates the corresponding HTML and CSS code to create a replica of the image on a web page.
Features of img2html
Convert images to clean, semantic HTML and CSS code
Generate up to 5 different layouts from a single image
Supports various frameworks, including Bootstrap and Foundation
Easy to use, with no coding experience required
Free to use
Website Description
Img2html revolutionizes web design with its advanced AI technology. It simplifies the design process for both new and experienced users, allowing for the creation of stunning websites quickly and efficiently. Experience the future of web design by starting with Img2html today.
It's been a while since I last shared the list of applications that I keep in my macOS dock. These are the tools that I find essential for my day-to-day tasks, from browsing the web to creative design and video editing. Here’s a rundown of the applications that I consider important and use frequently:
Browsers
Google Chrome My go-to browser for most online activities due to its speed, extensive extension support, and seamless integration with Google services.
Microsoft Edge A solid alternative to Chrome, especially for its privacy features and integration with Microsoft services.
Vivaldi A highly customizable browser that I use for specific tasks that require a personalized browsing experience.
Firefox Known for its strong privacy features and flexibility, Firefox is a reliable backup and sometimes my primary browser for privacy-focused browsing.
Development and Code Editing
Transmit An excellent FTP client that makes managing server files straightforward and efficient.
BBEdit A powerful text editor I use for coding, text manipulation, and general editing tasks.
Visual Studio Code My primary code editor, packed with features and extensions that cater to various programming needs.
Writing and Notes
Day One An excellent journaling app that helps me keep track of personal and professional reflections.
Notes Apple's built-in note-taking app that syncs seamlessly across all my devices for quick and easy access to important information.
Productivity and Communication
Terminal A must-have for command-line tasks, scripting, and managing macOS systems more efficiently.
Mail Apple's Mail app, which I use to manage my various email accounts in one unified inbox.
Microsoft Teams Essential for communication and collaboration with colleagues, especially for remote meetings and project coordination.
Screen Capture and Video Editing
Snagit 2024 A versatile screen capture and recording tool that’s perfect for creating tutorials and documentation.
Wondershare Filmora A user-friendly video editing software that I use for creating and editing videos quickly.
Auto Reframe Handy for automatically reframing video content for different aspect ratios, making my video editing workflow more efficient.
Final Cut Pro My main video editing software, offering powerful features for professional video production.
Motion Used alongside Final Cut Pro, Motion allows me to create stunning motion graphics and animations.
Automation and Efficiency
Keyboard Maestro An automation tool that boosts my productivity by automating repetitive tasks and creating complex workflows.
LaunchBar A powerful application launcher and productivity tool that speeds up my workflow by allowing quick access to apps, files, and more.
Design and Image Editing
Affinity Designer 2 A vector graphic design software that’s great for creating detailed illustrations and design work.
Pixelmator Pro A robust image editing tool with a range of features for photo enhancement and graphic design.
Amadine Another vector graphic design app that I use for creating illustrations and vector art.
PhotoScape X A versatile photo editing software with a wide range of tools for editing, collage making, and more.
Conclusion
These applications are not just icons on my dock; they are essential tools that help me stay productive, creative, and efficient in my daily tasks. Each serves a unique purpose, whether it’s browsing the web, coding, writing, communicating, or creating stunning visuals. I hope this gives you a glimpse into the tools I rely on and perhaps inspires you to explore some of these applications for your own workflow.
A few years ago, I came across an invaluable resource that quickly became a staple in my digital toolkit - the Web Tools CD for Macintosh. This CD, rich with Internet graphic files, provided a treasure trove of design elements that were both versatile and user-friendly. Let's take a walk down memory lane and explore what made this CD so special.
Unpacking the Web Tools CD
The Web Tools CD was more than just a collection of graphic files; it was a comprehensive resource designed to enhance the web design experience. Here’s a snapshot of the ReadMe file that accompanied the CD, highlighting some important operational notes and guidelines:
Compatibility Considerations: WebTools™ was designed to operate optimally without the use of RamDoubler or Virtual Memory. Users were advised to turn these extensions off before launching the software to avoid any performance issues.
QuickTime Integration: For maximum functionality on both Mac and Windows platforms, installing QuickTime was recommended. The CD conveniently included Mac QuickTime 2.1 and QuickTime for Windows 2.01 in the Extras folder, ensuring that users had everything they needed right out of the box.
Enhanced Visuals: To enjoy the vibrant 24-bit color graphics, users needed to set their monitors to 24-bit color mode and launch WebTools while holding down the Option key. This simple step unlocked the full potential of the CD's graphical content.
Usage and Licensing: All design elements on the disk were freely available for incorporation into web pages. However, there was a stipulation that these elements could not be offered as downloadable files. For detailed information, users were directed to the “Copyright and Licensing Information” chapter of the manual.
The Value of Web Tools CD
The Web Tools CD stood out for several reasons:
Rich Graphic Library: It offered a diverse range of graphic files, including icons, backgrounds, and other design elements that were essential for creating visually appealing web pages.
Ease of Use: The CD was user-friendly, making it accessible even for those who were not professional designers. The inclusion of QuickTime ensured smooth operation across different platforms.
Creative Freedom: Users had the freedom to incorporate the design elements into their web pages without worrying about licensing issues, provided they adhered to the guidelines.
Technical Support: The ReadMe file and manual provided clear instructions and troubleshooting tips, making it easy to get the most out of the CD.
Reflecting on the Experience
Looking back, the Web Tools CD was more than just a product; it was a creative enabler. It allowed web designers, both amateur and professional, to enhance their projects with high-quality graphics and intuitive tools. The careful attention to detail in the ReadMe file, along with the thoughtful inclusion of necessary software like QuickTime, showcased the creators' commitment to providing a seamless user experience.
In today's digital age, where we have a plethora of online resources and cloud-based tools, it's easy to forget the charm and utility of physical media like the Web Tools CD. However, for those of us who had the opportunity to use it, it remains a fond reminder of the early days of web design and the innovative spirit that drove the development of such resources.
Whether you're a nostalgic tech enthusiast or a curious web designer looking to explore the roots of web design, the Web Tools CD is a fascinating piece of digital history worth remembering.
Converting EPS to SVG: A Seamless Process with CloudConvert
If you've been working with EPS files and want to enjoy the benefits of SVG format, look no further than CloudConvert. This online tool offers a straightforward and efficient way to convert your EPS files to SVG without compromising quality.
Why Convert to SVG?
Scalability: SVG images maintain their quality regardless of size, making them perfect for responsive designs.
Search Engine Optimization (SEO): Search engines can index SVG images, improving your website's visibility.
Animation: SVGs support animation, adding dynamic elements to your designs.
File Size: SVG files are often smaller than their EPS counterparts, improving loading times.
Upload Your EPS File: Choose your EPS file from your computer or cloud storage.
Start Conversion: Click the "Start conversion" button.
Download Your SVG: Once the conversion is complete, download the SVG file.
Amadine: Your New Best Friend for Object Selection
While CloudConvert handles the file format conversion, Amadine takes your design experience to the next level with its exceptional selection tool. If you've ever struggled with selecting specific objects in Affinity Designer 2, you'll appreciate Amadine's precision and ease of use.
Amadine's selection tool offers:
Improved Accuracy: Select exactly what you need without accidentally grabbing unwanted elements.
Faster Workflow: Save time by selecting objects quickly and efficiently.
Enhanced Precision: Make fine adjustments with ease, ensuring pixel-perfect results.
By combining the power of CloudConvert for file conversion and Amadine for object selection, you can streamline your design workflow and create stunning visuals with greater efficiency.
As a parent of a child with celiac disease, I recently learned a valuable lesson about managing gluten exposure that I feel compelled to share with our community. It's crucial to understand that products like Gluten Cutter are not a solution for those with celiac disease, and here's why.
My daughter accidentally consumed non-gluten-free pasta, and about three hours later, she began vomiting. In a panic, I rushed to the store to purchase Gluten Cutter, believing it might alleviate her symptoms. However, this decision was misguided, and I want to explain why.
Firstly, Gluten Cutter and similar products are not FDA-approved treatments for celiac disease. They're marketed as digestive aids for people with mild gluten sensitivity, not for those with celiac disease. For individuals with celiac, any amount of gluten can trigger an autoimmune response, which these products cannot prevent or cure.
In our case, the Gluten Cutter was ineffective. My daughter threw up the medicine within minutes of taking it, likely due to her body's ongoing reaction to the gluten. This experience highlighted that there's no quick fix or "undo" button for gluten exposure in celiac patients.
What actually helped was a simple, time-tested approach:
Hydration: We focused on having her drink plenty of water to help flush her system.
Rest: Allowing her body to naturally expel the gluten was key.
Time: Within about two hours, her symptoms subsided.
Recovery: By the next morning, she had fully recovered and woke up hungry.
This incident reinforced the importance of strict gluten avoidance for celiac patients. No supplement can replace a gluten-free diet or mitigate the effects of accidental gluten ingestion.
If you or a loved one has celiac disease and accidentally consumes gluten, remember:
Stay calm and don't panic.
Focus on hydration.
Rest and allow the body to naturally process the gluten.
Consult with your healthcare provider if symptoms persist or worsen.
In conclusion, while it's tempting to seek a quick solution during a gluten exposure incident, products like Gluten Cutter are not the answer for celiac patients. The best approach is prevention through strict adherence to a gluten-free diet, and if exposure occurs, support your body's natural processes with hydration and rest.
Have you had a similar experience or have tips for managing accidental gluten exposure? Share your thoughts in the comments below.
Subtitles are essential for making your videos accessible to a wider audience. But why settle for plain text when you can transform them into eye-catching animations? FlexClip offers a simple yet powerful platform to create dynamic and engaging subtitles that elevate your video content.
Why Animated Subtitles Matter
Enhanced Engagement: Animated subtitles grab viewer attention and keep them hooked.
Improved Accessibility: They benefit viewers with hearing impairments.
Professional Look: Animated subtitles add a polished touch to your videos.
Getting Started with FlexClip
Upload Your Video: Begin by uploading your video file to the FlexClip platform.
Add Subtitles: FlexClip provides options to manually input subtitles or use its AI-powered auto-captioning feature.
Choose Your Animation: Explore FlexClip's extensive library of animated subtitle templates. You can customize fonts, colors, and effects to match your video's style.
Fine-Tune Timing: Ensure your subtitles sync perfectly with the audio by adjusting their duration and appearance.
Preview and Export: Preview your video with animated subtitles to check for any adjustments needed. Once satisfied, export your video in your preferred format.
Tips for Creating Stunning Animated Subtitles
Match the Style: Choose animations that complement your video's tone and content.
Keep it Readable: Prioritize clear and legible subtitles. Avoid overly complex animations that hinder readability.
Experiment with Timing: Play with subtitle duration and appearance to create different effects.
Less is More: Sometimes, subtle animations can be just as effective as flashy ones.
Beyond Subtitles: FlexClip's Video Editing Powerhouse
FlexClip isn't just about subtitles. It's a comprehensive video editing tool that offers:
Stock Media: Access a vast library of royalty-free images, videos, and music.
Text and Graphics: Add text overlays, graphics, and animations to enhance your visuals.
Music and Sound Effects: Enhance your video's atmosphere with a variety of audio options.
Easy-to-Use Interface: Enjoy a user-friendly platform that simplifies the video editing process.
By combining animated subtitles with FlexClip's other features, you can create professional-quality videos that stand out from the crowd.
Buying second-hand machinery can be a smart and cost-effective way to acquire the equipment you need without breaking the bank. Whether you're looking to expand your business or start a new project, used machinery offers a range of benefits. However, it's essential to approach the purchase with caution to ensure you get the best deal possible.
Here are five tips to help you buy second-hand machinery successfully.
Define Your Needs
Before diving into the market for second-hand machinery, clearly define what you need. Consider the type of equipment required, the specifications, and any particular features that are essential for your operations. Having a detailed list of requirements will help you narrow down your options and prevent you from being swayed by deals that don't meet your needs.
Questions to Consider:
What specific tasks will the machinery perform?
Are there any size or capacity requirements?
Do you need any special features or attachments?
Research the Market
Take the time to research the market thoroughly. Look into various sellers, including dealerships, online platforms, and auctions. Compare prices and read reviews to understand the going rates and the reputation of different sellers. Understanding the market will give you a better idea of what to expect in terms of pricing and availability.
Once you find a potential piece of machinery, it's crucial to inspect it thoroughly. If possible, visit the seller's location to see the equipment in person. Look for signs of wear and tear, rust, and any other damage that might affect the machinery's performance. If you're not an expert, consider bringing along a technician or someone with experience in machinery to help with the inspection.
What to Check:
Overall condition of the machine
Operational status (does it start and run smoothly?)
Maintenance records and service history
Check the Seller's Reputation
Buying from a reputable seller can make a significant difference in the quality of the machinery and the service you receive. Check the seller's reputation by reading reviews, asking for references, and researching their business history.
A trustworthy seller will be transparent about the machinery's condition and history and provide any necessary documentation.
Tips for Verification:
Look for online reviews and ratings
Ask for customer references
Verify the seller's business credentials and years of operation
Negotiate the Price
Don't be afraid to negotiate the price. Second-hand machinery often has room for price adjustments, especially if you can point out any issues or necessary repairs. Be prepared with your research to justify your offer and be willing to walk away if the seller is not willing to meet you halfway.
Negotiation Tips:
Use your research to support your offer
Highlight any repairs or maintenance the machine might need
Be polite but firm in your negotiations
Conclusion
Purchasing second-hand machinery can be an excellent way to save money and acquire quality equipment for your business. By defining your needs, researching the market, inspecting the machinery, checking the seller's reputation, and negotiating the price, you can ensure a successful purchase.
Buying second-hand machinery doesn't have to be a daunting task. With these tips in mind, you'll be well-equipped to find the right equipment at the right price. Happy hunting!
If so, then One Million Checkboxes is the perfect website for you. It’s exactly what it sounds like: a page filled with a million checkboxes. And the best part? Checking one box checks for everyone.
A Simple Pleasure
There’s something undeniably satisfying about watching those checkboxes fill up. It’s a digital equivalent of a zen garden - calming, repetitive, and oddly mesmerizing. The website’s simplicity is its genius. No distractions, no ads, just pure, unadulterated checkbox bliss.
The Psychology Behind It
Why are we so drawn to this seemingly pointless activity? Some might argue it’s a form of digital procrastination. Others might say it taps into our primal need for completion. Regardless of the reason, it’s clear that One Million Checkboxes has struck a chord with people.
Are you a developer or tech enthusiast who loves to journal but struggles to find a seamless way to integrate it into your workflow? Look no further! LaunchBar's "Send to Day One" action is here to revolutionize your journaling experience. Let's dive into how this powerful feature can enhance your productivity and streamline your journaling process.
The Power of VSCode Journal and LaunchBar
As a developer, you're likely already familiar with Visual Studio Code (VSCode). But did you know you can use it as a powerful journaling tool? VSCode Journal allows you to jot down your thoughts, keep track of tasks, and even store code snippets for future use - all within your favorite code editor.
Now, imagine being able to instantly transfer these journal entries to Day One, the popular journaling app, with just a few keystrokes. That's where LaunchBar's "Send to Day One" action comes in.
Benefits of LaunchBar's Instant Send
Lightning-Fast Transfer: With just six keyboard clicks, you can send your markdown text from VSCode directly to Day One. No more copy-pasting or switching between apps!
Seamless Integration: LaunchBar acts as a perfect companion to Day One, allowing you to quickly back up your journal entries without disrupting your workflow.
Markdown Support: Since both VSCode and Day One support markdown, your formatting remains intact during the transfer.
Improved Productivity: By reducing the friction between writing and archiving your thoughts, you're more likely to maintain a consistent journaling habit.
Flexibility: You can journal in VSCode whenever inspiration strikes, knowing you can easily send it to Day One later.
Three Things I Learned
Title Matters: The first line of your journal entry becomes the title in Day One. Make sure it's relevant and descriptive.
Hashtag Workaround: While you can't add tags directly through the "Send to Day One" action, you can use hashtags in your text as a workaround.
Accessibility Breeds Use: Once you start using the "Send to Day One" action, LaunchBar makes it increasingly accessible, encouraging more frequent journaling.
Getting Started
To set up this workflow:
Select the text that you wish to send to Day One Journal.
Hit the Shift Key twice.
Hit Tab
Hit the "return key" at the "Send to Day One" (If Day One doesn't appear Select Actions and then "Send to Day One.")
Conclusion
By leveraging the power of VSCode Journal and LaunchBar's "Send to Day One" action, you can create a journaling workflow that seamlessly integrates with your development environment. This setup not only encourages more frequent journaling but also ensures your thoughts are safely backed up in Day One. Give it a try and watch your journaling habit flourish alongside your coding projects!
When we think about the evolution of laptops, certain models stand out for their innovation and impact. Among these, the Powerbook G3 "WallStreet," released by Apple in 1998, holds a special place in the hearts of tech enthusiasts. As a proud owner of this classic machine, I'm excited to share some fascinating details about its design and features that set it apart from its contemporaries.
A Brief History
The Powerbook G3 series was a significant leap in laptop technology during the late '90s. It was known for its powerful performance, sleek design, and advanced features that made it a favorite among professionals and tech aficionados. The "WallStreet" model, in particular, was named after the famous financial district, symbolizing its robust capabilities and cutting-edge technology.
Unique Features of the Powerbook G3 "WallStreet"
One of the most distinctive features of the Powerbook G3 "WallStreet" is its built-in reset instructions. This thoughtful inclusion reflects Apple's user-centric design philosophy, even in the early days of their laptop innovations.
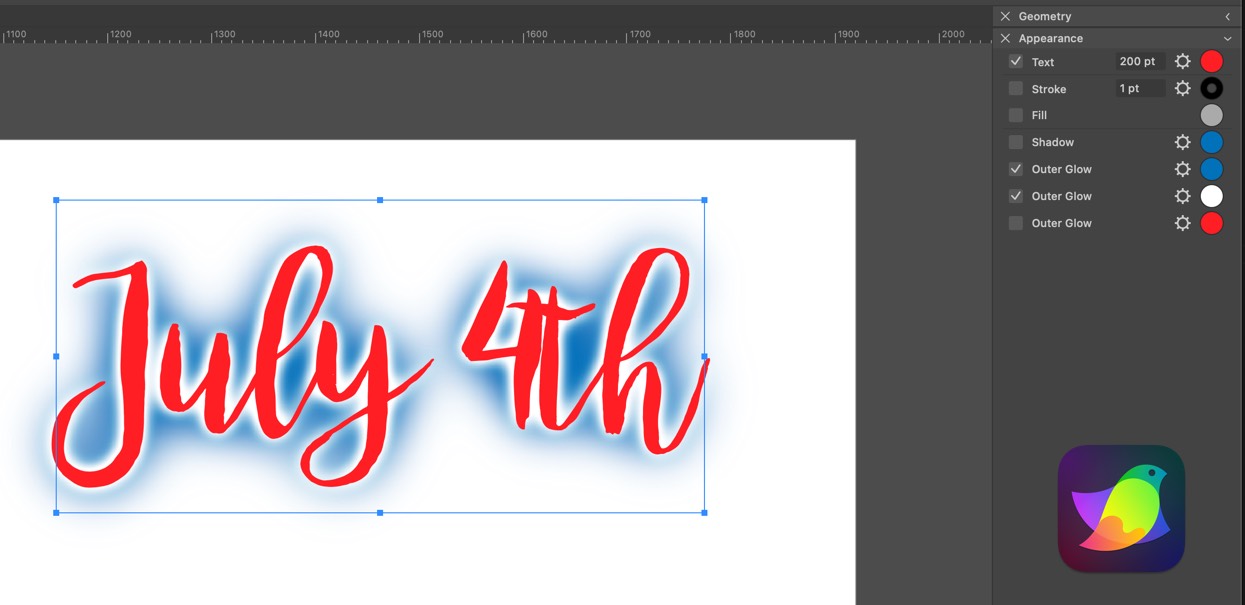
One of the nice features of Amadine is the ability to use multiple Appearances to an object. This allows you to create some cool effects. Such as this one that I did with the "July 4th" logo.
In Amadine, there are several Appearances you can add, Fill, Stroke, Gradient, Brush, Inner Glow, Outer Glow, Inner Shadow, Shadow and Blur.
Fill: This fills the inside of a shape with a solid color or pattern.
Stroke: This creates an outline around the edge of a shape with a chosen color, thickness, and style (e.g., dashed lines).
Gradient: This creates a smooth blend between two or more colors within a shape or stroke.
Brush: This allows you to apply a textured pattern as a fill or stroke, adding a unique touch.
Then there are effects that add depth and visual interest:
Inner Glow & Outer Glow: These simulate light emanating from within or around an object.
Inner Shadow & Shadow: These create a sense of depth by adding shadows behind objects.
Blur: This softens the edges of an object for a hazy effect.
By combining these appearances, you can create a wide range of design elements in Amadine. For a deeper dive into how to use these features, you can check out the Amadine user manual.
Living in New England, we are surrounded by an abundance of incredible eateries that cater to all tastes and dietary needs. As a parent of a 13-year-old daughter with Celiac disease, finding safe and delicious dining options is always a top priority. One thing we've discovered that makes dining out easier is always having Lee Kum Kee Gluten Free Soy Sauce packets on hand, which we stock up on from the Webstaurant Store.
The Importance of Gluten-Free Soy Sauce
For those with Celiac disease, even a small amount of gluten can cause serious health issues. Traditional soy sauce often contains wheat, making it a no-go for gluten-free diets. However, Lee Kum Kee offers a fantastic gluten-free alternative that doesn't compromise on taste. These soy sauce packets are perfect for adding a rich, savory flavor to any meal, whether you're dining out or eating at home.
Convenience of Lee Kum Kee Soy Sauce Packets
The convenience of these packets cannot be overstated. They are small, portable, and easily fit into a purse or pocket. Whether we're heading to a sushi restaurant, an Asian-fusion eatery, or even a local diner that doesn't have gluten-free soy sauce on hand, these packets ensure my daughter can enjoy her meal without worry. Plus, they are incredibly easy to use – just tear open a packet and drizzle over your dish for an instant flavor boost.
Why Webstaurant Store?
When it comes to purchasing Lee Kum Kee Gluten Free Soy Sauce packets, the Webstaurant Store is our go-to source. They offer competitive prices and the convenience of bulk buying, which means we never run out. Here are a few reasons why we love shopping at the Webstaurant Store:
Bulk Availability: Buying in bulk means we always have plenty of packets on hand, saving us from frequent trips to the store.
Cost-Effective: The prices at Webstaurant Store are hard to beat, making it affordable to keep a steady supply.
Reliable Shipping: Their fast and reliable shipping ensures that we get our soy sauce packets quickly and in perfect condition.
Having these soy sauce packets has truly enhanced our dining experiences. My daughter feels more included and less stressed about cross-contamination. We can focus on enjoying the delicious food and exploring new restaurants without the constant worry about gluten.
Today Show coverage of Matt Lauer interviewing Thomas Menino the mayor of Boston in 2002. The conversation is around the security during the first July 4th after the September 11, 2001 attacks.
In the video, Lauer asks Menino about the security measures that will be in place for the upcoming July 4th celebration in Boston. Menino says that security will be tight, but that people should still come out and enjoy the holiday. He also talks about the importance of celebrating American independence.
The video is a fascinating look back at a time when the country was still reeling from the September 11th attacks. It is also a reminder of the resilience of the American people.
Welcome to cryan.com's main blog page! Here you'll find a diverse collection of informative posts covering topics ranging from technology and lifestyle to career advice. There's something here for everyone.
We are committed to delivering the highest quality content, ensuring you have access to the most current and reliable information.