
Stitch Effect in Pixelmator
Here's how you create dash lines in an image using Pixelmator. Using Layers and the Style, you can easily create a cool stitch effect.
Unfortunately Pixelmator doesn't have the ability to create dash strokes using the Marquee Tool, so you have to use this trick. I think once you learn how to do it, it will be useful way to use Pixelmator.
Thankfully, Pixelmator is a powerful image tool and doing some simple effects can produce the desired results. It's simply a matter of getting things to work the way you want it to.
Simple steps to add a Stitch effect to any image.
- Open an image that you want to add the Stitch effect and select the layer.
- Using the Rectangular Marquee Tool, select the area where you want the Stitch to appear.
- Hold down the Shift-Command-N to create a new Empty Layer
- Hold down the Option-Command-F to open the Fill Dialog. Select any color you want, just set the Opacity to 0%. This way nothing shows!
- Command-7 To open the Styles Pallet
- In the Stroke section of the Styles Pallet, Select Color
- Change the color to White
- Make the Width to be 2 Px
- Change the Stroke style to be Dash
That's It! Play around with styles setting until you get the desired effect that you want! Have fun designing!
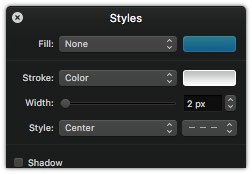
This is what your Styles Setting should be.