
How to Split a Stereo Audio File in Final Cut Pro and Disable a Problematic Track
Easy Fix to a Problem Audio File
When working with stereo audio in Final Cut Pro, you might occasionally run into a situation where one side of your track isn't quite up to par. Maybe the left channel is too boomy, or - as was my case - the right channel is just plain "garbage." Fortunately, Final Cut Pro provides a straightforward way to split your stereo audio into separate mono tracks, giving you the flexibility to disable or adjust the problematic channel without affecting the overall project.
In this blog post, I'll walk you through the step-by-step process of splitting a stereo audio file into dual mono tracks and disabling one channel. This method can be particularly useful if you need to reduce background noise or balance your mix when one track's audio levels are off.
Step 1: Import and Select Your Audio Clip
- Import Your Clip: Start by importing the clip with your stereo audio into Final Cut Pro.
- Select the Clip: In your timeline, click on the clip to ensure it's selected. You'll need to see the clip's details in the Inspector panel.
Step 2: Open the Audio Inspector
- Access the Inspector: With your clip selected, open the Inspector panel by clicking the Inspector button in the top right corner of Final Cut Pro.
- Switch to Audio: Make sure you're on the Audio tab where you can see all the properties related to your clip's audio configuration.
Step 3: Change the Audio Configuration to Dual Mono
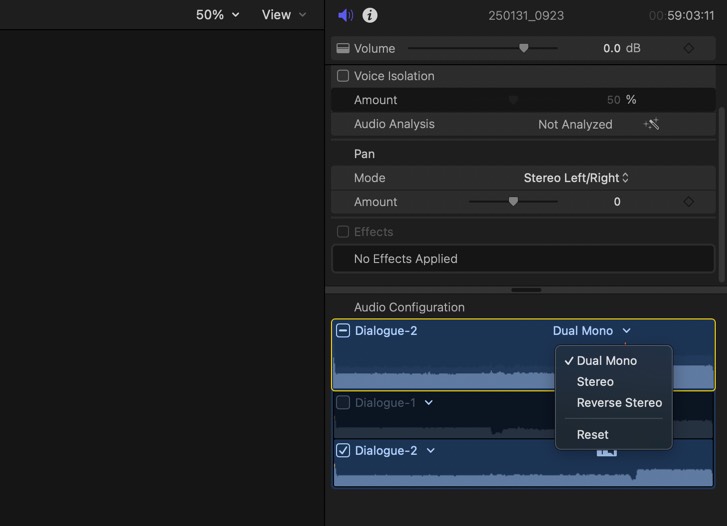
- Locate Audio Configuration: In the Audio Inspector, look for the Audio Configuration section. This area is where you can adjust how Final Cut Pro handles your audio channels.
- Select Dual Mono: Change the configuration from stereo to Dual Mono. By doing so, Final Cut Pro splits your stereo file into two separate mono tracks - one for the left channel and one for the right.
Step 4: Disable the Unwanted Track
- Identify the Problematic Track: Since my right track was causing issues, I needed to disable it. In the Inspector, after switching to Dual Mono, you'll see separate settings for each channel.
- Turn Off the Track: Locate the Dialogue checkbox for the track you wish to disable. Simply click on the checkbox for the problematic track (in my case, the right channel) to turn it off. This effectively mutes the audio coming from that channel without affecting the left channel.
Step 5: Fine-Tuning and Playback
- Play Back Your Clip: After disabling the unwanted track, play back your clip to ensure that the audio now meets your expectations. The background noise or unwanted audio should now be reduced or eliminated.
- Adjust as Needed: If you find that you need further tweaks, you can always revisit the Audio Inspector to make more adjustments. Sometimes you might want to apply additional filters or volume changes to get the perfect balance.
Why Use Dual Mono?
Using Dual Mono is a powerful way to gain more control over your audio tracks in Final Cut Pro. It allows you to isolate and modify individual channels - perfect for scenarios where: - One channel has excessive background noise. - A channel is corrupted or has poor-quality audio. - You need to create a specific audio effect by treating each channel differently.
This method not only improves your audio quality but also saves time in the editing process by avoiding the need for additional software or complex workarounds.
Conclusion
Splitting a stereo audio file into dual mono tracks and disabling one channel is a simple yet effective technique in Final Cut Pro. Whether you're dealing with problematic audio or just want more control over your mix, these steps can help you achieve a cleaner, more professional sound.