If you're a content creator, filmmaker, or just someone who appreciates high-quality music, you may have stumbled across TimKulig.com. This website is the digital home of Tim Kulig, a talented composer who offers a vast library of royalty-free music for all kinds of audio and video projects. As of March 14, 2025, this site continues to be a valuable resource for creators looking to enhance their work with unique, evocative soundscapes. Let's dive into what makes TimKulig.com stand out and why it's worth a visit.
What You'll Find on TimKulig.com
At TimKulig.com, visitors are greeted with a straightforward, user-friendly interface that emphasizes the music itself. The site serves as a hub for Tim's royalty-free music library, which is licensed under Creative Commons Attribution 4.0. This means you can use his music in your projects for free, as long as you provide proper attribution. For those who can't give attribution (e.g., in commercials), Tim offers an option to donate $30 per track or purchase an extended license through platforms like Filmmusic.io.
Website Description
Tim Kulig started his musical journey at the young age of 12 with nothing but a dream and a Casio CZ-101... and he's never looked back.
Over the last 3+ decades, Tim has contributed to numerous movies, internet videos, video games and live events with his musical pieces. He is on a journey to publish over 2,000 songs, making them available for free under Creative Commons when you give attribution to him in your movies, videos, and internet content.
His musical styles vary greatly and include Electronic, Orchestral, DnD, LoFi, Dreamcore, Jazz, Meditation, Ambient, Metal, Horror, Comedy, Glitch?just about any style you can imagine!
If you?ve ever needed to track down the origin of a phone number, fonefinder.net might just be the tool you?re looking for. This nifty website has been around since the late '90s, offering a straightforward way to uncover the city, state, and even country tied to almost any phone number worldwide.
What makes FoneFinder stand out is its simplicity. You just pop in a phone number, hit search, and voil-details like the geographic location and sometimes the telecom provider appear. It?s especially handy for those mystery calls from unknown area codes or international numbers. The site?s database is fueled by contributions from users and data enthusiasts globally, keeping it surprisingly robust for such a minimalist platform.
So, next time you?re staring at an unfamiliar number, give FoneFinder a whirl. It?s a quirky, reliable throwback to the early internet that still holds its own in 2025!
If you frequently work with lists or blocks of text, you know how tedious it can be to manually sort them alphabetically. Fortunately, LaunchBar - the powerful productivity tool for macOS - makes this task effortless with its "Sort Lines" action.
In this quick guide, I'll show you how to sort any text in seconds using LaunchBar.
How to Sort Text in LaunchBar
Select Your Text
Select the text you want to sort (e.g., a list of names, items, or keywords).
Open LaunchBar
Press Shift twice (or your preferred LaunchBar shortcut) to bring up the bar.
Find the "Sort Lines" Action
Press Tab to switch to actions.
Type "Sort Lines" and select "Sort Lines Ascending"
Execute & Paste
Press Return to sort the clipboard contents.
Press CommandC to copy
Now, just CommandV the sorted text wherever you need it!
Bonus Tip: Reverse Sorting
Want to sort in descending order? Simply run the "Sort Lines" action twice?it will reverse the order.
Why This is a Game-Changer
No manual editing ? No need to manually rearrange text in a text editor.
Works anywhere ? Use it in emails, notes, spreadsheets, or code.
Super fast ? Once you get used to the shortcut, sorting takes seconds.
Try running the command a few times, and you'll see how quickly it becomes second nature. Sorting text has never been this easy!
Tests that pass reliably instill confidence in your codebase, while unpredictable ones can erode trust and waste valuable time. Enter flaky tests - those pesky tests that don't always pass on the first try, even when the underlying code seems fine.
Fortunately, Playwright, a powerful browser automation framework, offers a handy tool to help QA automation teams tackle this challenge head-on: the --fail-on-flaky-tests option.
What Are Flaky Tests?
Flaky tests are the wild cards of the testing world. They might pass on one run and fail on the next, often due to timing issues, external dependencies, or subtle environmental differences.
While they don't necessarily indicate a bug in the application, they do signal a problem in the test itself - something that might need a closer look to ensure reliability.
For QA teams, flaky tests can be a headache. They slow down workflows, muddy the waters of test reporting, and make it harder to trust the results of a test suite. That's where Playwright steps in with a feature designed to shine a spotlight on these troublemakers.
Playwright's Flaky Test Detection
Playwright provides a built-in mechanism to identify and flag flaky tests, helping teams address them proactively. By enabling certain configurations, Playwright can detect when a test exhibits inconsistent behavior - passing sometimes and failing others - and mark it as flaky.
This doesn't just sweep the issue under the rug; it gives teams actionable insights to refine their tests.
One particularly useful option in Playwright's arsenal is --fail-on-flaky-tests. By default, this option is set to false, meaning Playwright will note flaky tests but won't treat them as failures in the overall test run.
However, when you flip this switch to true, Playwright takes a stricter stance: if any test is flagged as flaky, the entire test suite fails. This forces the team to confront the issue immediately rather than letting it linger.
How to Use --fail-on-flaky-tests
To leverage this feature, simply add the --fail-on-flaky-tests flag when running your Playwright tests from the command line. For example:
WebDriver options allow you to customize the behavior of your browser instance, enabling you to optimize performance, handle specific scenarios, and mitigate common testing challenges. By strategically applying these options, you can create more robust, stable, and efficient automated tests.
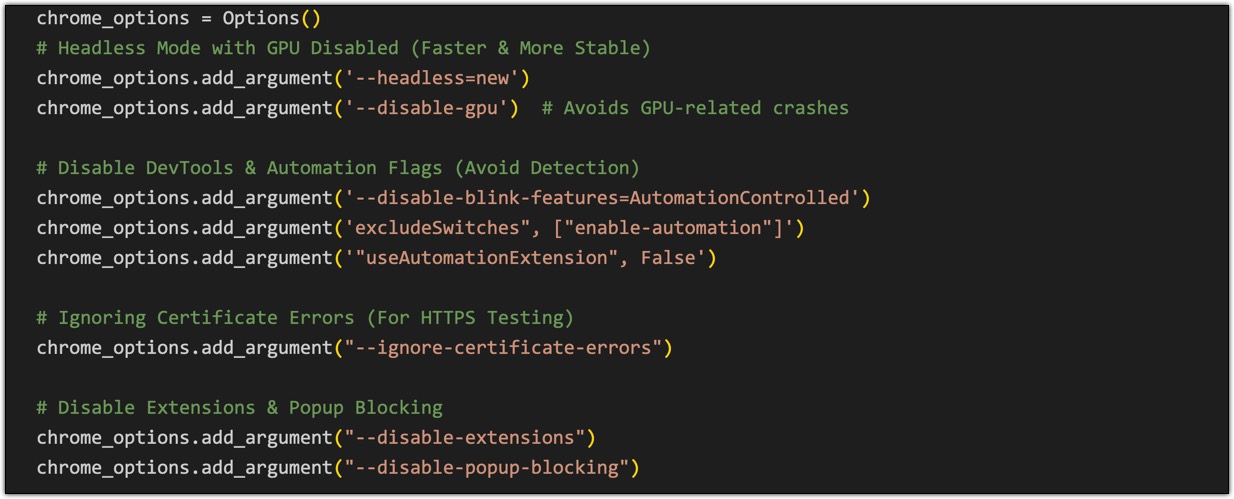
1. Headless Mode with GPU Disabled: Speed and Stability Combined
Running tests in headless mode-without a visible browser window-is a game-changer for speed and resource efficiency. However, GPU-related issues can sometimes lead to crashes. The solution? Disable the GPU while running headless.
--headless=new: Activates the newer, more efficient headless mode.
--disable-gpu: Prevents GPU-related crashes, ensuring test stability.
This combination provides a significant performance boost and enhances the reliability of your tests, especially in CI/CD environments.
2. Evading Detection: Disabling DevTools and Automation Flags
Websites are increasingly sophisticated in detecting automated browsers. To minimize the risk of your tests being flagged, disable DevTools and automation-related flags.
--disable-blink-features=AutomationControlled: Prevents the navigator.webdriver property from being set to true.
excludeSwitches, enable-automation: Removes the "Chrome is being controlled by automated test software" infobar.
useAutomationExtension, False: Disables the automation extension.
Important Note: While these options can help evade detection, they are not foolproof. Websites may employ more advanced techniques. Use these options responsibly and ethically.
When testing HTTPS websites with self-signed or invalid certificates, certificate errors can disrupt your tests. The --ignore-certificate-errors option allows you to bypass these errors.
This option is invaluable for testing development or staging environments where certificate issues are common. However, remember to avoid using this in production tests, as it can mask real security vulnerabilities.
4. Disabling Extensions and Popup Blocking: Minimizing Interference
Browser extensions and pop-up blockers can interfere with your tests, leading to unpredictable behavior. Disabling them ensures a clean and consistent testing environment.
This fixture sets up a Chrome browser with your desired options and makes it available to your test functions.
Conclusion
Mastering WebDriver options is essential for SQA engineers seeking to optimize their Pytest automation workflows. By leveraging these options, you can create faster, more stable, and reliable tests, ultimately improving the overall quality and efficiency of your testing efforts. Experiment with these options and discover how they can enhance your testing practices.
As Software Quality Assurance (SQA) professionals, we know that crafting effective test cases is both an art and a science. In his seminal 2003 paper, What Is a Good Test Case?, Cem Kaner, a thought leader in software testing, explores the complexity of designing test cases that deliver meaningful insights. Drawing from Kaner's work, here are four practical tips to elevate your manual test case writing, ensuring they are purposeful, actionable, and impactful.
1. Align Test Cases with Clear Information Objectives
A good test case starts with a purpose. Kaner emphasizes that test cases are questions posed to the software, designed to reveal specific information-whether it's finding defects, assessing conformance to specifications, or evaluating quality. Before writing a test case, ask: What am I trying to learn or achieve? For manual testing, this clarity is critical since testers rely on human observation and judgment.
Tip in Action: Define the objective upfront. For example, if your goal is to "find defects" in a login feature, craft a test case like: "Enter a username with special characters (e.g., @#$%) and a valid password, then verify the system rejects the input with an appropriate error message." This targets a specific defect class (input validation) and provides actionable insight into the system's behavior.
2. Make Test Cases Easy to Evaluate
Kaner highlights "ease of evaluation" as a key quality of a good test case. In manual testing, where testers manually execute and interpret results, ambiguity can lead to missed failures or false positives. A test case should clearly state the inputs, execution steps, and expected outcomes so the tester can quickly determine pass or fail without excessive effort.
Tip in Action: Write concise, unambiguous steps. Instead of "Check if the form works," specify: "Enter 'JohnDoe' in the username field, leave the password blank, click 'Login,' and verify an error message appears: 'Password is required.'" This reduces guesswork, ensuring consistency and reliability in execution.
3. Design for Credibility and Relevance
A test case's value hinges on its credibility-whether stakeholders (developers, managers, or clients) see it as realistic and worth addressing. Kaner notes that tests dismissed as "corner cases" (e.g., "No one would do that") lose impact. For manual testing, focus on scenarios that reflect real-world usage or critical risks, balancing edge cases with typical user behavior.
Tip in Action: Ground your test cases in user context. For a shopping cart feature, write: "Add 10 items to the cart, remove 2, and verify the total updates correctly." This mirrors common user actions, making the test credible and motivating for developers to fix any uncovered issues. Pair it with a risk-based test like "Add 1,000 items and verify system performance" if scalability is a concern, justifying its relevance with data or requirements.
4. Balance Power and Simplicity Based on Product Stability
Kaner defines a test's "power" as its likelihood of exposing a bug if one exists, often achieved through boundary values or complex scenarios. However, he cautions that complexity can overwhelm early testing phases when the software is unstable, leading to "blocking bugs" that halt progress. For manual testing, tailor the test's complexity to the product's maturity.
Tip in Action: Early in development, keep it simple: "Enter the maximum allowed value (e.g., 999) in a numeric field and verify acceptance." As stability improves, increase power with combinations: "Enter 999 in Field A, leave Field B blank, and submit; verify an error flags the missing input." This progression maximizes defect detection without overwhelming the tester or the process.
Final Thoughts
Kaner's work reminds us there's no one-size-fits-all formula for a "good" test case-context is everything. For SQA professionals engaged in manual testing, the key is to design test cases that are purposeful, executable, believable, and appropriately scoped. By aligning with objectives, ensuring clarity, prioritizing relevance, and adapting to the software's lifecycle, you'll create test cases that not only find bugs but also drive meaningful improvements. As Kaner puts it, "Good tests provide information directly relevant to [your] objective"-so define your goal, and let it guide your craft.
Every year, the April Blogging from A to Z Challenge attracts a diverse group of bloggers eager to take on the exciting task of writing posts corresponding to each letter of the alphabet. While I've considered joining in the past and even felt a surge of excitement about the idea, I've ultimately decided not to participate this year.
The challenge, as enticing as it may seem, requires a significant investment of time and creative energy. Coming up with topics that fit the alphabetical constraint while also being engaging and valuable to readers is no small feat. I've found that the effort required to adhere to this structure often detracts from the organic flow of ideas and the natural rhythm of blogging.
Moreover, my experience has shown that readers are more drawn to the content itself rather than the format in which it's presented. They seek out blogs for the quality of the writing, the depth of the insights, and the relevance of the topics. The challenge, while fun and stimulating in its own right, can sometimes feel like an artificial constraint that doesn't necessarily enhance the blogging experience for either the writer or the reader.
That being said, I'm not abandoning blogging in April by any means. Instead, I'll continue to share my thoughts and insights on a variety of subjects that I believe will resonate with my audience. I'll stick to my usual approach of letting the ideas that naturally come to mind guide my posts. This way, I can maintain the authenticity and spontaneity that I feel are essential to creating meaningful connections with my readers.
So, while I won't be joining the April Blogging from A to Z Challenge, I'll still be here, writing and sharing. I encourage you to explore the challenge if it interests you, but also to remember that there's no one-size-fits-all approach to blogging. Whether you choose to participate in the challenge or not, the most important thing is to keep writing and sharing your unique voice with the world.
If you?ve ever needed a quick, reliable way to generate random data, look no further than RandomGenerator.pro. This sleek, user-friendly website is a treasure trove for anyone seeking randomness in a variety of forms, whether for creative projects, testing, or just pure curiosity.
At its core, RandomGenerator.pro offers a range of tools to generate random numbers, letters, colors, and more. The interface is clean and intuitive, making it accessible to users of all levels. Need a random number for a raffle or a unique string for a coding project? The site delivers with just a few clicks. One standout feature is its ability to customize parameters, allowing you to set ranges or specific criteria for your random outputs, which adds a layer of flexibility that?s hard to beat.
What sets RandomGenerator.pro apart is its simplicity paired with utility. There?s no unnecessary clutter?just straightforward tools that work efficiently. It?s perfect for developers, educators, or anyone who needs a dash of randomness in their work or play. Plus, it?s free to use, which is always a bonus.
Whether you?re brainstorming, prototyping, or simply exploring, RandomGenerator.pro is a handy resource worth bookmarking. Give it a spin next time you need a random spark?it?s a small but mighty tool that delivers every time!
Website Description
Find the ultimate set of free random generators intended to inspire, teach, and entertain. Our inclusive platform has more than 30 distinct generators across various categories, ranging from animals and entertainment to food and nature. Whether you are a creative professional needing inspiration, an educator in need of teaching materials, a student completing projects, or merely someone new to discovering interesting things, our random generators offer unlimited means of exploration and creativity.
Random Generator Pro is the web's most extensive and accessible collection of random generators. Every generator has been hand-developed to present precise, high-quality information in each generation. Our website fuses high-performance random generation engines with huge databases to yield first-rate, targeted results for all categories. Ideal for art, education, choices, amusement, and many other applications - absolutely free and fully accessible without joining.
When working with audio in Audacity, achieving consistent loudness is crucial. You'll often encounter two powerful tools: Normalize and Loudness Normalization. While both aim to adjust audio levels, they operate on fundamentally different principles. Understanding their distinctions is key to making the right choice for your audio projects.
Normalize: Peak-Based Adjustment
Normalize works by finding the highest peak (the loudest point) in your selected audio and adjusting the entire waveform proportionally. You specify a target peak level (usually in dBFS - decibels relative to full scale), and Audacity scales the audio so that the highest peak reaches that target.
Peak-Based: Focuses solely on the loudest point.
Simple and Fast: Relatively quick processing.
Ignores Perceived Loudness: Doesn't consider how loud the audio sounds to human ears.
Can Create Inconsistent Perceived Loudness: Peaks may be normalized, but overall loudness may still be inconsistent.
Useful for aligning peak levels of similar audio files or preparing audio for further processing.
Loudness Normalization considers the perceived loudness of the audio, aligning it with how humans hear. It uses algorithms that analyze the audio?s overall loudness over time, rather than just the peaks. It targets a specific Integrated Loudness value, typically measured in LUFS (Loudness Units relative to Full Scale).
Perceived Loudness-Based: Considers the average loudness over time.
More Complex Processing: Takes longer than Normalize.
Creates Consistent Perceived Loudness: Results in a more uniform and balanced listening experience.
Uses LUFS and True Peak values.
Better for broadcast, streaming, and podcasting where consistent loudness is essential.
Follows industry standards like ITU-R BS.1770.
Which One is "Better" for Making Audio Louder?
The answer depends on your goal:
For simply raising the peak level without considering perceived loudness, use Normalize.
For achieving a consistent and balanced listening experience, use Loudness Normalization.
Why Loudness Normalization is Often Preferred:
Human hearing doesn?t perceive loudness linearly. A short, very loud peak might not sound as loud as a sustained, moderately loud sound. Loudness Normalization accounts for this by analyzing the audio?s overall energy over time. This results in audio that sounds more consistent and comfortable to listen to.
Practical Example:
Imagine you have a podcast recording with a few loud coughs and otherwise quiet speech.
Normalize: If you normalize to -1 dBFS, the coughs will reach -1 dBFS, but the speech might still be very quiet. This would result in an inconsistent listening experience.
Loudness Normalization: If you loudness normalize to -16 LUFS, the overall perceived loudness of the podcast will be consistent. The coughs will be brought down, and the speech will be raised to a more balanced level.
While Normalize has its uses, Loudness Normalization is generally the superior choice for achieving consistent and professional-sounding audio. By understanding the differences between these two tools, you can make informed decisions and elevate the quality of your audio projects. Choose Loudness Normalization when you want to create a listening experience that is both loud and consistent.
Welcome to cryan.com's main blog page! Here you'll find a diverse collection of informative posts covering topics ranging from technology and lifestyle to career advice. There's something here for everyone.
We are committed to delivering the highest quality content, ensuring you have access to the most current and reliable information.