
Liquivid Photo Fisheye Removal App
Easy way to fix the FishEye effect in photos done with the GoPro 7
If you take pictures with the GoPro camera you'll notice that the pictures may look distorted because of the fisheye effect. The photo can easily be fixed so they look good - a process that some people call defishing.
Affinity Photo and PhotoScape
Affinity Photo, PhotoScape, and Photoshop Elements have various tools to fix the images. Here's are some quick tips on ways to fix the fisheye effect in these applications.
- In Affinity Photo, you would use the Len Distortion Live Filter Layer tool. Simply select the Distortion amount that works best for you image.
- In PhotoScape X, the Lens Profile Correction tool does the work. It's located in the Transformation section. The GoPro x2192 Hero5 Black is the one that worked for me.
- In Photoshop Elements, the Correct Camera Distortion is the tool to fix FishEye. Simply use the
But the fastest and easiest way I found is to use an App that is specifically designed for that task. Save time from looking for different filters in various applications, and use a dedicated resource to make things easier.
Liquivid Photo Fisheye Removal
Liquivid Photo Fisheye Removal by Razvan Chisu is a quick and easy way to fix the photos. Simply drag and drop the photo to the app and presto it's fixed.
The application checks the photo meta-data for the camera type and automatically applied the best fix for the camera type. Yes, there is an option for GoPro 7.
Seven Things I learned about Liquivid Photo Fisheye Removal
I have been playing around with the application for a few days, and here are some of the things that I have learned.
- Liquivid Photo Fisheye Removal is free - you can download it from the app store. There is a similar tool for video, but that cost $7. Full details of all their apps are available on their website. (Check out the liquivid Video to HTML5 LITE app)
- There isn't any configuration needed, there is a settings option but it just opens to an empty dialog box.
- You have the ability to change the distortion strength. You get a live preview of the image as you adjust the slider.
- There is an "eye" icon underneath the picture, that's where you can see the before version of the image.
- There are 68 Distortion Camera settings - including Other/Unknown camera.
- There's a slider to adjust the JPG quality but you don't get a live preview of how reducing the quality impacts the image.
- The is no "batch mode" simple drag and drop one image at a time onto the window.
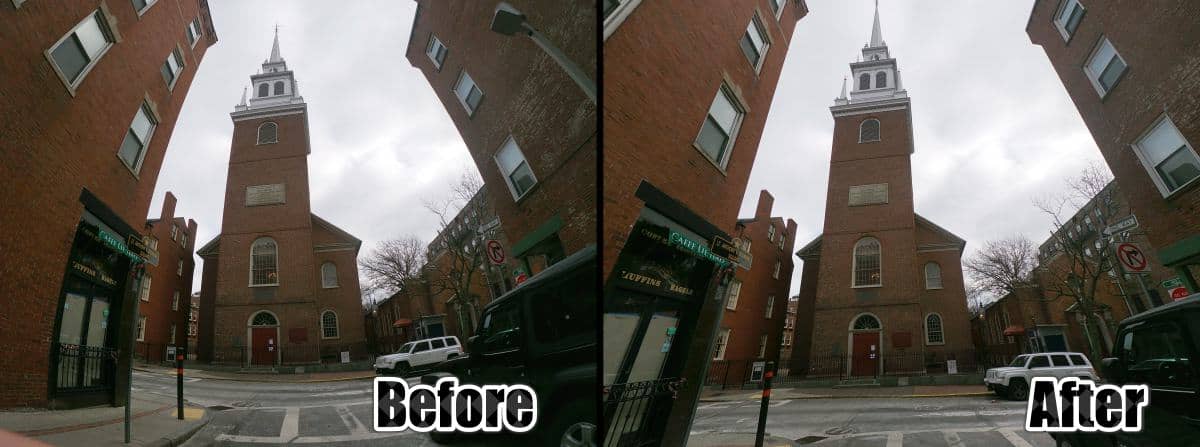
Example Photo Transformation
I would recommend trying out Liquivid Photo Fisheye Removal if you have any photos taken with the GoPro. Its simple design makes it easy to use.