How to Add Custom Sound Effects to the Sound Library
Enhancing Your Final Cut Pro Projects
Whether you're a seasoned video editor or just starting out, having a rich library of sound effects can elevate your Final Cut Pro projects to new heights. While Final Cut Pro comes packed with a variety of built-in sounds, adding your own collection of special effects allows for greater creativity and personalization. In this guide, we'll walk you through the process of adding your own sound effects to the Final Cut Pro Sound Library, ensuring they're readily available for any project you undertake.
Why Customize Your Sound Library?
Custom sound effects can set your projects apart, providing unique audio elements that perfectly match your vision. Whether you're working on a podcast, a short film, or a corporate video, having tailored sounds can enhance the storytelling and overall production quality.
Step-by-Step Guide to Adding Your Own Sound Effects
1. Organize Your Sound Effects
Before diving into Final Cut Pro, it's essential to organize your sound effects. Creating a dedicated folder for your custom sounds will keep everything neat and easily accessible.
Example:
I like to keep my audio files in a folder named "Podcast Sound Effects." This helps me quickly locate the sounds I need without sifting through unrelated files.

2. Locate the Final Cut Pro Sound Effects Library
Final Cut Pro stores its sound effects in a specific directory on your Mac. To add your own sounds, you'll need to navigate to this folder.
Path to Sound Effects Library:
/Library/Audio/Apple Loops/Apple/Final Cut Pro Sound Effects/
How to Access:
- Open Finder: Click on the Finder icon in your Dock.
- Navigate to the Library Folder:
- Press
Shift + Command + Gto open the "Go to Folder" window. - Enter
/Library/Audio/Apple Loops/Apple/Final Cut Pro Sound Effects/and pressEnter.
- Press
- Create a New Folder:
- To maintain organization, create a new folder within the Sound Effects directory. Right-click inside the folder, select "New Folder," and name it appropriately (e.g., "Podcast Sound Effects").
3. Add Your Custom Sound Effects
With your dedicated folder in place, it's time to add your custom sound effects.
Steps:
- Gather Your Audio Files: Ensure your sound effects are in a compatible format, such as
.wavor.aiff, which are widely supported by Final Cut Pro. - Copy the Files: Drag and drop your audio files into the newly created folder (e.g., "Podcast Sound Effects").
- Maintain File Organization: Consider naming your files descriptively (e.g.,
Door_Closing.wav,Laughter.wav) to make them easily searchable within Final Cut Pro.
4. Refresh Final Cut Pro's Sound Library
After adding your custom sounds, you may need to refresh Final Cut Pro to recognize the new additions.
How to Refresh:
- Restart Final Cut Pro: Close and reopen the application to allow it to scan the Sound Effects library for new files.
- Verify Your Sounds:
- Open a project in Final Cut Pro.
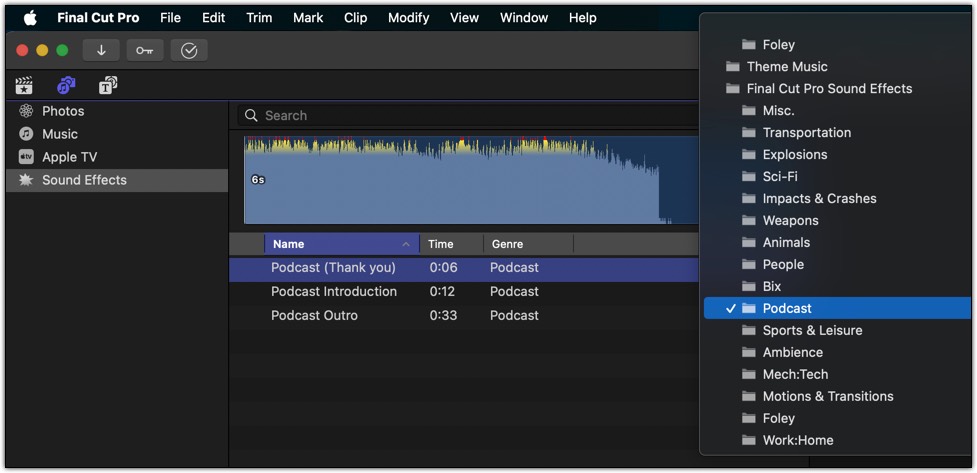
- Navigate to the "Sound Effects" browser.
- Look for your newly added folder (e.g., "Podcast Sound Effects") and ensure your sounds are visible and playable.
5. Utilize Your Custom Sound Effects in Projects
With your sounds now part of the Final Cut Pro Sound Library, integrating them into your projects is seamless.
Using the Sounds:
- Open the Sound Effects Browser: In your Final Cut Pro project, click on the "Sound Effects" tab.
- Browse to Your Folder: Locate your custom folder (e.g., "Podcast Sound Effects").
- Drag and Drop: Simply drag the desired sound effect onto your timeline where you want it to play.
- Adjust as Needed: Use Final Cut Pro's audio editing tools to adjust volume, fade in/out, and other properties to fit your project's needs.

Tips for an Organized Sound Library
- Categorize Your Sounds: Within your custom folder, consider creating subfolders for different types of sounds (e.g., "Ambient," "Transitions," "Foley") to streamline the search process.
- Consistent Naming Conventions: Use clear and consistent names for your sound files to make them easily identifiable.
- Backup Your Library: Regularly back up your custom sound library to prevent data loss and ensure you can restore your collection if needed.
Conclusion
Adding your own sound effects to the Final Cut Pro Sound Library is a straightforward process that can significantly enhance the quality and uniqueness of your video projects. By organizing your sounds thoughtfully and integrating them seamlessly into Final Cut Pro, you gain greater control over your audio landscape, allowing your creative vision to shine. Whether you're producing a podcast, a cinematic masterpiece, or any other type of video content, your custom sound effects will be an invaluable asset in bringing your projects to life.
