
Customize BBEdit Notebooks in the Dock
A Step-by-Step Guide to Boost Your Mac Productivity
Hello, fellow Mac enthusiasts! If you're anything like me, you probably have a BBEdit Notebook for every project under the sun - blogging, coding, writing documentation, and more. After all, the beauty of BBEdit's Notebook feature lies in its ability to help us stay organized, especially when we're juggling multiple ventures at once.
But here's a little annoyance that has irked me (and possibly you) for quite some time: when you add several BBEdit Notebooks to the right side of your Dock (the "Documents" area), they all show up with the same default BBEdit Notebook icon. It can make it tough to tell them apart at a glance, particularly if you have more than one. So what's a Mac power user to do? Let me walk you through a quick and easy fix to customize those icons - giving each Notebook a unique look - so you can access them without the guesswork.
The Challenge: Identical Icons in the Dock
By default, your BBEdit Notebooks look identical in the Dock's document area. If you keep more than one Notebook down there (and who doesn't?), you'll be left playing "icon roulette" whenever you want to open one. This is far from ideal, especially when you're in the middle of a productive streak and want to jump right into a specific Notebook.
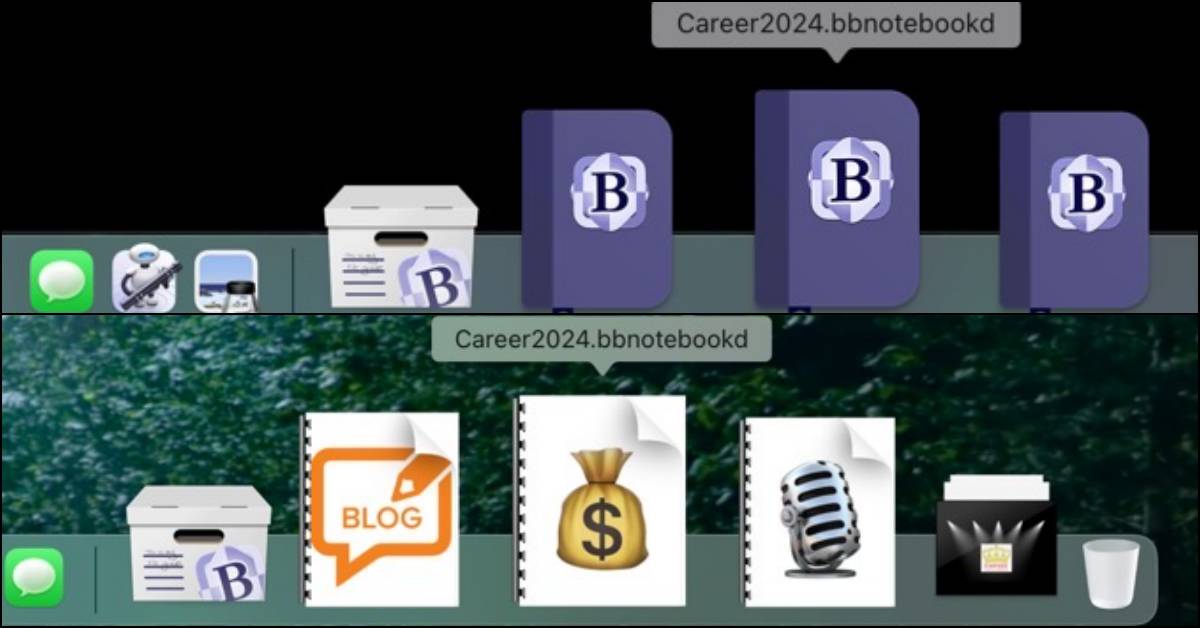
Before/After
The Workaround: Custom Icons
My solution uses a handy little app called Image2icon (though you can use other methods, too). With Image2icon, you can turn just about any image (a logo, a project icon, or even a picture of your cat - hey, you do you!) into a custom icon. It's the same concept as replacing any folder's icon; we're just applying it to the BBEdit Notebooks.
Step 1: Prepare Your Icon
- Install Image2icon (or your preferred icon-editing tool).
You can find Image2icon on the Mac App Store or from its developer's website.
- Choose or create an image for your Notebook icon.
This can be a PNG or JPG. I like to use distinct icons that remind me of each project's theme - like a pen for writing projects or a code bracket for development.
Step 2: Convert the Image to an Icon
- Open Image2icon and drag your chosen image into the app.
- Export the icon in ICNS or Finder icon format (depending on the tool's settings).
Step 3: Replace the BBEdit Notebook Icon
Locate your BBEdit Notebook file in Finder.
Get Info on the Notebook file by selecting it and pressing
Command + I.
Click the small icon in the top-left corner of the Info window to highlight it.
Paste the new icon you created (select the icon in Image2icon's Info panel or drag it from your export, and use
Command + Vin the BBEdit Notebook Info window).- Alternatively, if you used Image2icon's drag-and-drop functionality, you can just drag the new icon onto that small icon in the Get Info window.
Step 4: Refresh the Dock
- Remove the Notebook from the Dock by dragging it out until you see the "Remove" label.
- Drag your Notebook back in from the Finder onto the Dock's document area.
- Voilà! You should now see your shiny new icon in the Dock.
Pro Tips and Extra Ideas
- Keep a Consistent Theme: If you regularly create new Notebooks, it can be helpful to have a common theme or color palette for your icons. It keeps your Dock looking tidy and makes each Notebook icon instantly recognizable.
- Use Short, Descriptive Names: Even though the icons are front and center, a short name or label can go a long way in quickly identifying a Notebook. Right-click on a Notebook in the Dock, select "Show in Finder," and rename the file for clarity (e.g., "Blog Notebook," "Code Docs," "Marketing Plan").
- Drag and Drop for Quick Access: If you're creating a new BBEdit Notebook and already have a set of icons ready, don't forget you can instantly drag it onto the Dock for immediate use. No need to wait until later - get it set up the moment you create it.
Wrapping Up
And there you have it: a simple yet powerful way to distinguish your BBEdit Notebooks in the Dock. By replacing the default icon with a more personalized one, you'll spend less time hunting around and more time being productive in the apps and Notebooks you love.
Got any favorite BBEdit or Dock customization tricks up your sleeve? I'd love to hear about them! Feel free to share in the comments below or drop me a message on social media. Let's keep turning our Macs into the productivity powerhouses we know they can be.