The iMac Retina 5K, 27-inch (2019) might not be Apple's latest all-in-one, but it still holds its own. It was one of the last Intel-based iMacs, and for some users, that makes it special. Let's dive into some fun facts about this powerhouse Mac!
User-Upgradeable RAM - A Dying Feature
One of the best things about the 2019 iMac is its user-accessible RAM slot. Unlike today's sealed Apple Silicon Macs, this model lets you upgrade the RAM yourself. Officially, Apple supports up to 64GB, but tech enthusiasts have successfully installed 128GB. That's a serious boost for video editors, developers, and anyone running resource-heavy tasks.
That Gorgeous 5K Display
The Retina 5K display (5120×2880 resolution) is still stunning. It supports P3 wide color gamut and True Tone, making it a favorite for designers and video editors. For years, people considered it the gold standard for built-in Mac displays. In fact, it was so good that many professionals stuck with this iMac instead of shelling out thousands for an external 5K or 6K monitor.
The iMac That Outlived the Mac Pro
When Apple discontinued the iMac Pro (2017) in 2021, many professionals looked to the 2019 iMac as a worthy replacement. It had an option for a Core i9 processor, which outperformed some base-level 2019 Mac Pro configurations in certain single-core tasks. Not bad for an all-in-one!
Boot Camp and Virtualization Still Matter
Unlike Apple Silicon Macs, this iMac still supports Boot Camp, meaning you can run Windows natively. It's also a great machine for running older versions of macOS, making it useful for developers and legacy software users.
The T2 Chip - A Blessing and a Curse
Apple's T2 security chip improved SSD encryption, microphone privacy, and camera processing. It also enabled Hey Siri without an iPhone nearby. But it came with a trade-off - it made some repairs harder and added restrictions on downgrading macOS.
Why People Still Love This iMac in 202
Some people still prefer this model over newer Macs. Why?
It supports Intel-based apps without emulation.
You can boot from external drives more easily.
It's still one of the best-looking all-in-one Macs ever made.
The 2019 iMac 5K isn't just a relic of the past - it's a Mac with a lasting legacy. If you still have one, you've got a piece of Apple history that's worth holding onto!
When working with stereo audio in Final Cut Pro, you might occasionally run into a situation where one side of your track isn't quite up to par. Maybe the left channel is too boomy, or - as was my case - the right channel is just plain "garbage." Fortunately, Final Cut Pro provides a straightforward way to split your stereo audio into separate mono tracks, giving you the flexibility to disable or adjust the problematic channel without affecting the overall project.
In this blog post, I'll walk you through the step-by-step process of splitting a stereo audio file into dual mono tracks and disabling one channel. This method can be particularly useful if you need to reduce background noise or balance your mix when one track's audio levels are off.
Step 1: Import and Select Your Audio Clip
Import Your Clip: Start by importing the clip with your stereo audio into Final Cut Pro.
Select the Clip: In your timeline, click on the clip to ensure it's selected. You'll need to see the clip's details in the Inspector panel.
Step 2: Open the Audio Inspector
Access the Inspector: With your clip selected, open the Inspector panel by clicking the Inspector button in the top right corner of Final Cut Pro.
Switch to Audio: Make sure you're on the Audio tab where you can see all the properties related to your clip's audio configuration.
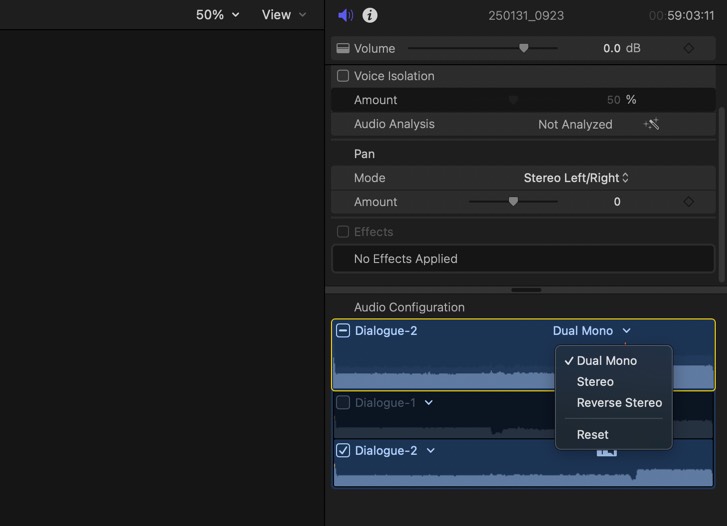
Step 3: Change the Audio Configuration to Dual Mono
Locate Audio Configuration: In the Audio Inspector, look for the Audio Configuration section. This area is where you can adjust how Final Cut Pro handles your audio channels.
Select Dual Mono: Change the configuration from stereo to Dual Mono. By doing so, Final Cut Pro splits your stereo file into two separate mono tracks - one for the left channel and one for the right.
Step 4: Disable the Unwanted Track
Identify the Problematic Track: Since my right track was causing issues, I needed to disable it. In the Inspector, after switching to Dual Mono, you'll see separate settings for each channel.
Turn Off the Track: Locate the Dialogue checkbox for the track you wish to disable. Simply click on the checkbox for the problematic track (in my case, the right channel) to turn it off. This effectively mutes the audio coming from that channel without affecting the left channel.
Step 5: Fine-Tuning and Playback
Play Back Your Clip: After disabling the unwanted track, play back your clip to ensure that the audio now meets your expectations. The background noise or unwanted audio should now be reduced or eliminated.
Adjust as Needed: If you find that you need further tweaks, you can always revisit the Audio Inspector to make more adjustments. Sometimes you might want to apply additional filters or volume changes to get the perfect balance.
Why Use Dual Mono?
Using Dual Mono is a powerful way to gain more control over your audio tracks in Final Cut Pro. It allows you to isolate and modify individual channels - perfect for scenarios where: - One channel has excessive background noise. - A channel is corrupted or has poor-quality audio. - You need to create a specific audio effect by treating each channel differently.
This method not only improves your audio quality but also saves time in the editing process by avoiding the need for additional software or complex workarounds.
Conclusion
Splitting a stereo audio file into dual mono tracks and disabling one channel is a simple yet effective technique in Final Cut Pro. Whether you're dealing with problematic audio or just want more control over your mix, these steps can help you achieve a cleaner, more professional sound.
The print() function is one of the most fundamental and frequently used functions in Python. While it's typically used to display output in a straightforward manner, you can get creative with it to format and present information in a more engaging way. In this post, we'll explore a fun and practical technique to enhance the way information is displayed in Python.
Printing Inline with end=
By default, print() adds a newline after each output. However, you can change this behavior using the end= parameter.
import random# Print numbers on the same line, separated by commasfor i inrange(5):print(random.randint(1, 99), end=", "if i <4else"n")# Print numbers on the same line, separated by spacesfor i inrange(5):print(random.randint(1, 99), end=" ")print("nDone!") # Moves to a new line after the loop
Why this is useful?
It helps create compact and clean output.
You control when to insert a new line or separator dynamically.
On my desk at work, among the monitors, keyboards, and Post-it notes, sits a little Hot Wheels model of the Scooby-Doo Mystery Machine. It's more than just a cool piece of nostalgia - it's a daily reminder of what QA is all about.
Let's take a closer look at the Mystery Machine and how it symbolizes the spirit of a great QA team.
The Mystery Machine: A Rolling QA Headquarters
The Mystery Machine isn't just a van. It's a mobile base of operations where the gang works together to solve mysteries. Inside, Fred crafts the plans, Velma deciphers the clues, Daphne thinks creatively, and Scooby and Shaggy keep things light (and occasionally find accidental solutions).
Sound familiar? That's a QA team in action.
Fred is your QA leader, strategizing the test plan.
Velma is the analytical mind, poring over logs and data.
Daphne represents the creative thinker, finding unconventional ways to break things (and help fix them).
Shaggy and Scooby? They're the humor and humanity, keeping spirits high even when the ghost of a recurring bug is haunting the build.
Together, this team tackles mysteries, just like we do when we're debugging or chasing down elusive defects.
Curiosity Fuels QA Success
If there's one trait the Scooby-Doo gang has in spades, it's curiosity. They never stop asking questions:
- What's causing the strange behavior?
- Where's the issue coming from?
- Is there a hidden clue we missed?
QA professionals share that relentless curiosity. It's what drives us to dig deeper when we encounter:
- Features that don't work as expected.
- Bugs that reappear like a masked villain.
- Performance issues that need investigation.
The lesson? Keep asking "why." Peel back every layer until you've uncovered the true culprit. Bugs, like spooky villains, are rarely what they seem at first glance.
"If It Weren't for You Meddling Kids!"
We've all heard Scooby-Doo's iconic line: "And I would have gotten away with it, too, if it weren't for you meddling kids!"
In QA, we're the meddling kids. Bugs try to sneak past us, but we're the ones who say, "Not so fast!" Developers might groan when we uncover another layer of issues, but deep down, they know we're making the product better.
Your meddling ensures that users experience software that is reliable, secure, and high quality. So, embrace the role - you're the hero of the story!
Teamwork Makes the Dream Work
The Scooby-Doo gang doesn't solve mysteries alone, and neither does QA. Fred, Velma, Daphne, Shaggy, and Scooby rely on each other's strengths, and that's what makes them successful.
In QA, collaboration is your superpower:
- Developers help you understand the code.
- Product managers share the user perspective.
- Stakeholders provide valuable insights.
Every voice matters. The best solutions come from combining perspectives and working as a team.
A Reminder for Every QA Professional
The Mystery Machine is more than just a van. It's a symbol of curiosity, persistence, and teamwork - the qualities that make QA essential.
In a recent phone call, I was contacted by an individual claiming to represent Publishers Clearing House (PCH), informing me that I had won $15.5 million. The conversation took an interesting turn when I questioned why they were communicating via phone instead of visiting me in person, as is customary for PCH prize awards. This challenge led to the abrupt end of the call, highlighting the fraudulent nature of the interaction.
This experience underscores a prevalent scam where fraudsters impersonate PCH representatives to deceive individuals. According to the Douglas County Sheriff's Office, victims often receive unsolicited communications claiming they've won large sums of money from PCH. The scammers then request payments for "taxes" or "processing fees" to claim the prize. (Douglas County Sheriff's Office)
It's crucial to recognize that PCH does not notify major prize winners via phone calls, emails, or text messages. Instead, the famous PCH Prize Patrol delivers prizes in person, without prior notification. Additionally, PCH never requires winners to pay fees to claim their prizes. (PCH Info)
Note: Many of these calls are from Jamaca.
YouTube Video
Practical Tips
To protect yourself from such scams, consider the following tips:
Be Skeptical of Unsolicited Communications: If you're informed of winning a prize without prior participation, it's likely a scam.
Never Pay to Claim a Prize: Legitimate sweepstakes do not require payment for taxes, fees, or any other purpose to claim winnings.
Verify the Source: Contact PCH directly at 1-800-392-4190 if you receive suspicious communications claiming to be from them. (USPS)
Report Suspicious Activity: Inform local law enforcement or consumer protection agencies about potential scams to help prevent others from falling victim.
By staying vigilant and informed, you can protect yourself and others from falling prey to such fraudulent schemes.
Becoming an electronics entrepreneur is both exhilarating and demanding. As you set out to establish your business, it's crucial to focus on strategic planning and market understanding. By aligning your business goals with the needs of your target audience, you can carve out a niche in this competitive field. This guide will provide you with insights to help you navigate the complexities of starting and growing your electronics venture.
Understanding Consumer Behavior
To successfully start and expand your electronics business, it's necessary to study the preferences and behaviors of your potential customers. By studying consumer behavior, you can pinpoint the demographics most likely to be interested in your products. This involves looking at purchasing trends, such as popular electronics categories and appealing price ranges for different age groups. By aligning your marketing strategies with these insights, you can better cater to your target audience and enhance your chances of thriving in the competitive electronics market.
Creating a Strategic Plan
A strategic plan serves as your roadmap for launching and expanding your business. This plan should clearly define your goals and the methods you'll use to achieve them, while also providing realistic financial forecasts to guide you through the business environment. A well-crafted strategy enables you to anticipate potential challenges and adapt to market changes. Financial projections, such as anticipated revenue and expenses, offer a framework for effective resource management and can be crucial for attracting investors.
Selecting Your Business Structure
Choosing the right business structure is a pivotal decision that can greatly influence your startup's success. Many entrepreneurs choose a limited liability company (LLC) because it offers advantages like shielding personal assets from business liabilities and providing potential tax benefits. An LLC in Massachusetts is particularly appealing due to its reduced administrative requirements and enhanced operational flexibility compared to other business structures. You can handle the setup by filing the necessary documents yourself or by utilizing a professional formation service. Be sure to carefully assess these services to ensure they align with your specific business goals.
Determining Your Unique Value Proposition
Crafting a compelling value proposition is essential for distinguishing your electronics business in a competitive market. This could involve highlighting cutting-edge technology or exceptional customer service. By pinpointing these unique features, you capture the interest of potential customers and establish trust and credibility. A well-defined value proposition is the cornerstone of your marketing strategy, ensuring that all promotional efforts are aligned and consistent with your brand message.
Leveraging Digital Tools for Growth
Online platforms are an important part of reaching and engaging your audience. Through social media platforms like Instagram and Facebook, you can use targeted advertising to connect with specific demographics. Email marketing offers a personalized way to communicate with your audience, fostering stronger relationships. Additionally, optimizing your website for search engines enhances visibility and attracts organic traffic, which is crucial for building brand awareness.
Pursuing Venture Capital
Venture capital can be a necessity to fuel growth in your electronics business. However, it's important to balance the influx of resources with the potential trade-off in company control. Venture capitalists often seek a substantial equity stake, which can mean sharing decision-making power. This partnership can provide access to valuable expertise and networks, but it's crucial to ensure that it aligns with your long-term vision. As you explore this option, think about how collaborating with investors might influence your business's future direction.
Prioritizing Sustainability
Integrating sustainable and eco-friendly materials into your product design is crucial for aligning with modern environmental standards. By opting for materials that are biodegradable or recyclable, you can significantly reduce the ecological footprint of your products. This conserves natural resources and attracts a growing base of environmentally conscious consumers. For example, using recycled plastics or sustainably sourced metals can lower production costs and enhance your brand's reputation. Prioritizing eco-friendly design can lead to long-term benefits, including compliance with regulations and increased market competitiveness.
The path to establishing a successful electronics business is paved with strategic decisions and innovative thinking. By focusing on a solid business structure, a clear strategic plan, and effective use of digital tools, you can lay a strong foundation for growth. Emphasizing sustainability and understanding your market will further position your business for success. With these elements in place, you are well-equipped to make a significant impact in the electronics industry.
Discover a treasure trove of engaging content and stay updated with the latest in blogging trends by visiting cryan.com today!
Selecting the right internet speed is crucial for a seamless online experience. Whether you're streaming movies, participating in video conferences, or gaming online, understanding your internet speed requirements ensures optimal performance.
Discover the Ideal Internet Speed for Your Needs
Allconnect's blog post, "FAQs: Internet Speeds – What Speed Do You Need?" offers an in-depth look at various internet speed requirements based on common online activities. The article breaks down speed recommendations for activities such as:
Email and Basic Browsing: Minimal speed requirements.
Streaming Video: Different speeds needed for SD, HD, and 4K content.
Online Gaming: Importance of speed and low latency.
Video Conferencing: Optimal speeds for smooth calls.
By understanding these recommendations, you can choose an internet plan that aligns with your household's usage patterns, ensuring a buffer-free and efficient online experience.
Why Visit Allconnect's Guide?
Navigating the myriad of internet plans and speed options can be overwhelming. Allconnect simplifies this process by providing clear, concise, and actionable information. Their guide not only answers common questions but also empowers you to make decisions that enhance your digital lifestyle.
Don't let slow internet speeds hinder your online activities. Visit Allconnect's comprehensive guide to determine the perfect internet speed for your needs and enjoy a seamless online experience.
Website Description
Allconnect.com is a comprehensive platform dedicated to helping consumers make informed decisions about their home services. From internet and TV to utilities and home security, Allconnect provides detailed guides, comparisons, and resources to simplify the selection process. Their user-friendly interface and expert insights make it easy to find the best services tailored to your needs.
Ocenaudio offers a wide range of filters to enhance audio, but the variety can feel overwhelming. To simplify things, I’ve provided descriptions of the major filters to clarify their functionality
Here are brief descriptions for each of the Oceanaudio audio filters:
General Filters in Ocenaudio
Lowpass Filter
Use the Lowpass Filter to remove high-frequency sounds, allowing only lower frequencies to pass through. It's ideal for reducing hiss or other high-pitched noise in recordings.
Highpass Filter
The Highpass Filter removes low-frequency sounds, permitting higher frequencies to pass through. It's commonly used to reduce rumble or eliminate unwanted bass noise.
Bandpass Filter
The Bandpass Filter isolates a specific range of frequencies while cutting both high and low frequencies outside that range. This is useful for focusing on particular frequency bands, like vocals or instruments.
Bandstop Filter
The Bandstop Filter removes a specific frequency range while allowing frequencies outside that range to pass through. It's helpful for eliminating specific noise, such as hums or feedback.
Apple Bandpass Filter
Similar to the Bandpass Filter but optimized with Apple's unique algorithms, it focuses on specific frequencies for a more refined and efficient result.
Apple Filter
A general-purpose filter from Apple's audio suite that allows for customizable frequency adjustments. It's versatile for enhancing or attenuating frequencies as needed.
Apple Highpass Filter
Removes low-frequency noise with precision using Apple's highpass technology. Perfect for eliminating bass-heavy interference while retaining clarity in higher frequencies.
Apple High Shelf Filter
Boosts or attenuates high frequencies above a certain threshold. This filter is excellent for brightening audio or reducing harshness in higher tones.
Apple Lowpass Filter
Filters out high frequencies using Apple's proprietary algorithms, ideal for smoothing recordings or reducing shrill sounds.
Apple Low Shelf Filter
Boosts or attenuates low frequencies below a set point, making it useful for enhancing bass or minimizing muddiness in recordings.
Equalization Filters in Ocenaudio
11-Band Graphic Equalizer
Offers control over 11 frequency bands, allowing you to adjust specific ranges to enhance or reduce particular tones. It's a simple and effective way to shape your audio for general corrections or creative effects.
31-Band Graphic Equalizer
Provides precise control over 31 frequency bands, ideal for fine-tuning audio across a wide spectrum. This is perfect for detailed equalization or addressing complex audio imbalances.
Apple Graphic Equalizer
A user-friendly equalizer from Apple that adjusts multiple frequency bands for overall tonal balance. Use it for quick and effective audio enhancements or corrections.
Apple N-Band Equalizer
An advanced equalizer offering customizable frequency bands, giving you precise control over specific audio frequencies. It's great for tailoring audio to your exact preferences or addressing detailed sound issues.
Apple Parametric Equalizer
Allows targeted adjustments to specific frequencies with control over bandwidth and gain. This filter is ideal for surgical edits, such as removing problem frequencies or enhancing specific audio elements.
Dynamics Processing Audio Filters in Ocenaudio
Compressor
Reduces the dynamic range by lowering the volume of loud sounds while keeping quieter sounds unaffected. This is useful for achieving a balanced and polished sound, especially in vocal or music tracks.
Expander
Increases the dynamic range by reducing the volume of quiet sounds below a set threshold. It's ideal for enhancing clarity and reducing unwanted low-level noise.
Limiter
Ensures audio does not exceed a specified volume level, preventing distortion or clipping. It's essential for mastering and creating audio with consistent loudness.
Noise Gate
Silences audio below a certain threshold, effectively removing background noise or hum. This is great for cleaning up recordings with unwanted ambient sounds.
Apple Dynamics Processor
A versatile tool for managing dynamics, combining compression, expansion, and limiting features. Use it for precise control over audio levels and tonal balance.
Apple Peak Limiter
Prevents audio peaks from exceeding a defined limit, ensuring clean and distortion-free output. It's commonly used in mastering to control sudden loud spikes.
Apple Multiband Compressor
Divides the audio into frequency bands and applies compression to each band independently. This allows for detailed dynamic control, making it ideal for complex audio mixes or mastering.
Special Audio Filters in Ocenaudio
Apply Quantization
Reduces the bit depth of audio, creating a lo-fi effect or preparing audio for specific formats. It's useful for creative sound design or adapting audio for digital applications.
Add Random Noise
Introduces random noise to your audio, often for testing, masking other sounds, or creating special effects. It's helpful in simulating certain acoustic environments or adding texture.
Apple Distortion
Applies distortion to the audio, creating an overdriven or gritty sound. It's commonly used in music production for creative effects or emphasizing certain frequencies.
Apple Net Send
Sends the audio stream to another device or software via a network, useful for real-time processing or collaborative work. It's ideal for live setups or remote audio workflows.
Apple AAC Encoder Round Trip
Simulates the compression and decompression of the AAC audio codec. This is helpful for previewing how audio will sound in AAC format without permanent conversion.
Apple Roger Beep
Adds a tone (beep) at the end of a transmission, often used in radio communications. This can be applied for authenticity in simulated broadcasts or fun effects.
Apple Sound Isolation
Isolates specific sounds or reduces background noise to enhance the clarity of a target audio source. It's excellent for cleaning up recordings with significant ambient interference.
Managing a crowded Clips Library in Final Cut Pro can sometimes feel like a daunting task, especially when you're working with large projects containing countless clips. Instead of permanently deleting clips you may later regret losing, here's a simple yet powerful tip to keep your library organized: use Rejected Clips.
The Problem: A Crowded Library
When your Clips Library grows too large, finding the footage you actually need can become a frustrating chore. Scrolling endlessly to locate key clips wastes time and hinders productivity. Deleting unused clips might seem like an easy fix, but what if you later realize you need one of those clips?
The Solution: Rejected Clips
By marking unwanted clips as "Rejected," you can declutter your library without losing access to those clips entirely. This workflow ensures that you're only seeing the files you're actively working with, while still keeping the option to revisit rejected clips if needed.
How to Reject Clips
Select the Clip: Highlight the clip you no longer want cluttering your view.
Press the Delete Key: This marks the clip as "Rejected." Don't worry - it's not permanently deleted, just hidden when filtered out.
Filter Your Clips View: Use the Clip Filtering menu to hide rejected clips. Simply set the filter to show only clips marked as "Favorites" or "Unrated." Rejected clips will no longer appear, keeping your library focused and manageable.
When You're Ready to Delete
If you're certain you'll never need a clip again, you can take the next step: 1. Select the Clip. 2. Use Command + Delete: This moves the clip to the Trash, but don't worry - Final Cut Pro will prompt you with a confirmation message before the clip is permanently removed.
Why This Trick Works
Non-Destructive Workflow: Rejected Clips remain in your library unless you choose to delete them permanently. This flexibility gives you peace of mind.
Efficient Sorting: By hiding rejected clips, you streamline your workflow and focus only on the essential files.
Organized Deletion: When you're ready to clean up for good, you already have a curated list of clips to review and delete.
Pro Tip
When filtering your Clips Library, don't forget to check back on your rejected clips every so often. You might rediscover footage you can repurpose for future projects.
Using Rejected Clips is a game-changer for staying organized in Final Cut Pro, and it's a "little-known" feature that every editor should add to their toolkit. Try it out and enjoy the newfound clarity in your Clips Library!
When working with Python, it's common to install numerous packages over time. Some of these packages might no longer be needed, and identifying them can help free up valuable disk space. In this blog post, we'll explore a practical way to list all installed Python packages, locate their directories, and estimate their size on disk.
The Command Breakdown
The following command pipeline is a powerful one-liner that accomplishes our goal:
pip list |tail-n +3 |awk'{print $1}'|xargs pip show |grep-E'Location:|Name:'|cut-d' '-f 2 |paste-d' '--|awk'{print $2 "/" tolower($1)}'|xargs du -sh2> /dev/null |sort-hr
Let's break this command into digestible pieces:
pip list: Lists all installed Python packages and their versions.
tail -n +3: Removes the first two lines of the output (the header row) to leave only the package names and versions.
awk '{print $1}': Extracts the first column, which contains the package names.
xargs pip show: Feeds the package names to the pip show command to retrieve details about each package.
grep -E 'Location:|Name:': Filters the output to include only the Location and Name fields.
cut -d ' ' -f 2: Splits each line by spaces and extracts the second field, which is the value of the Location and Name fields.
paste -d ' ' - -: Combines the Name and Location outputs into a single line per package.
awk '{print $2 "/" tolower($1)}': Constructs the full path to each package by appending the package name to its location.
xargs du -sh 2> /dev/null: Calculates the disk usage of each package directory and suppresses error messages (e.g., for inaccessible directories).
sort -hr: Sorts the packages by size in descending order.
This shows the size of each installed package, helping you identify large ones that might no longer be necessary.
Use Cases
Disk Space Cleanup: Remove large, unused packages to free up space.
Environment Management: Understand which packages are installed and ensure that only necessary ones are present in your environment.
Pro Tip: Automating Cleanup
Once you identify packages you no longer need, you can remove them using:
pip uninstall <package_name>
Considerations
Virtual Environments: Always run this command within the virtual environment you want to inspect to avoid confusion with global packages.
Dependencies: Be cautious when uninstalling packages as they may be dependencies for others.
By understanding your Python environment, you can keep it clean, efficient, and ready for action. Try out the command and see how much disk space you can reclaim!
The late Tip O'Neill, former Speaker of the House, famously said, "All politics is local." This highlights the importance of understanding the unique needs and concerns of individual communities in politics. Similarly, in Quality Assurance (QA), we can say, "All quality is contextual."
This principle means that the effectiveness of QA processes, tests, and standards depends on the specific context of the project, application, or business needs. Just as local concerns shape political decisions, the unique environment and requirements of each product guide QA priorities and strategies.
What Does "All Quality is Contextual" Mean?
Subjectivity of Quality: Quality is subjective and varies widely. A sturdy tool might be perfect for a construction worker, while a tech-savvy user might want a sleek, feature-rich device.
Purpose and Function: The main function of a product determines its quality. A chef's knife for professional use is judged differently than one for home cooking.
Cultural and Temporal Shifts: Quality standards change over time and across cultures. What was once top-notch craftsmanship might not meet today's standards.
User Perspective: Individual needs and expectations shape how quality is perceived. One user might value a smartphone's battery life, while another prioritizes the latest camera technology.
Economic Factors: Budget affects quality expectations. A durable, affordable product might be high quality for someone with limited resources, while someone with more money might seek premium features and aesthetics.
Environment of Use: The intended environment impacts quality assessment. Outdoor gear built for rugged conditions is judged differently than gear for casual urban use.
Practical Implications for QA
Tailored Testing Strategies: Develop QA strategies that address each project's specific needs and context.
Risk-Based Testing: Focus testing on areas with the highest risk and potential impact based on the product's context.
User-Centric Approach: Involve users throughout the QA process to ensure quality is assessed from their perspective.
Contextual Documentation: Clearly document the context and assumptions behind QA decisions and test results.
By embracing "All quality is contextual," QA teams can move beyond generic checklists. They can create more effective, efficient, and valuable testing strategies that truly meet each project's unique needs.
Recently, I came across a VHS tape dated July 1986, and it was like stepping into a time machine. The commercials on the tape offer a fascinating glimpse into what people were watching and what products were being advertised over 35 years ago. Let's take a trip down memory lane and see what we find!
1. WBZ Eyewitness Sports Update with Don Shane
The tape starts with a local news segment, the WBZ Eyewitness Sports Update with Don Shane. This short clip reminds us of the importance of local news and sports reporting. Back in 1986, people relied on local channels to stay up-to-date on what was happening in sports.
2. Hyundai Excel - Cars that make sense
Next up is a commercial for the Hyundai Excel, a car that was marketed as being sensible and practical. In 1986, South Korean car manufacturers were just starting to make inroads into the American market, and the Hyundai Excel was one of the first models to achieve widespread success.
3. The Karate Kid Part II - 1986 TV Trailer
The excitement builds as the tape plays a trailer for The Karate Kid Part II, which was released in theaters in June 1986. This movie sequel was highly anticipated by fans of the original film, and the trailer does a great job of building suspense and excitement.
4. Coors Light - "Who's going to be at the Silver Bullet tonight?"
We then get a taste of 1980s nightlife with a commercial for Coors Light beer. The commercial features a catchy jingle and asks the question, "Who's going to be at the Silver Bullet tonight?" This commercial takes us back to a time when going to the bar with friends was a popular way to spend an evening.
5. Old Milwaukee Beer - Mexican Food on Olvera Street, Los Angeles and Old Milwaukee Beer - It doesn't get any better than this
Old Milwaukee Beer is featured next with a single commercial that showcases the beer's association with good times and relaxation. The commercial depicts people enjoying Mexican food on Olvera Street in Los Angeles and incorporates the tagline 'It doesn't get any better than this.' This advertisement paints a picture of a simpler time when people cherished the company of friends along with good food and drinks.
6. WBZ Supporting Jazz in 1986 - With John Henning - "You gotta have Arts"
The tape then takes a turn for the artistic with a public service announcement from WBZ supporting jazz in 1986. The PSA features John Henning and the message "You gotta have Arts." This PSA highlights the importance of supporting the arts and culture in our communities.
7. Cocaine. The Big Lie - PSA from MLB featuring Mike Schmidt
The mood turns serious with the final commercial on the tape, a public service announcement about the dangers of cocaine. This PSA features Major League Baseball star Mike Schmidt and the message "Cocaine. The Big Lie." This commercial is a reminder of the serious drug problem that the United States was facing in the 1980s.
A Look Back at a Different Time
Watching these commercials from July 1986 is a reminder of how much has changed over the past 35 years. The styles, the products, and even the way news and entertainment are delivered have all been transformed. However, some things remain the same: the desire to be entertained, the importance of local news, and the need to combat social problems like drug abuse. This VHS tape is a valuable piece of history that provides a window into a bygone era.
In the dynamic world of business, maintaining a steady cash flow is critical for operational efficiency and growth. For businesses across the USA, factoring companies has become an indispensable tool for bridging financial gaps and ensuring smooth operations. If you're exploring ways to improve your cash flow, understanding what a factoring company does and how it can benefit your business is crucial.
What Is a Factoring Company?
A factoring company provides financial services that allow businesses to sell their outstanding invoices to the company in exchange for immediate cash. This process, known as invoice factoring, is a popular solution for businesses facing delays in payments from their clients. By converting unpaid invoices into working capital, factoring companies help businesses manage their expenses, payroll, and growth initiatives without relying on traditional loans.
How Does Factoring Work?
Invoice Submission: Businesses submit their unpaid invoices to a factoring company.
Verification: The factoring company verifies the validity of the invoices and the creditworthiness of the clients responsible for payment.
Cash Advance: Once approved, the business receives a percentage of the invoice value (usually 70-90%) as an immediate cash advance.
Payment Collection: The factoring company collects payment directly from the clients.
Final Settlement: After deducting a small factoring fee, the company remits the remaining balance to the business.
Benefits of Working with a Factoring Company
Improved Cash Flow: Factoring provides immediate access to funds, eliminating the waiting period for invoice payments.
No Debt Accumulation: Unlike loans, factoring is not a form of debt; it simply advances money already owed to your business.
Scalability: As your sales and invoices grow, factoring can scale to meet your increasing cash flow needs.
Time-Saving: Outsourcing invoice collection to a factoring company allows you to focus on core business activities.
Flexibility: Many factoring companies offer customized solutions tailored to specific industries and business sizes.
Is Factoring Right for Your Business?
Factoring is an excellent option for businesses across the USA that experience payment delays but have a strong client base with reliable credit. Industries that commonly benefit from factoring include:
Trucking and Transportation: Ensuring drivers are paid on time despite slow-paying shippers.
Staffing Agencies: Meeting payroll obligations while waiting for client payments.
Manufacturing and Wholesale: Maintaining production levels without financial strain.
Professional Services: Covering operational costs while awaiting client settlements.
How to Choose the Right Factoring Company
When selecting a factoring company, consider the following:
Industry Expertise: Some factoring companies specialize in specific industries, offering tailored services.
Terms and Fees: Compare rates, advance percentages, and contract terms to find the best fit for your business.
Reputation: Look for a company with positive client reviews and a proven track record.
Customer Support: Ensure the company provides reliable support to handle any issues or queries promptly.
Coverage: For nationwide businesses, choose a factoring company that serves clients across the USA.
Why Factoring Companies Are Essential Nationwide
For businesses operating across the USA, cash flow challenges are a universal concern. Factoring companies provide a seamless solution, helping businesses in diverse states and industries overcome financial hurdles. By ensuring immediate access to working capital, these companies empower businesses to stay competitive and grow in a fast-paced economy.
Final Thoughts
A factoring company can be a game-changer for businesses looking to stabilize cash flow and focus on growth. Whether you're a small business owner or managing a large-scale enterprise, factoring offers a flexible and efficient financial solution tailored to your needs.
In the dynamic world of video production, delivering clear and engaging content is paramount. Whether you're a professional filmmaker, a content creator, or someone who simply enjoys crafting videos, adding subtitles can significantly enhance the accessibility and reach of your work. Enter FinalCutSubtitle.com, a game-changing platform designed to revolutionize the way you integrate subtitles into your Final Cut Pro projects.
What is FinalCutSubtitle.com?
FinalCutSubtitle.com is a dedicated online service tailored specifically for Final Cut Pro users. It offers a comprehensive suite of tools and resources to create, edit, and manage subtitles effortlessly within your video editing workflow. Whether you're producing a short film, a YouTube vlog, or a corporate presentation, this platform simplifies the subtitle process, allowing you to focus more on your creative vision.
Website Description
This tool provides a free way to take your audio and generate subtitles specifically formatted for the titles (.fcpxml) in Final Cut Pro, allowing you to edit them to your needs. I hope this is able to streamline your subtitling workflow and save valuable time!
Hello, fellow Mac enthusiasts and music maestros! Welcome back to another Friday edition of Macintosh Blog, your go-to source for all things Apple and music production. Today, we're diving into a fantastic feature that can supercharge your creative workflow: Adding Your Own Songs and Clips to the Apple Loop Library in GarageBand.
Whether you're a budding producer or a seasoned pro, having a personalized loop library can make your projects more unique and streamline your creative process. Let's walk through the simple steps to enrich your Apple Loop Library with your custom creations.
Why Customize Your Apple Loop Library?
Before we get into the how, let's quickly touch on the why. Apple Loop Library is a treasure trove of pre-made loops and samples that can be seamlessly integrated into your music projects. By adding your own clips:
Personalization: Tailor your library to match your unique sound and style.
Efficiency: Quickly access your favorite sounds without hunting through countless files.
Organization: Keep your workspace tidy by categorizing your loops effectively.
Step-by-Step Guide to Adding Clips to Apple Loop Library
1. Create or Select Your Clip
Start by opening your preferred music production software - GarageBand, Logic Pro, or any other compatible application. Create a new project or open an existing one and select the song or clip you want to add to your Apple Loop Library. Ensure that the clip is well-mixed and mastered to maintain quality across different projects.
2. Drag the Clip to the Apple Loop Section
Once your clip is ready:
Locate the Timeline: This is where your tracks are laid out.
Select the Clip: Click on the song or specific segment you wish to save as a loop.
Drag and Drop: Click and drag the selected clip from the timeline directly into the Apple Loop Library section. This action initiates the process of adding your custom loop to the library.
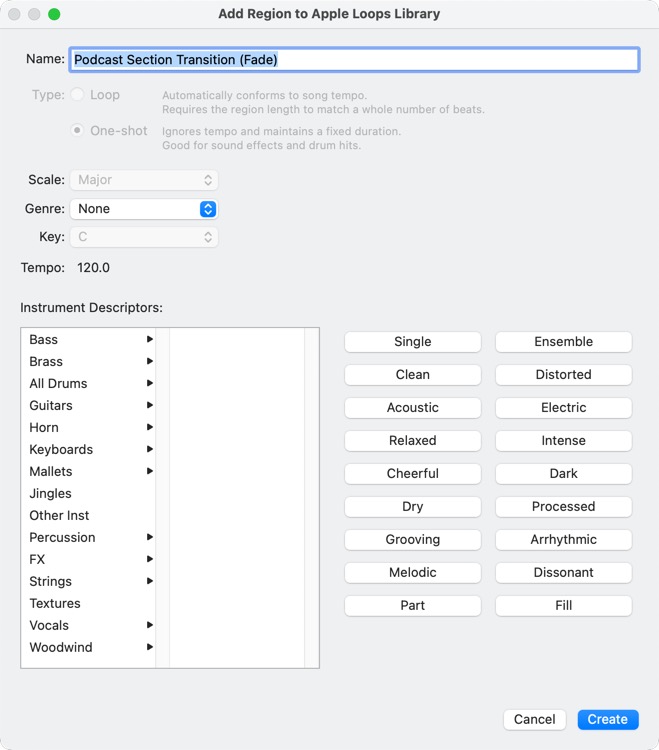
3. Name Your Loop Effectively
Naming your loops thoughtfully is crucial for easy retrieval later. Follow these tips:
Be Descriptive: Use names that describe the clip's mood, instrument, tempo, or key (e.g., "Sunny Acoustic Guitar - 120BPM - C Major").
Consistency: Maintain a consistent naming convention to keep your library organized.
Avoid Generic Names: Steer clear of vague names like "Loop1" or "Track A" which can make searching tedious.
4. Categorize Your Loop
After naming, categorize your loop to fit seamlessly within your existing library structure:
Genre: Rock, Pop, Jazz, Electronic, etc.
Instrument: Guitar, Drums, Synth, Vocals, etc.
Mood/Style: Chill, Energetic, Dark, Uplifting, etc.
Proper categorization ensures that you can quickly locate the perfect loop during your creative sessions.
5. Finalize and Save
Once named and categorized:
Review: Play back the loop to ensure it sounds as intended.
Save: Confirm the addition to your Apple Loop Library. Your custom loop is now ready to be accessed in any of your future projects.
Tips for an Organized Apple Loop Library
Regular Maintenance: Periodically review and update your library to remove unused loops and add new ones.
Backup: Keep a backup of your custom loops to prevent data loss.
Tagging: Utilize tags or keywords for even quicker searchability within your library.
Version Control: If you frequently update a loop, consider versioning (e.g., "Bassline V1", "Bassline V2") to keep track of changes.
Conclusion
Adding your own songs and clips to the Apple Loop Library is a straightforward process that can significantly enhance your music production workflow. By following these simple steps - dragging your clip to the library, naming it thoughtfully, and categorizing effectively - you can build a personalized library that reflects your unique sound and accelerates your creative process.
Stay tuned for more tips and tricks every Friday here at Macintosh Melody. Until next time, keep creating and harmonizing with your Mac!
Whether you're a seasoned video editor or just starting out, having a rich library of sound effects can elevate your Final Cut Pro projects to new heights. While Final Cut Pro comes packed with a variety of built-in sounds, adding your own collection of special effects allows for greater creativity and personalization. In this guide, we'll walk you through the process of adding your own sound effects to the Final Cut Pro Sound Library, ensuring they're readily available for any project you undertake.
Why Customize Your Sound Library?
Custom sound effects can set your projects apart, providing unique audio elements that perfectly match your vision. Whether you're working on a podcast, a short film, or a corporate video, having tailored sounds can enhance the storytelling and overall production quality.
Step-by-Step Guide to Adding Your Own Sound Effects
1. Organize Your Sound Effects
Before diving into Final Cut Pro, it's essential to organize your sound effects. Creating a dedicated folder for your custom sounds will keep everything neat and easily accessible.
Example:
I like to keep my audio files in a folder named "Podcast Sound Effects." This helps me quickly locate the sounds I need without sifting through unrelated files.
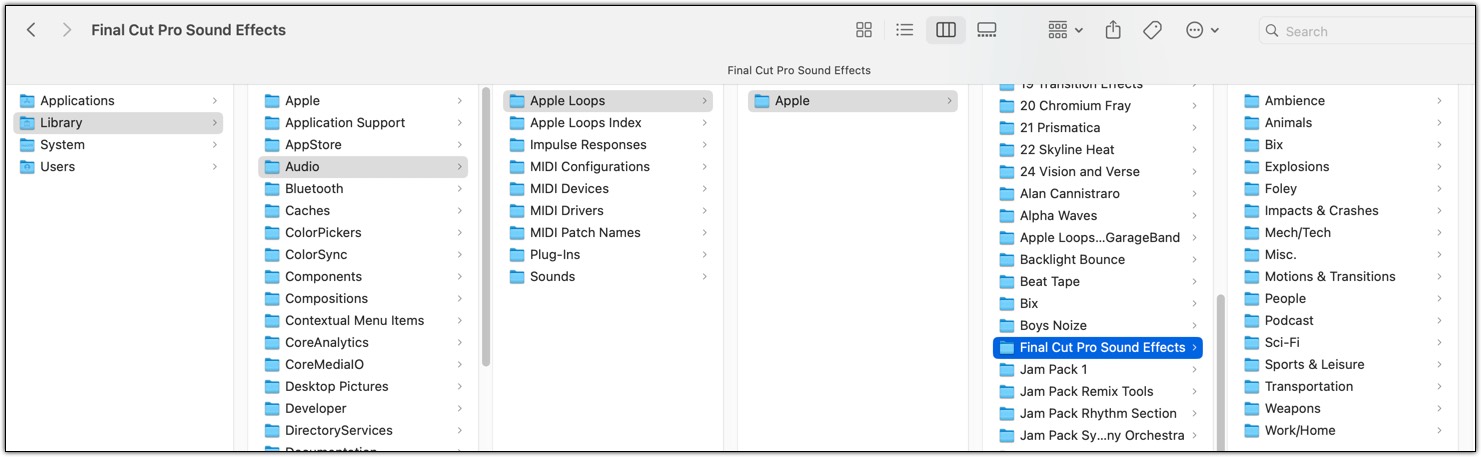
2. Locate the Final Cut Pro Sound Effects Library
Final Cut Pro stores its sound effects in a specific directory on your Mac. To add your own sounds, you'll need to navigate to this folder.
Path to Sound Effects Library: /Library/Audio/Apple Loops/Apple/Final Cut Pro Sound Effects/
How to Access:
Open Finder: Click on the Finder icon in your Dock.
Navigate to the Library Folder:
Press Shift + Command + G to open the "Go to Folder" window.
Enter /Library/Audio/Apple Loops/Apple/Final Cut Pro Sound Effects/ and press Enter.
Create a New Folder:
To maintain organization, create a new folder within the Sound Effects directory. Right-click inside the folder, select "New Folder," and name it appropriately (e.g., "Podcast Sound Effects").
3. Add Your Custom Sound Effects
With your dedicated folder in place, it's time to add your custom sound effects.
Steps:
Gather Your Audio Files: Ensure your sound effects are in a compatible format, such as .wav or .aiff, which are widely supported by Final Cut Pro.
Copy the Files: Drag and drop your audio files into the newly created folder (e.g., "Podcast Sound Effects").
Maintain File Organization: Consider naming your files descriptively (e.g., Door_Closing.wav, Laughter.wav) to make them easily searchable within Final Cut Pro.
4. Refresh Final Cut Pro's Sound Library
After adding your custom sounds, you may need to refresh Final Cut Pro to recognize the new additions.
How to Refresh:
Restart Final Cut Pro: Close and reopen the application to allow it to scan the Sound Effects library for new files.
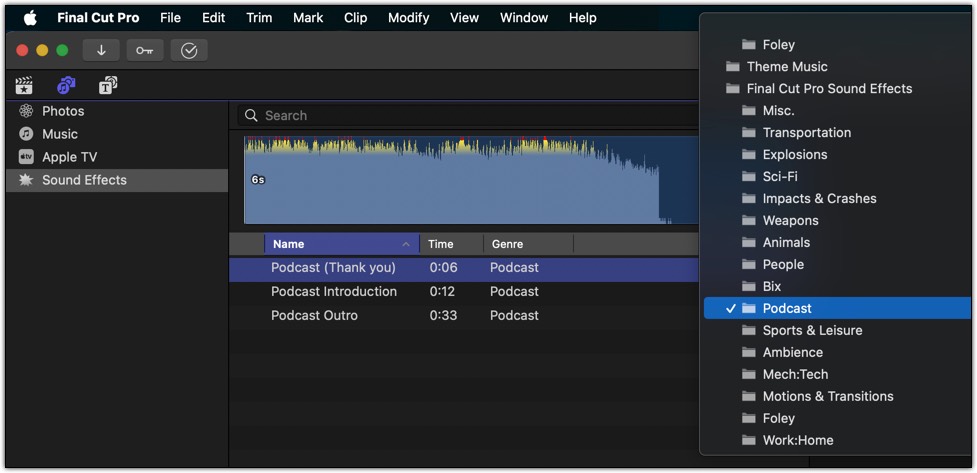
Verify Your Sounds:
Open a project in Final Cut Pro.
Navigate to the "Sound Effects" browser.
Look for your newly added folder (e.g., "Podcast Sound Effects") and ensure your sounds are visible and playable.
5. Utilize Your Custom Sound Effects in Projects
With your sounds now part of the Final Cut Pro Sound Library, integrating them into your projects is seamless.
Using the Sounds:
Open the Sound Effects Browser: In your Final Cut Pro project, click on the "Sound Effects" tab.
Browse to Your Folder: Locate your custom folder (e.g., "Podcast Sound Effects").
Drag and Drop: Simply drag the desired sound effect onto your timeline where you want it to play.
Adjust as Needed: Use Final Cut Pro's audio editing tools to adjust volume, fade in/out, and other properties to fit your project's needs.
Tips for an Organized Sound Library
Categorize Your Sounds: Within your custom folder, consider creating subfolders for different types of sounds (e.g., "Ambient," "Transitions," "Foley") to streamline the search process.
Consistent Naming Conventions: Use clear and consistent names for your sound files to make them easily identifiable.
Backup Your Library: Regularly back up your custom sound library to prevent data loss and ensure you can restore your collection if needed.
Conclusion
Adding your own sound effects to the Final Cut Pro Sound Library is a straightforward process that can significantly enhance the quality and uniqueness of your video projects. By organizing your sounds thoughtfully and integrating them seamlessly into Final Cut Pro, you gain greater control over your audio landscape, allowing your creative vision to shine. Whether you're producing a podcast, a cinematic masterpiece, or any other type of video content, your custom sound effects will be an invaluable asset in bringing your projects to life.
This a comprehensive table of various Python expressions categorized by their type. Each expression is accompanied by a sample value to illustrate its usage.
In the ever-evolving landscape of web development, Quality Assurance (QA) professionals play a pivotal role in ensuring that applications not only function correctly but also provide a seamless user experience. While automated testing tools and frameworks are indispensable, sometimes the most effective solutions lie hidden within the very code we test. Today, we'll delve into a nifty JavaScript trick involving document.designMode and explore other cool techniques that every QA expert should have in their toolkit.
The Magic of document.designMode
What is document.designMode?
document.designMode is a property in JavaScript that allows developers to enable or disable the ability to edit the content of a webpage directly. By setting document.designMode = "on";, the entire document becomes editable, transforming static content into a live, modifiable interface.
How to Use It in Chrome DevTools
Open Chrome DevTools: Right-click on any webpage and select "Inspect" or press Ctrl+Shift+I (Windows/Linux) or Cmd+Option+I (macOS).
Navigate to the Console: Click on the "Console" tab within DevTools.
Enable Design Mode:
document.designMode="on";
Edit the Page: Once activated, you can click on any text on the page and modify it directly. This change is temporary and only exists in your current browser session.
Why is This Cool for QA?
Quick Mockups: Simulate text changes to test how different content lengths or phrases affect the layout without altering the source code.
UI/UX Testing: Instantly visualize how design tweaks impact user experience, aiding in rapid feedback cycles.
Bug Reproduction: Easily manipulate page content to replicate issues reported by users, facilitating quicker diagnosis and resolution.
How Cool Is That?!
Absolutely! This simple trick can save QA professionals countless hours by allowing real-time editing and testing of web pages without diving into the codebase.
I recently stumbled upon a collection of vintage commercials on an old VHS tape. It was like stepping back in time! Here are a few of my favorites:
MasterCard - It's Smart Money: This commercial features a futuristic vision of how we'll be paying for things in the future. Instead of using cash or credit cards, we'll simply use our personal identification numbers (PINs). The commercial is a bit cheesy by today's standards, but it's still a fascinating glimpse into the future of payments. We are still waiting for this technology to be implemented.
Miller - Made the American Way: This commercial celebrates the American spirit and the hard work that goes into making Miller beer. It features a montage of images of American workers, from farmers to factory workers. The commercial is patriotic and inspiring, and it's a great reminder of what makes America great.
Yugo - The Road Back to Sanity Only $3,990: This commercial for the Yugo car is hilarious. It features the YuGo winning the 8,000 mile race across the country - in which some people didn't think they should enter.
I hope you enjoyed this trip down memory lane! If you have any other vintage commercials that you'd like me to write about, please let me know.
You've been doing everything right - or so you think. High-quality backlinks? Check. Steady content updates? Check. A well-maintained website with all the right tools? Double-check. And yet, your domain rating (DR) seems stuck in place, like a car with its wheels spinning in the mud. This frustrating phenomenon is what we call the DR plateau. It's that point where progress slows, even though your efforts feel endless. But why does this happen, and - more importantly - how can you fix it? This article will explore the mechanics of DR stagnation, unpack why it occurs, and offer strategies to push past the plateau. By the end, you'll have a clearer idea about why your domain rating stagnates and a few unconventional ideas to try.
What Is the DR Plateau?
First, let's clarify what domain rating is. DR measures the strength of a website's backlink profile. It's a score developed by one of the most respectable internet tools out there - Ahrefs, which ranges from 0 to 100. The higher your DR, the more authoritative your site appears to search engines.
The DR plateau happens when your score levels off. You see no improvement for weeks - or even months - even though you're actively building links, creating content, and optimizing on-page SEO. This isn't just bad luck; it's a signal that you've reached a threshold where simple tactics aren't enough.
If you've hit this wall, it's worth taking a step back to assess the bigger picture. Are you prioritizing quality over quantity when it comes to backlinks? Have you conducted a thorough SEO audit recently? And here's a big one: have you taken the time to check your domain reputation? If your site has even minor red flags - like spammy links or low-quality content - it could drag your DR down without realizing it.
Why Does Your Domain Rating Stagnate?
The short answer is diminishing returns. In SEO, the more you climb, the harder it gets to move up. Each point of DR requires exponentially more effort than the last. A jump from 10 to 20 might take just a handful of quality links. But moving from 50 to 60? That's an entirely different game.
There are three common reasons for DR stagnation.
Link Saturation
The quantity and quality of your backlinks heavily influence your DR score. If most of your new links come from domains already linked to you, their impact diminishes over time. It's like trying to fill a bucket that already has water - each drop adds less and less.
Low Authority of New Links
Not all backlinks are created equal. Links from low-DR or spammy sites won't boost your score. If your strategy prioritizes quantity over quality, you'll hit a wall quickly.
Algorithmic Scaling
Domain rating is logarithmic. This means each incremental increase requires exponentially more authority. In other words, the gap between DR 70 and DR 80 is far larger than the gap between DR 30 and DR 40. Without a substantial boost in high-authority links, progress slows to a crawl.
Breaking Through the Plateau
Pushing past the DR plateau isn't about working harder but working smarter. Here are some strategies to regain momentum and start climbing again.
Diversify Your Backlink Portfolio
One major reason why your domain rating stagnates is over-reliance on the same sources. To overcome this, focus on securing links from a wider range of domains. Target sites in adjacent niches or industries, aiming for those with higher authority than your own. The goal is to tap into fresh link equity that hasn't been diluted.
For example, if you've primarily been targeting blogs, consider pursuing backlinks from news outlets, academic institutions, or government sites. Expanding your network broadens the scope of your link profile, which can help reinvigorate your DR growth.
Prioritize High-Authority Links
Instead of chasing hundreds of low-quality links, shift your energy to securing a handful of links from highly authoritative sites. Guest posts on industry-leading blogs, HARO contributions, or partnerships with established brands can provide the kind of boost you need.
This might require extra effort upfront, but the payoff is worth it. A single high-quality backlink often carries more weight than dozens of mediocre ones.
Strengthen Your On-Site Authority
While backlinks are crucial, don't underestimate the power of on-page SEO. Conduct a content audit and focus on improving what's already ranking. Add more depth, update outdated information, and optimize internal linking structures. A stronger internal framework can amplify the impact of your external links.
For example, if you've published articles that haven't been updated in years, now is the time to revisit them. Even small improvements - like refining keyword usage or updating data - can have a ripple effect on your overall site authority.
Experiment With Digital PR
Digital PR campaigns can earn you backlinks from news sites, magazines, and other high-traffic platforms. Think creative pitches, original research, or eye-catching infographics. The idea is to generate buzz that naturally attracts backlinks.
For instance, if your company launches a study with surprising findings, pitching the results to major publications can result in valuable, high-DR backlinks. The key is crafting a hook that's newsworthy and relevant.
Leverage Strategic Partnerships
Collaborate with influencers or organizations that can share your content with their networks. These partnerships can drive traffic while exposing your site to new audiences - and fresh linking opportunities.
Whether it's a co-authored blog post, a joint webinar, or a guest appearance on a podcast, strategic partnerships can breathe new life into your backlink strategy.
Understanding the Long Game
Improving your DR isn't just a sprint; it's a marathon. And like any marathon, pacing matters. If you focus too much on quick wins, you'll burn out - or worse, your site's growth will stall. Instead, aim for consistent, sustainable improvements.
At this stage, it's also critical to manage expectations. Sometimes, DR stagnation reflects natural limits. Not every site can reach DR 90, and that's okay. Your ultimate goal should be building a site that delivers value and ranks well, not chasing arbitrary scores.
That said, breaking through the DR plateau isn't impossible. It requires a mix of patience, creativity, and a willingness to adapt. Experiment with different strategies, track progress and refine your approach as needed.
Remember that DR is just one metric among many. Focusing exclusively on your score can sometimes distract you from other important aspects of SEO, like user experience and conversion optimization. A well-rounded approach is always the better long-term play.
Why Your Domain Rating Stagnates: The Final Word
The DR plateau is frustrating, but it's not insurmountable. By understanding why your domain rating stagnates, you can identify the bottlenecks holding you back and use that valuable information to implement smarter strategies to overcome them.
Breaking through this plateau requires a balance of patience and action. Diversify your backlinks, focus on quality over quantity, and improve your on-page SEO. Even small, consistent efforts can lead to significant changes over time.
Remember: growth is rarely linear. Even the most successful sites experience periods of stagnation. What sets them apart is persistence and a willingness to innovate. Keep building, refining, and pushing forward - and eventually, you'll break through.
In the ever-evolving world of content creation, having a tool that simplifies the process while delivering professional-grade results is a game-changer. Enter Infography, a platform designed to help you craft stunning infographics, presentations, and other visual content effortlessly.
What Is Infography?
Infography is an intuitive online platform that combines ease of use with powerful design features. Whether you're a marketer, educator, or someone looking to elevate your visual storytelling, this tool is perfect for turning complex data into visually appealing content.
Website Description
Turn your blogs into stunning, shareable infographics.
Convert your complex blog posts into visually engaging infographics that simplify information and boost engagement.
Pixelmator Pro offers a powerful feature that allows you to save your own preset templates, making it easier to start new projects with consistent settings. Whether you frequently create blog headers, social media graphics, or specific print sizes, saving presets can streamline your workflow and ensure uniformity across your designs. Here's how you can take advantage of this feature:
Saving a New Preset Template
Open Pixelmator Pro: Launch Pixelmator Pro and create a new document.
Set Your Document Parameters: Choose the image orientation, size, resolution, and color depth that you want to save as a preset. These settings should match your typical use case, such as a standard blog header size or a social media post size.
Access the Preset Menu: In the "All Templates" window, located usually when you create a new document, look for the Preset dropdown menu.
Create a New Preset: Click on the down arrow next to the Preset dropdown menu, then select the option to add a new preset ('+' symbol).
Name Your Preset: Give your preset a descriptive name that helps you identify its purpose easily, such as "Blog Header Format" or "Social Media Post Size."
Save Your Preset: After naming your preset, confirm or make any other changes you may need and click "Save" or "OK" to add it to your presets list.
Selecting a Previously Saved Preset
Open Pixelmator Pro: Launch Pixelmator Pro and create a new document.
Access Your Presets: In the "All Templates" window, locate the Preset dropdown menu.
Choose "My Templates": Click on the arrow next to the Preset dropdown menu, then select "My Templates" to view a list of all presets you've saved.
Select Your Preset: Scroll through the list of saved presets and click on the one you wish to use. Pixelmator Pro will automatically apply the saved settings to your current document.
Benefits of Using Preset Templates
Efficiency: Save time by quickly applying predefined settings for common project types.
Consistency: Ensure that all your designs meet specific size and resolution requirements.
Customization: Tailor presets to your exact needs, such as specific color depths or orientations.
By utilizing Pixelmator Pro's preset templates feature, you can maintain consistency in your designs while speeding up your workflow. Whether you're a graphic designer, blogger, or social media manager, saving and using presets can significantly enhance your productivity.
Final Cut Pro is renowned for its video editing prowess, but did you know it's also a fantastic tool for audio editing? With its advanced features and intuitive interface, it can handle podcasts and other audio projects with ease. If you're transitioning from a traditional audio editor or just want to streamline your workflow, this guide will walk you through optimizing Final Cut Pro for audio editing.
1. Simplify the Timeline for Audio-Only Editing
When working on audio-centric projects like podcasts, you don't need the visual distractions of video clips. Final Cut Pro makes it easy to tailor your timeline for audio editing:
Change the Timeline Appearance:
Click on the "Change Appearance of the Clips in the Timeline" button (the filmstrip icon at the top-right of the timeline).
Select the first icon in the menu, which displays clips as audio waveforms only.
This view emphasizes the audio, giving you a clearer visual representation of your podcast's soundscape.
2. Insert Gaps with Ease
Sometimes, you may need to create pauses or structure your podcast with intentional silence. Final Cut Pro offers a quick shortcut to insert gaps into your timeline:
Shortcut for Gaps: Press Option + W to insert a blank section (gap) into your timeline.
Use this feature to add pauses for emphasis, transitions, or future editing notes.
3. Master the Audio Enhancements Panel
Final Cut Pro's built-in audio tools are incredibly powerful. Here are some essential features for podcasters:
Equalization (EQ):
Enhance vocal clarity by selecting the "Voice" preset in the Audio Inspector's Equalizer section. Adjust further to match the tone and style of your podcast.
Noise Reduction:
Use the "Reduce Background Noise" slider in the Audio Inspector to minimize ambient sound like fans, hums, or clicks.
Compressor:
Apply the Compressor effect to even out your audio levels. This is especially useful if your podcast includes multiple speakers with varying volumes.
4. Use Keyframe Editing for Precision
To fine-tune your audio levels, employ keyframes:
Adjusting Volume:
Hold Option and click on the audio line in the timeline to create keyframes.
Drag these points to fade in, fade out, or adjust the volume dynamically throughout your podcast.
Balancing Audio:
Use keyframes to balance dialogue and background music or sound effects.
5. Take Advantage of Final Cut Pro Effects
Final Cut Pro comes with several effects that can elevate your podcast's audio quality:
Voice Effects:
Try the "Channel EQ" for precise vocal adjustments.
Experiment with reverb and echo effects to add depth to certain segments, like intros or outros.
Sound Effects Library:
Browse the built-in sound effects library to add transitions, ambient noise, or jingles to your podcast.
6. Save Time with Final Cut Pro Shortcuts
Efficiency is key when editing podcasts, and Final Cut Pro's shortcuts can save you significant time:
Blade Tool: Press B to cut clips quickly.
Trim Tool: Press T to adjust clip edges without moving other elements.
Snap to Playhead: Press N to toggle snapping, making precise edits easier.
7. Exporting Audio Only
When your podcast is ready, you'll want to export it as an audio file:
Export Steps:
Go to File > Share > Master File (Default).
In the settings tab, select Format: Audio Only.
Choose your preferred audio format (e.g., AAC or WAV) and click Export.
Conclusion
Final Cut Pro may be designed for video, but its robust audio tools make it a perfect choice for podcast editing. By setting up the timeline for audio-only editing, leveraging shortcuts like Option + W, and mastering its effects, you can create professional-quality podcasts efficiently.
If you're familiar with Final Cut Pro's shortcuts and effects, this approach will feel intuitive and powerful. Whether you're producing interviews, storytelling, or panel discussions, Final Cut Pro has the tools to make your podcast shine.
Have a favorite tip for editing audio in Final Cut Pro? Share it in the comments below!
Welcome to our exploration of Python and WGet, two powerful tools that can enhance your web scraping capabilities. Whether you're an experienced programmer or just starting out, this post will guide you through integrating these tools to streamline your data retrieval tasks.
What is WGet?
WGet is a free utility for non-interactive download of files from the web. It supports HTTP, HTTPS, and FTP protocols, making it good tool for retrieving content from trusted sources. WGet can resume broken downloads, handle recursive downloads, convert links for local viewing, and much more, which makes it an excellent companion for web scraping projects.
Why Use Python with WGet?
Python, with its simplicity and extensive libraries, is perfect for scripting and automating tasks. When combined with WGet, you harness:
Simplicity: Python's syntax is easy to read and write, reducing development time.
Automation: Schedule downloads, manage files, and process data all within one script.
Flexibility: Handle data post-download with Python's data manipulation libraries like Pandas.
Setting Up
Before we dive into the example, ensure you have Python and WGet installed:
Python: Available on python.org.
WGet: On Unix-like systems, it's usually pre-installed or available via package managers like apt or brew. For Windows, you might need to download it from the GNU WGet site.
Example: Download and Process a Website Let's create a simple Python script that uses WGet to download a website and then processes the downloaded content:
python
import subprocess
import os
def download_website(url, directory="downloaded_site"):
    """
    Download a website using WGet and save it to the specified directory.
    :param url: URL of the site to download
    :param directory: Directory to save the downloaded site
    """
    # Create directory if it doesn't exist
    if not os.path.exists(directory):
        os.makedirs(directory)
    # Use WGet to download the site
    command = f"wget --recursive --no-clobber --page-requisites --html-extension --convert-links --restrict-file-names=windows --directory-prefix={directory} {url}"
    subprocess.run(command, shell=True, check=True)
    print(f"Successfully downloaded {url} to {directory}")
def process_files(directory):
    """
    Placeholder function to process files after download.
    Here you could analyze content, extract information, etc.
    """
    for root, dirs, files in os.walk(directory):
        for file in files:
            if file.endswith('.html'):
                # Example: You could open and read HTML files here
                pass
# URL of the site to scrape
url_to_download = "http://example.com"
# Download the site
download_website(url_to_download)
# Process the downloaded files
process_files("downloaded_site")
Explanation
wget Command: We use WGet with specific flags:
--recursive for recursive downloading.
--no-clobber to avoid re-downloading existing files.
--page-requisites to download all files necessary for the page display.
--html-extension adds .html to filenames that don't have an extension.
--convert-links modifies links for local viewing.
--restrict-file-names=windows for Windows-compatible file names.
Subprocess: This module allows Python to run WGet as an external command.
File Processing: A basic example where we could implement parsing, data extraction, or any other processing.
Conclusion
Combining Python with WGet gives you a potent tool for web scraping and data collection. This example just scratches the surface; you can extend this script to handle authentication, deal with specific formats, or integrate with other Python libraries for data analysis. Remember, with great power comes great responsibility - always respect the terms of service of the websites you scrape and consider the legal and ethical implications.
Ah, 17 years ago, the world changed forever. Steve Jobs held up the original iPhone, and we all collectively gasped, cheered, and promptly Googled "What is multi-touch?" Fast forward to today, and iPhones have gone from sleek communication marvels to pocket-sized powerhouses that can run augmented reality, 4K video editing, and, if rumors are true, predict the weather better than your local meteorologist. But for those of us in the world of Quality Assurance, the journey has been just as transformative.
The Early Days of Mobile QA:
When the first iPhone launched, QA teams were navigating uncharted territory. Testing mobile apps was like herding cats - except the cats were hidden bugs, the app stores had no clear submission guidelines, and the devices were limited to a few screen sizes (remember when 3.5 inches was revolutionary?). QA engineers often had to physically borrow phones from their coworkers to test compatibility. Emulators? Primitive. Automation? Practically nonexistent.
Every test plan felt like a high-stakes scavenger hunt. Did the app crash when you received a call? What happened if your cat pawed the screen mid-game? These were the burning questions we faced.
The BrowserStack Era:
Fast-forward to today, and tools like BrowserStack have become indispensable. With the explosion of device types, screen sizes, and operating systems, it's no longer practical to have a drawer full of devices (though some QA engineers probably still do). BrowserStack lets you simulate tests on an array of devices and operating systems, saving you from the logistical nightmare of sourcing a Samsung Galaxy A51 running Android 11 at 2 a.m. because "It's crashing for that one user in Tokyo."
Thanks to platforms like this, QA has evolved from reactive testing to proactive strategizing. Now, we're not just asking, "Does it work?" but also, "Does it perform? Is it secure? Does it load fast enough to avoid a one-star review?"
Story Time: The iOS 18.2 Saga
Last year, I got a little overexcited about Apple's latest iOS update, 18.2. Who wouldn't be? Darker Dark Mode, emojis that blink - it was a QA engineer's playground. I updated my personal device the minute it dropped and casually decided to test our company's website.
Surprise! CSS files that once made our site look sharp were suddenly throwing tantrums. Buttons misaligned, fonts replaced with Comic Sans (okay, not really, but it felt like it). It turns out BrowserStack hadn't yet updated to support iOS 18.2, which meant we couldn't immediately validate fixes on their platform. Thankfully, my impulse to "tinker first, debug later" saved the day.
Moral of the story? Sometimes, being a little too eager to update your device can reveal surprises even the best tools haven't caught up to yet. It's also a reminder that human intuition and exploration remain irreplaceable in QA.
Innovations Driving Mobile QA Today:
Mobile QA has seen incredible advancements over the years:
Automation Frameworks: Tools like Appium and XCUITest have made regression testing faster and more efficient.
AI in QA: Artificial intelligence is starting to predict and identify potential issues before a human even clicks "Run Test."
Performance Testing: Ensuring apps perform under all conditions, from slow networks to extreme battery saving modes.
Accessibility Checks: QA teams are prioritizing inclusivity, ensuring apps work seamlessly for everyone, including users with disabilities.
Looking Ahead:
Seventeen years after the first iPhone, mobile QA has become more sophisticated, efficient, and yes, even fun. The tools we have today allow us to focus on improving user experience instead of just putting out fires. But as technology evolves, so do the challenges. Foldable phones, AR/VR integration, and who knows what else are just around the corner.
One thing is certain: as long as there are users, there will be bugs. And as long as there are bugs, there will be QA engineers ready to squash them - sometimes with the latest tools, sometimes with sheer determination, and occasionally with a trusty early iOS update.
So here's to the iPhone, the 17 years of innovation it's inspired, and to us - the QA warriors who make sure that innovation works as intended. Let's raise a virtual glass (or an iPhone) to many more years of evolving together!
History often has moments that stand out, defining eras and leaving lasting impressions on the political landscape. One such moment unfolded on January 6, 2001, and was captured in the detailed coverage by KTVU Channel 2, a Fox affiliate serving the San Francisco Bay Area. Now, over two decades later, you can revisit this moment in history through my recently uploaded YouTube video: KTVU Coverage of the Election Results.
The Historic Context
The 2000 U.S. presidential election was one of the most contentious in modern history, culminating in a Supreme Court decision that effectively handed the presidency to George W. Bush. Al Gore, who had won the popular vote but lost the Electoral College after the Florida recount debacle, found himself in the difficult position of certifying his opponent's victory as the sitting Vice President and President of the Senate.
On January 6, 2001, Congress met to certify the Electoral College results, finalizing George W. Bush's win. This solemn event was steeped in political tension, as some members of Congress objected to the results. However, in the absence of a senator's co-signature on these objections, the protests were procedurally dismissed. Vice President Al Gore presided over the session with dignity, a poignant moment underscoring the weight of democratic responsibility.
KTVU's Coverage
KTVU Channel 2's reporting captured the gravity of the occasion, offering viewers in the Bay Area a window into the certification process and its broader implications. Known for its thorough journalism, KTVU's coverage provided context and analysis, helping the public understand the magnitude of what was unfolding. The video sheds light on how local news stations played a critical role in informing the public during pivotal historical events.
Why This Moment Matters
The 2000 election and its aftermath remain a key case study in American political history, illustrating the resilience of democratic institutions amidst challenges. Al Gore's certification of the results serves as a powerful example of upholding constitutional norms, even in the face of personal and political loss. This moment resonates today as a reminder of the importance of integrity and respect for the democratic process.
Watch the Video
Relive this significant chapter of history by watching the full KTVU coverage of the January 6, 2001, certification of the election results:
Reflection
The passage of time offers an opportunity to reflect on events like these, understanding their impact and the lessons they hold for future generations. By revisiting this coverage, we gain insight into the complexities of democracy and the critical role media plays in documenting history.
What are your memories of the 2000 election and its aftermath? Feel free to share your thoughts in the comments below or on the YouTube video page. Let's continue the conversation about this momentous event in our nation's history.
Achieving success in both academics and personal life begins with setting clear, actionable goals. These goals act as a compass, guiding you toward your dreams, helping you stay focused, and fueling your motivation. Without them, it's easy to lose direction or become overwhelmed by the countless distractions of everyday life. Whether you're striving for an A in your exams or aiming for personal growth, setting specific goals helps you chart a course that keeps you on track to success.
In this blog, we'll dive deep into the power of goal setting and explore how this simple yet transformative practice can unlock your potential, propelling you toward success in every area of life.
Why Does Goal Setting Matter for Your Success?
Imagine setting out on a road trip without a map or a destination in mind. You'd likely waste time, get lost, or feel unsure about the direction you're heading. The same is true for life. Setting goals provides the roadmap you need to reach your desired destination. They help you prioritize your efforts, stay organized, and ultimately achieve your dreams.
But goal setting isn't just about getting things done - it's about setting yourself up for sustained motivation, growth, and progress. When you break down your big ambitions into smaller, achievable goals, you create a pathway to success that's not only clear but also inspiring. You'll feel more confident, productive, and purposeful with every milestone you hit, no matter how small.
For students, however, balancing academics and personal life can sometimes feel overwhelming. If you're struggling with assignments, you might consider turning to an essay writer for me to help reduce your stress. An essay writer can assist with crafting essays and academic papers, allowing you to focus on other essential tasks while ensuring you meet your academic goals. This option can be a lifesaver when deadlines are tight or when you're juggling multiple responsibilities.
How Goal Setting Fuels Personal and Professional Growth
Setting goals is about more than checking things off a to-do list. It's about creating a mindset of progress and possibility. Here's how goal setting boosts your personal and professional success:
Focus: When you set a goal, you're telling yourself, "This matters to me, and I'm going to focus on it." That clarity helps you avoid distractions and gives you something to work toward each day.
Motivation: There's a powerful feeling that comes from knowing exactly what you're working for. Each step forward, no matter how small, fuels your motivation to keep going. That's because goal setting turns your dreams into tangible, reachable steps.
Self-Confidence: Achieving your goals, even the smallest ones, builds your self-esteem and confidence. You begin to realize that you can accomplish what you set out to do, which propels you forward toward even bigger challenges.
Personal Growth: Goals aren't just about reaching an end point - they're also about growing as a person. With each goal you achieve, you develop new skills, learn more about yourself, and become better equipped to take on even greater challenges.
While setting goals can be empowering, sometimes it's okay to ask for help. If academic tasks are consuming too much of your time, opting for paper writing services can ensure you meet your deadlines without compromising the quality of your work. Services like these provide professional support, allowing you to focus on your goals while experts handle your writing assignments. Plus, it's a good way to maintain a balance between your academic and personal aspirations. If you're really pressed for time, you can even choose to pay for essay services to help you stay on track, ensuring you never miss a deadline.
Introducing SMART Goals: Your Secret to Success
One of the best tools for effective goal setting is the SMART framework. SMART goals are designed to make your objectives clear, measurable, and achievable. Here's what SMART stands for:
Specific: Make your goal clear and well-defined. Instead of saying, "I want to get better at math," try, "I want to score at least 90% in my next math exam."
Measurable: Track your progress. How will you know when you've reached your goal? For example, if your goal is to improve your fitness, you could measure it by the number of workouts per week or the weight you lift.
Achievable: Set a goal that challenges you, but is still realistic. Stretching yourself is great, but making a goal that's too far out of reach can set you up for frustration.
Relevant: Your goal should matter to you. Align it with your values and long-term aspirations. For example, if you're passionate about healthcare, a relevant goal might be to get into a medical program at your university.
Time-bound: Give yourself a clear deadline. A goal without a timeframe is just a wish. Having a time limit keeps you motivated and ensures you're taking consistent action.
A Simple Step-by-Step Guide to Goal Setting
Setting goals might sound simple, but creating the right kind of goals is crucial for achieving success. Here's a step-by-step process you can follow to start setting your own SMART goals:
Identify Your Goals
Begin by reflecting on your personal and academic aspirations. What do you want to achieve in the next few months, the next year, and beyond? Think about areas like your education, career, personal growth, health, and relationships. Write them down to solidify your intentions.
Make Your Goals Specific
Instead of vague goals like "I want to get better at sports," define what success looks like for you. For example, "I want to run a 5k in under 30 minutes by the end of next month."
Make Your Goals Measurable
Measurable goals allow you to track progress and celebrate achievements. For example, "I will read one book per month" is easy to measure. You can see your progress and feel a sense of accomplishment each time you finish a book.
Make Your Goals Achievable
It's important to stretch yourself, but make sure your goals are attainable. Setting an impossible goal, like reading 10 books in a week, might cause frustration. Instead, aim for something more achievable but still challenging.
Make Your Goals Relevant
Ensure your goals align with your values and long-term objectives. A relevant goal is one that resonates with you and supports the life you want to create for yourself. This relevance keeps you committed to reaching your goal.
Make Your Goals Time-bound
Set a deadline for your goal. Having a clear timeline not only adds urgency, but it also helps you pace your efforts. Whether it's "by the end of this semester" or "in six months," having a deadline creates focus.
Goal Setting for Students: Real-Life Examples
Academic Goal:
Specific: I will score an A in my calculus class this semester.
Measurable: I will complete all assignments and spend at least 2 hours every weekend reviewing class notes.
Achievable: With my current understanding of math, this goal is challenging but within reach.
Relevant: A top grade in calculus is crucial for my application to an engineering program.
Time-bound: I will accomplish this by the end of the semester.
Personal Goal:
Specific: I will lose 12 pounds by the end of the summer.
Measurable: I will exercise for 30 minutes each day and stick to a balanced, healthy diet.
Achievable: I'm committed to making healthier lifestyle choices.
Relevant: Losing weight will boost my confidence and improve my overall health.
Time-bound: This goal will be achieved by August 31.
Conclusion: Start Setting Your SMART Goals Today!
Success doesn't happen by accident - it's the result of careful planning, focused action, and persistence. By setting SMART goals, you turn your dreams into tangible, measurable objectives. The SMART framework gives you a roadmap to follow, ensuring that every step you take brings you closer to the life you envision.
PowerfulAI.tools is an extensive directory that curates a wide range of AI tools across various categories, including productivity, image generation, writing, and more. The platform is updated daily, ensuring users have access to the latest AI resources.
If you've browsed through the applications on your Mac, you might have stumbled upon an app called Instruments nestled within the Xcode package. For many general Macintosh users, this tool might seem unfamiliar or even unnecessary. But before you decide to remove it, let's explore what it is, its purpose, and whether it's something you should keep.
What is Instruments?
Instruments is a robust performance analysis and testing tool included with Xcode, Apple's development environment for creating macOS, iOS, watchOS, and tvOS applications. While its primary users are software developers, the app's capabilities are impressive, even for those curious about how their Mac operates under the hood.
The tool is designed to profile apps, processes, and devices, helping developers optimize performance and identify issues like memory leaks, high CPU usage, or unclosed network connections.
Key Features of Instruments:
Profiling Applications: It traces the behavior of apps and gathers data over time.
Comprehensive Analysis: Instruments provides detailed insights into memory usage, CPU activity, disk I/O, and more.
Customizable Tools: Specialized tools, called "instruments," allow users to focus on specific areas, such as graphics rendering or network activity.
Side-by-Side Data Comparison: Developers can view various types of data simultaneously, making it easier to identify issues caused by interactions between different components.
Is Instruments Useful for General Mac Users?
For the average Mac user, Instruments may not have an immediate use. Its focus is squarely on software development and optimization, tasks that most non-developers don't engage with. However, if you're curious about your system's performance or want to understand how resource-intensive an app is, Instruments could offer insights.
Should You Remove It?
If you're not a developer and have no plans to profile apps or processes, you might wonder whether you should delete Instruments to free up space. Here are some considerations:
Part of Xcode: Instruments is bundled with Xcode, which itself is a large application. If you're not using Xcode, you could consider uninstalling Xcode entirely instead of just Instruments.
Disk Space: Instruments alone doesn't consume a significant amount of space. Removing Xcode as a whole will have a more noticeable impact.
Reinstallable: If you ever need it, you can reinstall Xcode (and Instruments) from the Mac App Store.
How to Uninstall Xcode (and Instruments)
If you decide to remove Xcode, which includes Instruments, here's how to do it:
These commands remove additional files associated with Xcode.
Final Thoughts
Instruments is a powerful tool for developers but holds little utility for the average user. If you're not working on app development and need extra disk space, consider removing Xcode (and with it, Instruments). However, if you're intrigued by performance analysis and want to explore what makes your Mac tick, Instruments might be worth a closer look.
For developers, incorporating Instruments early in your workflow can save time and help create smoother, more efficient apps. For everyone else, it's another reminder of the incredible depth of tools macOS offers to its users.
Organizing Your Notebooks with the Checkmark Symbol in BBEdit
BBEdit is a powerhouse tool for writers, coders, and anyone who loves efficient text editing. But did you know that you can leverage simple visual cues to organize your work better? One such trick is using the checkmark symbol to indicate completed or posted notebooks directly in BBEdit's file list and content.
Why Use the Checkmark Symbol?
The checkmark symbol is a clean, universally recognizable mark that conveys task completion at a glance. By placing it on the first line of your BBEdit files, it not only appears prominently in the file's content but also shows up in BBEdit's document listing (if supported by your version and operating system).
This small visual tweak can:
Streamline organization: Quickly differentiate completed notebooks from pending ones.
Enhance readability: Spot completed items without opening every file.
Save time: Focus on unfinished work while reviewing your projects.
How to Implement This Workflow
Insert the Checkmark Symbol
On macOS, you can easily insert the checkmark symbol by:
Pressing Control + Command + Space to open the character picker.
Searching for "check" and selecting the symbol.
Add the Symbol to the First Line
Open your notebook file in BBEdit.
On the first line, add the checkmark symbol followed by a brief status note. For example:
Notebook on Markdown Syntax
Save Your File
Ensure the file is saved. The first line will now serve as a visual marker in BBEdit's open document list or file preview pane.
Practical Examples
Here are some ways you might use this system:
Blog Content Tracking: Mark posts as published with the checkmark symbol and drafts without.
Project Notes: Identify completed milestones or ideas that have been implemented.
Code Review: Use the symbol to signify approved scripts or resolved issues.
Wrapping Up
BBEdit offers endless possibilities for customization, and small hacks like the checkmark symbol can make a significant impact on your workflow. Whether you're tracking blog posts, notebooks, or project statuses, this simple visual cue helps you stay organized and focused.
Start incorporating the checkmark symbol into your BBEdit workflow today and enjoy the clarity it brings to your projects! If you have additional tips for using symbols in BBEdit, feel free to share them in the comments or tweet at me.
As a long-time user of Snagit, I've appreciated its powerful capabilities for capturing and editing images. However, there's always room for improvement! Here are some features I'd love to see introduced in Snagit 2025:
New Tools
One tool I've always admired is the Skitch Annotation tool, which allows users to add text directly to a stamp arrow. This functionality streamlines communication by combining annotations and directional emphasis in one neat element. If Snagit incorporated something similar, it would elevate its annotation game significantly.
For more on the Skitch Annotation tool and why it's so useful, check out this blog post.
Expanded Shapes
Currently, Snagit's Shapes tool is quite limited, offering just four options. While these shapes cover basic needs, having a broader selection would open up new possibilities for highlighting and emphasizing key parts of an image. Options like stars, polygons, and custom shapes would be incredibly helpful for creating engaging visuals.
Enhanced Image Insert Features
When inserting an image into another image, Snagit's capabilities are functional but could be more polished. Adding shadows to the inserted image, for example, would make it blend seamlessly into the existing content, giving a more professional appearance. This small but impactful feature could dramatically enhance the final product's visual quality.
Final Thoughts
These features would not only improve Snagit's usability but also empower users to create more dynamic and visually appealing content. Here's hoping the developers at TechSmith take these ideas into consideration for Snagit 2025! What features are you hoping to see in the next version of Snagit? Let me know in the comments!
Welcome to cryan.com's main blog page! Here you'll find a diverse collection of informative posts covering topics ranging from technology and lifestyle to career advice. There's something here for everyone.
We are committed to delivering the highest quality content, ensuring you have access to the most current and reliable information.