Mastering Image Fill Capabilities
Basic features of using Images in Fill Shape
Amadine is a versatile and user-friendly vector graphic design app that empowers designers to create stunning visuals with ease. Among its array of features, the Image Fill capability stands out, offering a robust set of tools for enhancing shapes with background images. Whether you're looking to add depth, texture, or a splash of creativity to your designs, understanding Amadine's Image Fill options can elevate your work to the next level. Let's dive into how you can make the most of these features.

Adding Background Images
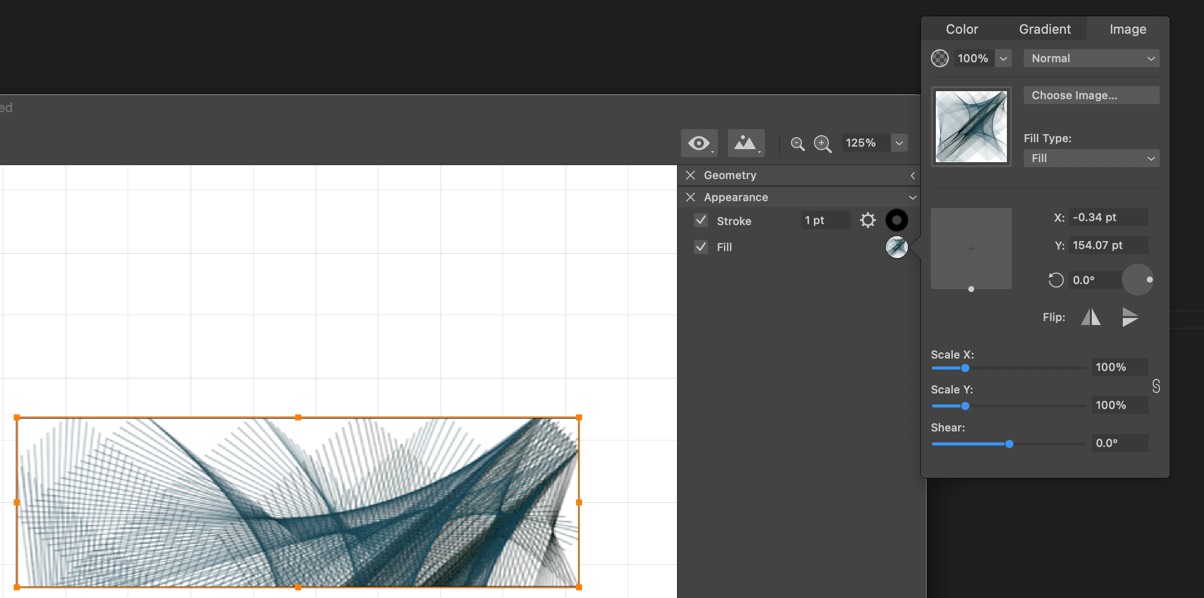
To begin, you can click on the "Choose Image" button to add a background image to any shape. This straightforward process opens up a world of possibilities, allowing you to integrate external images seamlessly into your designs.
Fill Types: Fill, Tile, and Stretch
Amadine offers three primary fill types to control how your background image is applied to a shape:
Fill: This option scales the image to cover the entire shape. You can adjust the alignment using the area just below the "Fill Type" option. Additionally, you can scale and shear the image to fit your design needs perfectly.
Tile: This setting repeats the image to fill the shape. It's perfect for creating patterns and textures that need to be consistent across a larger area.
Stretch: As the name suggests, this option stretches the image to fit the shape's dimensions, ensuring that the image covers the entire shape without any gaps.
Image Application Options
Amadine also provides several options for how the image interacts with the shape and underlying objects. These blending modes can dramatically alter the appearance of your design, offering creative flexibility. Here are the available modes:
- Normal: The image is applied as-is without any blending.
- Multiply: Darkens the base color to reflect the blend color by multiplying the colors.
- Screen: Lightens the base color to reflect the blend color by screening the colors.
- Overlay: Combines Multiply and Screen modes, preserving highlights and shadows of the base color.
- Darken: Selects the darker of the base or blend colors.
- Lighten: Selects the lighter of the base or blend colors.
- Color Dodge: Brightens the base color to reflect the blend color by decreasing the contrast.
- Color Burn: Darkens the base color to reflect the blend color by increasing the contrast.
- Soft Light: Gently lightens or darkens the colors, similar to shining a soft light on them.
- Hard Light: Harshly lightens or darkens the colors, similar to shining a harsh light on them.
- Difference: Subtracts the blend color from the base color or the base color from the blend color, depending on which is brighter.
- Exclusion: Creates an effect similar to Difference but with lower contrast.
- Hue: Applies the hue of the blend color to the base color.
- Saturation: Applies the saturation of the blend color to the base color.
- Color: Applies the hue and saturation of the blend color to the base color, preserving the luminosity.
- Luminosity: Applies the luminosity of the blend color to the base color, preserving the hue and saturation.
Practical Applications
Using these fill types and blending modes, you can create a wide range of effects, from subtle textures to bold graphic statements. For instance, you might use the Multiply mode to add a textured paper effect to a shape, or the Overlay mode to integrate complex patterns without losing the shape's original color dynamics.
By mastering Amadine's Image Fill capabilities, you can add a professional and creative touch to your vector designs. Experiment with different combinations to discover unique effects that can make your work stand out.
Conclusion
Amadine's Image Fill feature is a powerful tool that offers endless creative possibilities. By understanding and utilizing the different fill types and blending modes, you can enhance your designs in ways that were previously unimaginable. So go ahead, explore these features, and let your creativity shine!
