
GoPro Backpack Clip
An Unexpected Golf Cart Game-Changer
Who knew a simple GoPro backpack clip could elevate your golf cart experience? I recently discovered a hidden gem that's transformed the way I capture my golfing adventures.
I've always wanted to record the scenic drives around the golf course, the camaraderie with my buddies, and those epic shots from different angles. But finding a secure and versatile mounting solution for my GoPro was always a challenge. That is until I stumbled upon the humble backpack clip.
Why the Backpack Clip Works Brilliantly:
- Easy Installation: The clip securely attaches to the top of the golf cart frame, requiring no additional tools or modifications.
- Versatility: The clip allows you to adjust the GoPro's angle, giving you the freedom to capture both the course and the occupants of the cart.
- Stability: Despite its simplicity, the clip provides surprisingly good stability, even when the cart is traversing bumpy terrain.
- Compactness: The clip is lightweight and doesn't obstruct the cart's functionality or your view.
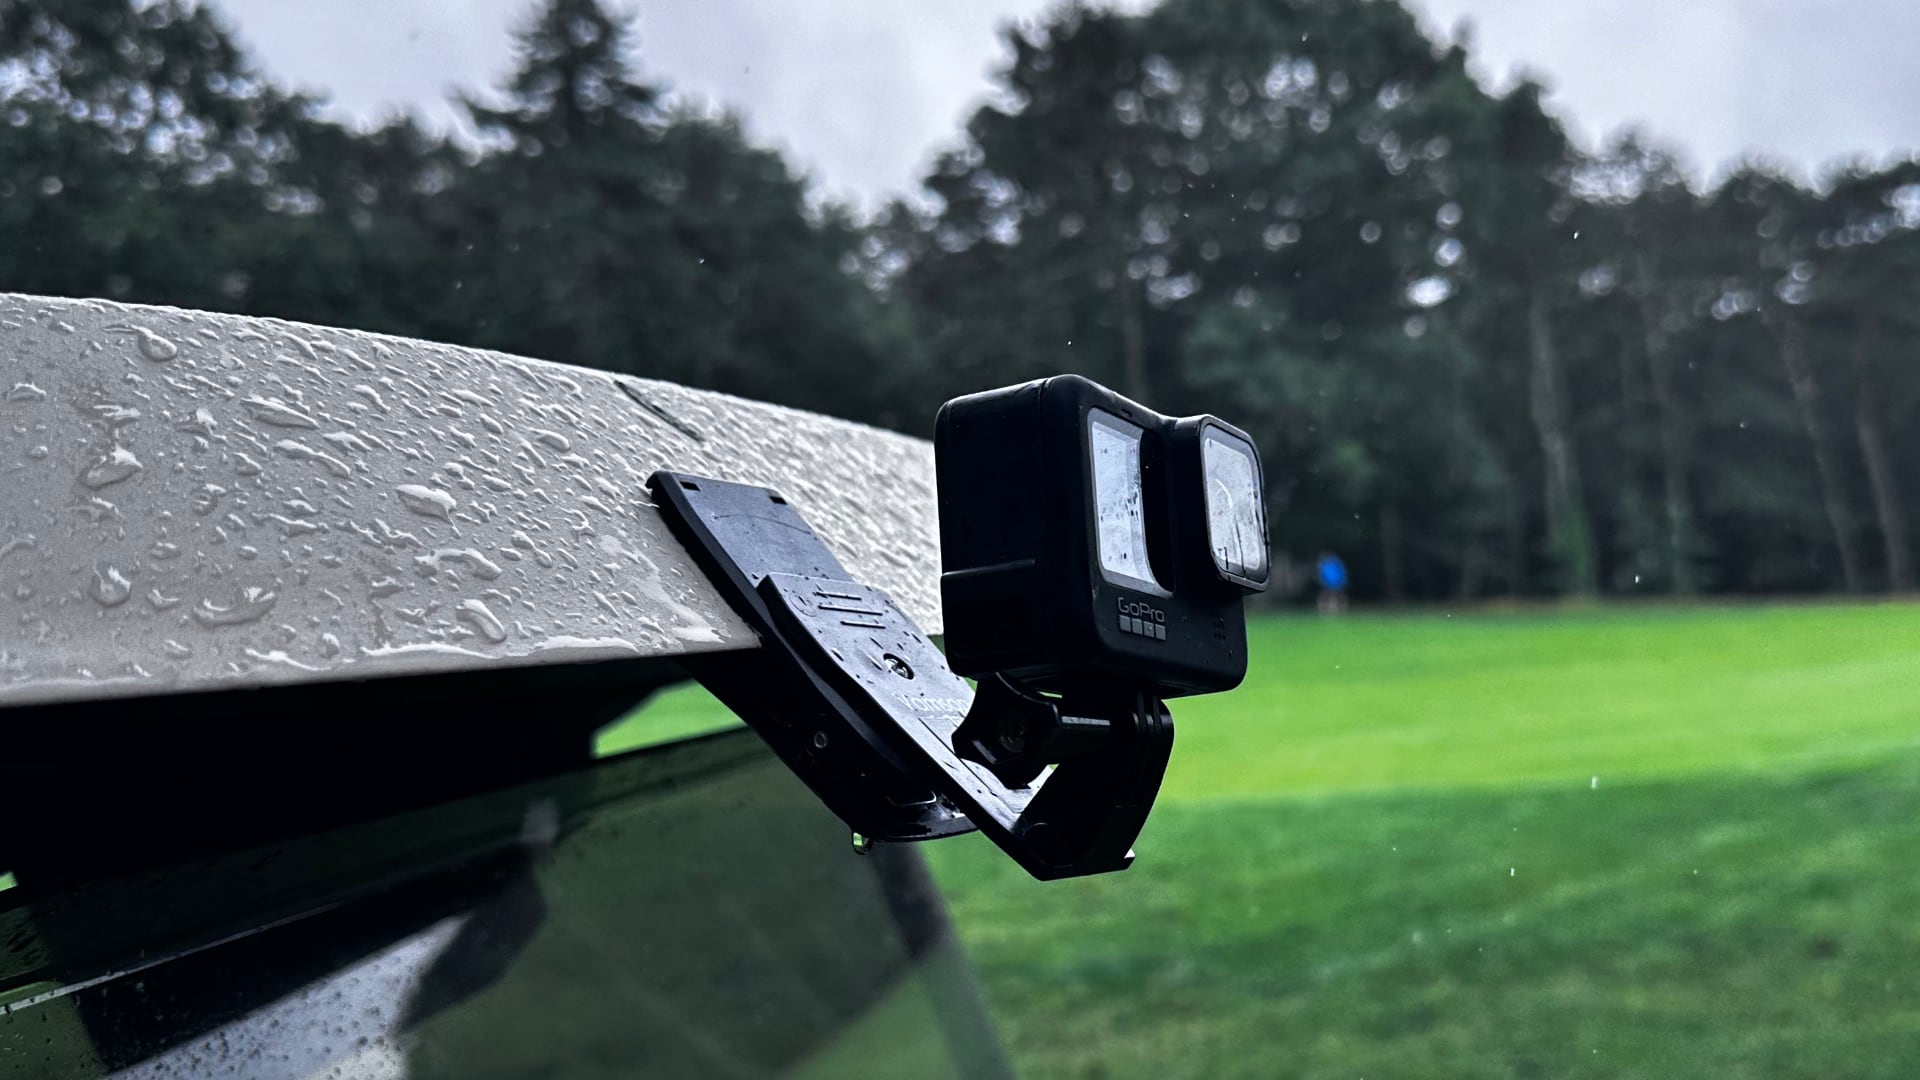
My Vamson Backpack Clip on the Golf Cart at Ocean Edge in Brewster, Massachusetts.
Capture Every Moment:
With the GoPro mounted on the backpack clip, you can effortlessly record:
- Stunning Course Views: Capture the beauty of the golf course as you drive around, from lush fairways to breathtaking water hazards.
- Hilarious Cart Shenanigans: Record those unforgettable moments with your golfing buddies ? from epic celebrations to questionable shot choices.
- Swing Analysis (Sort Of): While not a professional setup, you can still get some interesting angles of your swing by positioning the GoPro accordingly.
Tips for Optimal Results:
- Experiment with Angles: Try different GoPro angles to find the perfect perspective for your desired shots.
- Secure the Clip: Ensure the clip is firmly attached to the cart to prevent accidental drops.
- Battery Life: Given the continuous recording, make sure your GoPro has a fully charged battery or consider using a portable charger.
Next time you hit the golf course, give the GoPro backpack clip a try. You might be surprised at the creative and engaging content you can capture. It's a simple yet effective solution that will undoubtedly enhance your golfing experience.
Have you tried using a backpack clip for your GoPro on a golf cart? Share your tips and experiences in the comments below!
PermalinkZooming 5k Video Footage
1080p Tips when Shooting with the GoPro
In the world of video production, resolution and image quality are crucial for delivering a visually stunning experience. As technology advances, higher resolution cameras like 5K are becoming more popular, offering filmmakers and content creators greater flexibility in post-production. One of the key advantages of shooting in 5K is the ability to zoom in on your footage without sacrificing quality when producing a 1080p project. In this blog post, we'll explore the limits of zooming in on a 5K video for a 1080p output without losing quality.
Understanding Resolutions:
Before diving into the specifics, it's essential to understand what 5K and 1080p resolutions mean. 5K resolution typically refers to a video with a resolution of 5120 x 2700 pixels, while 1080p, or Full HD, has a resolution of 1920 x 1080 pixels. In other words, a 5K video has roughly 2.7 times the number of pixels compared to a 1080p video.
Determining the Zoom Factor:
To maintain image quality when downscaling a 5K video to a 1080p project, it's essential to determine the maximum zoom factor. This can be calculated by dividing the resolution of the source footage (5K) by the target resolution (1080p).
Zoom Factor = (5120 / 1920) x (2700 / 1080) 2.67
This means that you can zoom in up to 2.67 times without losing quality in a 1080p project.
Maximizing Zoom Potential:
Here are some tips to ensure that you're maximizing the zoom potential of your 5K footage in a 1080p project:
Shoot with a high-quality lens: Invest in a lens that delivers excellent image quality to capture the best possible footage from the start. This will ensure that you retain as much detail as possible when zooming in on your 5K video.
Use a tripod or gimbal: When shooting with the intention of zooming in during post-production, keeping your footage stable is essential. The slightest camera shake will be magnified when you zoom in, so using a tripod or gimbal can help you achieve smoother and sharper results.
Record at a high bitrate: A higher bitrate means more data is being captured, resulting in better overall video quality. Choose the highest bitrate setting available on your camera to ensure that you're capturing the maximum amount of detail.
Be mindful of your camera's sensor size: Smaller sensors may struggle with noise and image quality when zooming in, even with 5K resolution. If possible, opt for a camera with a larger sensor to maintain quality when zooming in.
Use professional video editing software: Quality video editing software will offer better scaling algorithms that retain detail and reduce artifacts when zooming in on your footage.
Conclusion:
Shooting in 5K resolution provides content creators with the flexibility to zoom in on their footage without sacrificing quality in a 1080p project. By following the tips outlined in this post, you can effectively maximize the potential of your 5K footage and create stunning, high-quality videos that captivate your audience. Remember, you can zoom in up to 2.67 times without losing quality, so take advantage of this creative freedom to enhance your storytelling and make your videos stand out.
PermalinkHow to Take Stunning Night Lapses with Your GoPro 9
QR Code to Get You Started
Night lapse photography is a great way to capture the beauty of the night sky, the movement of stars, or the changing light of a cityscape. With a GoPro, you can take stunning night lapses that will amaze your friends and family.
Sample Video
Here are some tips for taking night lapses with your GoPro:
Use the recommended settings. For night lapse photography, the best settings will depend on the GoPro model you are using and the conditions in which you are shooting. However, some general settings that you will want to use include:
- Resolution: 4K or 2.7K
- Lens: Wide angle
- Interval: Auto night lapse interval
- Shutter: Auto shutter
- ISO: Min 100, Max 800
- White balance: Auto
- Color: Natural
QR Code to Add the Setting to Your Camera
Additional Pro Tips
Find a dark location. The darker the location, the better your night lapse will look. If you can, find a location that is away from city lights and other sources of artificial light.
Use a tripod. A tripod is essential for night-lapse photography. It will help to keep your GoPro steady and prevent your images from being blurry. A stationary platform is good too. In my example, I used a mailbox post.
Experiment with different settings. There is no one-size-fits-all solution for night lapse photography. The best settings will vary depending on the conditions you are shooting in. So experiment with different settings until you find what works best for you.
PermalinkFront Screen Options
Know Your Options with the front screen
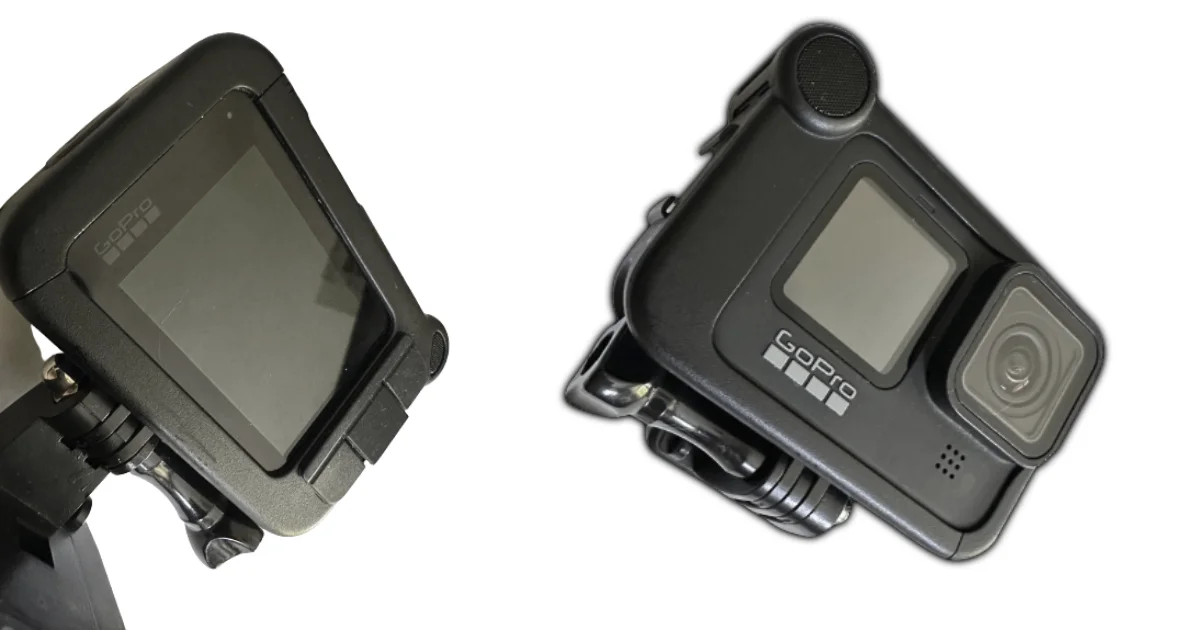
GoPro Hero 9 is a high-quality action camera with various features. One of the features that make it stand out is its front-screen options. The GoPro Hero 9 has four front screen options: Screen off, Status Only, Actual Screen, and Full Screen. In this blog post, we will discuss each of these front-screen options and their benefits.
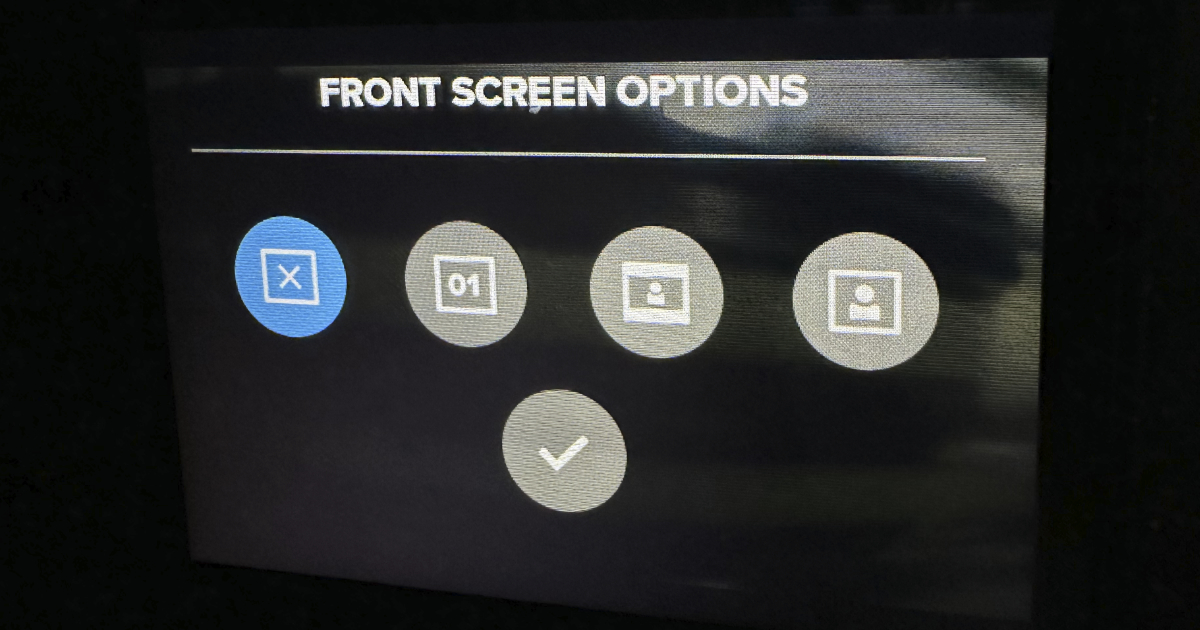
Screen off
The Screen off option is one of the four front screen options of the GoPro Hero 9. As the name suggests, this option turns off the front screen of the camera. This option is helpful when you want to save battery power or avoid distractions while recording. When this option is selected, the camera will still be recording, but the front screen will be off.
Status Only
The Status Only option is another front-screen option that is available on the GoPro Hero 9. This option displays basic information about the camera, such as the battery life, recording time, and shooting mode. This option is helpful when you want to conserve battery life while still being able to keep an eye on the camera?s status.
Actual Screen
The Actual Screen option is a front screen option that displays a live preview of what the camera is recording. This option is useful when you want to see what you are recording, especially when you are taking selfies or vlogs. This option is also helpful when you want to ensure that you are capturing the right angle or framing.
Full Screen
The Full-Screen option is the fourth and final front-screen option of the GoPro Hero 9. This option displays the same live preview as the Actual Screen option, but it fills the entire front screen. This option is helpful when you want to see a larger view of what you are recording or when you are using the camera to take photos.
Conclusion
The GoPro Hero 9 is an excellent action camera that comes with several features, including four front-screen options. These options include Screen off, Status Only, Actual Screen, and Full Screen. Each option has its benefits, and it is up to the user to choose which option to use based on their needs. Whether you want to conserve battery life, see a live preview, or take selfies, the GoPro Hero 9 has a front-screen option that will suit your needs.
PermalinkMagnetic Mount
Use a Smartphone Mount to mount a USB Portable Charger nearby
Are you a GoPro enthusiast looking for a convenient way to capture all your adventures hands-free? If so, you may want to consider using a magnetic mount for your GoPro. Not only does it make it easy to attach and detach the camera, but it also allows for 360-degree rotation and gives you the flexibility to mount it in different locations. But did you know that magnetic mounts can also be used to extend the power of your GoPro? In this
Magnetic Mount for GoPro
A magnetic mount for your GoPro is a simple yet effective solution for capturing footage on the go. These mounts typically consist of a base with a strong magnet and a tripod mount. All you have to do is place a Tripod Ball head on the mount and then attach the GoPro, and you're ready to shoot. Magnetic mounts offer several advantages over traditional mounts, such as easy installation and removal, 360-degree rotation, and the ability to mount your GoPro in unconventional locations.
One of the most significant benefits of using a magnetic mount is the flexibility it provides. You can attach your GoPro to any magnetic surface, such as a car or a metal pole, without the need for additional accessories. This makes it ideal for capturing footage while driving, cycling, or even surfing. The strong magnet ensures that your GoPro stays securely in place, even during high-speed activities.
The mount is great whenever you have a metal object - like a building pole - and you want to record an event without having to stand at the location. Recently I used it to record a Talent Show. I setup the GoPro on the basement cellar pole and set it up to record the whole event.
Extending Power with a USB Portable Charger
One of the downsides of using a GoPro is that the battery life is limited. This can be a problem if you're planning on filming for an extended period. Fortunately, there's a solution: using a USB Portable Charger to extend the power of your GoPro. USB Portable Chargers are small, lightweight, and easy to carry, making them ideal for outdoor activities.
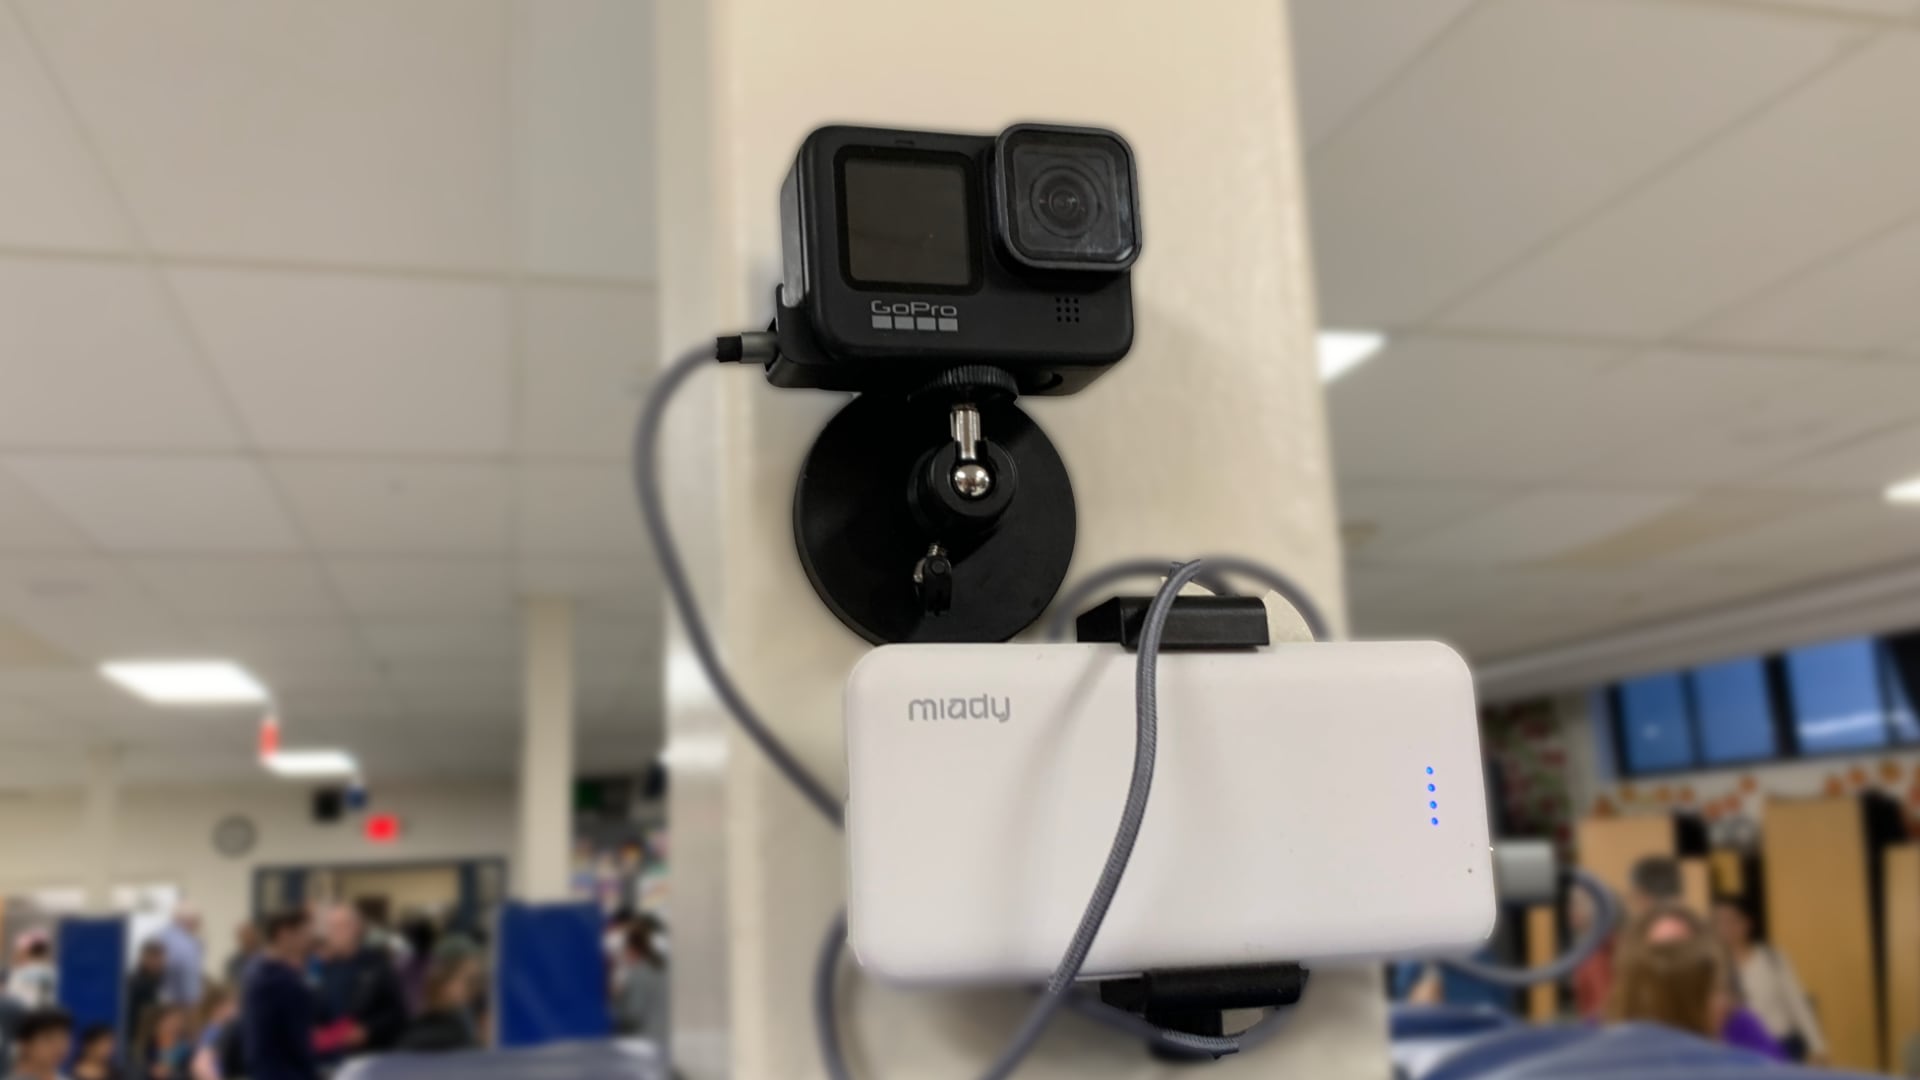
To use a USB Portable Charger, have a second Magnetic Mount but this time put a camera holder on it. The camera holder is a perfect size for most USB Portable Chargers. You can put the USB Portable Charger in the camera holder and now you can put the USB Portable Charger near the GoPro. This eliminates the need to have a long USB-C cable.
Why two mounts?
The magnet in a typical Magnet Camera Mount isn't strong enough to hold both the GoPro and a USB Portable Charger. Having a second mount balances the weight on the GoPro and USB Portable Charger.
One of the benefits of using a magnetic charger is that it's easy to connect and disconnect. You won't have to worry about fumbling with extra long cables or connectors, as the charger simply snaps into place. This makes it easy to take off the device when production ends.
Conclusion
Using a magnetic mount for your GoPro and a USB Portable Charger to extend its power are two simple yet effective solutions for capturing all your adventures. Magnetic mounts offer flexibility and convenience, while magnetic chargers provide an easy way to keep your GoPro powered on the go. Whether you're a seasoned adventurer or a casual user, these accessories are sure to enhance your GoPro experience.
You can find a Magnet Tripod Mount for about $16 on Amazon. This is one that I recently purchased: PellKing Magnet Camera Mount for GoPro Insta360 Akaso DJI Action,with Rotation Ball Head Super Strong Rubber Coating Neodymium Magnet for Car, Attaches to Steel or Other Magnetic Surfaces.
Remember to get two: one for the GoPro and one for the USB Portable Charger. This is definitely something to have as an accessory. You never know when you'll run into a situation when you could have placed the GoPro in a better location only if you had a Magnetic Mount.
PermalinkMedia Transfer Protocol
Transfer Files to Your Computer
Microsoft developed the Media Transfer Protocol (MTP) for the purpose of connecting digital cameras, smartphones, and personal computers and transferring files. It is a popular protocol for connecting and transferring files between devices. In addition to being more efficient and versatile than Picture Transfer Protocol (PTP), MTP is an upgrade of PTP.
How to Use MTP on the GoPro Hero 9
Using MTP on the GoPro Hero 9 is simple and straightforward. You can transfer files right away by connecting your camera to your computer. Once connected, the camera will automatically enter MTP mode, and you can begin transferring files using the GoPro Quik App or Image Capture. All files can be transferred or specific files can be transferred.
![]()
View of Pixelmator getting files from the GoPro
Four Things I Learned
- You can import images and videos using Image Capture or Pixelmator Pro.
- If you create timelapse using photos they are just photos in the MTP mode, if you have GoPro Cloud service the files are combined to a timelapse video. (Probably worth the service if you do a lot of Timelapse.)
- Final Cut Pro crashes when I tried to open up the GoPro drive. Commander One and Graphic Converter weren't able to see the GoPro.
- Using GoPro Quik, you can only import all objects on your GoPro. If you want to import individual videos or photos you have to use Image Capture or Pixelmator Pro.
Advantages of Using MTP on the GoPro Hero 9
Using MTP on the GoPro Hero 9 has several advantages. Firstly, it is a fast and efficient way to transfer files compared to other methods like Wi-Fi. Secondly, it is a secure way to transfer files as it requires a physical connection between the camera and the device. Lastly, MTP allows for the transfer of large files, making it ideal for photographers who need to transfer high-resolution images and videos.
Conclusion
The GoPro MTP feature makes it easy to transfer files between devices. It's fast, efficient, and secure, so it's great for photographers who need to move big files quickly. If you have a GoPro Hero 9, use the MTP feature.
PermalinkGoPro Travel Case
Really Not Worth Buying
When it comes to protecting our valuable gadgets, finding the right carrying case can be a crucial decision. However, not all products live up to their promises. In the case of the Carrying Case for GoPro Hero 9 Hard Shell Carrying Case, it's important to question whether it truly offers value for money. In this blog post, we will delve into the reasons why this particular carrying case may not be worth the investment, especially when there are simpler alternatives available.
Limited Practicality
One of the main concerns with the Carrying Case for GoPro Hero 9 Hard Shell Carrying Case is its limited practicality. While it may provide a certain level of protection for your GoPro, it fails to offer any additional features or functionalities. Essentially, it's just a shell designed to hold your GoPro securely. This means that if you're looking for a carrying case that offers more versatility or storage space for accessories, you'll be left disappointed.
Unnecessary Bulk
Another drawback of this particular carrying case is its bulkiness. Carrying cases are meant to offer convenience and ease of transportation, but the Carrying Case for GoPro Hero 9 Hard Shell Carrying Case falls short in this regard. The hard shell design adds unnecessary bulk, making it inconvenient to carry around. It takes up valuable space in your bag or backpack and can even be a hassle to fit in smaller compartments.
Cost-Effectiveness
Investing in a carrying case should provide a balance between functionality and cost-effectiveness. Unfortunately, the Carrying Case for GoPro Hero 9 Hard Shell Carrying Case fails to deliver on this front. The high price tag associated with this product is unjustified when you consider the lack of additional features and the availability of more affordable alternatives.
Overlooked Simplicity
One of the most compelling arguments against purchasing the Carrying Case for GoPro Hero 9 Hard Shell Carrying Case is the overlooked simplicity of using a ziplock bag. Many users have found that using a ziplock bag provides the same level of protection and convenience as this expensive carrying case. Simply placing your GoPro in a ziplock bag ensures protection from dust, dirt, and minor bumps, while being significantly more cost-effective and accessible.
Accessibility and Convenience
Finding the Carrying Case for GoPro Hero 9 Hard Shell Carrying Case every time you need to store or transport your GoPro can be a hassle. In contrast, a ziplock bag offers instant accessibility and convenience. There is no need to spend time searching for the case or dealing with any additional zippers or compartments. A ziplock bag is readily available and easily replaceable, ensuring that you can focus on capturing moments rather than fussing with a cumbersome case.
Conclusion
In conclusion, the Carrying Case for GoPro Hero 9 Hard Shell Carrying Case may not be the ideal investment for GoPro users. Its limited practicality, unnecessary bulk, and high cost are significant drawbacks that overshadow its benefits. Instead, opting for a simpler solution like a ziplock bag can provide the same level of protection and convenience, all while being more cost-effective. Ultimately, the decision is yours, but it's worth considering whether this particular carrying case truly meets your needs or if a simpler alternative might be a better fit.
PermalinkMedia Mod
Useful Accessory to Super Charge Your GoPro
If you're an avid vlogger or content creator, you know how important it is to have the right equipment to capture high-quality footage. The GoPro Media Mod is one such tool that has gained a lot of popularity in recent times. In this blog post, we're going to explore the features of the GoPro Media Mod and how it can take your vlogging game to the next level.
Enhanced Audio Quality
One of the most significant advantages of the GoPro Media Mod is its enhanced audio quality. It comes with a built-in directional microphone that filters out background noise and captures clear audio. It also has a 3.5mm mic port that allows you to connect an external microphone for even better sound quality. Whether you're filming in a busy street or a windy beach, the Media Mod ensures that your audio is crystal clear.
Additional Ports and Features
Apart from the improved audio quality, the GoPro Media Mod also has additional ports and features that make it a versatile tool for content creators. It comes with an HDMI-out port that allows you to connect your GoPro to an external display, making it easier to review your footage on a larger screen. It also has two cold shoe mounts that allow you to attach accessories such as lights, microphones, or even a second camera. Additionally, the Media Mod has a built-in USB-C port for charging your GoPro or connecting it to an external power source.
Three Things I Learned
Audio Meter - When you are using the Media Mod microphone there is an audio meter that appears on the screen to show the sound level. This has come in handy many times when I wanted to make sure that audio was getting to the GoPro.
Cold Shoe Mounts - As for the GoPro Cold Shoe, I don't have any real accessories for it. The only thing I do have is a cold shoe leveler, so that way I can check if my GoPro camera is level on the tripod. I do plan to get a microphone.
Hard to get the SD Card - With the GoPro Media mod, you have to take the whole thing off to get the SD card. This can be a bit of a hassle, especially if you are in a rush. You can use the MTP mode to import media using the GoPro Quik app. However, you have to download all the media - you can't select individual media.
Conclusion
In conclusion, the GoPro Media Mod is an excellent tool for content creators who want to take their vlogging game to the next level. With enhanced audio quality, additional ports and features, and improved ergonomics, it's a versatile tool that can help you capture high-quality footage in any situation. If you're serious about your vlogging or content creation, the GoPro Media Mod is definitely worth investing in.
I would certainly recommend getting the media mod. At $56 it might seem a bit pricy, but I think it's worth it.
PermalinkLightning cable Trick with GoPro
Easily get the SD Card Out
GoPro cameras are great for capturing those unforgettable moments, but one of the biggest challenges with these cameras can be getting the SD card out. The SD card is where all of your footage is stored, and if you want to transfer your videos and photos to your computer or other device, you'll need to remove the card. In this blog post, I'll share with you a trick for getting the SD card out of your GoPro using a lighting cable.
First, let's talk about why it can be difficult to remove the SD card from a GoPro. The SD card slot on most GoPro models is located inside the camera, behind a small door or flap. This can make it tricky to get your fingers in there to push the card out. Additionally, the SD card can sometimes be snugly held in place by the camera's mechanism, making it even harder to remove.
But fear not, there's a trick that you can use to easily get the SD card out of your GoPro. All you need is a lightning cable that you use to charge your iPhone. Here's what you need to do:
- Remove the lightning cable from your iPhone's charger.
- Take the lightning cable and insert it into the small opening where the SD card is located.
- Gently push the cable in until you feel resistance.
- Pull the cable out, and the SD card should come with it.
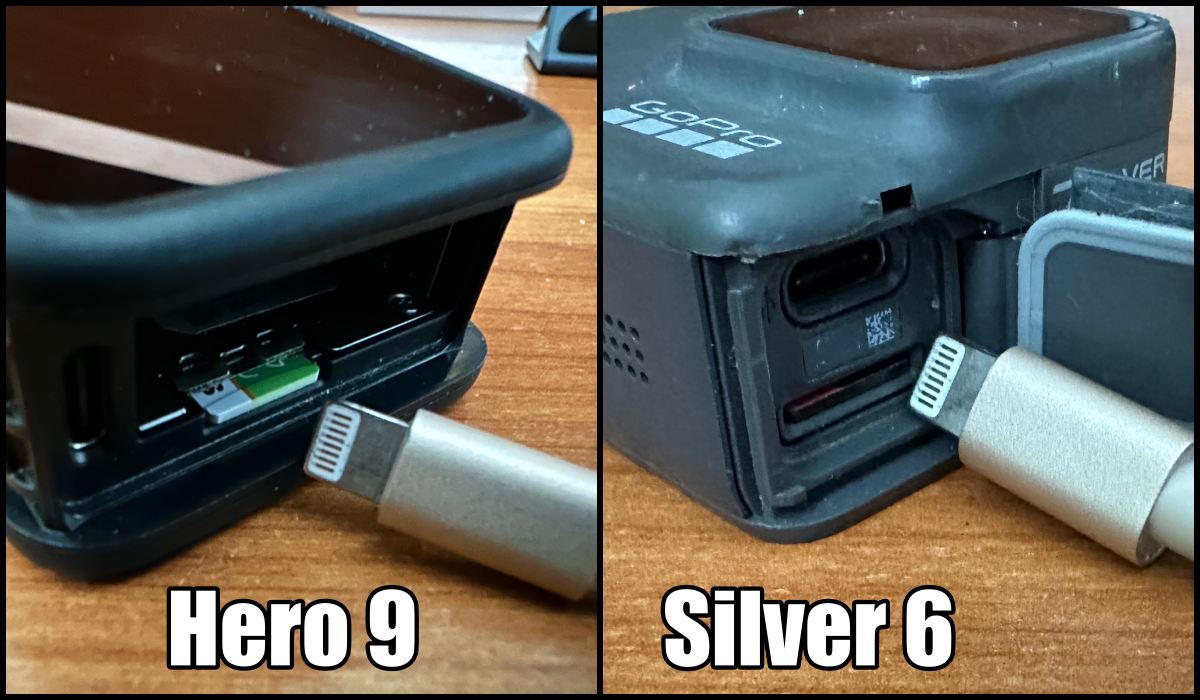
It's important to note that you should be gentle when using this trick. Don't force the cable in or pull too hard when removing it, as you don't want to damage the SD card or the camera itself.
In conclusion, getting the SD card out of your GoPro doesn't have to be a frustrating experience. With this simple trick using a lightning cable, you'll be able to remove the card quickly and easily. Just remember to be gentle and take your time, and you'll be able to transfer your footage to your computer or other device with ease.
PermalinkTelephone Pole Mount
Using a Heavy-Duty Wrap-It Storage Straps and Gopro Clip Mount
The GoPro camera is a popular choice for recording videos and capturing memories, but mounting the camera can sometimes be a challenge. In this blog post, we will discuss how to mount a GoPro on a telephone pole using Heavy-Duty Wrap-It Storage Straps and a GoPro Clip Mount.
Using Heavy-Duty Wrap-It Storage Straps
Heavy-Duty Wrap-It Storage Straps are a versatile tool that can be used for a variety of tasks, including mounting a GoPro camera on a telephone pole. These straps are made of high-quality materials and are designed to be durable and long-lasting. To mount a GoPro camera on a telephone pole, simply wrap the Heavy-Duty Wrap-It Storage Straps around the pole and tighten them securely. The straps will hold the camera firmly in place, even in windy conditions.
Using a GoPro Clip Mount
A GoPro Clip Mount is a small, lightweight accessory that allows you to attach your GoPro camera to a variety of surfaces, including a telephone pole. To use a GoPro Clip Mount, simply attach the mount to the camera and then clip it onto the Heavy-Duty Wrap-It Storage Straps that are wrapped around the telephone pole. The mount will hold the camera securely in place, allowing you to record your video without any worry of the camera falling off the pole.
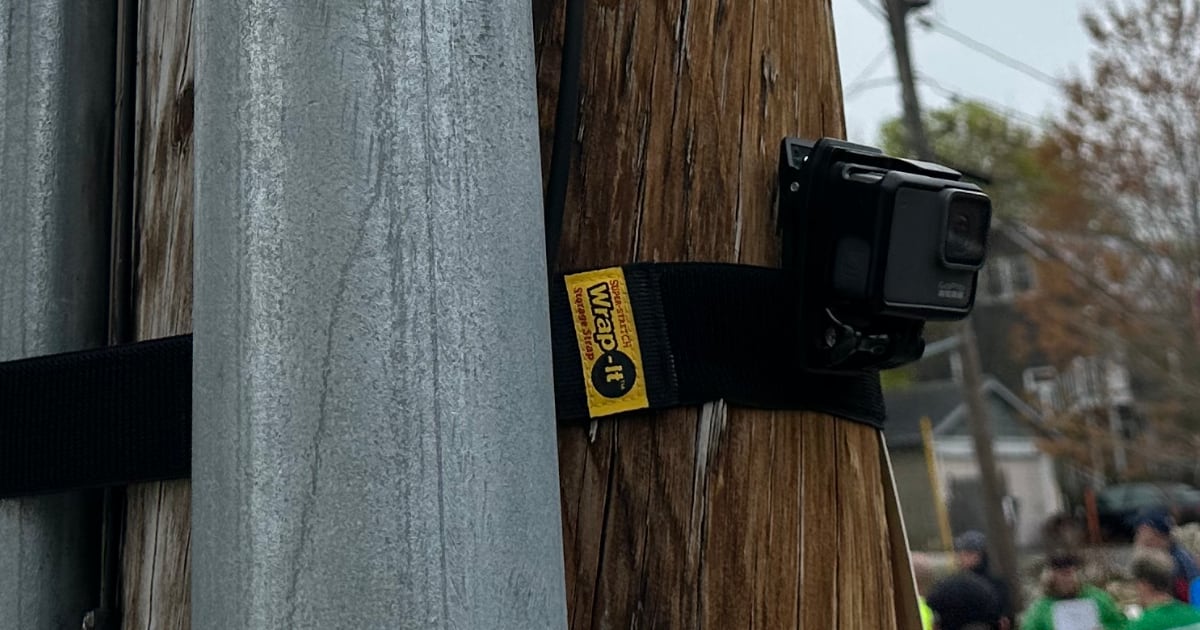
GoPro Telephone Pole Mount at the Boston Marathon
Benefits of Using Heavy-Duty Wrap-It Storage Straps and a GoPro Clip Mount
Using Heavy-Duty Wrap-It Storage Straps and a GoPro Clip Mount to mount a GoPro camera on a telephone pole offers several benefits. First, it allows you to record a unique perspective that would be difficult to capture with a traditional camera setup. Second, the Heavy-Duty Wrap-It Storage Straps and GoPro Clip Mount are both affordable and easy to use, making this setup accessible to anyone who wants to try it. Lastly, the straps and mount are both durable and reliable, ensuring that your camera will stay in place throughout your recording.
Conclusion
Mounting a GoPro camera on a telephone pole is a great way to capture a unique perspective for your video. By using Heavy-Duty Wrap-It Storage Straps and a GoPro Clip Mount, you can ensure that your camera stays in place and captures the footage you need. So, next time you?re looking to create a unique video, consider using these tools to mount your GoPro camera on a telephone pole.
PermalinkAbout
GoPro is the most popular action camera in the World. Check out some tips and tricks on using the camera.
Check out all the blog posts.
Blog Schedule
| Wednesday 9 | Pytest |
| Thursday 10 | PlayWright |
| Friday 11 | Macintosh |
| Saturday 12 | Internet Tools |
| Sunday 13 | Misc |
| Monday 14 | Media |
| Tuesday 15 | QA |