This year was a challenging year for the Boston Blog content. I haven't been to Boston much since early March. Most of the content was things that I had in the backlog to post someday.
I'll be discontinuing blogging about Boston places for a while. I hope that I can get some new content by the Summer of 2021.
Top 10 Blog Post
Samuel Adams Gravestone-- Interesting facts about Samuel Adams Gravestone at the Granary Burying Grounds.
Spanish/American War Cannons-- Located on the State House Lawn. This was a hard piece to put together since I haven't been able to get an up-close look at the cannons.
Paul Revere Statue-- Interesting Facts about Boston's Paul Revere Statue in the North End.
Emancipation Group-- Facts about the Boston Statue people suggest to take down. The statue was taken down on December 29, 2020.
Sacco and Vanzetti Plaster Sculptor Mold-- The Plaster Sculptor Mold at the Boston Public Library remembering the events around Sacco and Vanzetti trial and execution in Boston.
Queen Elizabeth II Plaque-- Queen Elizabeth II visited Boston in 1976. There is a plaque at the old North Church remembering her visit.
Edward Cohen Plaque-- Special Plaque in the Statehouse that took nearly 100 years to be placed. Commemorates the work of a person that was killed at the State House because of mistaken identity.
Zakim Bridge-- A landmark bridge in Boston skyline located near the Boston Gardens
Blade Tool Tricks-- (November 24) Learn how to quickly cut multiple tracks
Transparent Background in PowerPoint-- (October 20) How to make the background in Powerpoint transparent for Final Cut Pro. You can then use the Powerpoint movie in any Final Cut Pro project.
Trim Start and End-- (October 13) Cool Shortcut to quickly cut out a clip from a certain point.
Adding Favorites Folders to Import-- (September 15) Add your favorite folder to the Import dialog sidebar. This makes it easy to navigate to common folders.
Slow Motion Video-- (September 8) Using the iPhone Slo-Mo videos in Final Cut Projects
Getting Live Photos-- (August 18) How to get the Movies from Live Photos taken with the iPhone.
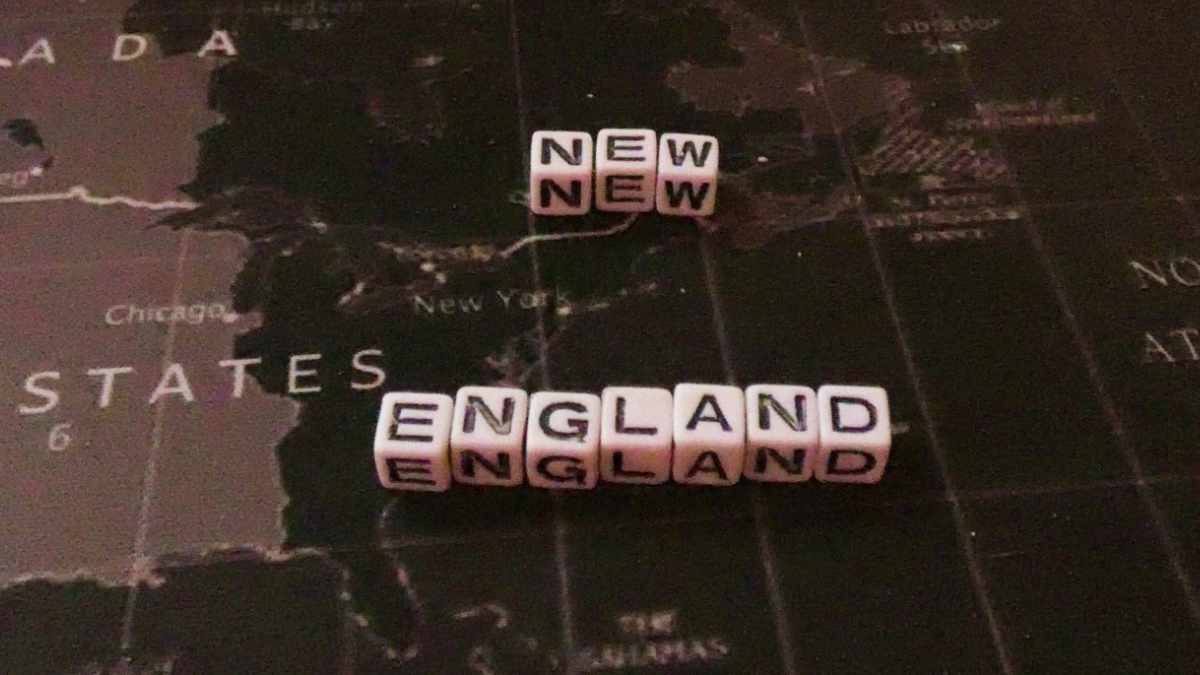
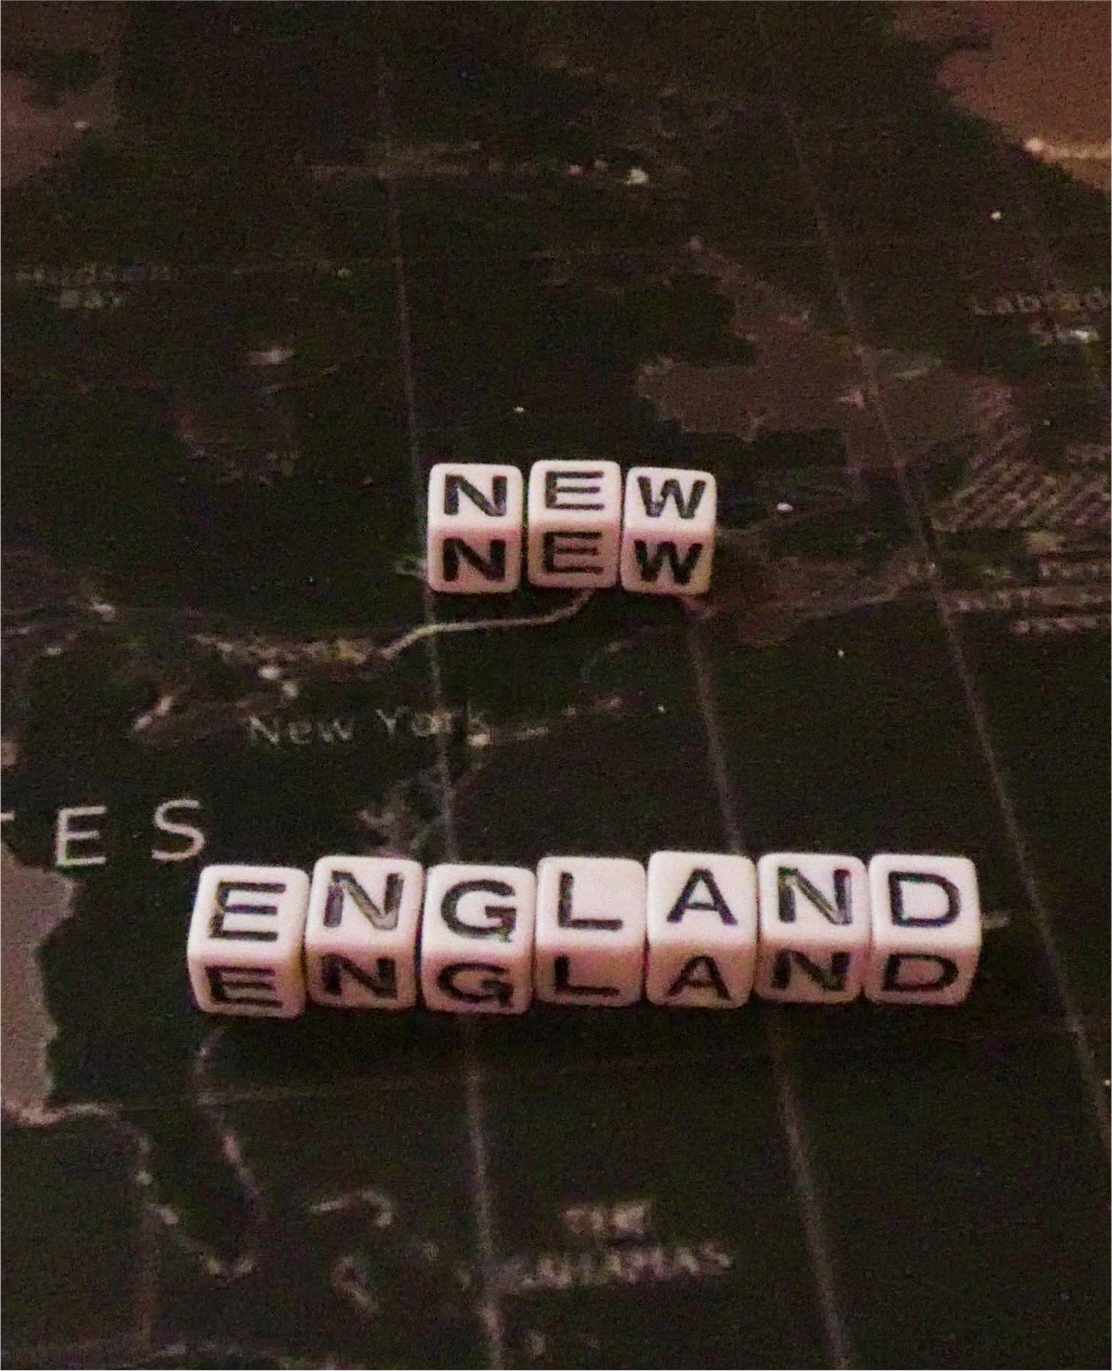
During the Spring and Summer months, I blogged about various New England locations. It was fun thinking up all the various locations that I have visited over the years.
It's time to look back at some of the best posts of 2020. (Check out the 2019 Post.)
Slack Tips for QA - (February 11) Some useful tips and tricks to get the most out of Slack.
Dynamic Bookmarklets - (June 24) Great way to build a Bookmark that is time based.
Letter to the QA Manager - (September 9) An interesting letter that I found. Helpful in understanding the relationship of a QA Engineer and a QA Manager.
Best QA Advice - (October 14 ) Some great QA advice that I have gotten over the years.
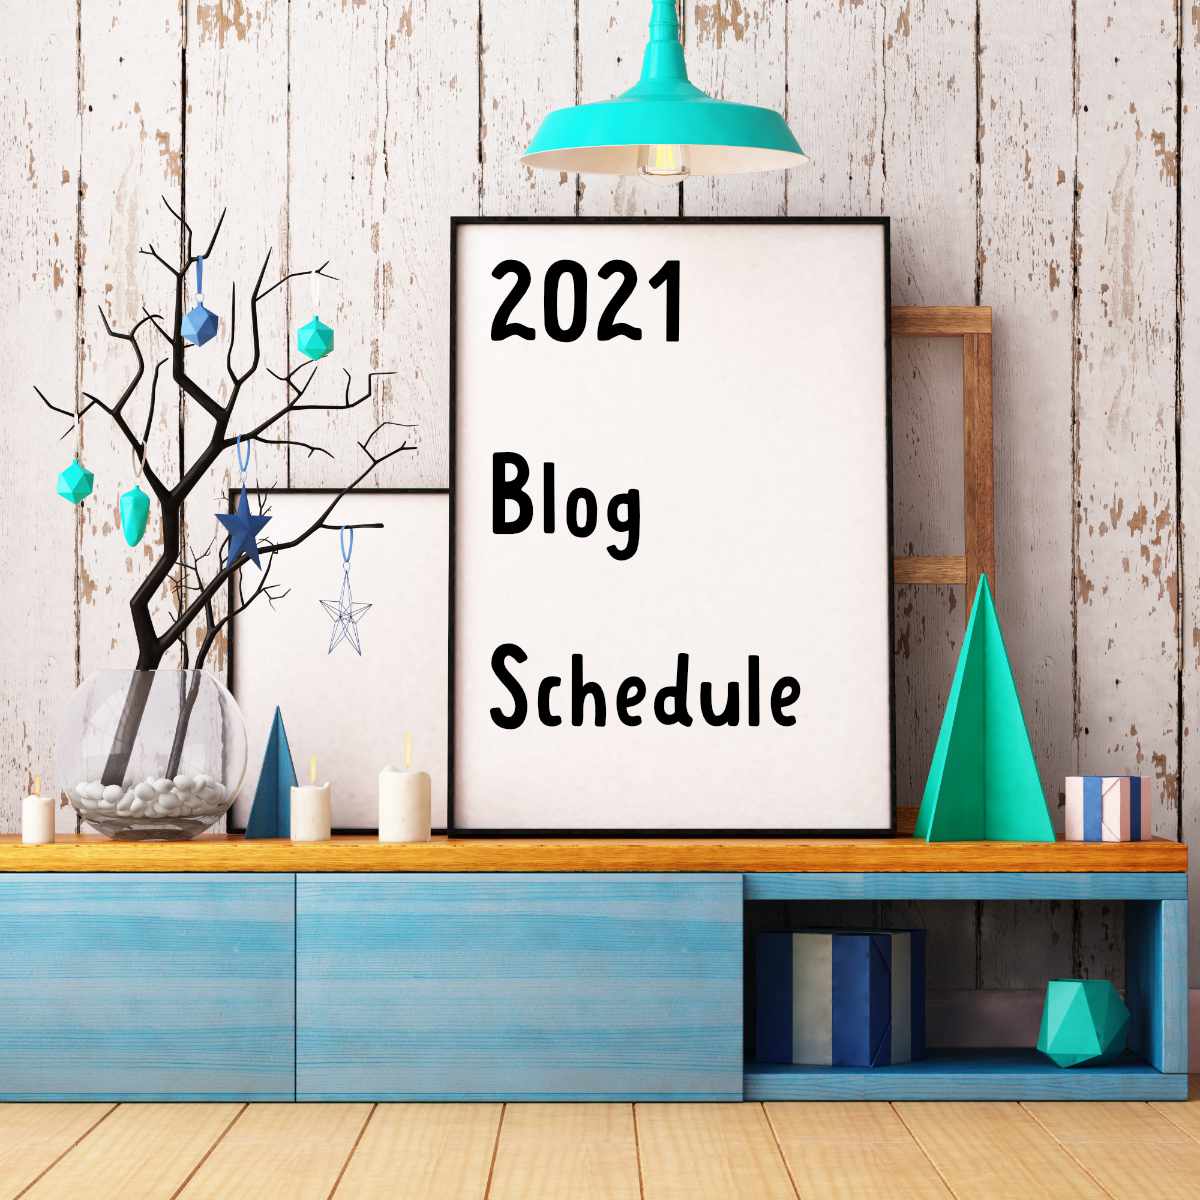
2021 Goals
I'll keep posting useful QA Tips and Tricks that I learn. Most of the information is around the Software as a Service model.
I don't have any specific content targets. I'll keep the content going through February. I may take a break for some time to think of useful content to post.
Here's is the plan for 2021 Blogging. One of the biggest changes is that the year will start off with no Boston Blog. This is because I haven't been into the city for a while to get updated pictures and content ideas.
Perhaps sometime in 2021 I'll get back into Boston and bring back the Boston blog content - as I know it's a very popular topic.
General Plan for Now
Sun
Open
General open topic that I feel worthy of Blogging
Mon
Productivity
Cool Productivity tips, could be computer base or just some general tips.
Tue
Final Cut Pro
I am learning more about Final Cut Pro every day
Wed
Affinity Designer
Tips and Tricks on getting the most out of Affinity Designer
Thu
BBEdit
Tips and Tricks on this popular text editor
Fri
Macintosh (General)
Fun things I learn using the Macintosh
Sat
Internet
Cool Tools on the Internet
I am committed to keeping this schedule at least through January.
Ideas
If you have any content that you would like to contribute, feel free to contribute via the Feeback form.
There was a lot of really good post this year, I was able to find some cool online tools. Out of the 51 posts, these are the top 3 items:
WhatTheFont - (February 2nd) I use this tool all the time. When I find some text in the wild that I would like to duplicate, this tool makes a big difference.
Clipping Magic - (May 9th) Removing the background on images is a bit trickly, nothing like an online tool to make things easier.
Coronavirus COVID-19 Dashboard - (March 28th) For much of the year, this was the go to dashboard that all the major TV networks were using to report on the COVID-19 numbers.
Check All The Posts
You can checkout the entire collection of blog posting on Internet Tools.
This is the annual top 3 Macintosh Blog post of the year. There were 51 Macintosh Blog post this year, all of them posted on Fridays.
This year I am only going to highlight the top 3 posts. The criteria are based on the usefulness of the information and how I apply the information for my Macintosh experience.
Top 3 Blog Posts
Unlock your Mac using the Apple Watch - (April 3) This was a cool trick to quickly get back to my work after stepping away from the computer. Unfortunately, the IT department didn't like that and disable it for my work computer. However, the trick is still useful for my home computer.
Inkscape Spray Tool - (August 8) I really liked that you could spray any image in a the clipboard. It can create a cool effect.
Missing Disk in Sidebar using Big Sur - There is a bug in macOS 11 that prevents some SD Disks were not showing in the sidebar or in Final Cut Pro. I provide a couple of alternative solutions until Apple comes out with a fix.
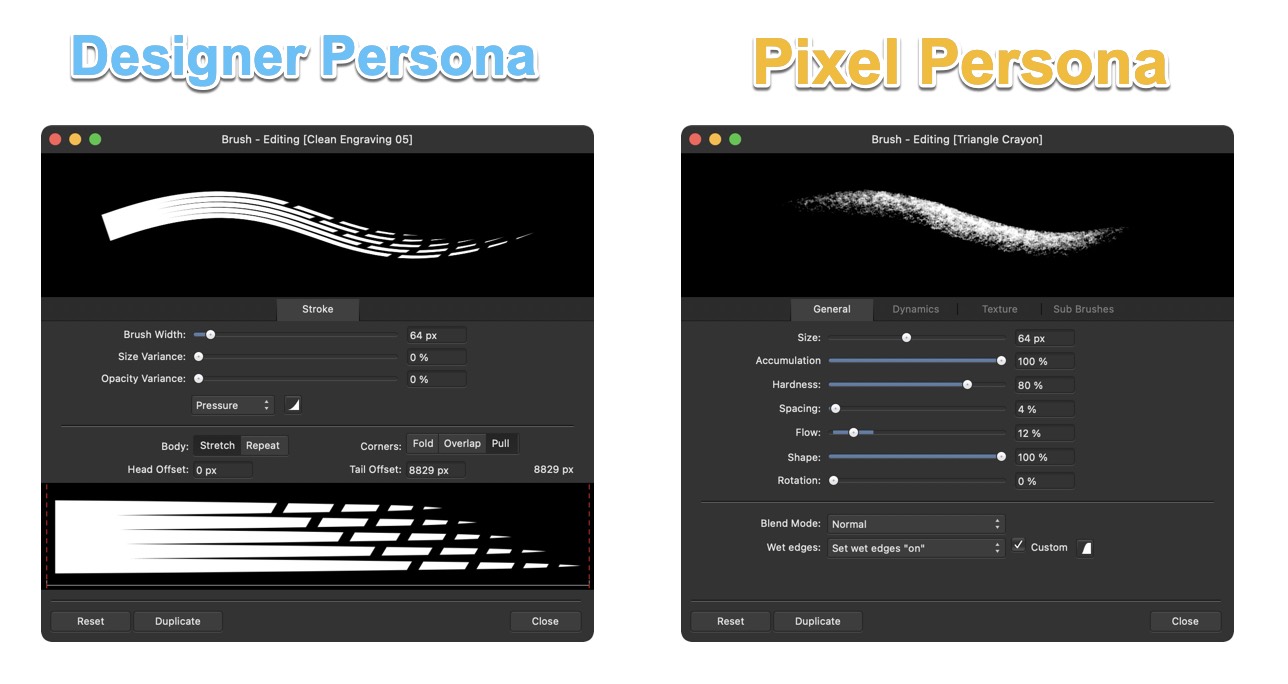
In Affinity Designer there are two types of brush controls. When you're using the Designer Persona you have a very limited set of brush options. However, when you're in Pixel Persona you have a lot more options.
See that you have more options in the Pixel Persona
Five Things I Learned
Only Pixel brushes are available in the Pixel Persona. So if you installed brushes and don't see them in Affinity Designer it's probably because you're not in the right persona.
The Pixel Persona gives you a lot more controls with Flow and scatter, something that isn't available in the Designer Persona.
Click the "Duplicate" button when making changes so that you can access the settings whenever you want.
After using the brush make sure to rasterize the layer.
If you are using Affinity Designer brush a lot you may want to get a Wacom tablet so that you can add pressure effect to the brushes - giving a more realistic look.
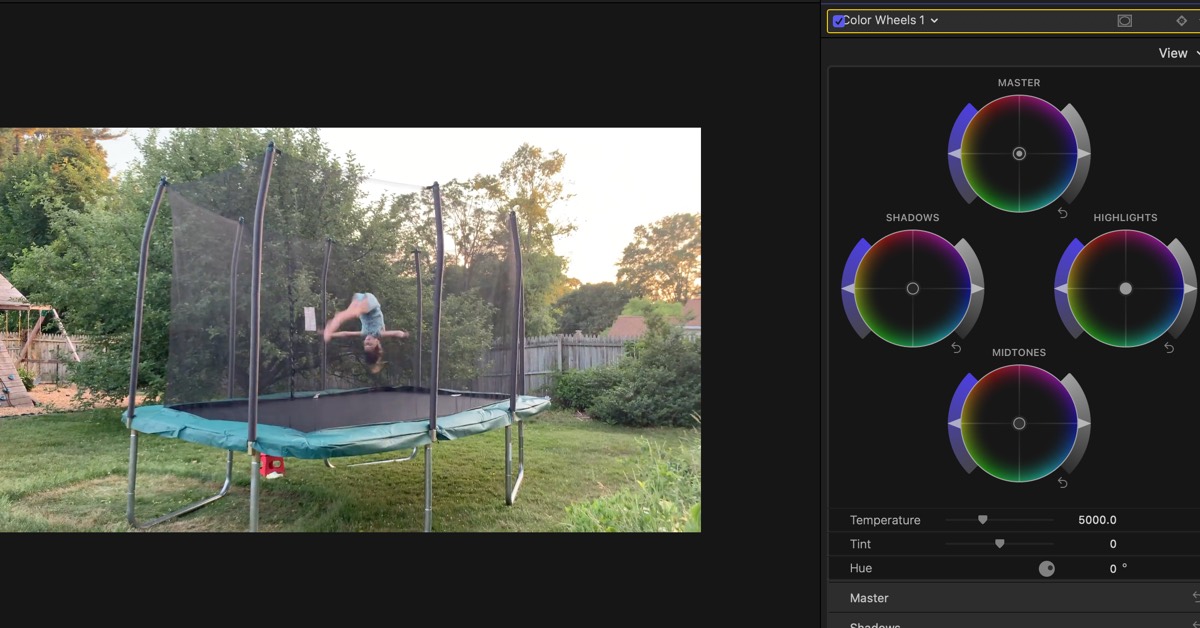
You can change easily the color of a clip by using the Color Wheel option. The color wheel helps you adjust the clip's brightness and saturation levels on each side of the four-color wheels. You get an instant live preview of the adjustment.
Five Thing I have Learned
The color wheel really helps me balance two different cameras that I use to film a church service. The cameras don't exactly have the same white balance effect.
I find it easier to balance the colors of similar clips using the color wheel instead of the 'Balance Color' feature.
There are controls on the bottom of the color wheels section that allows you to adjust for Temperature, Tint, Hue, and Mix. I really haven't played around with these.
Usually the Master and Shadows are the only wheels I have to control. My shooting is inside and the lighting doesn't change that much.
Using the colors wheels really help make using two cameras so much better. People really can't tell that there are two different cameras being used.
Finding the Color Wheel
The color wheel section is located in the Color Inspector of the selected clip. Simply put the playhead on the clip that you want to be adjusted and type in Command 6.
Click on the 'No Corrections' popup menu and select '+Color Wheel'
Start playing around with various settings to see what works best for your situation.
Today I got a strange feedback comment from a form on this website. This is the email that I got:
Notice#: 491343
Date: 2020-12-20
YOUR IMMEDIATE ATTENTION TO THIS MESSAGE IS ABSOLUTELY NECESSARY!
YOUR DOMAIN cryan.com WILL BE TERMINATED WITHIN 24 HOURS
We have not received your payment for the renewal of your domain cryan.com
We have made several attempts to reach you by phone, to inform you regarding the TERMINATION of your domain cryan.com
CLICK HERE FOR SECURE ONLINE PAYMENT: http://domainsetupmain.com/?n=cryan.com&r=a&t=2592097539&p=v1
IF WE DO NOT RECEIVE YOUR PAYMENT WITHIN 24 HOURS, YOUR DOMAIN cryan.com WILL BE TERMINATED
CLICK HERE FOR SECURE ONLINE PAYMENT: http://domainsetupmain.com/?n=cryan.com&r=a&t=2592097539&p=v1
ACT IMMEDIATELY.
The submission notification cryan.com will EXPIRE WITHIN 24 HOURS after reception of this email
Right away I knew this couldn't be true - after all, why did they use the website feedback form for communication.
domainsetupmain.com
The above links won't work. Apparently, the website was taken down. When I viewed the information, it was telling me all about the price but nothing about the services. They wanted the credit card information quicker than they are telling you why they needed it.
At first I thought it was an SEO scam, trying to get people to sign up for simple SEO placement.
Turns out the site was just scamming people out of their money.
Remember!
If you get similar emails like the one above. It's a scam. Always check your domain registration to find out if it's expiring soon.
Oh, I didn't actually click on the link. I figured the "t=" was just tracking my click. I viewed the site with a different "t=" number and a different domain.
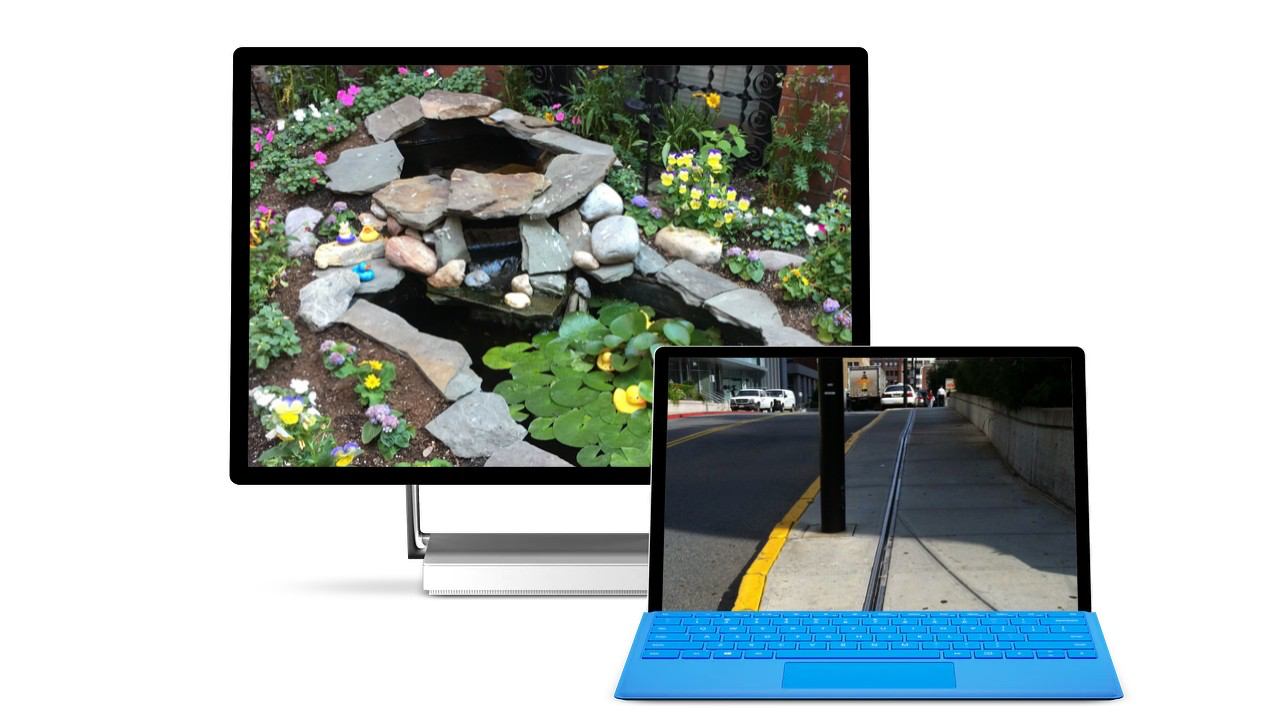
Today I updated some classic Boston Blog postings. These two are located near where I worked at the Prudential Center in Boston.
Duck Pond on Botolph Street
Updated some content on the Duck Pond on Botolph Street post from 2015. I remember walking by this duck pond every day for about 3 years. It was fun seeing the changes the owner did for each season.
Updated the graphic for desktop and mobile users
Fixed Spelling
Mystery Rails on Ring Road
Updated some information on the Mystery Rails on Ring Road that I wrote back in 2013. This is one of my all time favorite blog titles.
Updated the graphic for desktop and mobile users
Fixed Spelling and formating
More updates coming next week, and then on the 31st, a look back at the best Boston Blog postings of 2020.
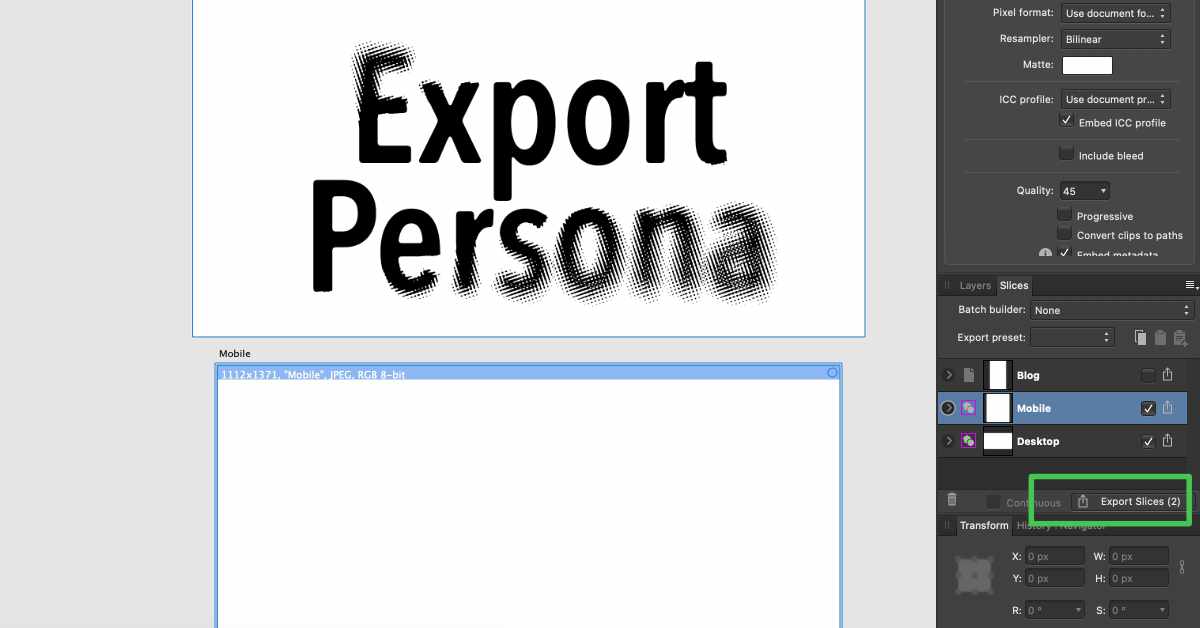
Affinity Designer's ArtBoard feature makes it easy to work on different size images at the same time. I can work on an image for Desktop users at the same time as Mobile users.
Exporting ArtBoard can be tricky as for the longest time I exported each ArtBoard via the Export option. There is a better way.
The secret to properly exporting an ArtBoard is to use the export persona. You can export the individual ArtBoard as their names with a click of a button.
Tips and Tricks
If your using templates, you should define the default ArtBoard preset in the template. Simply edit the template and set the compression in each ArtBoard in the Export Persona.
Affinity Designer does not support variables. So you can't set up an ArtBoard template and have a different Layer Slice name every time you open it.
The name of the slice is the name of the output image.
Use the "Export Slices" button (see Green Box in the graphic) at the bottom of the slices tab to export all the ArtBoards at once. This is your one click and done.
Final Cut Pro includes several Logic Effect tools. These tools help improve the audio in your Final Cut projects.
Which audio effect works best for you depends on your audio needs. It might be tricky to figure out which effect does what.
Logic Pro Effects Tools
Here's a description of each Logic Effects functionality from Apple.com.
Adaptive Limiter - This is a versatile tool for controlling the perceived loudness of sounds. It works by rounding and smoothing peaks in the signal, producing an effect similar to an analog amplifier being driven hard. Like an amplifier, it can slightly color the sound of the signal.
This is great when you have a video clip that has several sound peaks and you want to boost up the other audio. This is a better alternative than using the Normalize feature in Fission and Audacity.
Compressor - This emulates the sound and response of several professional-level compressors. It tightens up your audio by reducing sounds that exceed a certain threshold level, smoothing out the dynamics, and increasing the overall volume - the perceived loudness.
Enveloper - This is an unusual processor that lets you shape the attack and release phases of a signal - the signal transients, in other words.
This can be used to help highlight some of the vocal sounds in a song.
Expander - This is similar in concept to a compressor, but increases, rather than reduces, the dynamic range above the threshold level.
Gain - Gain amplifies (or reduces) the signal by a specific decibel amount.
Limiter - This reduces any peak above the threshold to the threshold level, effectively limiting the signal to this level.
Multichannel Gain - Multichannel Gain allows you to independently control the gain and phase of each channel in a surrounding mix.
Multipressor - Multipressor (an abbreviation for multiband compressor) is a versatile audio mastering tool. It splits the incoming signal into different frequency bands- up to four -and enables independent compression of each band. After compression is applied, the bands are combined into a single output signal.
Noise Gate - This is used to suppress unwanted noise that is audible when the audio signal is at a low level. This effectively removes lower-level parts of the signal, while allowing the desired parts of the audio to pass.
Spectral Gate - This is used as a tool for creative tool design.
You can use this tool to muffle music so that it sounds like it's coming through the wall, or change a regular voice to sound like it was from a telephone call.
Surround Compressor - This is specifically designed for compression of complete surround mixes. It is commonly inserted in a surround output channel strip or in audio or aux channel strips -busses- that carry multichannel audio.
Yagni is an abbreviation for "You Aren't Gonna Need It," referring to code that does not add functionality to pass tests or meet requirements.
Four Reasons QA Should Be Aware of Yagni
Makes Code Hard to Read - Developers may leave unused code - perhaps for their testing or design process. When someone else picks up the code it could cause confusion as to what the functionality is doing. This is true for QA as sometimes they need to read the code review to understand how to unique exploratory testing around the functionality.
Removed QA-Only Code - Developers may add code to help QA validate certain functionality. This should get removed from the code, not commented out. This way the code doesn't accidentally get activated.
Adds Risk to the Code - If it's not part of the feature, then there's no reason it should go out in production. Keeping Yagni code in could open a back door to your application.
Applies to QA Test Plan - Check your test case repository. Are there tests that fit into the Yagni principle? Why are they are part of your test plan? Clear it out so that your tests don't look so overwhelming.
Interesting Side-Note
According to Google translate Yagni is Turkish for "That is."
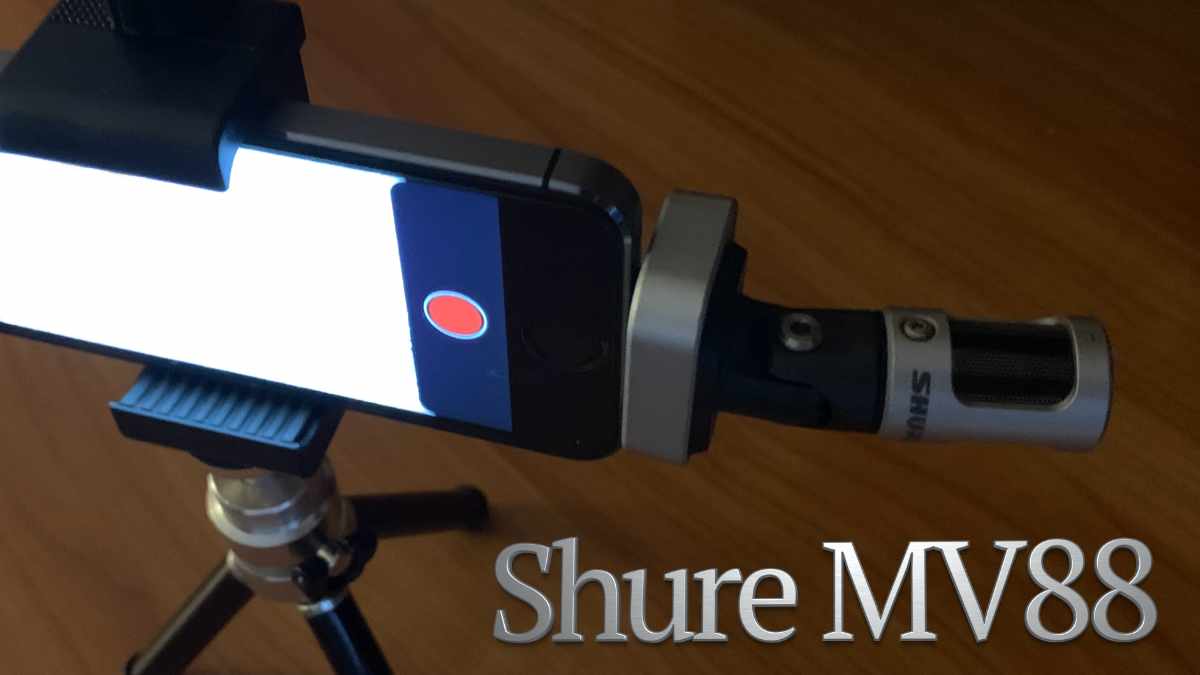
If your looking for a alternative microphone for the iPhone, I would highly recommend checking the Shure MV88 microphone. It's a great way to get superior audio recorded using your iPhone.
This microphone costs $149, so it may not be the best tool for everyone. If you don't any audio on your iPhone, this is a pretty powerful tool and worth the price tag.
Five Things I Learned
Flexible Head - You can move the head up to 90-degrees. Works great when you are interviewing someone, or want to record the content of a speaker.
Works in Memo and Camera App - You can use the microphone in just about any sound or video app. I haven't encountered an app that it doesn't work with. You may have to unlock the phone in order to use some apps.
Carry Case - Comes with a handy case to protect the microphone. It's big and bulky - to protect the microphone sensitive parts.
Quality Stereo Sound - You can tell the difference between the iPhone Microphone.
Doesn't Connect with some iPhone cases - You can use a lightning extension cable with the Shure MV88. The extension cable gives you the flexibility to use the microphone away from the phone.
Professional Bloggers and Podcasters- Popular podcasters use the MV88 as their primary recording tool or when they are on the street interviewing people.
MOTIV Audio App
The MOTIV Audio app is great because it gives you more control over how the microphone accept sounds. It takes a bit to learn if you are used to other applications.
To get the most out of your microphone certainly use the MOTIV Audio app. I would recommend reading the guide to be more familiar with the capabilities of the app.
With a lot of people working from home, it's been hard for some people to stay focus without the usual background noise. Some people can work in private, others need office noise to focus.
The people over at mynoise.net has a noise machine with an office sound.
Website Description
While some people have difficulty working in a noisy environment, others feel the opposite. Once you have acquired the ability to concentrate on ambient noise, you may find it surprisingly difficult to work from a quiet home. Here is an interactive sound generator that will allow Teleworkers to create their ideal work ambiance!
Bare Bone's BBEdit is a great text editor tool. Many people use it for programing developement.
I tend to use it for anything text related. When I am writing up some long text for email, Slack, or whatever, I am usually using BBEdit.
New Feature!
One of the new features in BBEdit 13.5 is the Randomize Order functionality.
This feature randomly sorts the selected text. The end result is selected text gets replace by a random sorted collection.
Release Note Description
Added "Randomize order" as an option for "Sort Lines". If turned on, this overrides all other sorting options, and will generate a random ordering for all lines in the document.
Why makes this useful to me?
I manage a team scrum weekly standup. This allows me to sort the speaking order randomly. Prior to this feature, I would go to Random.org and use that sorting functionality. I was concern about the confidentiality of the data. I am not sorting a list of company passwords, but the list of names could be used for someone to cold call into the company. I am not being paranoid, just being cautious.
I can also use the random sort feature in a Text Factory run. In the following example, I apply the random sort and then add a line number.
BBEdit's feature makes it easy to randomly sort my list of names in an application that I already use all the time.
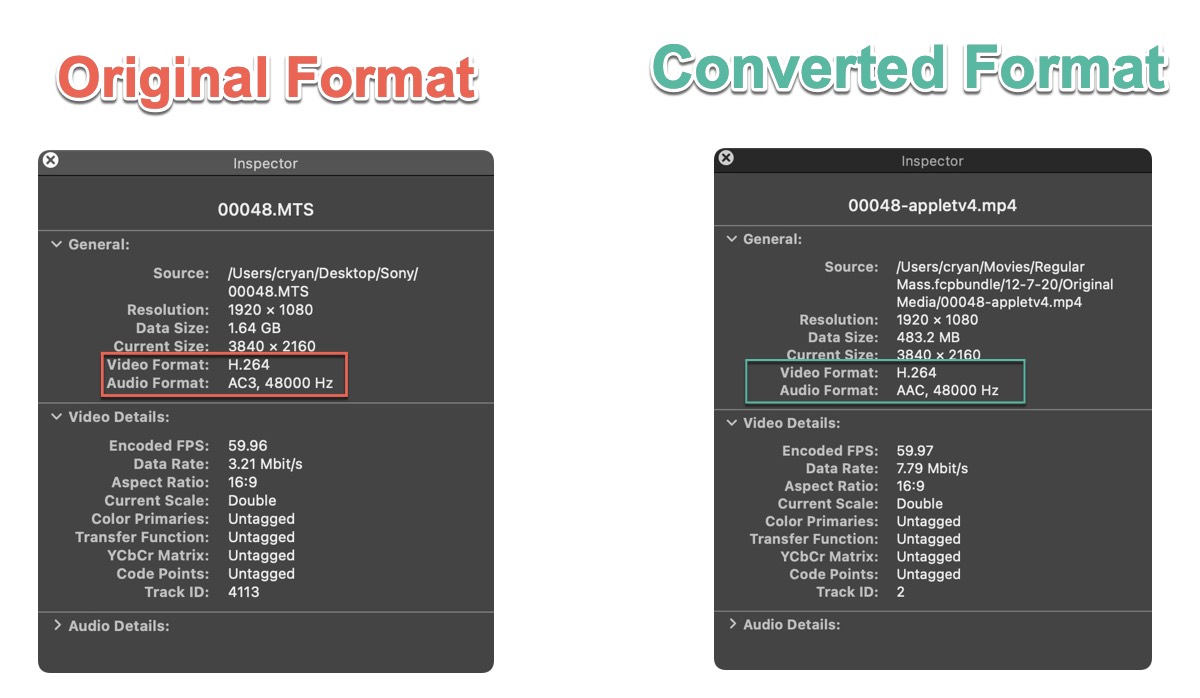
If your shooting video with Sony or Panasonic cameras, chances are your shooting using the AVCHD Video Format. You'll see the video file end with ".mts" or ".m2ts."
There's nothing wrong with this format until you decide to synchronize video and audio files.
Problem with Synchronize Clips
One of the things I noticed when I attempted to synchronize a video clip with a separate audio file, is that it was taking Final Cut Pro a long time to generate a new file. When I decided to quit the synchronization, it would take a long time for the cancelation to complete. I would have to force quit the application.
I didn't encounter this issue with any other video source.
There's something about the mts format that is triggering some weird behavior with Final Cut Pro Synchronize engine.
It may have something to do with the AC3 Audio format (Dolby AC-3) as seen in the difference between the two converted files.
My quick solution was to convert the video file using QuickTime Player or Smart Converter Pro.
In QuickTime Player, I used the "Greater Compatibility (H.264)" settings. Export the clip as 1080
In Smart Converter Pro, I used the Apple TV 4 setting.
Once I converted the Video and Audio, I had no problems using the Synchronize Clips feature.
Not Using Synchronize Clips?
If you're not using Synchronize Clips, you may encounter problems with other audio functionality. For example Audio Effects or with the Auto Enhance Audio functionality.
Find Clips that Have AC3 Format
Here's how to see the Audio format of the clips that are in your Final Cut Pro projects:
In Final Cut Pro make sure that the Browser is displayed and in List Mode.
Right click on any Browser column, for example, Camera Name. You should see a drop down menu. Select "Codecs"(Third from the bottom)
The Codecs column data list Audio and Video format for each of the clips being used.
Look for clips that have the AC3 audio format. When you find one, right-click on it to reveal in Finder.
Use the "Quick Solution" that I described earlier to convert it. I know it's painful to have to convert multiple files, but this should fix issues that you may be having.
Some Developers use QA as their testing environment without testing their code first. In some situations, if the code compiled they thought it was safe for QA to test.
In software development, this is known as 'throw it over the wall' testing. Developers feel that the Change is so small - they just give it to QA to test it.
Not a Good idea
Bad news - that's not what QA is for. At least not in an agile environment.
Developers shouldn't be sending code to QA without having some sanity testing. They should at least know that the change they are making are working.
Yes they should be testing their code.
What Should QA Be Use For?
QA should be used to test security risks, performance issues, vulnerability, and usability. It shouldn't be the front line of any testing.
Developers should always be testing their code. They should have accountability for how their code works.
This weekend I pulled out some old data CDs and DVDs. I was looking around at some of the files that I saved back in 2003. These disks are 17-years old and are at risk of soon being "expired."
CD-R, DVD-R, and DVD+R discs should have a life expectancy of 100 to 200 years or more. However, what is questionable is if the hardware will still be able to recognize the CD/DVD formating.
I found lots of digital photos, taken with my Fuji FinePix A303 camera.
Halls Christmas Tree Stand
I found a bunch of pictures taken at the Hall's Christmas Tree shop in West Concord. These were taken on December 6, 2003.
This past weekend we actually purchased a live tree, but not at Hall's in West Concord. Halls stopped selling Christmas trees in West Concord in 2008.
Toby Hall closed the West Concord Shop because he decided to retire.
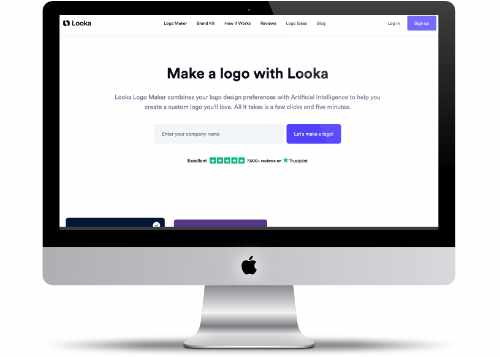
About a year ago I posted a cool Logo Generator that makes it easy to create your own logo from various styles.
Recently I was made aware of a cooler site that makes it easy to create a modern logo. This is perfect for anyone looking to make a logo for their blog, YouTube Channel or even a team project.
Looka uses Artificial Intelligence to create a unique logo for you.
Website Description
Looka Logo Maker combines your logo design preferences with Artificial Intelligence to help you create a custom logo you'll love. All it takes is a few clicks and five minutes.
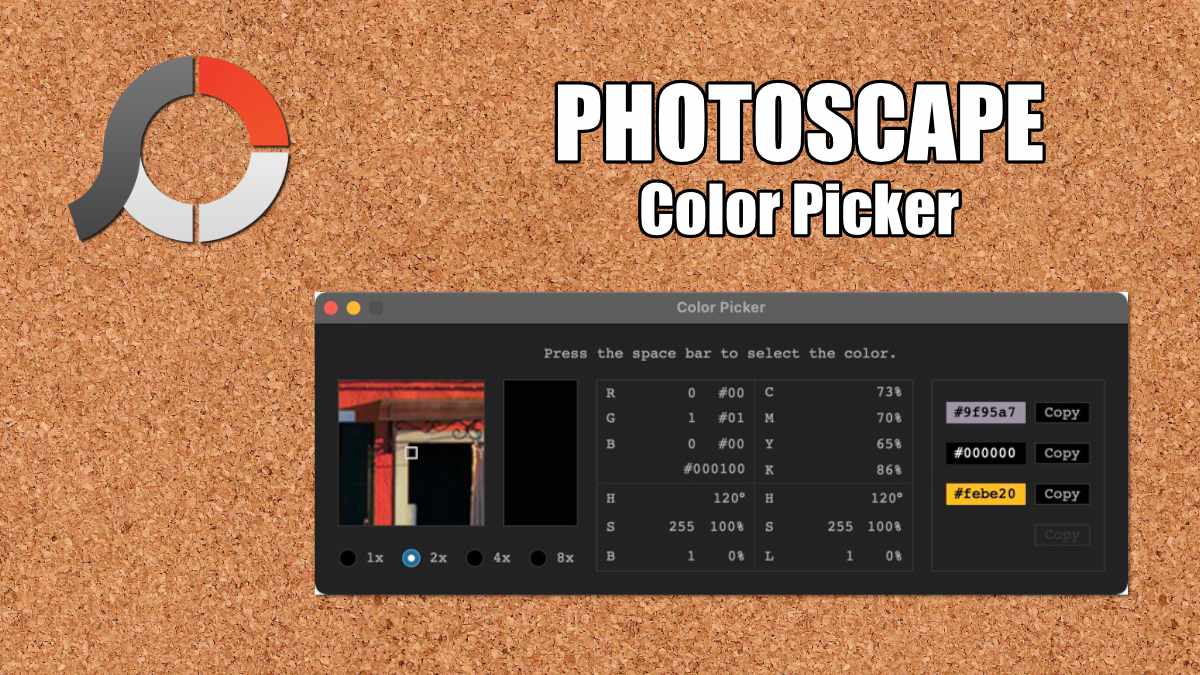
One of the neat tools in PhotoScape X is the Color Picker. This feature allows you to select a pixel and paste the HEX value into the clipboard. It's an easy way to get some color into an HTML document.
Four Things I Learned
When you find the right color, simply click the space bar to select the color and have the hex value pasted in your clip board
You can change the pixel view to a fine point the color you're looking for - particularly if it's an HD photo.
The Color Picker will save the last four options, allowing you to go back and get any previous selection. The background of the color picker shows the selected color.
The pasted copy doesn’t contain the ‘#’ symbol. This is weird because it shows in the dialog box when you select the color and in the color history section.
Since March 13th, I have only been to Boston once -> October 12. So it's been challenging to post content without actually visiting sites.
Usually when I post something, I try to visit the site and get some information about it.
Since I am working from home, I haven't been able to get any new pictures.
Updating Content
Throughout December I'll be updating many old Boston blog posts. Some of these were using old image formats and had some pretty bad spelling mistakes.
I am not sure what will happen in January. I may take a pause on the Boston post for a while, just until I can get more relevant content.
Until then every Thursday, I'll randomly pick a couple of Boston Blog posts that I think should be updated.
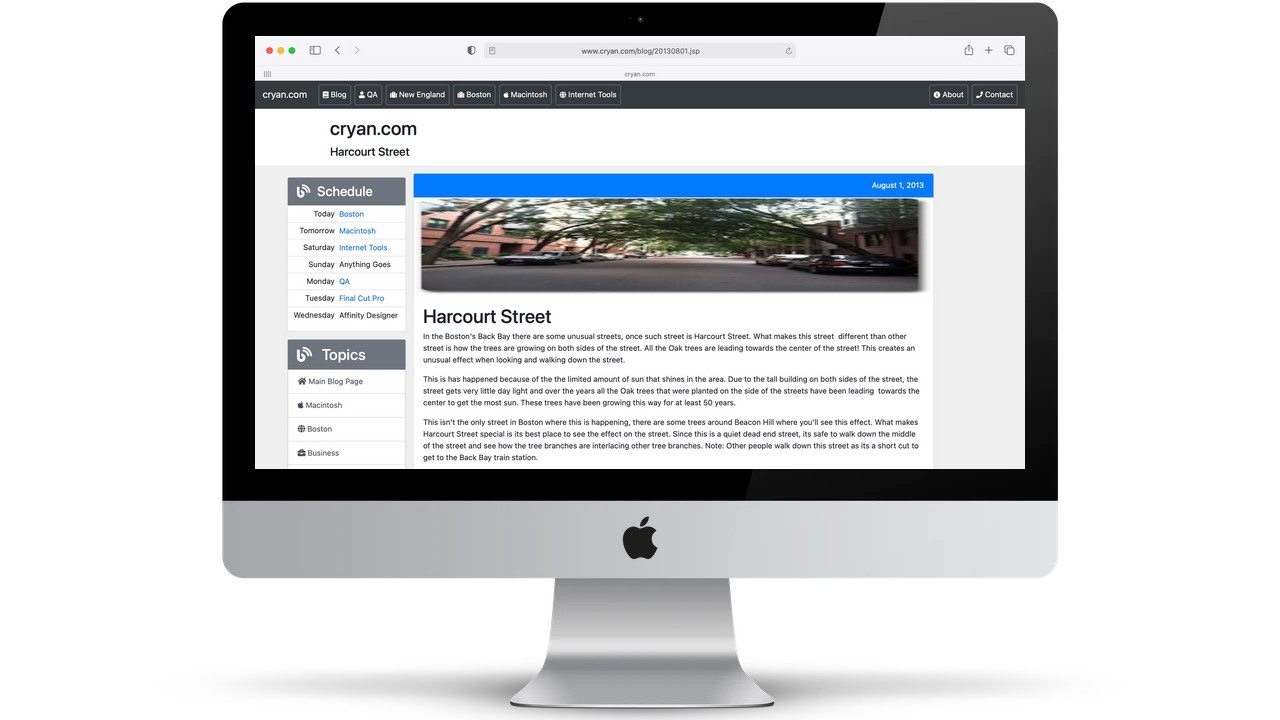
Bad Seats At Fenway
Section 5 in Fenway Park - I updated the main graphic so it loads for desktop and mobile. I also did some spelling/grammar check. I had a hard time trying to find the picture that I used for that post.
The picture was really hard to find. This post was from 2013 and I take way more pictures now than I did in 2013. Luckily I was able to find it in Google Photos. I just searched for "St Botolph St 2013" and found it in a few minutes.
I think the picture helps describe what's unique about the location.
FreeiesBug.com has a lot of great design resources to download.
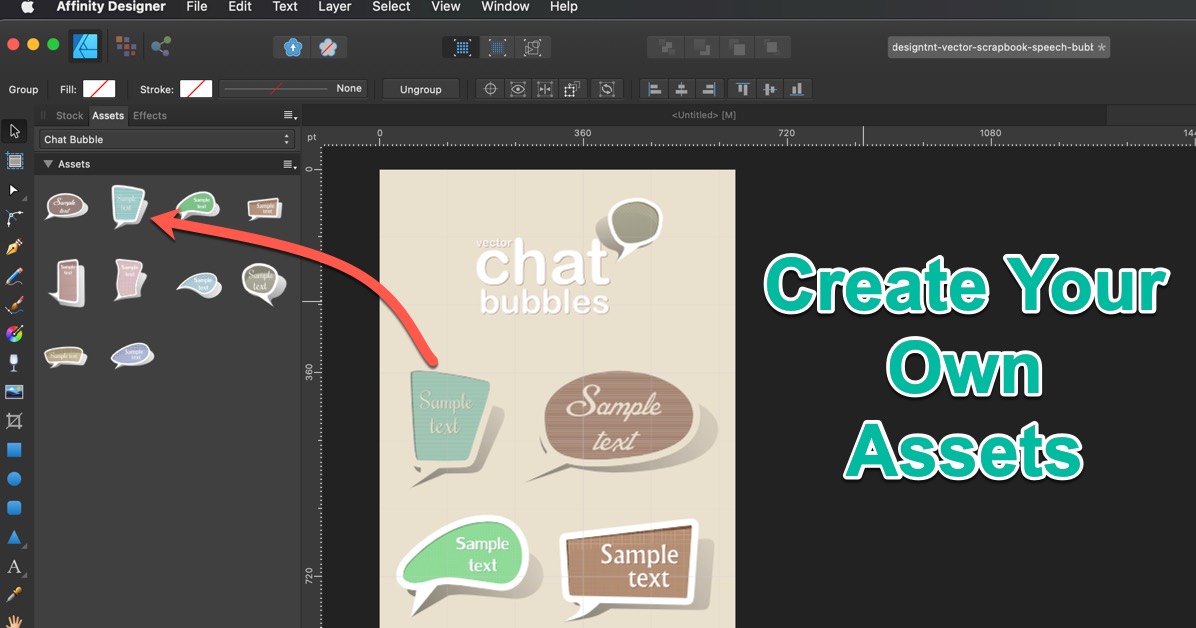
Creating Your Own
If you have EPS or AI graphic files downloaded from Creative Market, Inky Deals, Deposit Photo, 123RF, or others. You can easily make your own Affinity Designer collection from those collections.
In the above graphic, you can see how I moved the images in the AI file into my own Asset collection. Now I have access to the balloon graphics whenever I want.
Key Tips and Tricks
Create a new Asset Category. This can be done by going to the panel preferences. That's located at the top right of the panel. This will help you be more organize and you can easily remove it at a later date.
When you're doing this from AI or EPS files, make sure to GROUP the items before dragging and dropping it to the Asset Panel. Keyboard Shortcut: Command G
I usually lock the layers first before doing any selection. This prevents you from accidentally moving objects in the file during your selection.
I then switch to the "Outline view mode." Keyboard Shortcut: Command Y. This way I can see the lines that I want to use.
After you select the items, use Command G to group them. Then move the objects to the Assets panel
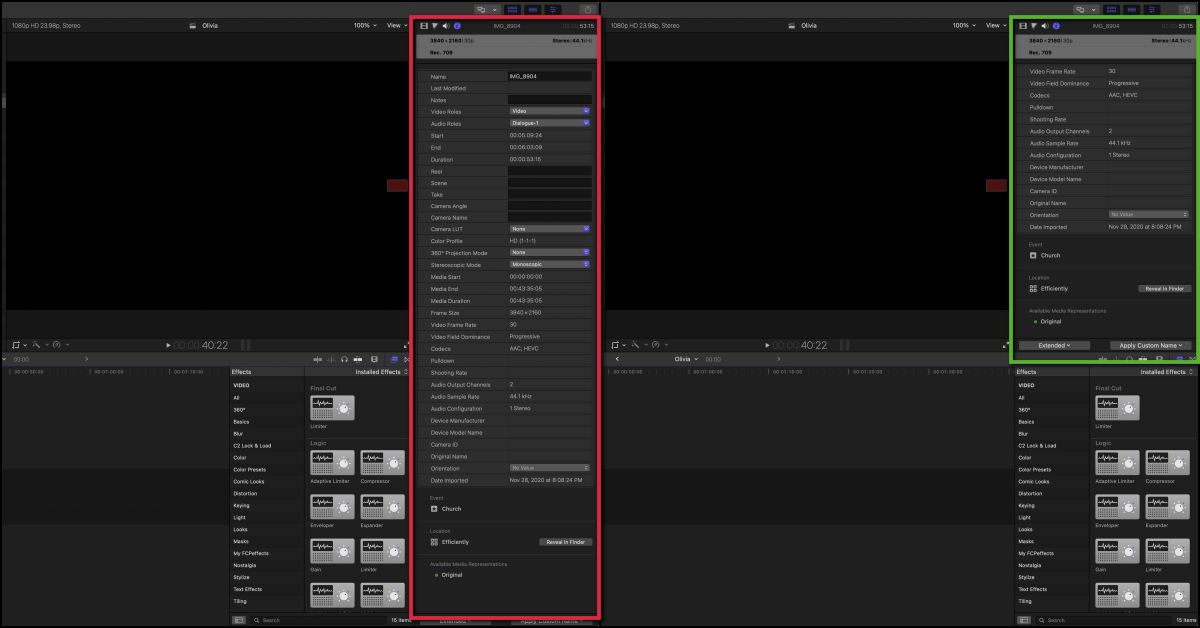
Sometimes the Inspector panel can take up too much room, here's how to fix that.
Side-By-Side view of the Final Cut Pro window with the Inspector panel using the full left side.
If you see the Info Panel using up the complete left side of the Final Cut Pro window, and you have no idea what happens. This is because somehow you have the 'Toggle Inspector Height' enabled.
You can enable/disable this feature by using the shortcut Control Command 4, or selecting the menu item under the View Menu.
This blog post came about because a few people have posted on a Facebook group about how to reduce the size of the inspector panel.
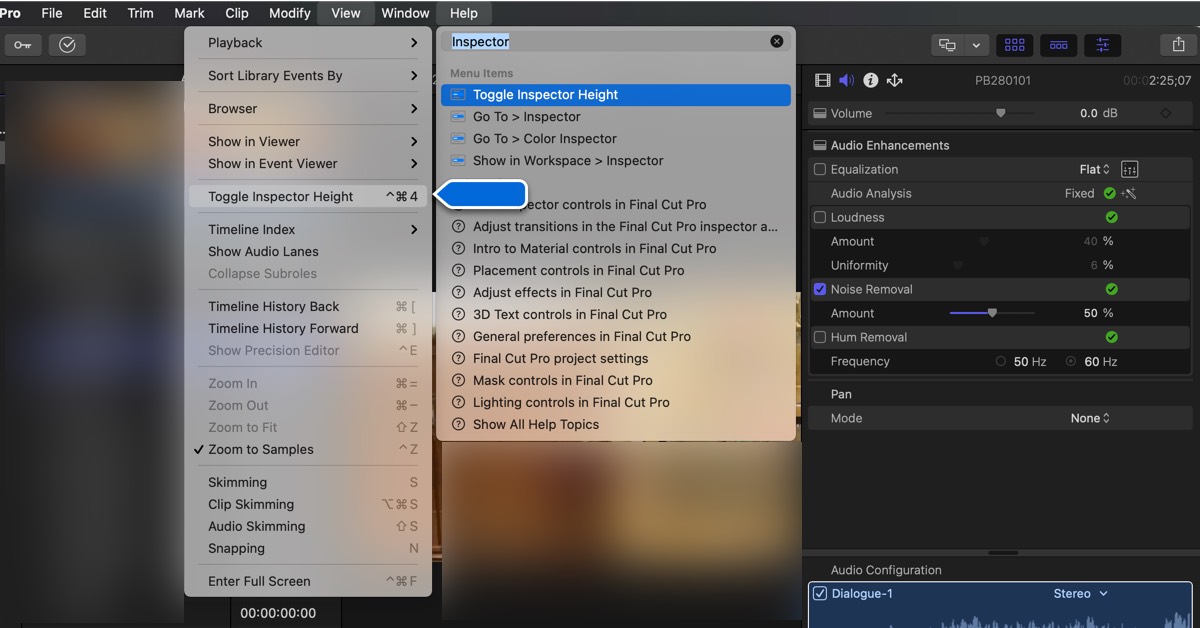
Help Can Guide the Way
Check out the above image.
If you search for "Inspector" using the help menu, and then select the "Toggle Inspector Height" the help will guide you to where to find the "Toggle Inspector Height" section.
Welcome to cryan.com's main blog page! Here you'll find a diverse collection of informative posts covering topics ranging from technology and lifestyle to career advice. There's something here for everyone.
We are committed to delivering the highest quality content, ensuring you have access to the most current and reliable information.