Simplifying Your Design Workflow
EPS to SVG with CloudConvert and Amadine’s Selection Magic
Converting EPS to SVG: A Seamless Process with CloudConvert
If you've been working with EPS files and want to enjoy the benefits of SVG format, look no further than CloudConvert. This online tool offers a straightforward and efficient way to convert your EPS files to SVG without compromising quality.
Why Convert to SVG?
- Scalability: SVG images maintain their quality regardless of size, making them perfect for responsive designs.
- Search Engine Optimization (SEO): Search engines can index SVG images, improving your website's visibility.
- Animation: SVGs support animation, adding dynamic elements to your designs.
- File Size: SVG files are often smaller than their EPS counterparts, improving loading times.
How to Use CloudConvert
- Visit CloudConvert: Go to https://cloudconvert.com/eps-to-svg.
- Upload Your EPS File: Choose your EPS file from your computer or cloud storage.
- Start Conversion: Click the "Start conversion" button.
- Download Your SVG: Once the conversion is complete, download the SVG file.
Amadine: Your New Best Friend for Object Selection
While CloudConvert handles the file format conversion, Amadine takes your design experience to the next level with its exceptional selection tool. If you've ever struggled with selecting specific objects in Affinity Designer 2, you'll appreciate Amadine's precision and ease of use.

Amadine's selection tool offers:
- Improved Accuracy: Select exactly what you need without accidentally grabbing unwanted elements.
- Faster Workflow: Save time by selecting objects quickly and efficiently.
- Enhanced Precision: Make fine adjustments with ease, ensuring pixel-perfect results.
By combining the power of CloudConvert for file conversion and Amadine for object selection, you can streamline your design workflow and create stunning visuals with greater efficiency.
PermalinkJuly 4th Appearance Effect
Using Multiple Appearance to create a cool effect
One of the nice features of Amadine is the ability to use multiple Appearances to an object. This allows you to create some cool effects. Such as this one that I did with the "July 4th" logo.
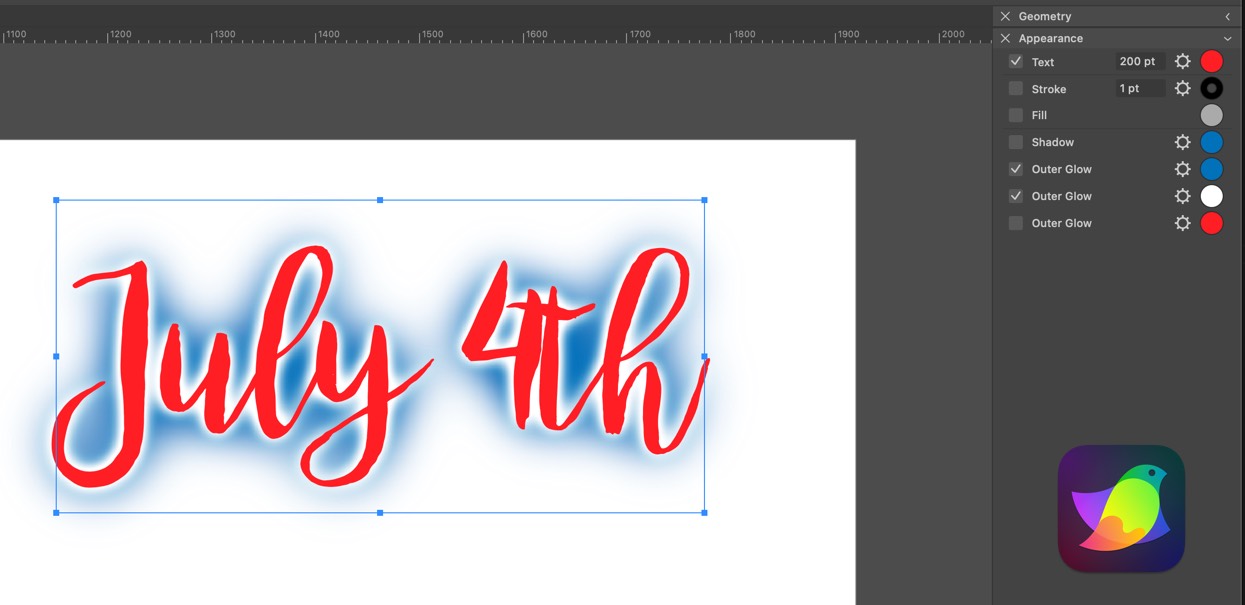
In Amadine, there are several Appearances you can add, Fill, Stroke, Gradient, Brush, Inner Glow, Outer Glow, Inner Shadow, Shadow and Blur.
- Fill: This fills the inside of a shape with a solid color or pattern.
- Stroke: This creates an outline around the edge of a shape with a chosen color, thickness, and style (e.g., dashed lines).
- Gradient: This creates a smooth blend between two or more colors within a shape or stroke.
- Brush: This allows you to apply a textured pattern as a fill or stroke, adding a unique touch.
Then there are effects that add depth and visual interest:
- Inner Glow & Outer Glow: These simulate light emanating from within or around an object.
- Inner Shadow & Shadow: These create a sense of depth by adding shadows behind objects.
- Blur: This softens the edges of an object for a hazy effect.
By combining these appearances, you can create a wide range of design elements in Amadine. For a deeper dive into how to use these features, you can check out the Amadine user manual.
PermalinkMastering Image Fill Capabilities
Basic features of using Images in Fill Shape
Amadine is a versatile and user-friendly vector graphic design app that empowers designers to create stunning visuals with ease. Among its array of features, the Image Fill capability stands out, offering a robust set of tools for enhancing shapes with background images. Whether you're looking to add depth, texture, or a splash of creativity to your designs, understanding Amadine's Image Fill options can elevate your work to the next level. Let's dive into how you can make the most of these features.
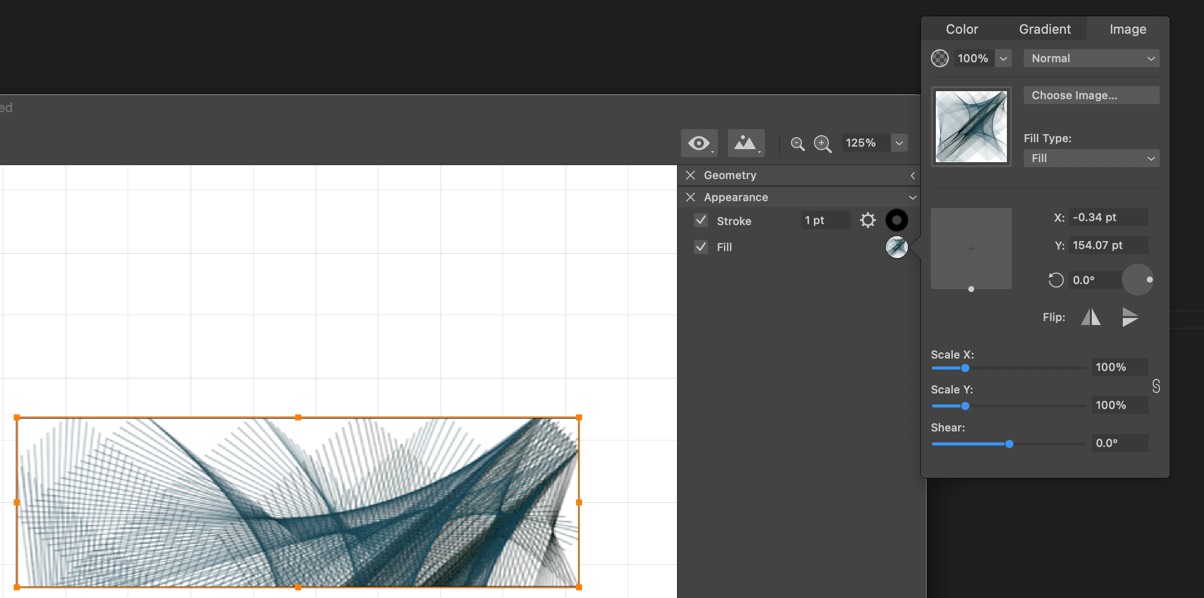
Adding Background Images
To begin, you can click on the "Choose Image" button to add a background image to any shape. This straightforward process opens up a world of possibilities, allowing you to integrate external images seamlessly into your designs.
Fill Types: Fill, Tile, and Stretch
Amadine offers three primary fill types to control how your background image is applied to a shape:
Fill: This option scales the image to cover the entire shape. You can adjust the alignment using the area just below the "Fill Type" option. Additionally, you can scale and shear the image to fit your design needs perfectly.
Tile: This setting repeats the image to fill the shape. It's perfect for creating patterns and textures that need to be consistent across a larger area.
Stretch: As the name suggests, this option stretches the image to fit the shape's dimensions, ensuring that the image covers the entire shape without any gaps.
Image Application Options
Amadine also provides several options for how the image interacts with the shape and underlying objects. These blending modes can dramatically alter the appearance of your design, offering creative flexibility. Here are the available modes:
- Normal: The image is applied as-is without any blending.
- Multiply: Darkens the base color to reflect the blend color by multiplying the colors.
- Screen: Lightens the base color to reflect the blend color by screening the colors.
- Overlay: Combines Multiply and Screen modes, preserving highlights and shadows of the base color.
- Darken: Selects the darker of the base or blend colors.
- Lighten: Selects the lighter of the base or blend colors.
- Color Dodge: Brightens the base color to reflect the blend color by decreasing the contrast.
- Color Burn: Darkens the base color to reflect the blend color by increasing the contrast.
- Soft Light: Gently lightens or darkens the colors, similar to shining a soft light on them.
- Hard Light: Harshly lightens or darkens the colors, similar to shining a harsh light on them.
- Difference: Subtracts the blend color from the base color or the base color from the blend color, depending on which is brighter.
- Exclusion: Creates an effect similar to Difference but with lower contrast.
- Hue: Applies the hue of the blend color to the base color.
- Saturation: Applies the saturation of the blend color to the base color.
- Color: Applies the hue and saturation of the blend color to the base color, preserving the luminosity.
- Luminosity: Applies the luminosity of the blend color to the base color, preserving the hue and saturation.
Practical Applications
Using these fill types and blending modes, you can create a wide range of effects, from subtle textures to bold graphic statements. For instance, you might use the Multiply mode to add a textured paper effect to a shape, or the Overlay mode to integrate complex patterns without losing the shape's original color dynamics.
By mastering Amadine's Image Fill capabilities, you can add a professional and creative touch to your vector designs. Experiment with different combinations to discover unique effects that can make your work stand out.
Conclusion
Amadine's Image Fill feature is a powerful tool that offers endless creative possibilities. By understanding and utilizing the different fill types and blending modes, you can enhance your designs in ways that were previously unimaginable. So go ahead, explore these features, and let your creativity shine!
PermalinkSheets in Amadine
Manage Your Document Better
Sheets in Amadine are akin to layers in traditional design software, but with an added dimension of organization. They allow you to compartmentalize different parts of your design within a single document, making it easier to manage, edit, and navigate large or complex projects.
Benefits of Using Sheets
- Improved Organization: Sheets enable you to keep different elements of your design separate, preventing clutter and making it easier to locate specific components.
- Streamlined Workflow: By organizing your design into sheets, you can focus on one aspect of your project at a time, which can lead to a more streamlined and efficient workflow.
- Enhanced Collaboration: When working on a project with a team, sheets can help distribute tasks more effectively by assigning different sheets to different team members.
Getting Started with Sheets
Here's a step-by-step guide to help you get started with Sheets in Amadine:
- Creating a New Sheet
- Open your Amadine project.
- Navigate to the Sheets panel. If the panel is not visible, you can enable it from the View menu.
- Click the "+" icon at the bottom of the Sheets panel to create a new sheet.
- Name your sheet appropriately to reflect its content (e.g., "Background," "Text," "Icons").
- Adding Content to Sheets
- Select the sheet you want to work on by clicking its name in the Sheets panel.
- Use the drawing tools to add elements to the selected sheet.
- Repeat the process for each sheet, adding specific elements as needed.
- Managing Sheets
- Reordering Sheets: Drag and drop sheets within the panel to reorder them.
- Visibility: Toggle the visibility of individual sheets by clicking the eye icon next to each sheet's name. This is useful for focusing on specific parts of your design without distraction.
- Locking Sheets: Click the lock icon to prevent accidental edits to a sheet.
- Editing Sheets
- To edit content on a specific sheet, ensure it is selected in the Sheets panel.
- Make your desired changes using Amadine's comprehensive set of design tools.
- You can also move content between sheets by cutting from one sheet and pasting into another.
Advanced Tips for Using Sheets
- Layering Effects: Apply different effects to sheets to create depth and dimension in your design. For example, you can apply a blur effect to a background sheet to make foreground elements stand out.
- Sheet Templates: Create template sheets for recurring design elements, like headers or footers. This can save time and ensure consistency across projects.
- Grouping Sheets: Group related sheets together. For example, if you're designing a UI, group sheets for buttons, forms, and navigation elements separately.
Practical Applications
- UI/UX Design: Use sheets to separate different components of your interface, like navigation bars, buttons, and content areas.
- Illustration: Organize your illustration into foreground, middle ground, and background sheets to simplify the process of adding details and making adjustments.
- Marketing Materials: Create sheets for different versions of your design, such as versions with different color schemes or text layouts.
Conclusion
Sheets in Amadine offer a versatile and powerful way to manage your design projects. By effectively utilizing this feature, you can maintain a high level of organization, streamline your workflow, and improve collaboration with team members. Whether you're a solo designer or part of a larger team, mastering Sheets in Amadine will undoubtedly enhance your productivity and creativity.
PermalinkPersonal Font Style Collection
Add Font Styles to Your Library
Amadine, the intuitive vector graphics software, offers a plethora of features for designers and illustrators. However, one feature it lacks is a "Favorite" font section?a common convenience in many applications. But don't worry, there's a clever workaround to this limitation. By adding your preferred font styles directly to your Amadine library, you can access them with ease. Here's how to do it:
Creating Your Font Library
- Start by creating a new text field in your Amadine document.
- Apply your desired font and style to this text. Whether it's a bold header or an italicized sub-header, style it exactly as you would like it to appear in your projects.
- Select the styled text field and navigate to your personal Amadine Library.
- Right-click in the library window and choose "Add Object."
And that's it! You've successfully added a styled font object to your library.

Using Your Styled Fonts
Whenever you need to use your pre-styled fonts:
- Open your Amadine Library and simply click on the font object you wish to use.
- Drag and drop it into your project, and you're done!
This method is a quick and efficient way to add frequently used headers and sub-headers to your designs. It not only saves time but also ensures consistency across your various projects.
Why This Matters
In the fast-paced world of design, efficiency is key. By utilizing this simple trick, you can:
- Reduce repetitive tasks, allowing you to focus more on the creative aspects of your work.
- Maintain a consistent style throughout your designs, which is crucial for branding and professional aesthetics.
- Speed up your workflow significantly, especially when working with text-heavy designs.
So, give it a try and see how this neat trick can enhance your design process in Amadine!
PermalinkBlog Schedule
| Thursday 27 | Final Cut Pro |
| Friday 28 | Macintosh |
| Saturday 1 | Internet Tools |
| Sunday 2 | Misc |
| Monday 3 | Media |
| Tuesday 4 | QA |
| Wednesday 5 | Python |