
Wish List: SnagIt 2025
Some Features I would like to see this year
As a long-time user of Snagit, I've appreciated its powerful capabilities for capturing and editing images. However, there's always room for improvement! Here are some features I'd love to see introduced in Snagit 2025:
New Tools
One tool I've always admired is the Skitch Annotation tool, which allows users to add text directly to a stamp arrow. This functionality streamlines communication by combining annotations and directional emphasis in one neat element. If Snagit incorporated something similar, it would elevate its annotation game significantly.
For more on the Skitch Annotation tool and why it's so useful, check out this blog post.
Expanded Shapes
Currently, Snagit's Shapes tool is quite limited, offering just four options. While these shapes cover basic needs, having a broader selection would open up new possibilities for highlighting and emphasizing key parts of an image. Options like stars, polygons, and custom shapes would be incredibly helpful for creating engaging visuals.
Enhanced Image Insert Features
When inserting an image into another image, Snagit's capabilities are functional but could be more polished. Adding shadows to the inserted image, for example, would make it blend seamlessly into the existing content, giving a more professional appearance. This small but impactful feature could dramatically enhance the final product's visual quality.
Final Thoughts
These features would not only improve Snagit's usability but also empower users to create more dynamic and visually appealing content. Here's hoping the developers at TechSmith take these ideas into consideration for Snagit 2025! What features are you hoping to see in the next version of Snagit? Let me know in the comments!
PermalinkSnagit Christmas
Yes, Virginia, there is a Christmas Stamps
Snagit 2024 is a powerful screen capture tool with a variety of features that make editing and annotating captures effortless. One of the hidden gems of this tool is its extensive library of stamps - fun, creative elements you can add to your captures. Did you know that Snagit includes a collection of Christmas-themed stamps to bring holiday cheer to your visuals?
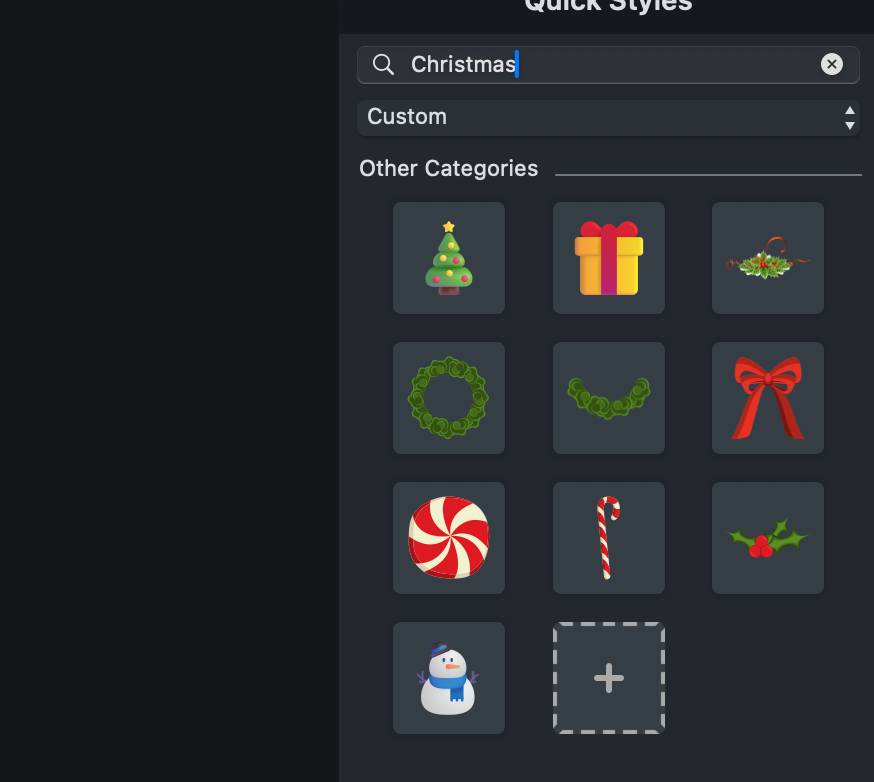
Whether you're creating festive tutorials, holiday-themed social media posts, or just adding some seasonal joy to your documentation, these stamps are the perfect touch. From cheerful Santa hats to decorative ornaments and candy canes, Snagit's Christmas stamps let you dress up your images with ease.
To use them, simply:
- Open your capture in Snagit Editor.
- Navigate to the Stamps Tool.
- Search for "Christmas" or browse through the categories to find the holiday-themed stamps.
- Drag and drop your chosen stamp onto your capture and resize or reposition it as needed.
These stamps are a simple way to spread holiday cheer, adding a bit of creativity and joy to your projects. Don't limit yourself - combine stamps, annotations, and effects to craft something truly unique.
So, let Snagit 2024 help you get into the holiday spirit! Start exploring the Christmas stamps today and create something magical.
PermalinkHow to Find and Back Up Your Snagit Custom Stamps
Protect your custom stamps before upgrading or migrating your Snagit installation with this simple step-by-step guide.

If you're a dedicated Snagit user, you likely rely on custom stamps to add efficiency and personalization to your screen captures. Custom stamps save time and elevate your workflows, so ensuring they're not lost during upgrades or migrations is crucial. In this blog post, I'll guide you through locating your Snagit Custom Stamps files and backing them up securely.
Where Are Snagit Custom Stamps Stored?
On macOS, Snagit stores your custom stamps in a folder within the user-specific library. Here's the typical location for Snagit 2024:
/Users/yourusername/Library/Group Containers/7TQL462TU8.com.techsmith.snagit/Snagit 2024/Stamps/CustomIn this path: - yourusername is your Mac's username. - The folder 7TQL462TU8.com.techsmith.snagit is specific to your installation and may vary slightly.
My Library
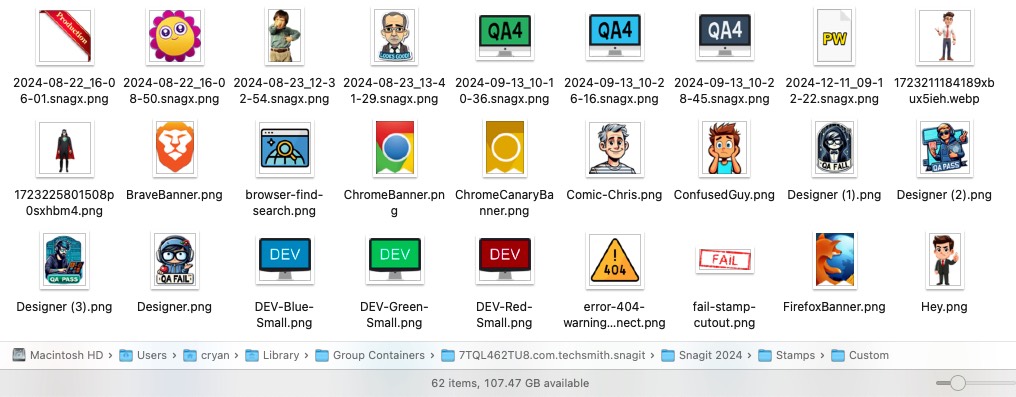
Files in my Custom Stamps.
Why Back Up Your Custom Stamps?
Backing up your custom stamps ensures:
- Seamless Transition: When upgrading Snagit or migrating to a new computer, you won't lose your stamps.
- Customization Preservation: Re-creating stamps is time-consuming. A backup keeps your customizations intact.
- Data Security: Unexpected issues, like corrupted files, won't leave you starting from scratch.
Steps to Back Up Your Snagit Custom Stamps
- Locate the Stamps Folder
Open Finder and navigate to:
/Users/yourusername/Library/Group Containers/7TQL462TU8.com.techsmith.snagit/Snagit 2024/Stamps/CustomTip: If the Library folder is hidden, press Command + Shift + . (period) in Finder to show hidden files.
- Copy the Custom Stamps Folder
- Select the
Customfolder inside theStampsdirectory. - Press Command + C to copy the folder.
- Select the
- Paste the Folder in a Backup Location
- Choose a safe backup location, such as:
- An external drive
- A cloud storage service like iCloud, Google Drive, or Dropbox
- Paste the folder by navigating to the desired location and pressing Command + V.
- Choose a safe backup location, such as:
Restoring Your Custom Stamps
When setting up Snagit on a new computer or after an upgrade: 1. Install Snagit. 2. Navigate to the corresponding stamps directory: /Users/yourusername/Library/Group Containers/7TQL462TU8.com.techsmith.snagit/Snagit [Version]/Stamps/Custom 3. Replace the Custom folder with your backup copy.
Final Notes
- Verify the Folder Structure: After restoring, open Snagit to ensure your custom stamps are accessible.
- Keep Regular Backups: Make it a habit to back up your stamps periodically, especially before major updates or system changes.
By taking these simple steps, you'll ensure your Snagit workflow remains uninterrupted. Your custom stamps will always be ready to use, no matter what changes come your way!
PermalinkCreating Custom Icons for your own "Custom Stamp" in SnagIt
Easy to Do and So many Choices!
If you frequently use SnagIt to create charts and visual content, you've probably noticed how helpful the "Custom Stamp" feature can be. Did you know you can create your own custom icons to enhance your images further? Here's a step-by-step guide to crafting your unique stamps and streamlining your visual workflows.
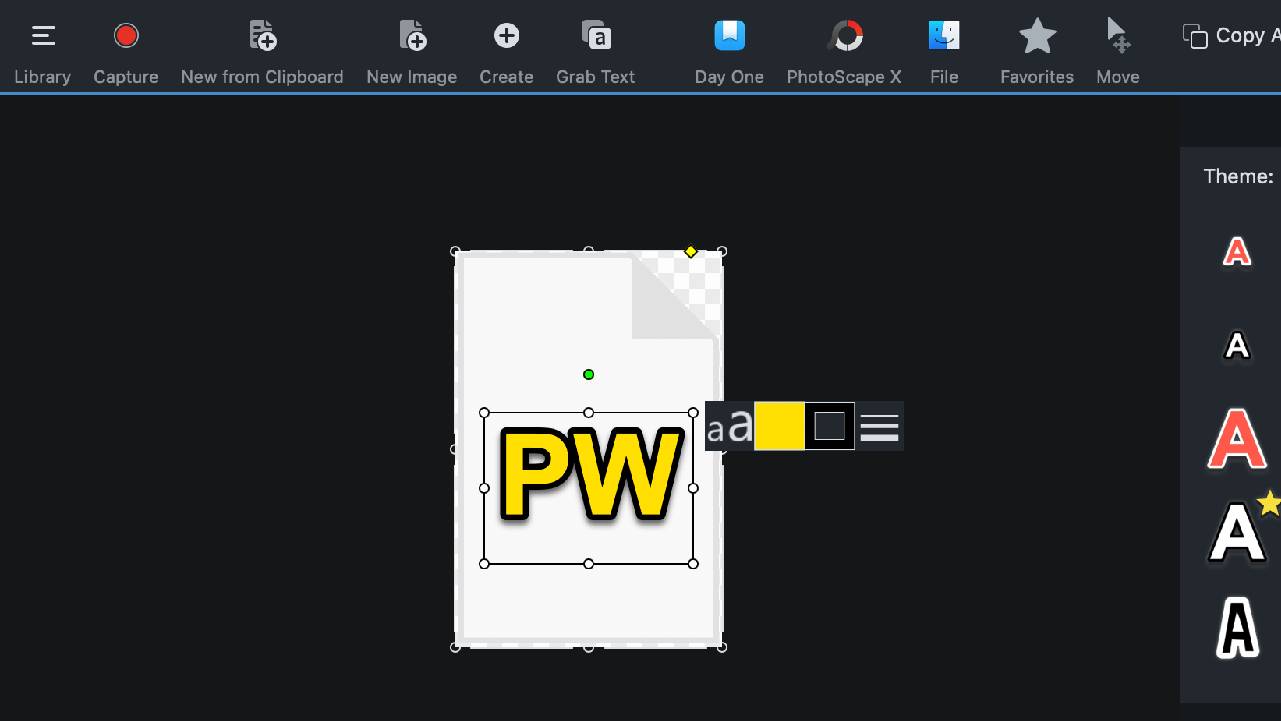
Step 1: Create a New Image
Begin by creating a new blank canvas in SnagIt. Set the dimensions to 256 by 256 pixels to ensure your custom stamp will maintain optimal resolution and proportions.
Step 2: Utilize Existing Stamps
Browse SnagIt's extensive stamp collection for inspiration. Find an icon or graphic that fits your needs, then simply drag and drop it onto your blank canvas. This will act as the base for your custom stamp.
Step 3: Customize Your Stamp
Add your creative flair to the stamp. You can overlay: - Text: Add labels, annotations, or even branding. - Graphics: Incorporate shapes, arrows, or other design elements. - Colors: Change the icon's color scheme to match your project's theme.
SnagIt's editing tools make it easy to fine-tune your design until it's perfect.
Step 4: Save Your Custom Stamp
Once you're happy with your design, it's time to save it as a reusable stamp: 1. Click File > Save As Stamp (or press Control + Option + Command + S). 2. Give your new stamp a descriptive name to locate it easily later.
SnagIt will automatically flatten your image into a single layer, preserving the design exactly as you see it.
Step 5: Use Your Custom Stamp
Your new stamp is now part of your SnagIt stamp collection! Access it anytime to add a personal touch to charts, diagrams, or other visual projects.
Why Use Custom Stamps?
Custom stamps can save you time and help standardize your visual content. Whether you're creating branded icons for presentations or unique markers for charts, this feature ensures your designs are consistent and tailored to your needs.
Take advantage of SnagIt's versatility and create stamps that elevate your projects. With just a few steps, you'll have a library of custom icons at your fingertips!
PermalinkCreative Use of Custom Stamps in SnagIt to Easily Identify Screenshot Environments
Mark Your Screenshots with Environment-Specific Custom Stamps for Clarity and Efficiency
If you've ever taken screenshots of software across different environments – maybe production, staging, or testing – you probably know how easy it is to lose track of which environment the screenshot came from. This confusion can lead to costly mistakes, especially when sharing or documenting bug reports. A creative and highly effective way to solve this problem is by using custom stamps to clearly mark your screenshots.
In this post, I'm going to show you how to create and use custom stamp icons in SnagIt to visually identify the environment where the screenshot was taken. For a bonus touch, I'll share how I use color to quickly convey whether something is "good" or "bad."
What Are Custom Stamps?
Custom stamps are graphic overlays that you can add to your screenshots to communicate additional information at a glance. Think of them like a digital sticker that tells you exactly what you need to know – like the environment type – without having to dig deeper into documentation or notes. This small visual addition makes your images much more meaningful and useful, particularly for Quality Assurance (QA) or documentation purposes.

Some of the Environment stamps that I have: QA2, Prod and DEV.
My Setup for Custom Stamps
I create custom stamps using Affinity Designer, but you can use any graphic editor that allows you to create images with transparent backgrounds, including SnagIt. The stamps I use feature a monitor screen that includes the name of the environment. The beauty of this approach is that you can easily tailor the visuals to match your needs. Here's what I do:
- Environment-Specific Monitors: Each stamp includes a small monitor icon, and on that monitor, the environment name is written clearly (e.g., "Production," "Staging," "Development").
- Color-Coding for Quick Reference: I use colors to convey an immediate visual signal about the environment:
- Green Screen: For safe environments, such as Staging or Testing, I use a green color to indicate that changes made here won't impact end-users.
- Red Screen: For Production, I use a red color to signal caution. This tells the viewer that any changes in this environment are critical and require extra scrutiny.
How to Create Custom Stamps
Here's a simple guide to creating your own custom stamps:
- Choose Your Tool: You can use Affinity Designer, SnagIt, or even something like Canva or GIMP. The key is to use a tool that lets you create transparent backgrounds.
- Design the Monitor Icon: Create a small graphic of a monitor screen. This monitor will serve as the base of your stamp. You can be creative here - add a bit of shadow or depth to make it look polished.
- Add Environment Labels: Label the monitor with the environment name: "Prod," "Stage," etc. Make sure the text is readable and short - like a street sign would be.
- Apply Color Coding: Use a colored screen on the monitor to indicate status: green for good environments, red for bad code, yellow for testing, etc.
- Save in Transparent Format: Save your image as a .PNG with a transparent background, which will allow it to blend seamlessly into your screenshot.
Applying Custom Stamps to Your Screenshots in SnagIt
Once you have your custom stamps ready, you can easily apply them using SnagIt. In SnagIt, you can create a stamp library where you store these custom stamps for quick access.
To add a stamp in SnagIt:
- Open your screenshot in the SnagIt Editor.
- Navigate to the Stamps Tool.
- Select your custom stamp from your library and drag it onto the screenshot.
- Position the stamp somewhere that won't obstruct key information. I usually place mine in the top-right corner for consistency.
Get Creative with Your Own Stamps
The beauty of custom stamps is that they are totally adaptable to your workflow. Want to create different icons for different users (e.g., Admin vs. Standard user)? Go for it! You could also make stamps to indicate the date the screenshot was taken or the version number of the software.
Pro Tip: If you use Affinity Designer, you can create a template where you simply modify the text or color for each new environment stamp you need. This speeds up the process and keeps your stamps consistent. (Also useful when you want to create unique stamps for big projects.)
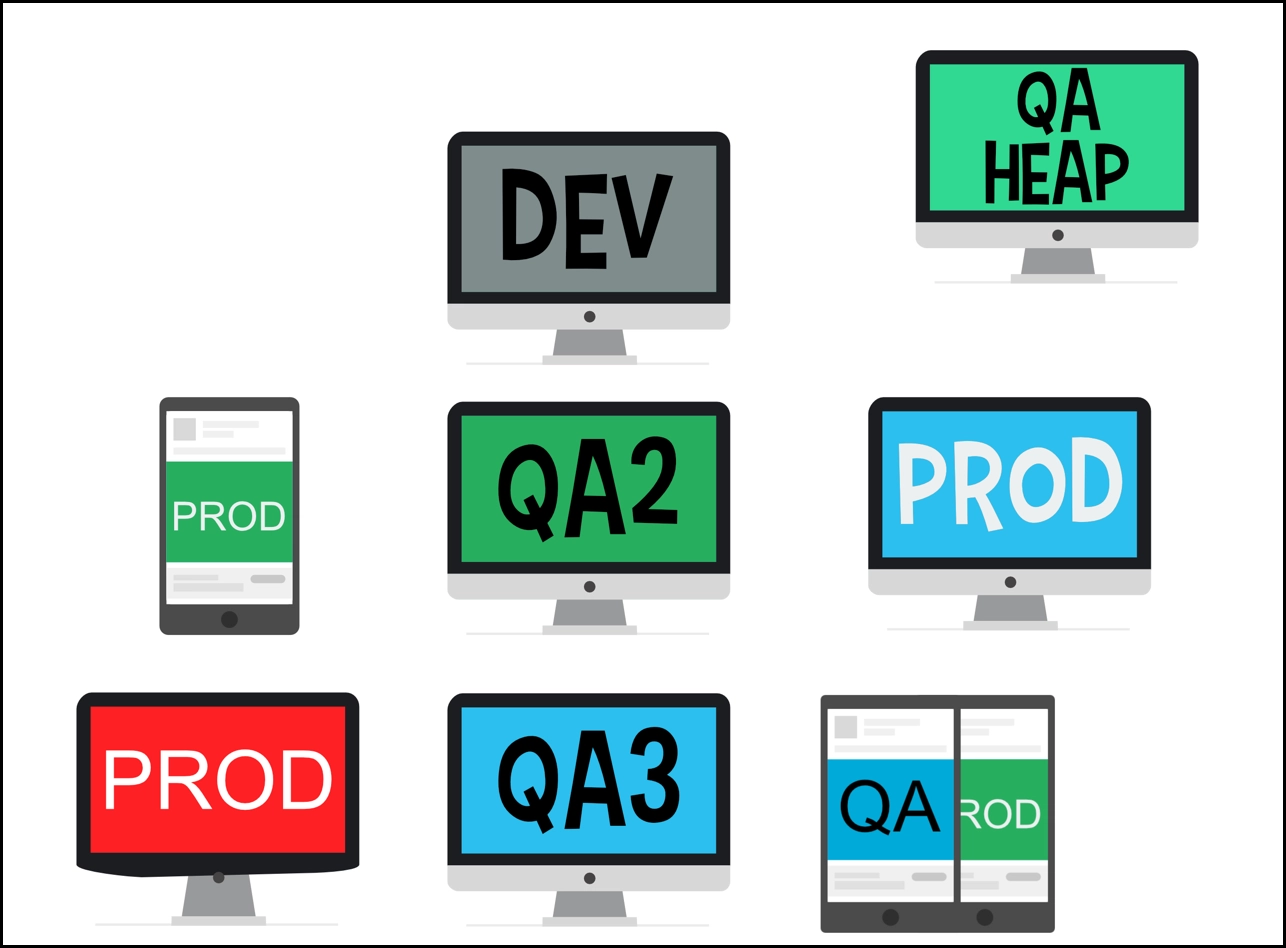
My collection of icons in Affinity Designer
Make Your Screenshots More Informative
Custom stamps make it easy to identify crucial details about the screenshot at a glance, eliminating guesswork and potential errors. I've found it particularly useful in QA processes, where the origin environment of an issue can make all the difference in terms of impact and priority.
Have fun creating your own stamps and seeing how much easier it makes organizing your screenshots! If you create some cool stamps, feel free to share them. I'd love to see what you come up with!
PermalinkStreamline Your Screen Captures: How I Use a Gaming Mouse with SnagIt on macOS
Discover how a simple gaming mouse setup saves time and enhances efficiency for seamless screen captures on macOS, even with Windows-only configuration tools.
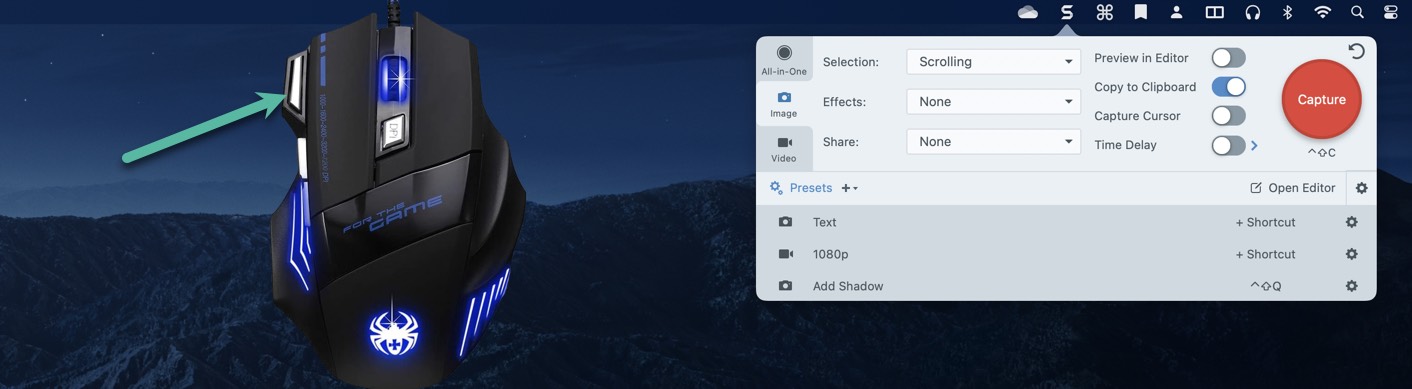
Arrow points to my Snagit Capture button.
As someone who takes countless screenshots for work, having a fast and reliable way to capture my screen is essential. Over time, I've honed my setup to make screen capturing a breeze, thanks to SnagIt and a Zelotes Ergonomic 7200 DPI LED Optical Wired Gaming Mouse. Here's how I use this combination to streamline my workflow.
Setting Up the Mouse for Mac SnagIt Users
The Zelotes mouse comes with configurable buttons, but there's a catch - it requires Windows to set them up. Here's how I made it work:
- Configure on Windows: Using the Zelotes software, I mapped one of the mouse buttons to execute the Command + Shift + C shortcut, which triggers SnagIt's capture tool.
- Plug and Play on Mac: Once the configuration is saved, it persists even when I plug the mouse into my MacBook. No additional setup is needed on macOS!
Why This Setup Works So Well
I've set SnagIt's All-In-One mode as the default capture action, which means with a single button press, I can start a capture and choose between Image or Video. Most of the time, I'm working with static images, and I frequently resize the capture area after the initial selection.
What I love about this setup is the convenience. The few seconds I save might seem minor, but the ease of having screen capture at my fingertips makes it all worthwhile. Plus, SnagIt's built-in editing tools allow me to polish 90% of my captures directly within the app.
Tips for Replicating This Setup
If you're considering trying something similar, here are a few things to keep in mind:
- Windows Requirement: The Zelotes mouse configuration software is Windows-only. If you don't have access to a Windows machine, this solution might not work for you.
- Explore Alternatives: There are other mice with configurable buttons that might be easier to set up directly on macOS.
- Optimize Your Workflow: Whether you're capturing static images or videos, SnagIt's customization options can save you time and make your work more efficient.
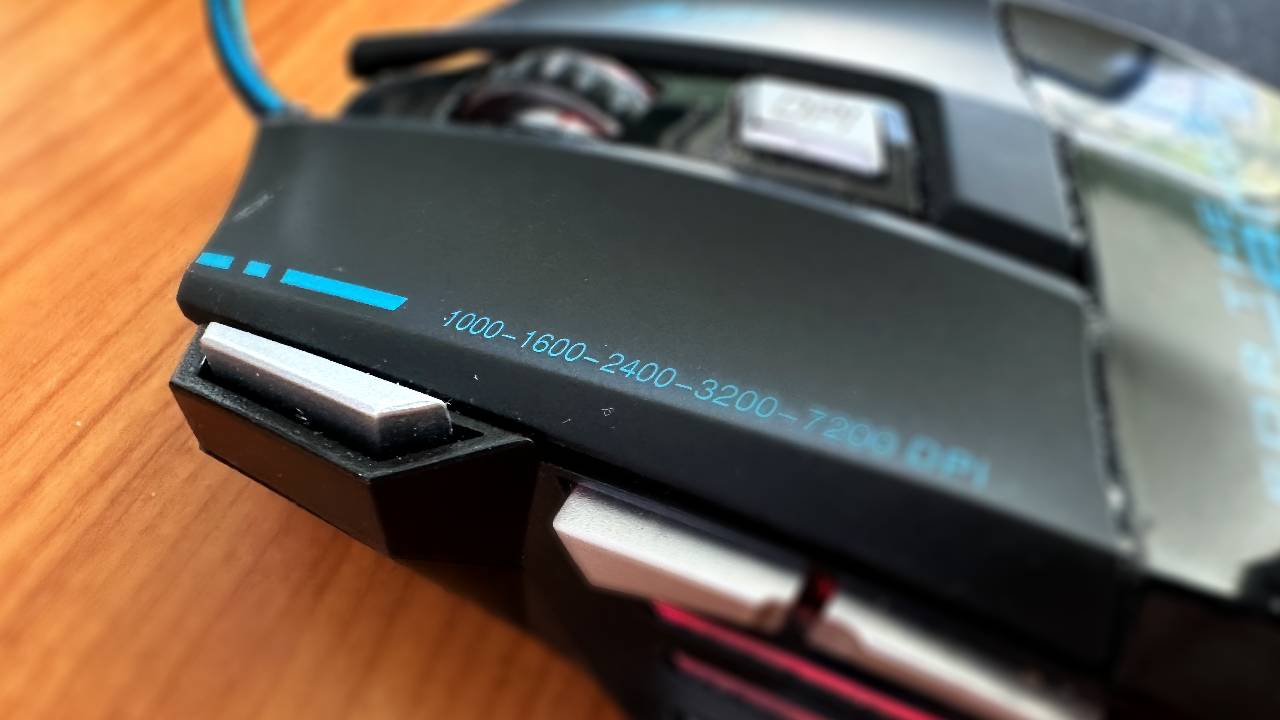
My Mouse with the SnagIt Capture button at my finger tips.
Final Thoughts
This simple but effective setup combines the precision of a gaming mouse with the power of SnagIt to handle screen captures quickly and efficiently. If you frequently capture screens and want to add a bit of convenience to your process, consider a similar approach. It's small tweaks like these that make everyday tasks smoother and more enjoyable.
PermalinkUsing the Fill Tool to Convert Colors to Transparent in Snagit 2024
A quick guide to making your images look professional with transparent backgrounds.
Why Convert Colors to Transparent?
Transparency is critical in design and presentations. It allows images to blend seamlessly into documents, websites, or slides without distracting blocky backgrounds. Whether you're customizing icons, removing background colors, or emphasizing an element, this technique can save time and effort.
Steps to Convert Colors to Transparent in Snagit 2024
- Capture or Open Your Image: Start by capturing an image using Snagit or opening an existing file. Ensure the image has a distinct color you want to make transparent (e.g., a white or solid-colored background).
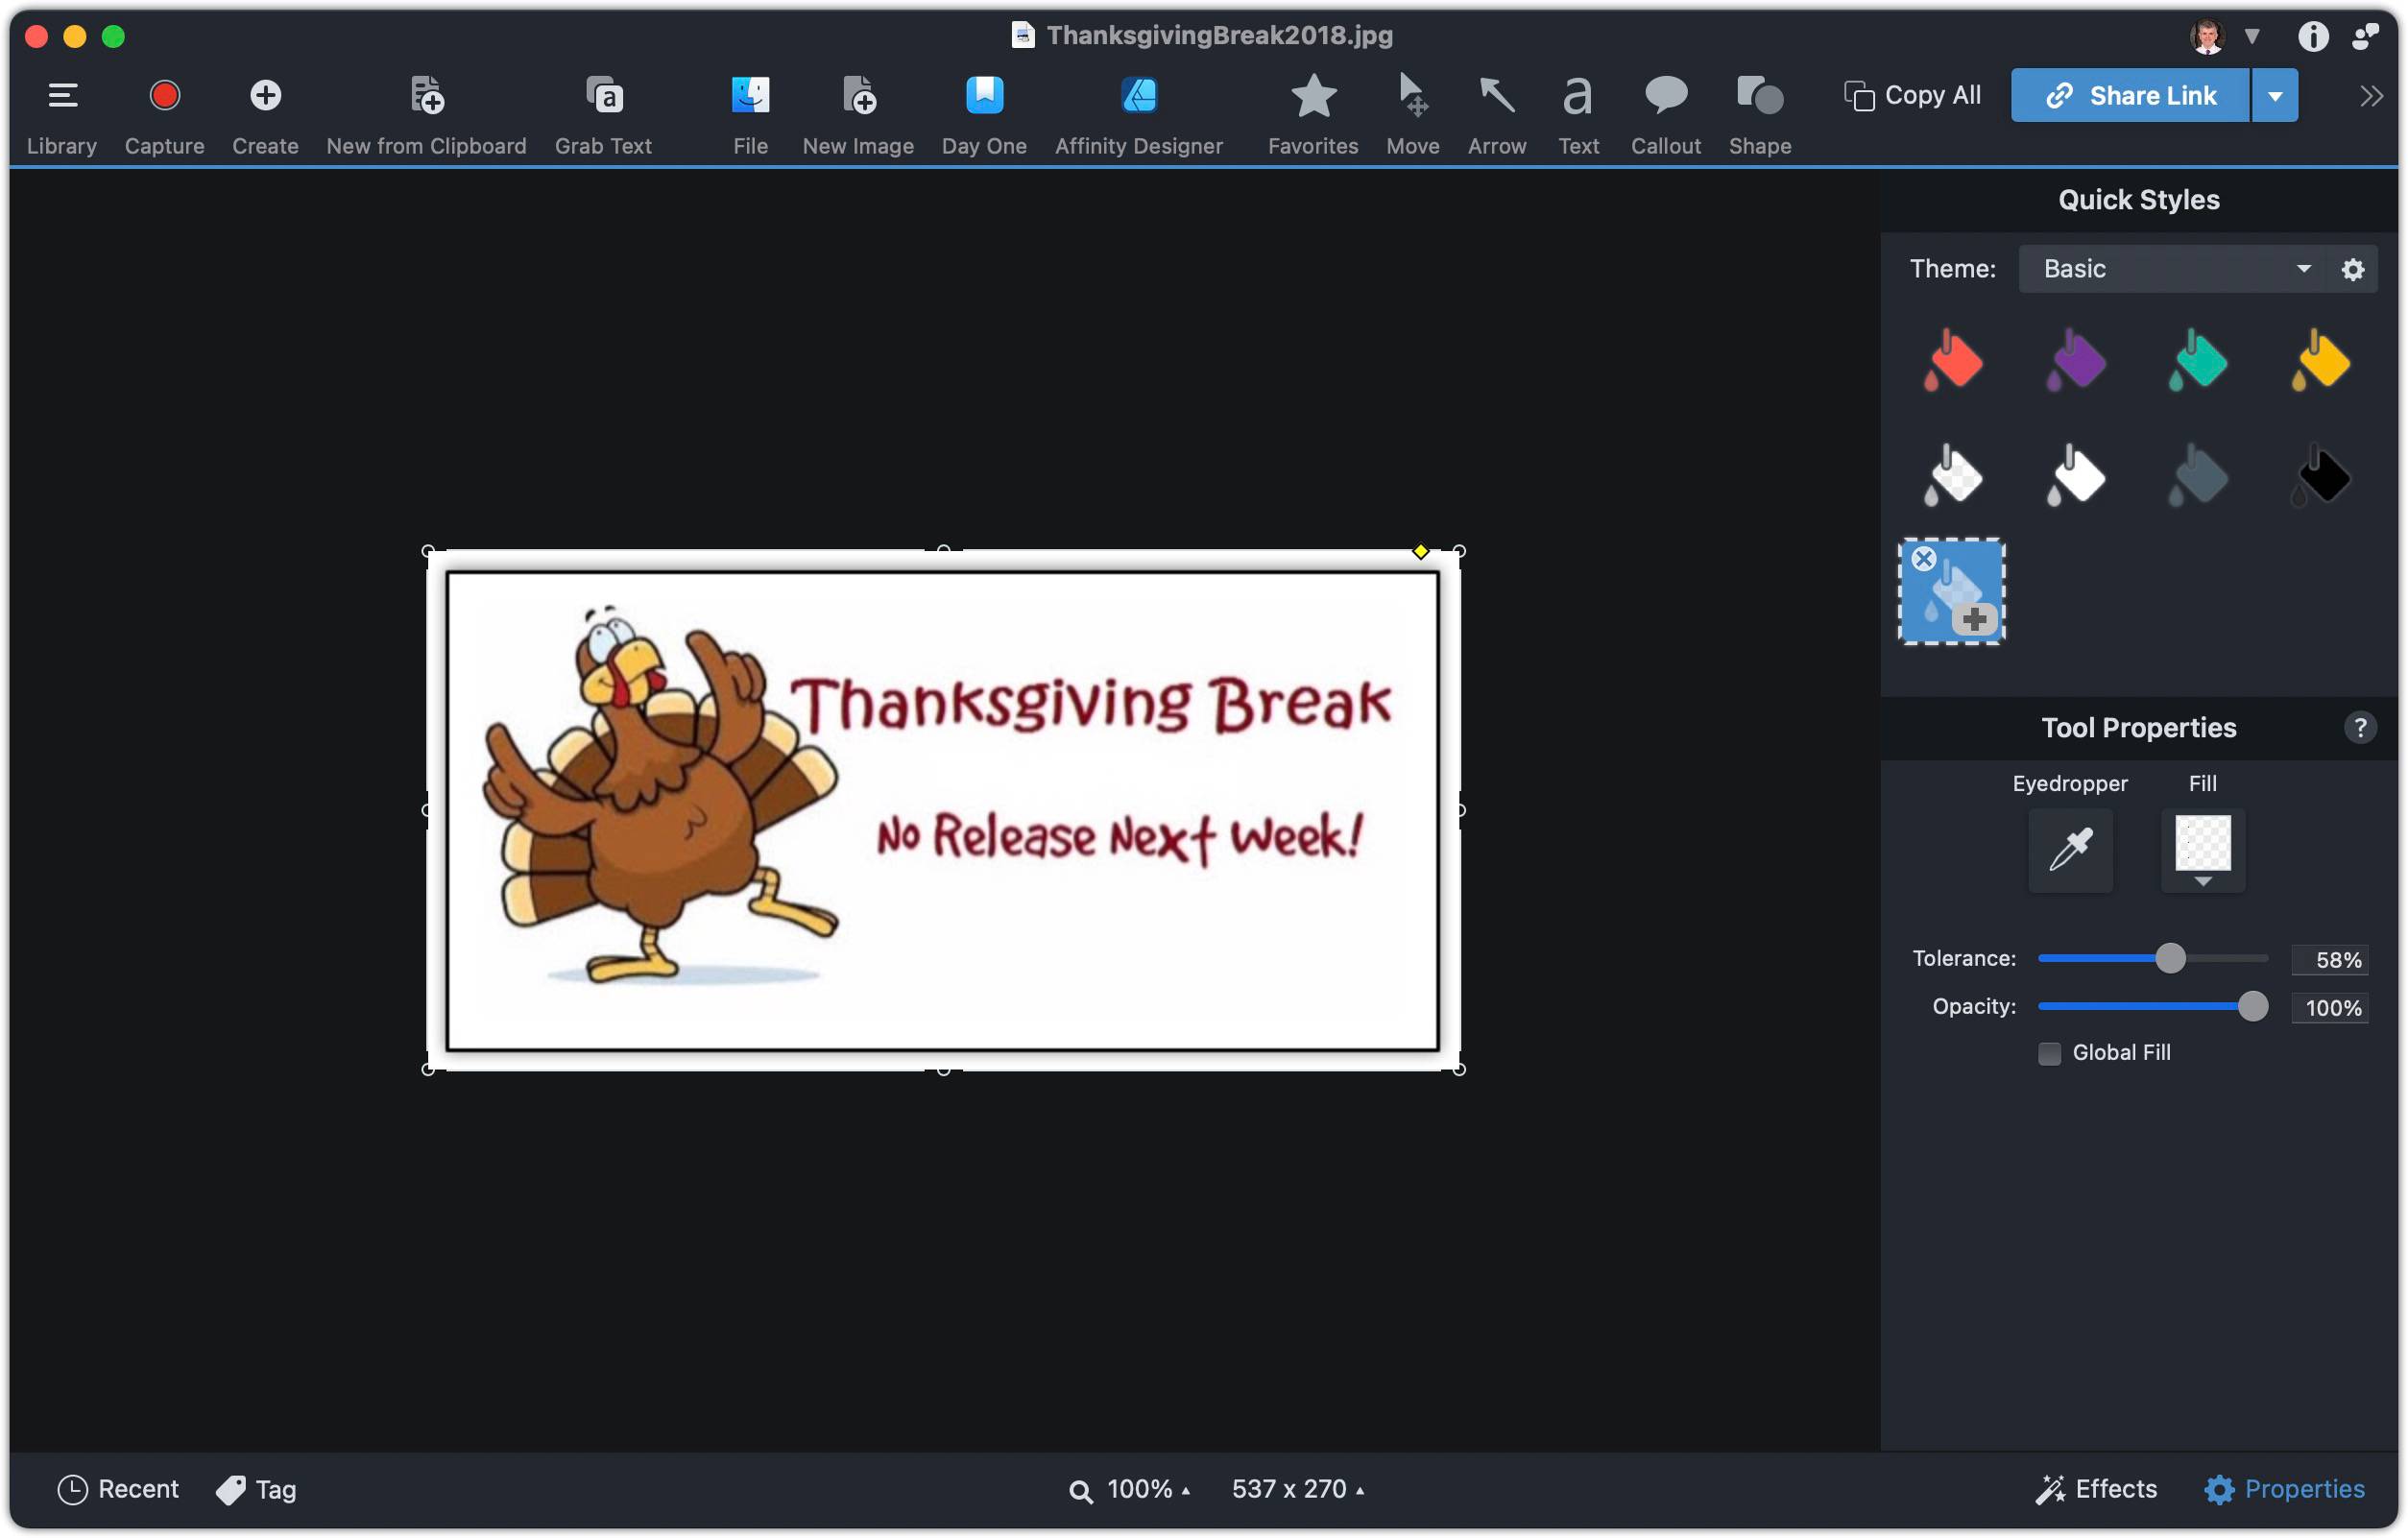
- Select the Fill Tool: In the Snagit Editor, locate the Fill Tool in the toolbar on the right-hand side. If it's not visible, you can add it via the toolbar customization options.
- Adjust the Fill Settings: Click on the Color dropdown menu near the top of the editor and select the Transparent option. Adjust the Tolerance setting to control how closely Snagit matches the color.
- Apply the Fill: Click on the area of the image you want to make transparent. Snagit will automatically replace the color with transparency.
- Refine the Edges: Use the Zoom Tool to closely examine edges. Refine areas as needed using the Eraser Tool.
- Save Your Image: Save your image in a format that supports transparency, such as PNG.
Tips for Better Results
- Use High Contrast Images: Ensure there's a clear distinction between the color you want to remove and the rest of the image.
- Experiment with Tolerance: Start with a low tolerance and gradually increase it to avoid removing unintended parts of the image.
- Preview with Backgrounds: Preview your image against different backgrounds to ensure it looks clean.
Applications of Transparent Backgrounds
Transparent images have a wide range of uses:
- Presentations: Insert transparent graphics into slides for a polished look.
- Website Graphics: Create seamless buttons, icons, or logos.
- Product Tutorials: Highlight specific features in screenshots without distracting backgrounds.
- Stamps: Create stamps from snapshots.
Top 5 Wednesday Blog Post
A Year in Review

As 2023 winds down, it's a perfect time to reflect on the wealth of content that has graced my blog. This year, I explored a diverse range of topics, from the latest in tech gadgets to unique local spots. Out of all the posts, there are five that stand out, each offering a unique perspective and valuable insights. Here's a look back at these top five blog posts:
1. GoPro 9 Wide Screen vs iPhone 14 Pro Max (Posted on February 22, 2023)
This post sparked a lot of interest, primarily because it tackled the question of which device captures the best wide-screen images: the GoPro 9 or the iPhone 14 Pro Max. I delved into detailed comparisons of image quality, user experience, and versatility, providing a comprehensive guide for photography enthusiasts.
2. GoPro Feet Adapter (Posted on May 3, 2023)
In this intriguing post, I reviewed the GoPro Feet Adapter, a nifty accessory that enhances the GoPro's capabilities. This post was particularly popular among adventure sports enthusiasts and GoPro users looking for ways to augment their filming experiences.
3. Legacy Technology Drawer (Posted on July 12, 2023)
A nostalgic journey into the past, this post explored the concept of a 'Legacy Technology Drawer', where old gadgets and tech treasures are stored. It struck a chord with readers who share a fascination with the evolution of technology and the sentimental value of older gadgets.
4. Ashland Marathon Park (Posted on September 13, 2023)
Breaking away from tech, this post took readers on a virtual tour of Ashland Marathon Park, highlighting its history, beauty, and the community's connection to it. It was a favorite among local readers and those interested in discovering new places.
5. Custom Templates in Snagit (Posted on October 11, 2023)
Rounding out the top five, this post focused on how to create and use custom templates in Snagit, a popular screen capture tool. It provided practical tips and creative ideas, making it a go-to resource for both novice and experienced Snagit users.
Reflections and Looking Forward
Each of these posts reflects a unique aspect of my interests and expertise, ranging from technology reviews to local explorations. As I look forward to another year of blogging, I'm excited to delve even deeper into these topics and explore new ones that capture the curiosity and imagination of my readers. Stay tuned for more adventures in tech, productivity, and beyond in 2024!
PermalinkUsing macOS Stationary Pad feature with Snagit
Make Your Own Templates!
I'm excited to share a nifty trick that combines Snagit's robust screen capturing capabilities with a lesser-known macOS feature: the Stationary Pad. This powerful duo can dramatically streamline your workflow by creating a reusable template library.
Step 1: Crafting Your Main Template in Snagit
The first step is to create your main template in Snagit. This template will serve as the basis for all your future work, so it's important to design it carefully. Consider the elements you frequently use, such as specific annotations, shapes, or text formats.
How to Create a Template in Snagit:
- Open Snagit Editor and select the option to create a new image.
- Design your template by adding placeholders, text, shapes, or any other elements you regularly use.
- Once satisfied, save the file as a Snagit Capture file (
.snagfile).
Step 2: Transforming Your Template into a Stationary Pad File
Once your template is saved, the next step is to leverage macOS's Stationary Pad feature. This feature allows you to create a "master copy" of your file. Whenever you double-click this master copy, macOS automatically creates and opens a new instance, leaving the original file untouched.
Setting Up Stationary Pad:
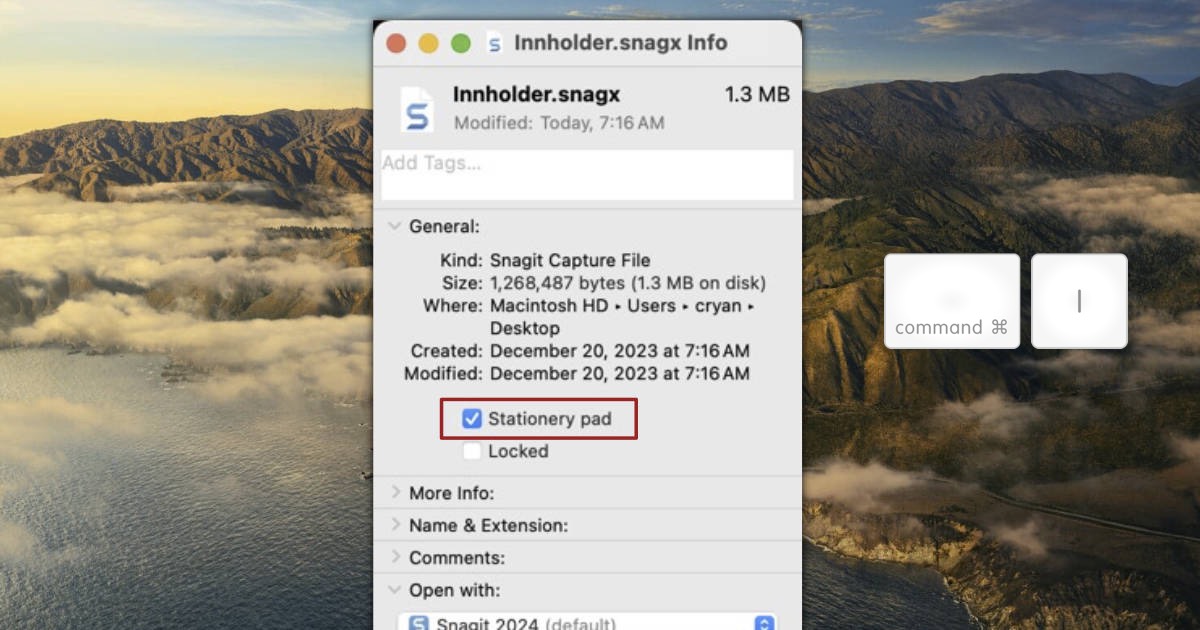
- Locate your saved Snagit file in the Finder.
- Right-click on the file and select "Get Info." (or use the shortcut Command-i)
- In the Info window, find and check the option labeled "Stationary Pad."
Step 3: Utilizing Your New Template
Now, every time you need to use your template, simply navigate to where you saved it and double-click the file. A new copy of your template will open in Snagit, ready for use. This method ensures that your original template remains unchanged, no matter how many times you use it.
Benefits for QA Professionals
- Consistency: Ensures all your captures maintain a consistent format.
- Efficiency: Reduces the time spent on setting up each new capture.
- Organization: Keeps your workspace tidy by reducing clutter.
Tips for Maximizing Efficiency
- Customize for Different Needs: Create multiple templates for different types of QA tasks.
- Regular Updates: Periodically update your templates to reflect changes in your workflow.
- Template Folder: Create a Template folder in your home directory of all your Snagit Templates. If you make it easy to find, then you'll likely use it often.
Conclusion
By combining Snagit with macOS's Stationary Pad feature, you can significantly streamline your repetitive tasks. This approach not only saves time but also ensures a high level of consistency and organization in your work. Give it a try and see how it transforms your workflow!
PermalinkSnagit - More than a Capture Tool
Use Snagit to Communicate Better
As a QA professional with extensive experience using Snagit, I've come to appreciate its versatility beyond just being a screen capture tool. In this week's post, I'd like to highlight how Snagit can be an invaluable asset for communicating messages quickly and effectively in various platforms like Slack, Jira, or email.
Efficient Communication in Slack, Jira, and Email
- Slack: Snagit allows you to capture parts of your screen and directly paste them into Slack conversations. This is particularly useful for quickly showcasing bugs, design issues, or explaining complex ideas that are hard to put into words.
- Jira: For bug tracking and project management in Jira, Snagit's screenshots can be attached to tickets to provide visual context. This is crucial for developers and designers to understand the exact nature of the issue.
- Email: Sometimes, an email needs more than just text. With Snagit, you can add annotated screenshots or quick screen recordings to your emails, making your communication more comprehensive and less prone to misinterpretation.

Leveraging the Snagit Editor for Enhanced Communication
- Annotations and Markups: Snagit's editor is robust, offering various tools for annotations like arrows, text, shapes, and more. These can be used to highlight or point out specific parts of your screen capture, making your message clearer.
- Step-by-Step Guides: You can create step-by-step instructional content by combining multiple screenshots. This is especially helpful in creating tutorials or guides.
- Customization: The editor allows you to personalize your captures with effects like borders, shadows, and filters. This can be useful for adhering to brand guidelines or just adding a personal touch to your communications.
Speed and Convenience
- Quick Access Toolbar: Snagit's toolbar allows for rapid screen captures and quick access to editing tools, streamlining the process of creating and sending out visual messages.
- Templates and Stamps: Pre-designed templates and stamps can save time, especially when you need to create consistent documentation or reports.
In conclusion, Snagit is much more than a simple screen capture tool. Its ability to integrate seamlessly with tools like Slack, Jira, and email, combined with its powerful editing features, makes it an essential tool for any QA professional looking to enhance their communication. Whether it's explaining a complex issue, creating a guide, or just making your point clearer, Snagit provides the means to do so efficiently and effectively.
PermalinkAbout
Discover Innovative Techniques and Cool Ways to Maximize Your Productivity with TechSmith Snagit
Check out all the blog posts.
Blog Schedule
| Tuesday | QA |
| Wednesday | Veed |
| Thursday | Business |
| Friday | Macintosh |
| Saturday | Internet Tools |
| Sunday | Open Topic |
| Monday | Media Monday |
Other Posts
- How to Find and Back Up Your Snagit Custom Stamps
- Mastering Snagit's Fill Tool
- Snagit Signature Stamp
- Halloween Template
- Top 5 Wednesday Blog Post
- Snagit Christmas
- QA App Buttons for Snagit
- Using the Fill Tool to Convert Colors to Transparent in Snagit 2024
- Snagit Presets
- Halloween Snagit Stamps
- Creative Use of Custom Stamps in SnagIt to Easily Identify Screenshot Environments
- Wish List: SnagIt 2025
- Streamline Your Screen Captures: How I Use a Gaming Mouse with SnagIt on macOS
- Custom Templates in Snagit
- Snagit - More than a Capture Tool