
Unlock Clearer Dialogue in Final Cut Pro with Voice Enhance
Discover the Quick and Easy Way to Enhance Spoken Word in Your Videos
As a regular Final Cut Pro video editor, you've likely heard the mantra: audio is just as important as visuals. Nowhere is this truer than with dialogue. Whether you're crafting an interview, a narrative film, or a podcast, clear spoken word is essential to keeping your audience engaged. Fortunately, Final Cut Pro offers a powerful yet simple tool to elevate your audio game: the Voice Enhance preset within its Equalization (EQ) features. In this post, I'll walk you through what Voice Enhance is, how to use it, and why it's a must-know for any Final Cut Pro user.
What is Equalization?
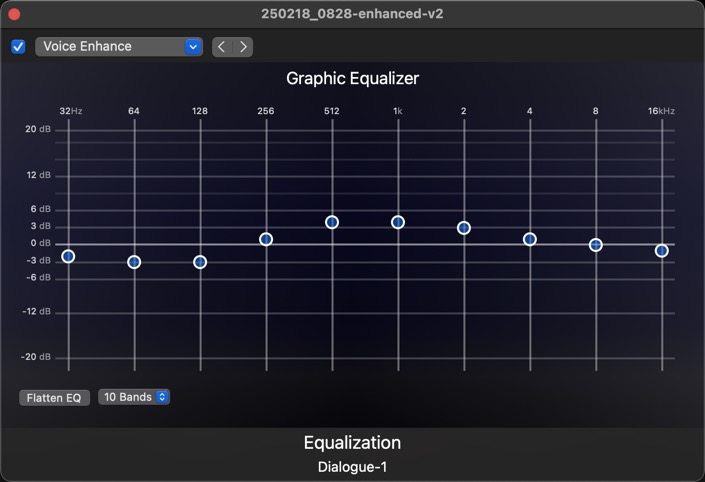
Equalization, or EQ, is all about balancing the different frequency components of an audio signal. Imagine it as a way to tweak the bass (low frequencies), mids (mid-range frequencies), and treble (high frequencies) to shape the sound. For dialogue, the mid-range - typically between 1kHz and 4kHz - is where the human voice shines, and adjusting these frequencies can make speech clearer and more prominent.
In Final Cut Pro, the Equalization tools let you refine your audio with precision, and the Voice Enhance preset takes this a step further by offering a quick, tailored solution for spoken word.
Where to Find Voice Enhance
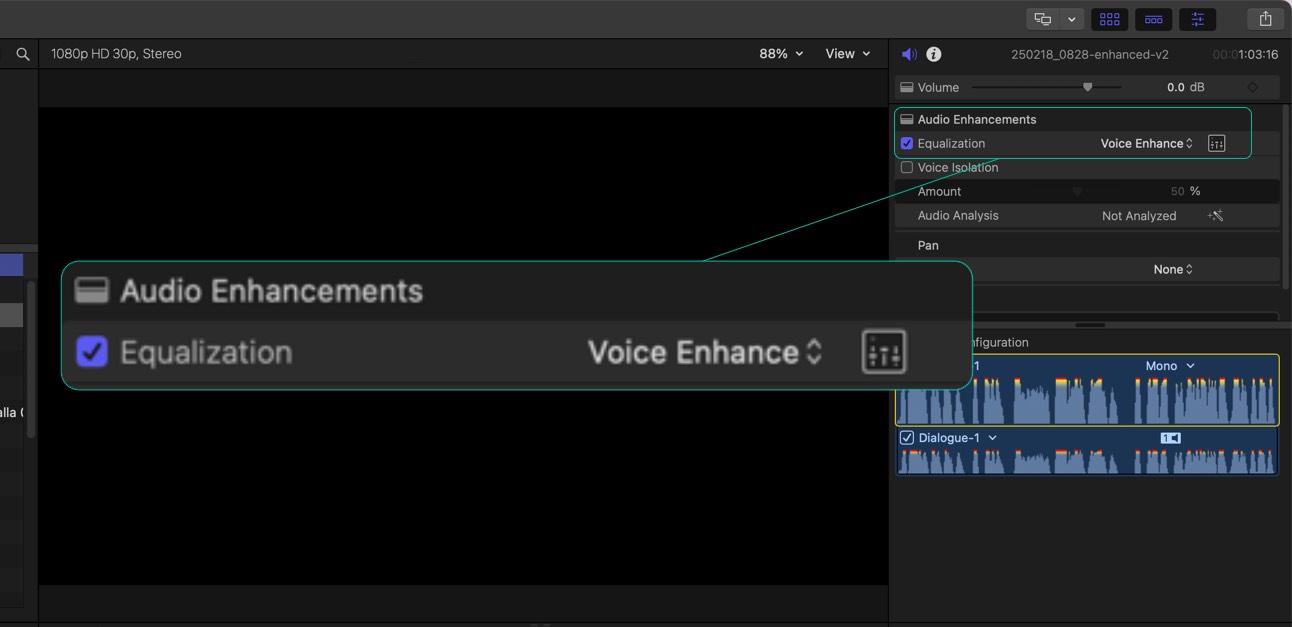
You'll find the Voice Enhance option nestled in the Inspector under the Audio tab, specifically tied to the Equalizer effect. It's part of Final Cut Pro's broader Audio Enhancements toolkit, designed to streamline the process of improving sound quality. Voice Enhance stands out as a fast way to boost dialogue, making it ideal for editors who need results without diving deep into manual EQ adjustments.
Here's how to apply it:
- Select Your Clip: In your timeline, click on the video or audio clip containing the dialogue you want to enhance.
- Open the Effects Browser: Hit Command + 5 to bring up the Effects Browser, where all of Final Cut Pro's effects live.
- Add the Equalizer Effect: Navigate to Audio Effects, locate the Equalizer, and double-click it to apply it to your selected clip.
- Head to the Inspector: With your clip still selected, open the Inspector (press Command + 4) and go to the Audio tab.
- Select Voice Enhance: In the Equalizer settings, click the Preset dropdown menu and choose Voice Enhance.
That's it! Final Cut Pro will instantly apply an EQ curve optimized for human speech, boosting those key mid-range frequencies while taming lows that might muddy the sound.
Why Use Voice Enhance?
The Voice Enhance preset is a game-changer for several reasons:
- Speed: It's a one-click solution. No need to spend time fiddling with frequency bands if you're short on time or new to audio editing.
- Clarity: By emphasizing the frequencies where dialogue lives, it ensures your audience hears every word crisp and clear.
- Accessibility: You don't need to be an audio engineer to get professional-sounding results.
This makes it perfect for projects like vlogs, interviews, or any video where spoken word takes center stage. Plus, since it's non-destructive, you can always tweak or remove it later if needed.
When It Works Best (and When It Doesn't)
Voice Enhance is a fantastic starting point, but it's not a cure-all. Here's what to keep in mind:
- Ideal Use Case: It shines on clips where dialogue is the main focus, free from heavy background music or sound effects. Think raw interview footage or narration tracks.
- Limitations: If your audio is plagued by noise, distortion, or poor recording quality, Voice Enhance alone won't fix it. You might need to pair it with noise reduction tools or, in extreme cases, re-record the audio.
- Mixed Audio: Applying it to a clip with both dialogue and music could alter the music in unintended ways, so consider isolating your voice track if possible.
Always listen to the result after applying the preset. If something sounds off - too bright or too thin - you can dive into the Equalizer's manual controls to fine-tune it.
Pro Tips for Using Voice Enhance
To maximize this feature, try these tricks:
- Check Your Audio First: Ensure your clip's volume levels are balanced before applying Voice Enhance to avoid amplifying any existing issues.
- Tweak if Needed: After selecting the preset, use the Equalizer's graphic interface in the Inspector to adjust specific bands. Cut low frequencies (below 100Hz) to reduce rumble or soften highs (above 10kHz) to tame harshness.
- Layer Enhancements: Combine Voice Enhance with other audio tools like compression or the Loudness setting for an even more polished sound.
Final Thoughts
The Voice Enhance preset in Final Cut Pro's Equalizer is a quick, effective way to boost spoken word in your audio clips. Found in the Inspector under Audio Enhancements, it simplifies the EQ process, delivering clear dialogue with minimal effort. Whether you're a beginner or a seasoned editor working under a tight deadline, it's a tool worth adding to your workflow.
Next time you're editing, give Voice Enhance a spin - just don't forget to listen critically and adjust as needed. Your audience will thank you for it. Happy editing!