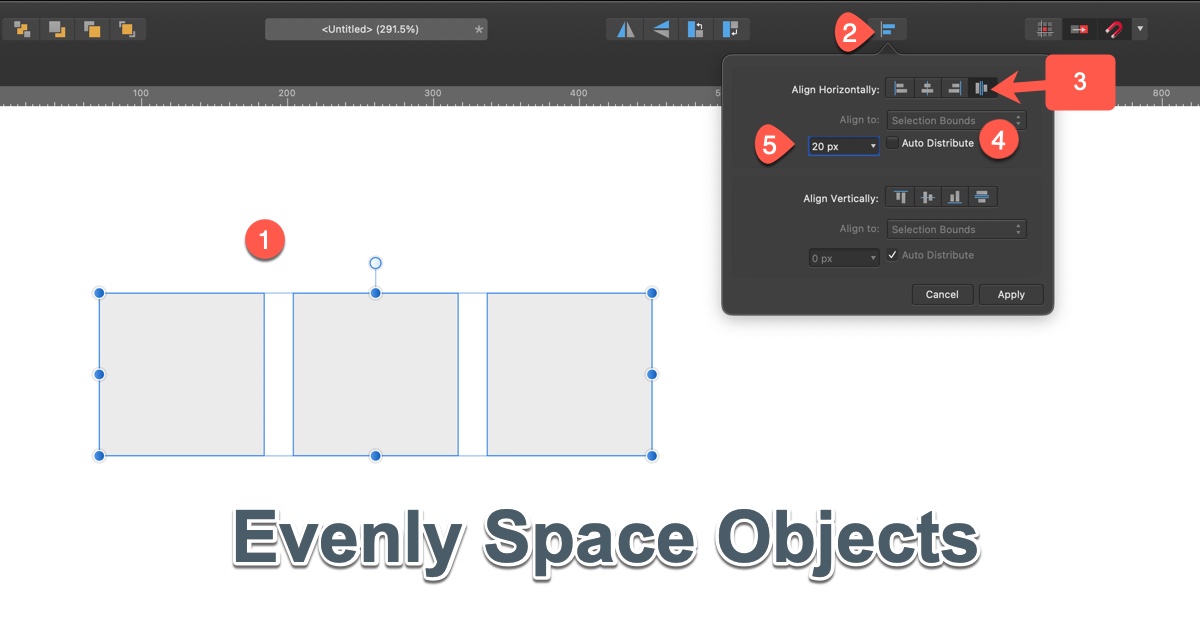
Evenly Space Objects
Use the Alignment functionality to evenly space objects in your design.
There may be times when you want objects to be evenly spaced. For example, you may want three boxes to be exactly 20 pixels apart.
Affinity Designer makes doing this task as easy as possible.
Steps to Evenly Space Objects
Simple steps to nicely space a group of objects:
- Select a group of objects that you want to evenly space.
- Click on the alignment icon in the tool bar.
- Click on the last icon in the Align Horizontally or Align Vertically.
- If you want to manually distribute, uncheck the "Auto Distribute"
- Enter in the value that you want to see between the objects.
I would recommend playing around with this dialog box - just so you know how things work.
PermalinkUsing Emoji in Affinity Designer
A simple work around on using Emoji in Affinity Designer
Affinity Designer and Affinity Photo don't support Emojis. Which means that if you try to add an Emoji or Symbol from the Edit menu all you see is a square. I don't know why Affinity hasn't supported this - maybe in version 2?
Alternative Solution
You can get around this limitations by using the Emoji images on the emojipedia.org website. Simply search for the emoji or symbol that your looking for and then drag and drop it into your document.
While this isn't the best solution, it does offer an advantage - the ability to select the emoji that works for your design.
Create an Emoji Assets Collection
I took about 10-minutes to build my own Emoji Asset Collection. I basically went through all the popular Emoji that I thought I would use.
Basically, I dragged and drop the images from emojipedia and then move the image to a dedicated Asset panel.
PermalinkWhite Balance in Affinity Designer
You can easily color correct images in Affinity Designer
There are a few differences between Affinity Photo and Affinity Designer - where as some functionality isn't available in both applications.
White Balance is available in both applications.
White Balance fixes issues with the color of a photo - particularly if the photo was taken with bad lighting.
Apply White Balance
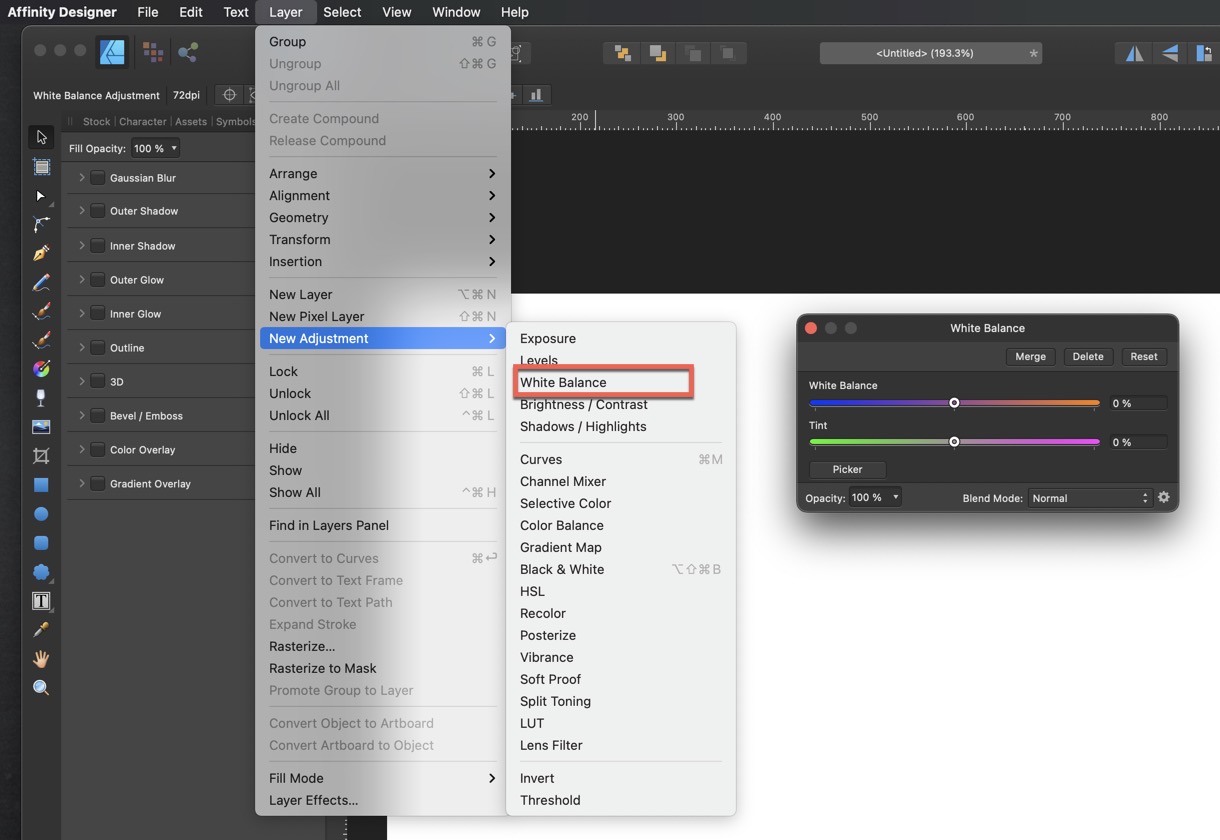
In Affinity Designer, White Balance is applied to a particular object in a layer.
- Select the Layer that you want to apply the White Balance.
- Select the Layer Menu
- Select the "New Adjustment" and then select the White Balance.
Best to Use the Picker
I would highly recommend using the "Picker" to identify the pixel in the photo that should be white.
Simply click on the "Picker" and then select the part of the image that should be white.
You can play around with the "White Balance" and "Tint" sliders to get some interesting color effects on your photo.
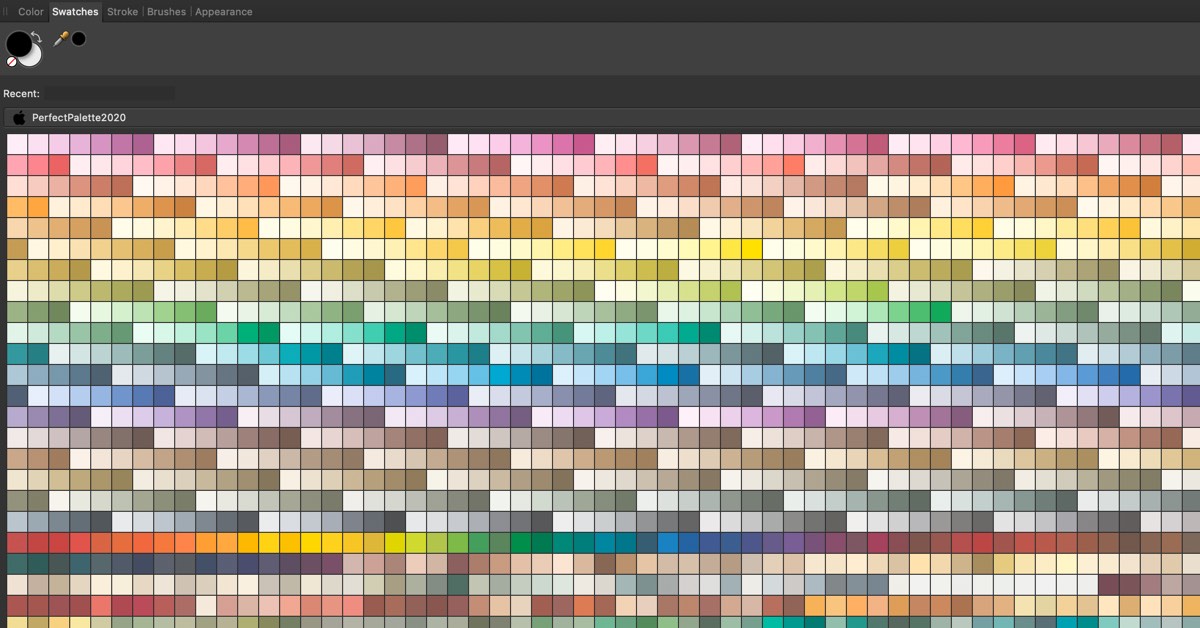
PermalinkColor Palette
Import some Paint Palette to grow your Swatches collection.
Swatches are a way easily pick a color that you would like to use as an object color or as a font color. It’s a great way to switch between colors and maintain a consistent look and feel.
Affinity Designer supports the ability to import Swatches. You can import any standard. Swatch file to use in Affinity or in the system.
Build Your Library
Since you can import any library, why not import some generic colors. It might give you some colors that you may not have thought about.
Here are a couple of swatches to download and import:
Sherwin-Williams
One of the popular paint companies in the world has made available their entire paint catalog in a single swatch file.
Download the ColorSnap Photoshop CS2 & Later swatch file.
Make sure the file you download has an ASE extension - that's what Affinity Designer supports.
Dunn Edwards Paint
Dunn-Edwards has been the leading paint manufacturer in the Southwestern United States since 1925.
They have made their entire color palette available in Adobe Illustrator format - which works perfectly well in Affinity Designer.
Visit the Illustrator Swatches page on to download the swatches.
Note: There are a lot more colors in the Dunn Edwards Pallete than in the Sherwin-Williams.
PermalinkChange Shortcuts
Change the Short Cuts to make Affinity Designer work for you
Affinity Designer has a lot of great keyboard shortcuts as part of the standard installation. What's nice is that you can pretty much set your own shortcut to whatever works for you.
When I was using Photoshop, a long time ago, I got in the habit of using Shift Command D to place images. So for a while, I replaced the Affinity Designer section for "Place Images" with the Shift Command D.
Place Image Tool
Recently I have learned that the "Place Image Tool" offers the same flexibility to inserting images using the "Place" menu which is located under the File menu.
There's no short-cut assigned to the "Place Image Tool." The letter 'i' is assigned to the Color Picker, which I hardly use. It didn't make sense to have a short-cut to something that I don't use.
Last week, I decided to change the shortcut 'i' for the "Place Image Tool." The keyboard shortcut has come in handy so many times.
Remember the Place Image Options
The one thing I have to keep in mind is all the options when placing an image:
| Drag | To place your image. (This is what I should do.) |
| Click | To place your image at default size. (This is usually what I do.) |
| Control | to preview the image before dragging |
| Command | To place center about the starting point |
| Shift | To drag without keeping the aspect ratoi |
| Option | To ignore snapping (if its on) |
Good Reminder!
This is a good reminder to evaluate all the different keyboard shortcuts in Affinity Designer. Are there any that could be changed to make your life easier?
You can see all the keyboard shortcuts by going under Preferences and selecting Keyboard Shortcuts.
PermalinkChamping
Affinity Designer Tool Bar shortcuts.
Affinity Designer includes a lot of great keyboard shortcuts. These shortcuts make things so much easier.
The tools menu has a lot of great shortcuts enabled by default. For fun, I put in the shortcut letters (abcfghimnpvyz) in an anagram generator to see if some words might come out to help remember some of the letters.
The biggest word to come out was: Champing
Toolbar shortcuts
Here's what "Champing" represents:
| C | Corner Tool |
| H | View Tool |
| A | Node Tool |
| M | Rectangle Tool |
| P | Pen Tool |
| I | Color Picker Tool |
| N | Pencil Tool |
| G | Fill Tool |
Most Popular Keys
These are the four most popular toolbar shortcut keys that I need to learn and start using. Learning these will save me a lot of time.
These are the most common tools I use:
| B | Vector Brush Tool | Drawing |
| H | View Tool | Move the canvas around. |
| T | Text Tool | Type some text. |
| V | Move | Move Objects around the canvas |
The initals BHTV is Beverly HIlls Television. That won't help remember the shortcuts, but it is interesting.
PermalinkConvert to Curve or Rasterize?
Know the difference between the two
Why You Would Converting to Curve?
Converting a vector object to Curve allows you to manipulate the object even more.
Example
You can change individual letters in a text so they appear in different colors or styles.
This is a very common action, so much so that Affinity Designer has made it easy to do the conversion.
When the object is selected:
- Click on the "Convert to Curve" in the toolbar.
- In the Layers menu select the "Convert to Curves" menu option.
- Right Click on the object and select "Convert to Curve"
- Use they keyboard shortcut: Command Return
After the object is changed you should see the "(Curve)" in the object Layer row.
Why You Would Rasterize an Object?
Rasterizing is when you want to convert an object into a Pixel object.
This is usually done when you import an image and want to do some changes to it. When you rasterize an image, anything outside of the canvas will get chopped off.
Example
You placed an image in a document and you want to remove anything not on the canvas.
Affinity Designer Brushes
Use the Pixel Persona Brushes for more control
In Affinity Designer there are two types of brush controls. When you're using the Designer Persona you have a very limited set of brush options. However, when you're in Pixel Persona you have a lot more options.
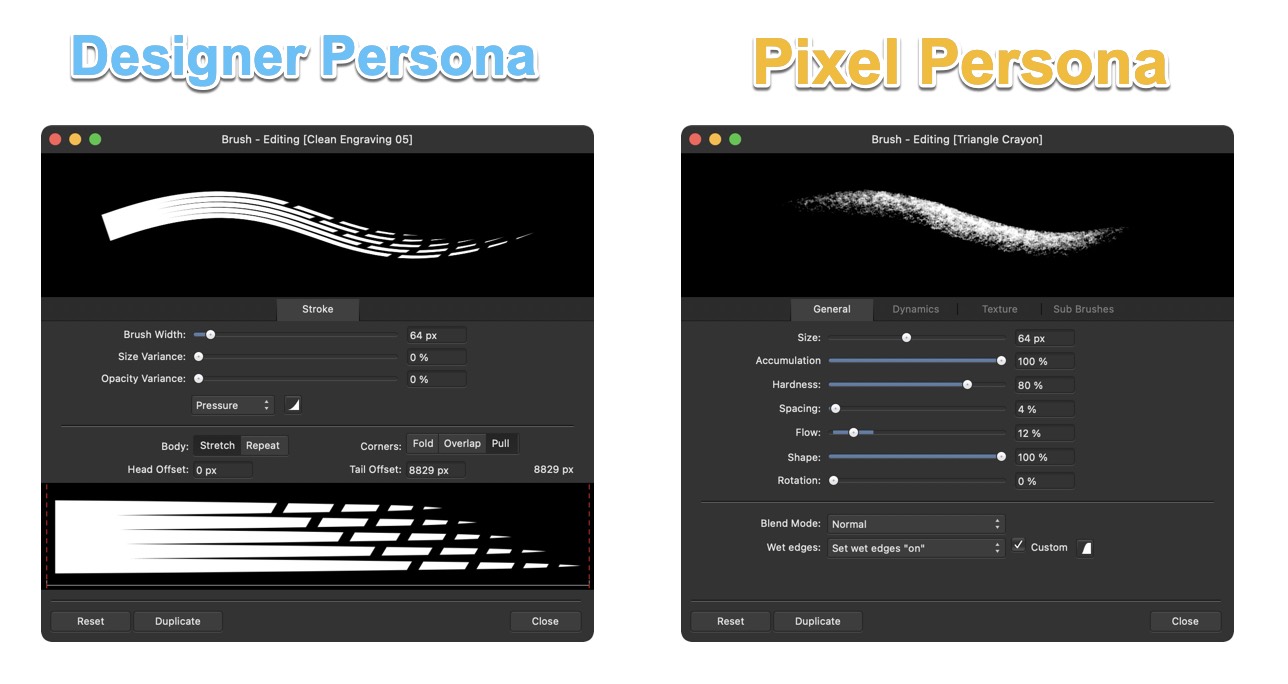
See that you have more options in the Pixel Persona
Five Things I Learned
Only Pixel brushes are available in the Pixel Persona. So if you installed brushes and don't see them in Affinity Designer it's probably because you're not in the right persona.
The Pixel Persona gives you a lot more controls with Flow and scatter, something that isn't available in the Designer Persona.
Click the "Duplicate" button when making changes so that you can access the settings whenever you want.
After using the brush make sure to rasterize the layer.
If you are using Affinity Designer brush a lot you may want to get a Wacom tablet so that you can add pressure effect to the brushes - giving a more realistic look.
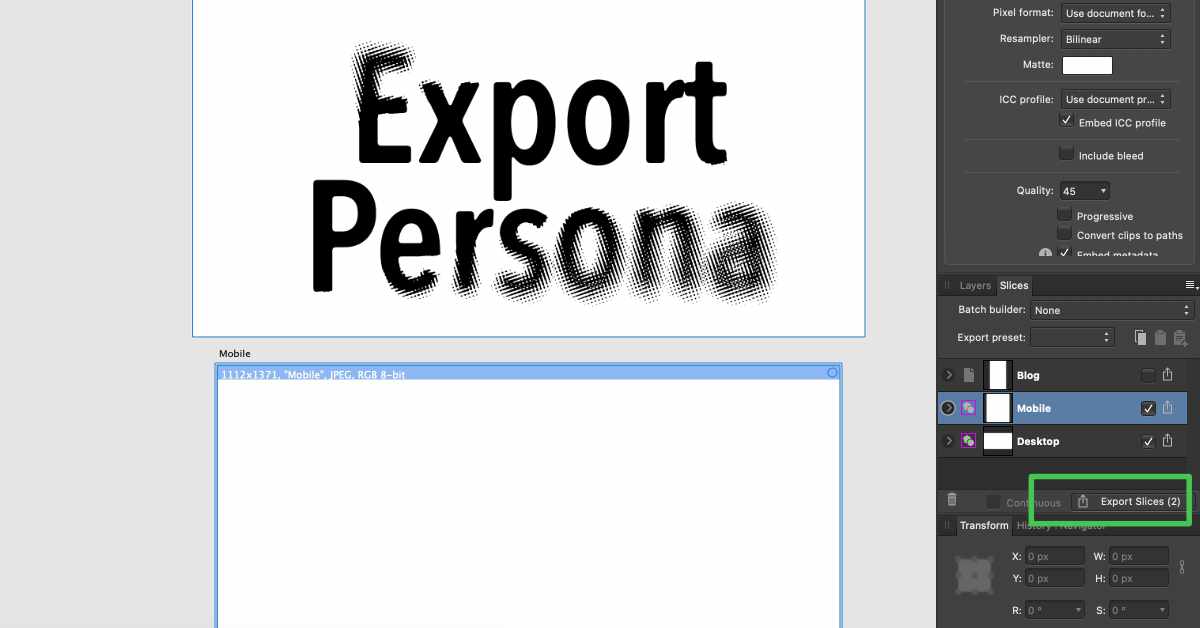
PermalinkQuickly Export Artboard Sections
Easy way to export all the ArtBoards at once
Affinity Designer's ArtBoard feature makes it easy to work on different size images at the same time. I can work on an image for Desktop users at the same time as Mobile users.
Exporting ArtBoard can be tricky as for the longest time I exported each ArtBoard via the Export option. There is a better way.
The secret to properly exporting an ArtBoard is to use the export persona. You can export the individual ArtBoard as their names with a click of a button.
Tips and Tricks
If your using templates, you should define the default ArtBoard preset in the template. Simply edit the template and set the compression in each ArtBoard in the Export Persona.
Affinity Designer does not support variables. So you can’t set up an ArtBoard template and have a different Layer Slice name every time you open it.
The name of the slice is the name of the output image.
Use the "Export Slices" button (see Green Box in the graphic) at the bottom of the slices tab to export all the ArtBoards at once. This is your one click and done.
PermalinkChecklist Functionality in Affinity Designer
How to create a custom checklist in Affinity Designer
There is no checklist functionality in Affinity Designer or Affinity Photo. While you can create bullet lists, you can't create checklists.
At least not out of the box, but there is an easy way to change that.
You simply use custom paragraph styles with the "Emoji & Symbols" functionality. Here's how to get it done.
Steps the create your Custom Checklist
The best way to understand how to do this is to watch it in action.
Things To Note
To create a checkbox, you should create a new paragraph style called CheckBox.
Add a Billet list, and then change the text.
You can get the Checkbox from the "Emoji & Symbols" dialog box. Its in the Bullets/Stars section. (You can search for Ballot Box)
Expand the default "Emoji & Symbols" box by clicking on the icon in the top right corner.
Don't forget to click Ok once done.
You will need to create the style for every new document.
If you use templates, if you create the style in the master template, it will be available in every new iteration.
Remember the shortcut to open up the "Emoji & Symbols" dialog: Control - Command - Space.
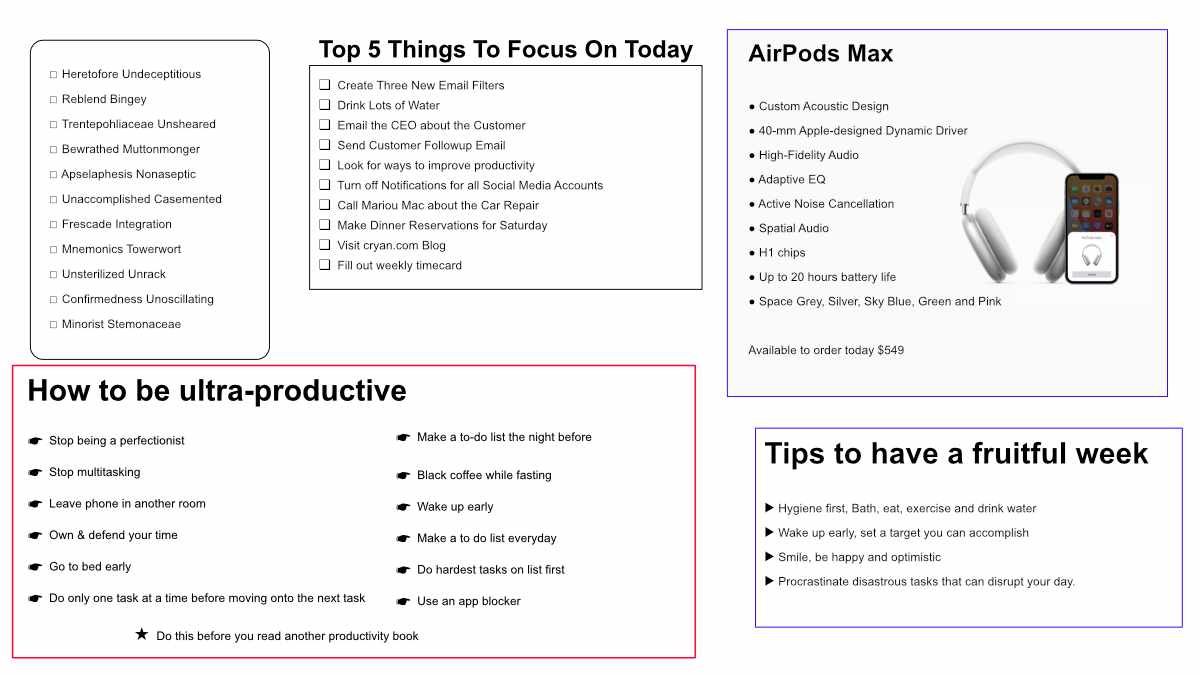
Sample Designs
This is a sample design of all the cool things you can do with the checklist in Affinity Designer and the symbols in the "Emoji & Symbols" section.
About
Welcome to the Affinity Blog, your ultimate resource for mastering the art of digital design and photo editing with Affinity products. Whether you're a professional designer or a creative enthusiast exploring the realms of graphic design, this blog is dedicated to unlocking the full potential of Affinity Photo and Affinity Designer.
Here, we delve deep into the nuances of these powerful tools, sharing insightful tips, time-saving tricks, and innovative techniques to enhance your creativity. From detailed tutorials on how to achieve stunning effects in Affinity Photo, to expert advice on vector graphics and layout design with Affinity Designer, our content is crafted to help you elevate your projects. We also keep you updated with the latest features and updates from the Affinity suite, ensuring you always have the edge in your creative endeavors. Whether you're looking to refine your skills, discover new functionalities, or simply seek inspiration, the Affinity Blog is here to guide you through every brush stroke and pixel. Join us, and transform your digital creations into works of art!
Download the latest Apps on Affinity's website.
Check out all the blog posts.
Blog Schedule
| Sunday | Open Topic |
| Monday | Media Monday |
| Tuesday | QA |
| Wednesday | Veed |
| Thursday | Business |
| Friday | Macintosh |
| Saturday | Internet Tools |
Other Posts
- White Balance in Affinity Designer
- Add Any Emoji into Affinity Designer
- Stitching Panoramas in Affinity Photo
- Better Arrows in Affinity Designer
- Change Shortcuts
- Affinity Designer Stamps
- Affinity Designer Calendar Template
- Pat Snyder Font Collection
- OmniGraffle Text Boxes
- Quickly Export Artboard Sections
- Folder Icon Maker
- Using Emoji in Affinity Designer
- Affinity Photo Dust and Scratches
- OmniGraphic Margin Functionality
- Checklist Functionality in Affinity Designer