
How I Edit QA Training Videos with Final Cut Pro
Pro Tool for QA
Why I Choose Final Cut Pro Over Basic Video Tools
As a Software Quality Assurance Engineer, I've created many QA training videos to help teams understand software testing best practices, automation strategies, and troubleshooting techniques. While tools like Snagit are great for quick screen recordings, I've found that Final Cut Pro (FCP) takes training videos to the next level.
With just a little extra effort, I can make my QA videos more engaging, professional, and effective, which leads to better knowledge retention. Here's how I optimize QA training videos in Final Cut Pro to ensure they keep the audience's attention while delivering valuable content.
1. Enhancing Engagement with Professional Transitions
QA training videos can sometimes feel dry, especially when explaining complex concepts like test automation frameworks, regression testing, or debugging techniques. Instead of presenting raw screen recordings, I use custom transitions from My FCPeffects to add smooth scene changes and keep the video visually appealing.
A few transitions I frequently use:
- Zoom & Pan Transitions - Great for focusing on specific parts of the screen.
- Fade & Cross Dissolve - Helps create a natural flow between sections.
- Slide-in Annotations - Useful for drawing attention to key points.
2. Recording and Editing Voiceovers for Clarity
A well-structured voiceover can guide viewers through complex QA concepts without overwhelming them. Final Cut Pro allows me to record and fine-tune my voiceover directly in the timeline.
How I improve voiceovers in FCP:
- Noise Reduction & EQ Adjustments - Removes background noise for crystal-clear explanations.
- Compression & Limiting - Ensures a balanced audio level throughout the video.
- Reverb & Audio Effects - Adds depth, making the voiceover sound more natural.
With these audio tweaks, my videos feel more polished and professional, helping viewers focus on the content rather than struggling to hear the explanations.
3. Adding Background Music for Engagement
Music can make a big difference in keeping viewers engaged. In Final Cut Pro, I add subtle background music to prevent dead air and enhance pacing. I select royalty-free tracks that complement the training video's tone without being distracting.
Some good places to find background music:
- YouTube Audio Library
- Artlist.io
- Epidemic Sound
4. Exporting QA Training Videos in Multiple Formats
Once the video is complete, I need to share it in different formats depending on the audience:
- YouTube & Vimeo - For public or internal training repositories.
- Slack & Microsoft Teams - Quick sharing with remote teams.
- MP4/DVD - For offline viewing or onboarding packages.
Final Cut Pro makes exporting to multiple formats quick and efficient, ensuring my training videos are accessible across various platforms.
Why This Matters for QA Professionals
Creating high-quality QA training videos is more than just recording a screen. It's about making software testing education accessible, engaging, and effective. With Final Cut Pro, I can:
- Improve knowledge retention with professional visuals and audio.
- Make complex testing concepts easier to follow.
- Demonstrate my communication and technical skills - both valuable for a QA career.
As I continue my QA career journey, these skills show my ability to train, document, and communicate software testing knowledge effectively, making me a strong candidate for QA leadership and automation roles.
If you're looking for a QA Engineer who combines technical expertise with clear communication and training skills, let's connect!
PermalinkUnlock Clearer Dialogue in Final Cut Pro with Voice Enhance
Discover the Quick and Easy Way to Enhance Spoken Word in Your Videos
As a regular Final Cut Pro video editor, you've likely heard the mantra: audio is just as important as visuals. Nowhere is this truer than with dialogue. Whether you're crafting an interview, a narrative film, or a podcast, clear spoken word is essential to keeping your audience engaged. Fortunately, Final Cut Pro offers a powerful yet simple tool to elevate your audio game: the Voice Enhance preset within its Equalization (EQ) features. In this post, I'll walk you through what Voice Enhance is, how to use it, and why it's a must-know for any Final Cut Pro user.
What is Equalization?
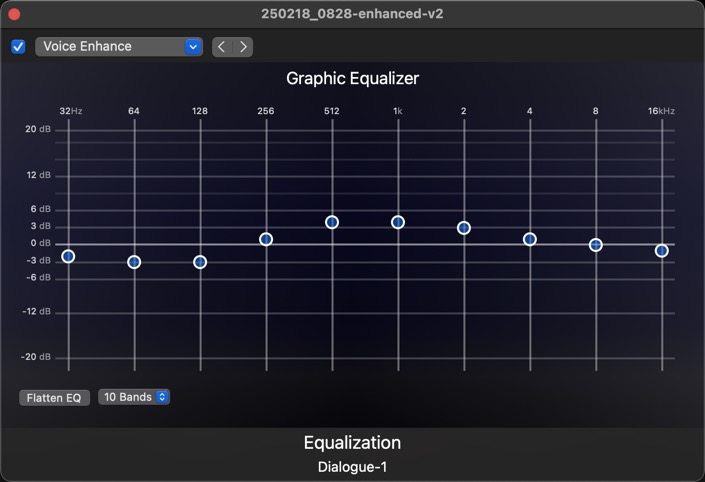
Equalization, or EQ, is all about balancing the different frequency components of an audio signal. Imagine it as a way to tweak the bass (low frequencies), mids (mid-range frequencies), and treble (high frequencies) to shape the sound. For dialogue, the mid-range - typically between 1kHz and 4kHz - is where the human voice shines, and adjusting these frequencies can make speech clearer and more prominent.
In Final Cut Pro, the Equalization tools let you refine your audio with precision, and the Voice Enhance preset takes this a step further by offering a quick, tailored solution for spoken word.
Where to Find Voice Enhance
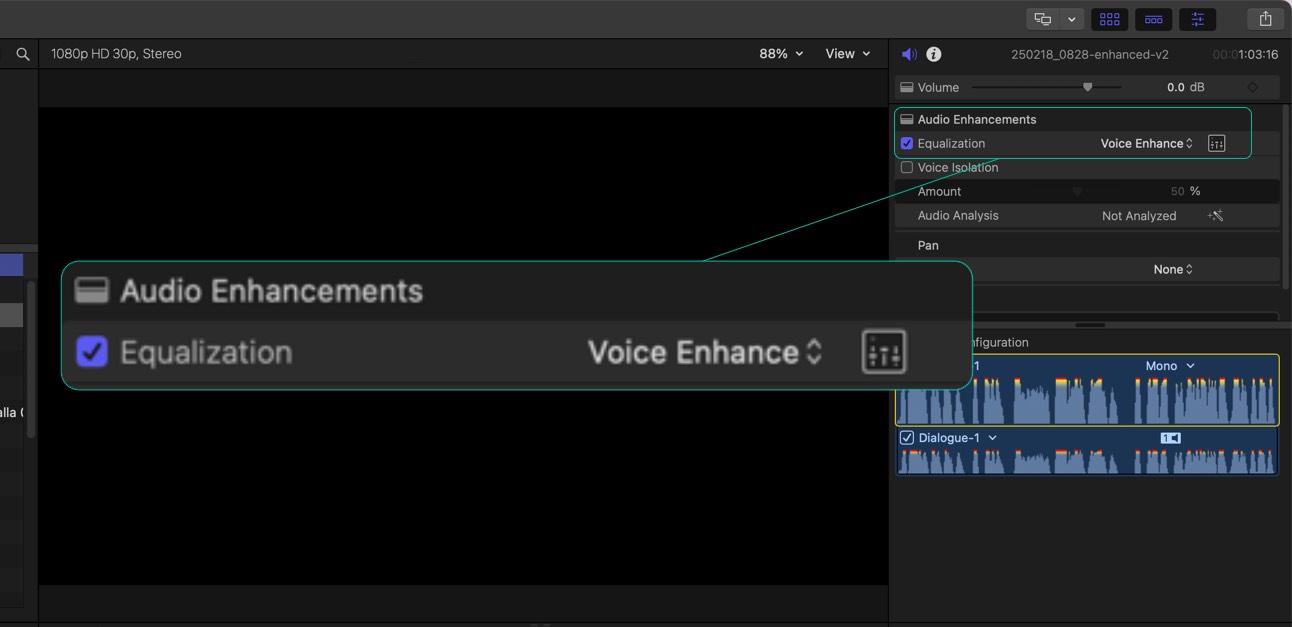
You'll find the Voice Enhance option nestled in the Inspector under the Audio tab, specifically tied to the Equalizer effect. It's part of Final Cut Pro's broader Audio Enhancements toolkit, designed to streamline the process of improving sound quality. Voice Enhance stands out as a fast way to boost dialogue, making it ideal for editors who need results without diving deep into manual EQ adjustments.
Here's how to apply it:
- Select Your Clip: In your timeline, click on the video or audio clip containing the dialogue you want to enhance.
- Open the Effects Browser: Hit Command + 5 to bring up the Effects Browser, where all of Final Cut Pro's effects live.
- Add the Equalizer Effect: Navigate to Audio Effects, locate the Equalizer, and double-click it to apply it to your selected clip.
- Head to the Inspector: With your clip still selected, open the Inspector (press Command + 4) and go to the Audio tab.
- Select Voice Enhance: In the Equalizer settings, click the Preset dropdown menu and choose Voice Enhance.
That's it! Final Cut Pro will instantly apply an EQ curve optimized for human speech, boosting those key mid-range frequencies while taming lows that might muddy the sound.
Why Use Voice Enhance?
The Voice Enhance preset is a game-changer for several reasons:
- Speed: It's a one-click solution. No need to spend time fiddling with frequency bands if you're short on time or new to audio editing.
- Clarity: By emphasizing the frequencies where dialogue lives, it ensures your audience hears every word crisp and clear.
- Accessibility: You don't need to be an audio engineer to get professional-sounding results.
This makes it perfect for projects like vlogs, interviews, or any video where spoken word takes center stage. Plus, since it's non-destructive, you can always tweak or remove it later if needed.
When It Works Best (and When It Doesn't)
Voice Enhance is a fantastic starting point, but it's not a cure-all. Here's what to keep in mind:
- Ideal Use Case: It shines on clips where dialogue is the main focus, free from heavy background music or sound effects. Think raw interview footage or narration tracks.
- Limitations: If your audio is plagued by noise, distortion, or poor recording quality, Voice Enhance alone won't fix it. You might need to pair it with noise reduction tools or, in extreme cases, re-record the audio.
- Mixed Audio: Applying it to a clip with both dialogue and music could alter the music in unintended ways, so consider isolating your voice track if possible.
Always listen to the result after applying the preset. If something sounds off - too bright or too thin - you can dive into the Equalizer's manual controls to fine-tune it.
Pro Tips for Using Voice Enhance
To maximize this feature, try these tricks:
- Check Your Audio First: Ensure your clip's volume levels are balanced before applying Voice Enhance to avoid amplifying any existing issues.
- Tweak if Needed: After selecting the preset, use the Equalizer's graphic interface in the Inspector to adjust specific bands. Cut low frequencies (below 100Hz) to reduce rumble or soften highs (above 10kHz) to tame harshness.
- Layer Enhancements: Combine Voice Enhance with other audio tools like compression or the Loudness setting for an even more polished sound.
Final Thoughts
The Voice Enhance preset in Final Cut Pro's Equalizer is a quick, effective way to boost spoken word in your audio clips. Found in the Inspector under Audio Enhancements, it simplifies the EQ process, delivering clear dialogue with minimal effort. Whether you're a beginner or a seasoned editor working under a tight deadline, it's a tool worth adding to your workflow.
Next time you're editing, give Voice Enhance a spin - just don't forget to listen critically and adjust as needed. Your audience will thank you for it. Happy editing!
PermalinkHow to Remove Echo in Final Cut Pro Using Voice Isolation
Make the Audio Sound Better
Echo in audio recordings can be a frustrating issue, especially when editing dialogue or voiceovers in Final Cut Pro. Whether you're working on a vlog, interview, or any other project, reducing echo can significantly improve sound clarity. Fortunately, Final Cut Pro 10.6.2 (or later) includes a built-in Voice Isolation feature, which makes it easier than ever to clean up your audio.
In this guide, I'll show you how to remove echo in Final Cut Pro using the Voice Isolation tool, along with some extra tips to enhance your audio further.
Step-by-Step Guide to Removing Echo in Final Cut Pro
1. Select Your Audio Clip
First, open your project in Final Cut Pro and locate the audio or video clip with unwanted echo. Click on the clip to select it.
2. Open the Audio Inspector
With your clip selected, go to the Inspector panel (found in the top right corner of the Final Cut Pro interface). Click on the Audio Inspector tab, which looks like a small speaker icon.
3. Enable Voice Isolation
In the Audio Inspector, find the Voice Isolation option. It is available in Final Cut Pro 10.6.2 or later on macOS Monterey or newer.
- Click the checkbox to enable Voice Isolation for the selected clip.
4. Adjust the Strength of Voice Isolation
Once enabled, you'll see a slider that allows you to control how much isolation is applied.
- A good starting point is 50%, which helps reduce echo while keeping the voice natural.
- Increase the slider if you still hear too much echo.
- Be careful not to go too high (above 80%), as this can make the voice sound unnatural or robotic.
5. Fine-Tune Your Audio (If Needed)
If Voice Isolation alone doesn't completely remove the echo, you can try these additional tweaks:
Use EQ to Reduce Echo
- In the Audio Inspector, enable the Equalizer (EQ) effect.
- Try a Low Cut (High Pass) Filter to remove unnecessary low frequencies, which can sometimes contribute to an echoey sound.
- Experiment with reducing frequencies in the 200–500 Hz range, where room reverb often builds up.
Add Noise Reduction (If Needed)
- If your audio still sounds too "roomy," apply Noise Reduction (also found in the Audio Inspector) and adjust the amount carefully.
Use a Third-Party Plugin for Advanced Echo Removal
If Voice Isolation and EQ don't completely fix the problem, consider using third-party audio plugins like iZotope RX De-Reverb for more advanced control.
Use the AI-powered DeRoom plugin from FxFactory for advanced echo removal. Add it to your clip, then adjust sensitivity and reduction sliders for optimal results.
Final Thoughts
The Voice Isolation feature in Final Cut Pro is a powerful built-in tool that can quickly reduce echo and improve voice clarity with just a few clicks. By adjusting the Voice Isolation slider, applying EQ, and fine-tuning with Noise Reduction, you can achieve clean, professional audio for your videos.
PermalinkCreate a crowd effect in Final Cut Pro
Cool effect from any audio
To make your audio clip sound like a crowd of people saying "Happy Birthday" or some other saying in Final Cut Pro, follow these steps:
Method 1: Duplicate & Offset
- Duplicate the Audio Clip Multiple Times
- Select your audio clip in the timeline.
- Press Option + Shift + Drag to make multiple copies.
- Repeat until you have about 5 - 10 copies.
- Offset Each Clip Slightly
- Drag each duplicate slightly forward or backward in the timeline to create a staggered effect.
- This prevents the voices from sounding like a single voice just playing louder.
- Adjust the Pitch of Some Clips
- Select a clip and go to Effects > Audio > Pitch.
- Apply the Pitch effect and slightly raise or lower the pitch (+2 or -2 semitones).
- Repeat this for some of the other clips to create vocal variation.
- Pan the Clips Left and Right
- Open the Audio Inspector (Shortcut: Command + 4).
- Use the Pan slider to move some clips left and others right.
- This creates a wider, more immersive sound.
- Lower the Volume on Some Clips
- Reduce the volume on a few clips to make it sound more natural.
- Avoid making all clips the same volume to mimic real crowd dynamics.
How to Split a Stereo Audio File in Final Cut Pro and Disable a Problematic Track
Easy Fix to a Problem Audio File
When working with stereo audio in Final Cut Pro, you might occasionally run into a situation where one side of your track isn't quite up to par. Maybe the left channel is too boomy, or - as was my case - the right channel is just plain "garbage." Fortunately, Final Cut Pro provides a straightforward way to split your stereo audio into separate mono tracks, giving you the flexibility to disable or adjust the problematic channel without affecting the overall project.
In this blog post, I'll walk you through the step-by-step process of splitting a stereo audio file into dual mono tracks and disabling one channel. This method can be particularly useful if you need to reduce background noise or balance your mix when one track's audio levels are off.
Step 1: Import and Select Your Audio Clip
- Import Your Clip: Start by importing the clip with your stereo audio into Final Cut Pro.
- Select the Clip: In your timeline, click on the clip to ensure it's selected. You'll need to see the clip's details in the Inspector panel.
Step 2: Open the Audio Inspector
- Access the Inspector: With your clip selected, open the Inspector panel by clicking the Inspector button in the top right corner of Final Cut Pro.
- Switch to Audio: Make sure you're on the Audio tab where you can see all the properties related to your clip's audio configuration.
Step 3: Change the Audio Configuration to Dual Mono
- Locate Audio Configuration: In the Audio Inspector, look for the Audio Configuration section. This area is where you can adjust how Final Cut Pro handles your audio channels.
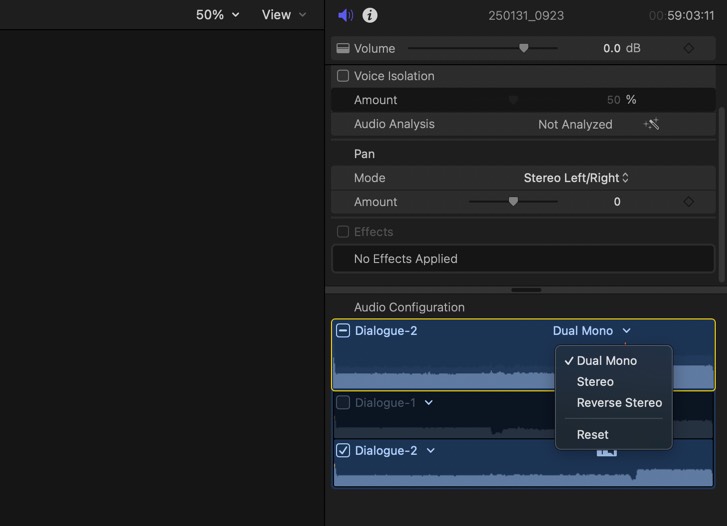
- Select Dual Mono: Change the configuration from stereo to Dual Mono. By doing so, Final Cut Pro splits your stereo file into two separate mono tracks - one for the left channel and one for the right.
Step 4: Disable the Unwanted Track
- Identify the Problematic Track: Since my right track was causing issues, I needed to disable it. In the Inspector, after switching to Dual Mono, you'll see separate settings for each channel.
- Turn Off the Track: Locate the Dialogue checkbox for the track you wish to disable. Simply click on the checkbox for the problematic track (in my case, the right channel) to turn it off. This effectively mutes the audio coming from that channel without affecting the left channel.
Step 5: Fine-Tuning and Playback
- Play Back Your Clip: After disabling the unwanted track, play back your clip to ensure that the audio now meets your expectations. The background noise or unwanted audio should now be reduced or eliminated.
- Adjust as Needed: If you find that you need further tweaks, you can always revisit the Audio Inspector to make more adjustments. Sometimes you might want to apply additional filters or volume changes to get the perfect balance.
Why Use Dual Mono?
Using Dual Mono is a powerful way to gain more control over your audio tracks in Final Cut Pro. It allows you to isolate and modify individual channels - perfect for scenarios where: - One channel has excessive background noise. - A channel is corrupted or has poor-quality audio. - You need to create a specific audio effect by treating each channel differently.
This method not only improves your audio quality but also saves time in the editing process by avoiding the need for additional software or complex workarounds.
Conclusion
Splitting a stereo audio file into dual mono tracks and disabling one channel is a simple yet effective technique in Final Cut Pro. Whether you're dealing with problematic audio or just want more control over your mix, these steps can help you achieve a cleaner, more professional sound.
PermalinkUsing Rejected Clips to Manage Your Clips Library
Move Some Clips Out of the Way
Managing a crowded Clips Library in Final Cut Pro can sometimes feel like a daunting task, especially when you're working with large projects containing countless clips. Instead of permanently deleting clips you may later regret losing, here's a simple yet powerful tip to keep your library organized: use Rejected Clips.
The Problem: A Crowded Library
When your Clips Library grows too large, finding the footage you actually need can become a frustrating chore. Scrolling endlessly to locate key clips wastes time and hinders productivity. Deleting unused clips might seem like an easy fix, but what if you later realize you need one of those clips?
The Solution: Rejected Clips
By marking unwanted clips as "Rejected," you can declutter your library without losing access to those clips entirely. This workflow ensures that you're only seeing the files you're actively working with, while still keeping the option to revisit rejected clips if needed.
How to Reject Clips
- Select the Clip: Highlight the clip you no longer want cluttering your view.
- Press the Delete Key: This marks the clip as "Rejected." Don't worry - it's not permanently deleted, just hidden when filtered out.
- Filter Your Clips View: Use the Clip Filtering menu to hide rejected clips. Simply set the filter to show only clips marked as "Favorites" or "Unrated." Rejected clips will no longer appear, keeping your library focused and manageable.
When You're Ready to Delete
If you're certain you'll never need a clip again, you can take the next step: 1. Select the Clip. 2. Use Command + Delete: This moves the clip to the Trash, but don't worry - Final Cut Pro will prompt you with a confirmation message before the clip is permanently removed.
Why This Trick Works
- Non-Destructive Workflow: Rejected Clips remain in your library unless you choose to delete them permanently. This flexibility gives you peace of mind.
- Efficient Sorting: By hiding rejected clips, you streamline your workflow and focus only on the essential files.
- Organized Deletion: When you're ready to clean up for good, you already have a curated list of clips to review and delete.
Pro Tip
When filtering your Clips Library, don't forget to check back on your rejected clips every so often. You might rediscover footage you can repurpose for future projects.
Using Rejected Clips is a game-changer for staying organized in Final Cut Pro, and it's a "little-known" feature that every editor should add to their toolkit. Try it out and enjoy the newfound clarity in your Clips Library!
PermalinkHow to Add Custom Sound Effects to the Sound Library
Enhancing Your Final Cut Pro Projects
Whether you're a seasoned video editor or just starting out, having a rich library of sound effects can elevate your Final Cut Pro projects to new heights. While Final Cut Pro comes packed with a variety of built-in sounds, adding your own collection of special effects allows for greater creativity and personalization. In this guide, we'll walk you through the process of adding your own sound effects to the Final Cut Pro Sound Library, ensuring they're readily available for any project you undertake.
Why Customize Your Sound Library?
Custom sound effects can set your projects apart, providing unique audio elements that perfectly match your vision. Whether you're working on a podcast, a short film, or a corporate video, having tailored sounds can enhance the storytelling and overall production quality.
Step-by-Step Guide to Adding Your Own Sound Effects
1. Organize Your Sound Effects
Before diving into Final Cut Pro, it's essential to organize your sound effects. Creating a dedicated folder for your custom sounds will keep everything neat and easily accessible.
Example:
I like to keep my audio files in a folder named "Podcast Sound Effects." This helps me quickly locate the sounds I need without sifting through unrelated files.
2. Locate the Final Cut Pro Sound Effects Library
Final Cut Pro stores its sound effects in a specific directory on your Mac. To add your own sounds, you'll need to navigate to this folder.
Path to Sound Effects Library:
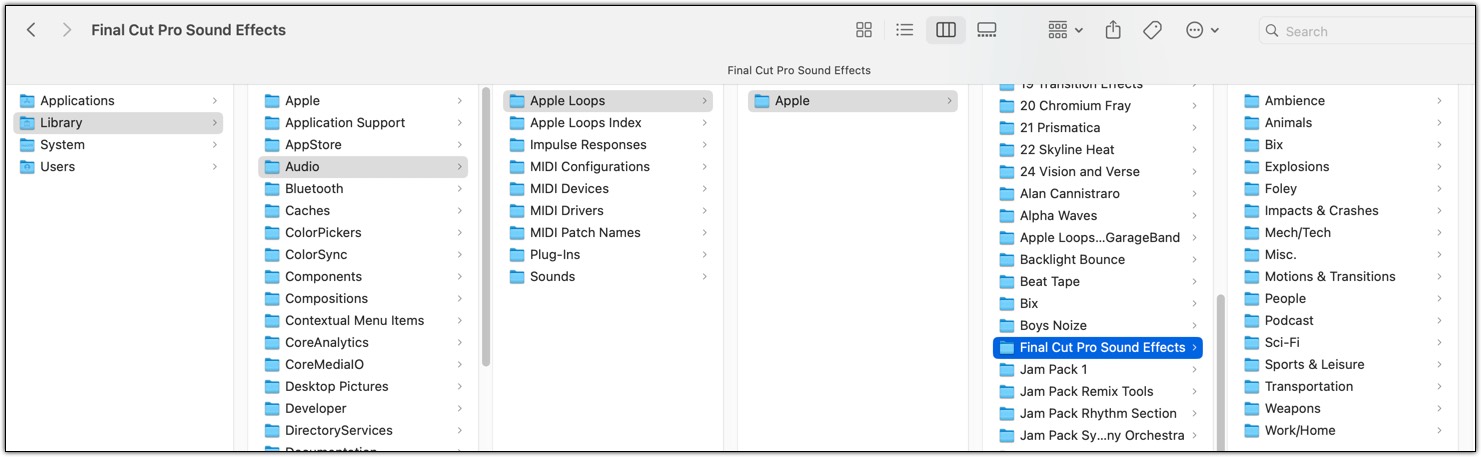
/Library/Audio/Apple Loops/Apple/Final Cut Pro Sound Effects/
How to Access:
- Open Finder: Click on the Finder icon in your Dock.
- Navigate to the Library Folder:
- Press
Shift + Command + Gto open the "Go to Folder" window. - Enter
/Library/Audio/Apple Loops/Apple/Final Cut Pro Sound Effects/and pressEnter.
- Press
- Create a New Folder:
- To maintain organization, create a new folder within the Sound Effects directory. Right-click inside the folder, select "New Folder," and name it appropriately (e.g., "Podcast Sound Effects").
3. Add Your Custom Sound Effects
With your dedicated folder in place, it's time to add your custom sound effects.
Steps:
- Gather Your Audio Files: Ensure your sound effects are in a compatible format, such as
.wavor.aiff, which are widely supported by Final Cut Pro. - Copy the Files: Drag and drop your audio files into the newly created folder (e.g., "Podcast Sound Effects").
- Maintain File Organization: Consider naming your files descriptively (e.g.,
Door_Closing.wav,Laughter.wav) to make them easily searchable within Final Cut Pro.
4. Refresh Final Cut Pro's Sound Library
After adding your custom sounds, you may need to refresh Final Cut Pro to recognize the new additions.
How to Refresh:
- Restart Final Cut Pro: Close and reopen the application to allow it to scan the Sound Effects library for new files.
- Verify Your Sounds:
- Open a project in Final Cut Pro.
- Navigate to the "Sound Effects" browser.
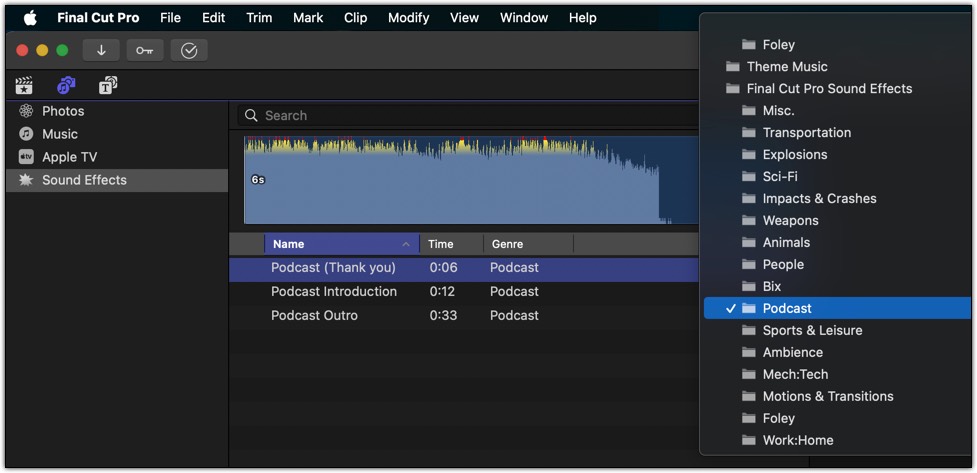
- Look for your newly added folder (e.g., "Podcast Sound Effects") and ensure your sounds are visible and playable.
5. Utilize Your Custom Sound Effects in Projects
With your sounds now part of the Final Cut Pro Sound Library, integrating them into your projects is seamless.
Using the Sounds:
- Open the Sound Effects Browser: In your Final Cut Pro project, click on the "Sound Effects" tab.
- Browse to Your Folder: Locate your custom folder (e.g., "Podcast Sound Effects").
- Drag and Drop: Simply drag the desired sound effect onto your timeline where you want it to play.
- Adjust as Needed: Use Final Cut Pro's audio editing tools to adjust volume, fade in/out, and other properties to fit your project's needs.
Tips for an Organized Sound Library
- Categorize Your Sounds: Within your custom folder, consider creating subfolders for different types of sounds (e.g., "Ambient," "Transitions," "Foley") to streamline the search process.
- Consistent Naming Conventions: Use clear and consistent names for your sound files to make them easily identifiable.
- Backup Your Library: Regularly back up your custom sound library to prevent data loss and ensure you can restore your collection if needed.
Conclusion
Adding your own sound effects to the Final Cut Pro Sound Library is a straightforward process that can significantly enhance the quality and uniqueness of your video projects. By organizing your sounds thoughtfully and integrating them seamlessly into Final Cut Pro, you gain greater control over your audio landscape, allowing your creative vision to shine. Whether you're producing a podcast, a cinematic masterpiece, or any other type of video content, your custom sound effects will be an invaluable asset in bringing your projects to life.
PermalinkSetting Up Final Cut Pro for Audio Editing
A Guide for Podcasters
Final Cut Pro is renowned for its video editing prowess, but did you know it's also a fantastic tool for audio editing? With its advanced features and intuitive interface, it can handle podcasts and other audio projects with ease. If you're transitioning from a traditional audio editor or just want to streamline your workflow, this guide will walk you through optimizing Final Cut Pro for audio editing.
1. Simplify the Timeline for Audio-Only Editing
When working on audio-centric projects like podcasts, you don't need the visual distractions of video clips. Final Cut Pro makes it easy to tailor your timeline for audio editing:
- Change the Timeline Appearance:
Click on the "Change Appearance of the Clips in the Timeline" button (the filmstrip icon at the top-right of the timeline).- Select the first icon in the menu, which displays clips as audio waveforms only.
- This view emphasizes the audio, giving you a clearer visual representation of your podcast's soundscape.
- Select the first icon in the menu, which displays clips as audio waveforms only.
2. Insert Gaps with Ease
Sometimes, you may need to create pauses or structure your podcast with intentional silence. Final Cut Pro offers a quick shortcut to insert gaps into your timeline:
- Shortcut for Gaps: Press Option + W to insert a blank section (gap) into your timeline.
- Use this feature to add pauses for emphasis, transitions, or future editing notes.
3. Master the Audio Enhancements Panel
Final Cut Pro's built-in audio tools are incredibly powerful. Here are some essential features for podcasters:
Equalization (EQ):
Enhance vocal clarity by selecting the "Voice" preset in the Audio Inspector's Equalizer section. Adjust further to match the tone and style of your podcast.Noise Reduction:
Use the "Reduce Background Noise" slider in the Audio Inspector to minimize ambient sound like fans, hums, or clicks.Compressor:
Apply the Compressor effect to even out your audio levels. This is especially useful if your podcast includes multiple speakers with varying volumes.
4. Use Keyframe Editing for Precision
To fine-tune your audio levels, employ keyframes:
- Adjusting Volume:
- Hold Option and click on the audio line in the timeline to create keyframes.
- Drag these points to fade in, fade out, or adjust the volume dynamically throughout your podcast.
- Hold Option and click on the audio line in the timeline to create keyframes.
- Balancing Audio:
Use keyframes to balance dialogue and background music or sound effects.
5. Take Advantage of Final Cut Pro Effects
Final Cut Pro comes with several effects that can elevate your podcast's audio quality:
- Voice Effects:
- Try the "Channel EQ" for precise vocal adjustments.
- Experiment with reverb and echo effects to add depth to certain segments, like intros or outros.
- Try the "Channel EQ" for precise vocal adjustments.
- Sound Effects Library:
Browse the built-in sound effects library to add transitions, ambient noise, or jingles to your podcast.
6. Save Time with Final Cut Pro Shortcuts
Efficiency is key when editing podcasts, and Final Cut Pro's shortcuts can save you significant time:
- Blade Tool: Press B to cut clips quickly.
- Trim Tool: Press T to adjust clip edges without moving other elements.
- Snap to Playhead: Press N to toggle snapping, making precise edits easier.
7. Exporting Audio Only
When your podcast is ready, you'll want to export it as an audio file:
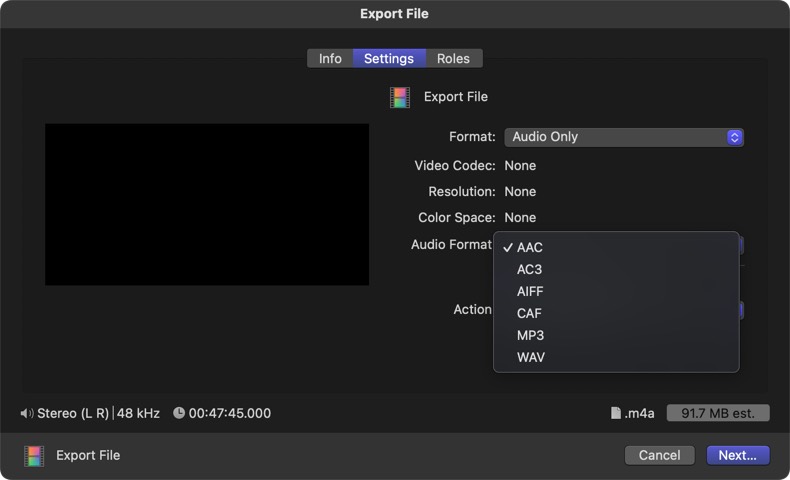
- Export Steps:
- Go to File > Share > Master File (Default).
- In the settings tab, select Format: Audio Only.
- Choose your preferred audio format (e.g., AAC or WAV) and click Export.
- Go to File > Share > Master File (Default).
Conclusion
Final Cut Pro may be designed for video, but its robust audio tools make it a perfect choice for podcast editing. By setting up the timeline for audio-only editing, leveraging shortcuts like Option + W, and mastering its effects, you can create professional-quality podcasts efficiently.
If you're familiar with Final Cut Pro's shortcuts and effects, this approach will feel intuitive and powerful. Whether you're producing interviews, storytelling, or panel discussions, Final Cut Pro has the tools to make your podcast shine.
Have a favorite tip for editing audio in Final Cut Pro? Share it in the comments below!
PermalinkAudio Editing with Final Cut Pro
Good Tools for Editing Audio Files
Did you know that Final Cut Pro isn't just for videos? It's also a powerful tool for audio editing. Whether you're a podcaster, musician, or just someone who wants to clean up audio files, Final Cut Pro can help you achieve professional results.
Importing Your Audio Files
- Open Final Cut Pro: Launch the app and create a new project.
- Import Audio: Click on "File" > "Import" and select your audio files. You can also drag and drop them directly into the timeline.
Basic Audio Editing Techniques
- Trimming: To shorten a clip, simply drag the edges of the clip in the timeline.
- Splitting: Right-click on a clip and select "Split" to divide it into two parts.
- Joining: Select multiple clips and press "Command+J" to join them together.
- Fading In/Out: To create a gradual transition, right-click on the clip and select "Add Fade In" or "Add Fade Out."
Cleaning Up Audio
- Noise Reduction: Final Cut Pro has excellent built-in noise reduction tools. Select a noisy section and go to "Effects" > "Audio Effects" > "Noise Reduction." Adjust the settings to reduce background noise.
- Equalization: Use the equalizer to boost or cut specific frequencies. This can help improve audio quality and clarity.
- Gain: Adjust the overall volume of a clip using the gain slider.
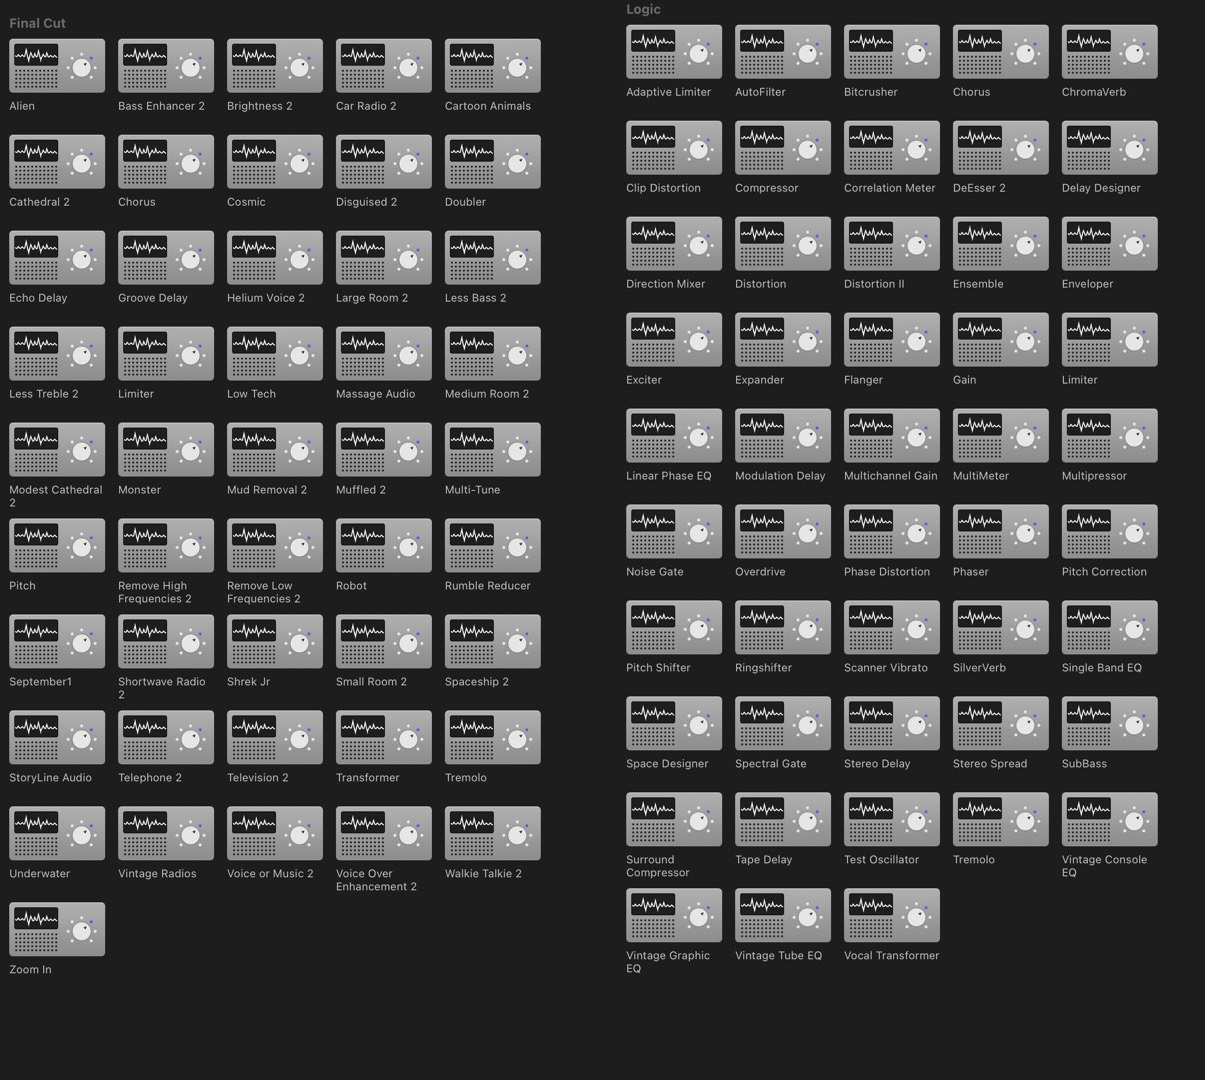
Sample of some of the Audio Effects.
Exporting Your Audio
- Create a Range: Select the portion of the audio you want to export.
- Export: Go to "File" > "Share" > "Export" > "Format" > "Audio Only" Under Audio Format choose your desired format (e.g., WAV, MP3, AAC).
- Set Export Settings: Adjust settings like sample rate, bitrate, and channel configuration.
- Save: Choose a destination and save your exported audio file.
Remember: While Final Cut Pro is a great tool for audio editing, it might not be the best choice for complex audio processing tasks. For more advanced features, consider using dedicated audio editing software. I believe its a good solution when you want to parse out a large audio file.
Permalinkfcpeffects Mega Package
Great Final Cut Pro Black Friday Deal
If your videographer and looking for a great Black Friday deal, check out FCPeffect's Mega package deal. You get 1900+ presets for only $57 - the best deal ever offered on this collection.

Key things in this package
- 200+ Titles, Graphics & Overlays ($420 Value)
- 1000+ Different Transitions ($350 Value)
- 700+ Video Effects & Color Grading Tools ($830 Value)
Some Personal Thoughts
This is a great collection to have available when you need it. You never know when a certain lower-third title will be the perfect fit for the project that you're working on.
There are plenty of Effects that are very useful to have. Some of my favorite include: HDR Plug in, White Balance Plug in, Better Ken Burns, and so much more.
The Transitions are really valuable to have at your disposal. If you want to "swipe right" there are 123 items to pick from. Giving you more power to create an awesome video.
Screen Splitter is a great screen splitting tool.
You get lifetime access, so you don't need to install everything now. You can install the package and remove items - then at a later point you can install them again. You don't need to take space and memory for effects that you are not likely going to use.
This package is a no brainer to get and I highly recommend it.
One More Thing...
FCPEFFECTS was located on Sanibel Island in Southwest Florida. On September 29, 2022, Sanibel Island was hit hard by Hurricane Ian. Residents will not be allowed back until September.
FCPEFFECTS will donate 25% of all sales directly to this island's residents who are now jobless and homeless.
PermalinkAbout
This blog series will explore the many different features and tools of Final Cut Pro X. We will cover everything from basic editing techniques to more advanced topics such as color grading and motion graphics. We will also provide tips and tricks to help you get the most out of Final Cut Pro X.
Check out all the blog posts.
Blog Schedule
| Saturday | Internet Tools |
| Sunday | Open Topic |
| Monday | Media Monday |
| Tuesday | QA |
| Wednesday | Veed |
| Thursday | Business |
| Friday | Macintosh |