
Lower Third
Setting your own default on Lower Third
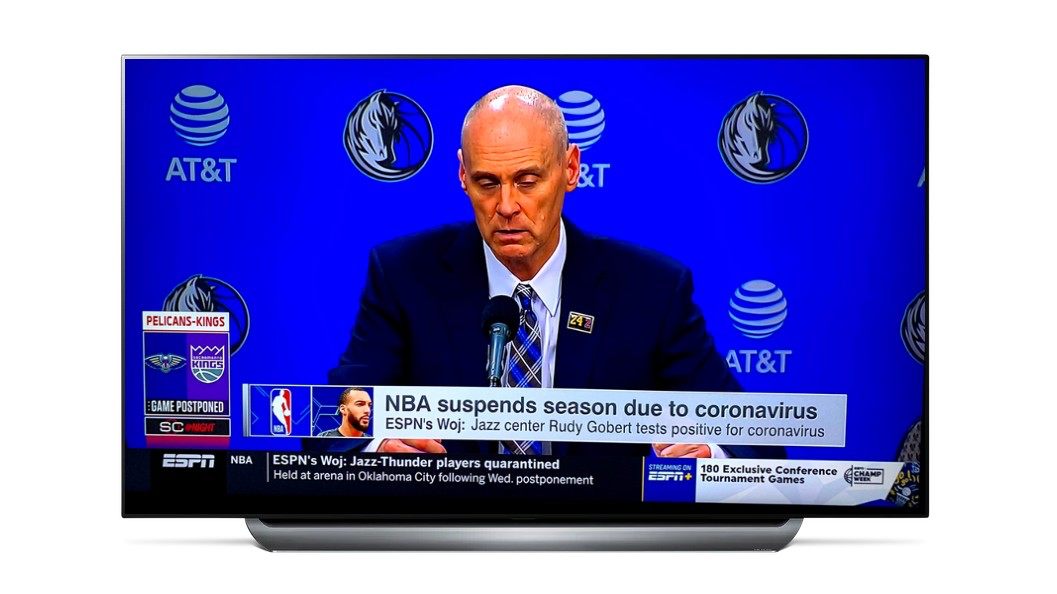
Today is election day in the United States and tonight many people will be glued to their TVs watching election results. You'll likely see lots of lower-thirds graphics. I thought looking at lower-thirds would be a good topic this week.
Lower-Thirds is a text graphic used most commonly on TV news stations. This is usually used to inform the viewer of the speaker or location that they are watching.
Example of a Lower Third
One of the nice things about Final Cut Pro is that you can’t define a default lower third. What this does is any time that you want to use that template your simply type in the shortcut: Control - Shift - T
Final Cut Pro uses the default lower third when you apply the short cut, but it's really easy to change that.
Change the Default Lower Third
- Go to the Title and Generator Sidebar: Option - Command - 1
- Find a tile that you want to apply with the keyboard shortcut. (Note: It doesn't have to be a lower third, it can be any title.)
- Right click on the image and select "Make Default Lower Third"
Jump Cuts
Final Cut Pro has built in Jump Cuts Effects
When you have a long boring scene it might help spice things up by using jump cuts. They seem to be in all the rage with YouTubers. They seem to be very popular with Rebecca Zamolo YouTube Videos.
What Are Jump Cuts
Jump cuts are when you remove a set of frames with the intent to make the scene go quicker. In Final Cut Pro, you have the option to easily skip 3,5,10,20,30 frames. The more frames you remove the bigger the effect it has.
How to apply Jump Cuts
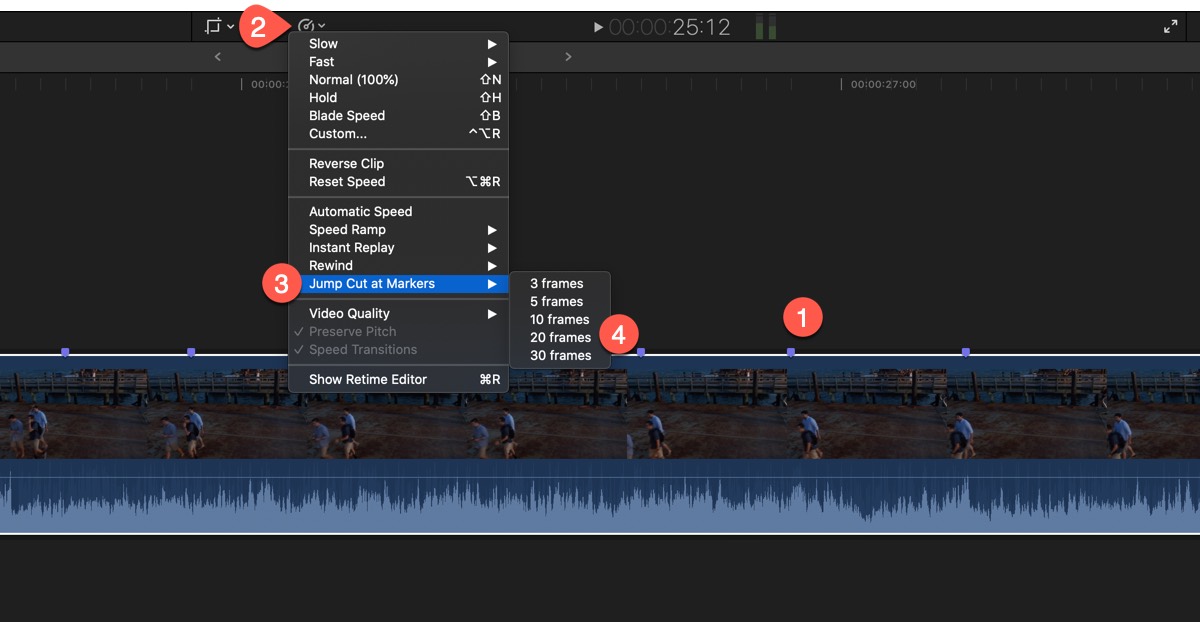
In Final Cut Pro, you define Jump Cuts with markers.
- Simple mark where you want to apply a Jump Cut
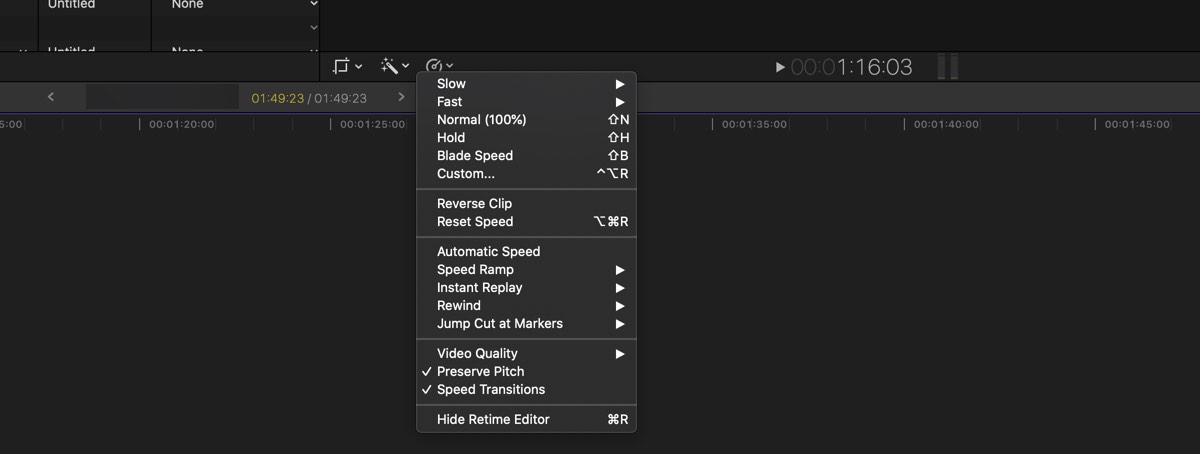
- Select the "Retime" pop-up menu just below the viewer - the icon looks like a dashboard speed gauge. Then go all the way down and select Jump Cut.
- Note: If the Jump Cut option is not available, it is because you didn't select the clip to apply the jump cut to.
- Then select the number of frames to remove. I have found that "20 frames" works best in most cases.
After you apply the Jump Cut, you'll see a green bar on top of the clip, this is the Retime Editor. If you want to add additional Jump Cuts, you still have to follow the above steps. There are no keyboard shortcuts to add Jump Cuts.
PermalinkTransparent Background in PowerPoint
How to make the background in Powerpoint transparent for Final Cut Pro
While Apple makes it easy to create transparent movies from Keynote to Final Cut Pro, it's a bit tricky to get it to work with Microsoft Powerpoint.
Why use Microsoft Powerpoint?
PowerPoint has some unique transitions and effects that are not available in Keynote. If you have Microsoft PowerPoint installed it might be better to use that for some cool effects.
Using PowerPoint or Keynote might be better than using Apple Motion for simple tasks.
How to Export Transparent Background
To get a transparent background in PowerPoint you need to use the green screen effect. There is no way to control the export video type.
Example
This has all the transitions that are available in Microsoft PowerPoint. I used a green background and used the Keyer effect to remove that background in Final Cut Pro. (That’s how you remove the green screen. )
PermalinkTrim Start and End
Cool Shortcut to quickly cut out a clip
A common task that I have to do in Final Cut Pro is trim a clip. Usually, this is to just clean up the tail end of the clip that doesn't make sense to keep for the story, or when I need to end the clip smoothly.
The quick way to get this done is to use the "trim to end" short cut key:

How this Works
When you mouse over a clip in the timeline and use the above short cut, the clip will get trim from the point of the red mouse over and not the white preview line.
If you make a mistake, simply type in Command - Z to undo the last action.
Quick and Easy Tip
Once you start using this a couple of times, you'll see that this is such a time saver. This is so much better than adding a blade and then deleting the section.
PermalinkLower Third Overlay
Comedy Central has a guide on where to place the lower third.
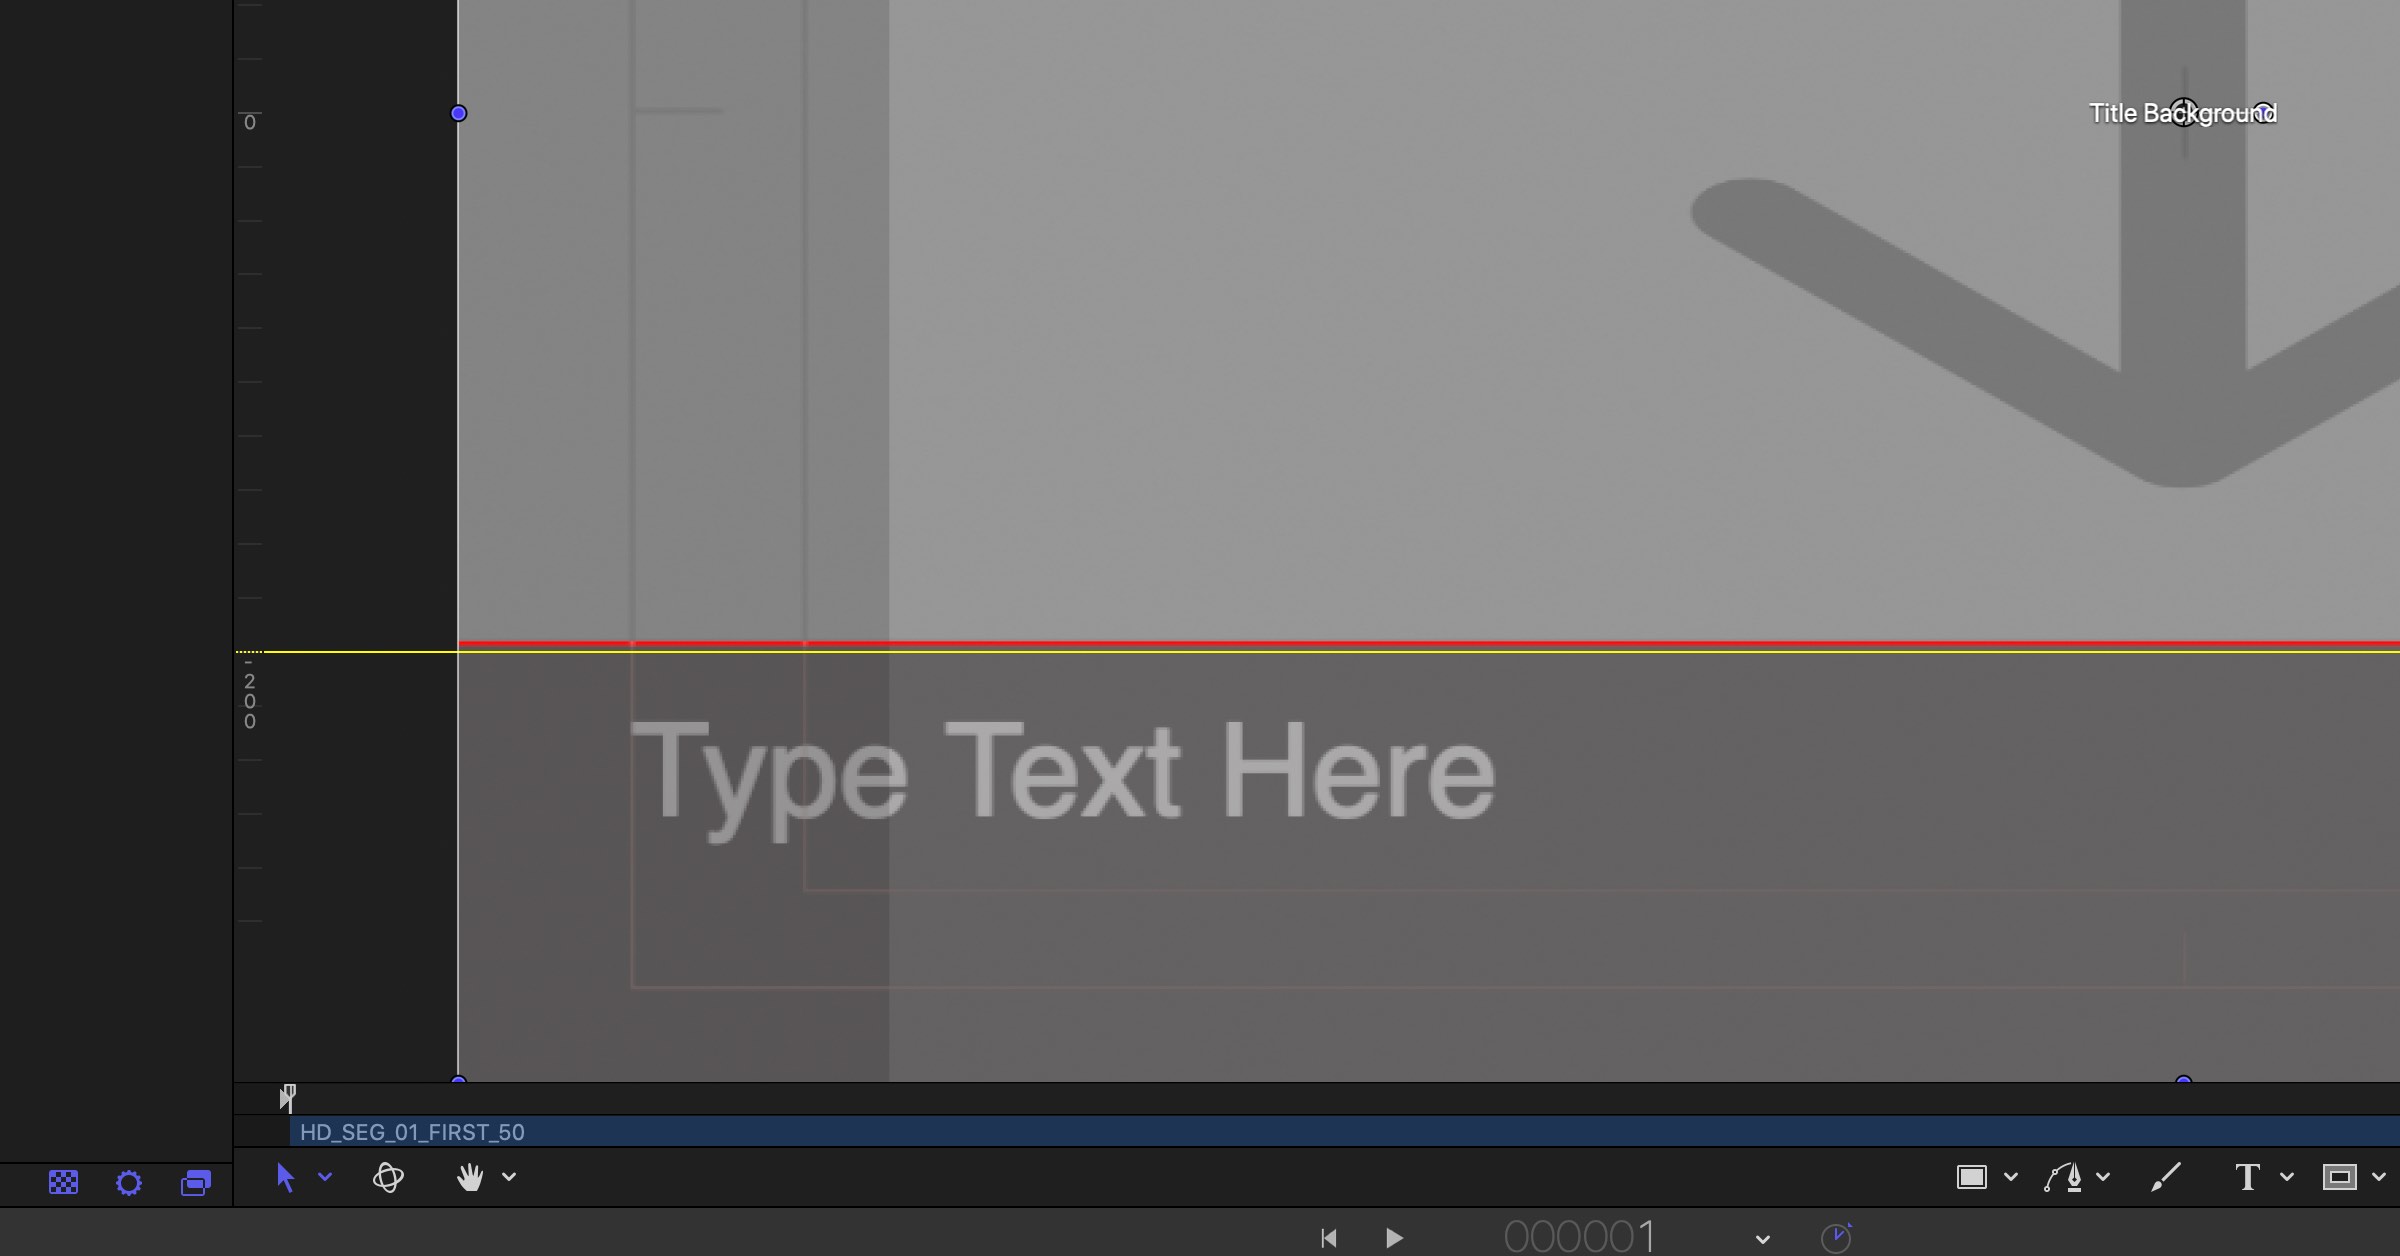
If your building your own lower third from scratch, you may want to have an overlay guide to help you align text correctly.
I found the image overlay on Comedy Central to be very useful to properly laying out the lower third title. The image overlay has a logo placement helps to professionally align a logo on the bottom right of the screen.
Basically you add this image to your Title project and align your lower 3rd correctly. Once you are done simply remove it from your project.
Steps to Add the Overlay in Motion
- Download the file from the Comedy Central's overlays website
- Open up any Final Cut Pro Title Project
- Import the overlay. (You'll see that the overlay fits perfectly into a standard 1920x1080 format.)
- You may need to move the Overlay layer below the text layer.
- Now adjust the text layer so that its below the lower third line.
- Hide the Comedy Central overlay image and continue working as normal.
Don't want to use the guide?
Simply turn on the ruler and look for the 200 on the left side. (See the above screenshot)
PermalinkApple Motion
Apple Motion complements Final Cut Pro
Apple Motion is a powerful motion graphic toll that gives you - the creator - the ability to create Hollywood effects right from you computer. You can create cinematic 2D, 3D titles, fluid transitions, and realistic effects in real-time.
For about $49, you get a lot of power for not a lot of money. One instructor said, that "its highly under price for the capabilities that the application gives you."
There’s still a lot of things for me to learn about Apple Motion. Here are just some of the things that I learned so far.
Five Things I have Learned
- Apple Motion complements Final Cut Pro. They work very well together to help make powerful productive videos. Apple Motion does have a learning curve - just like Final Cut Pro.
- You can edit any Title, Effect and Transition in Final Cut Pro using Apple Motion. It doesn't matter if it came with Final Cut Pro or was purchased separately. Simply right-click on the object and select "Open a copy in Motion." This option is only available if you have Motion installed.
- Apple Motion is the only way you can create favorite titles. So if you like to use certain colors or text styles, you can save them in a custom Category so that you can reuse them over and over again. This is very useful when you won't use the same fonts or colors in all your videos.
- Apple Motion comes with 1,900 Apple-designed, royalty-free graphics. There's a lot of cool things you can do. With great powers come with great responsibility.
- Lynda.com Motion 5.3 Essential Training is a great way to learn about the application. I started learning the power of Motion by editing existing titles. Watching Ian Robinson really has helped me understand the capabilities of Apple Motion.
Color Correction Assistance for Final Cut Pro
Use Photolemure to figure out the color correction.
My Olympus XZ-2 iHS doesn't handle white balance very well. I find that the videos that I take inside the church tend to be darker than the same video taken using the Nikon 5500 and the Sony DSC-HX200v. I am not exactly sure why this camera has problems.
The videos are good, just the colors are dark. They need to be touched up if I want to use the footage - and have the ability to use that camera in future shots.
Color Correction is a bit tricky in Final Cut Pro and I find that the "auto" balance color doesn't always work well.
Photolemur 3 to the Rescue
When I ran into this problem last week, I decided to export a frame of the video and put it through Photolemur 3.
What's Photolemure 3?
Photolemur is an absolutely automatic photo enhancer that uses Artificial Intelligence to apply all the enhancements your image needs, on its own. All you have to do is to import your image to the app, and the photo enhancer does everything else automatically from there.
My theory was to let the artificial intelligence tell me how the image should look. Then I can use the Final Cut Pro color adjuster to get the video to look perfect.
The results:
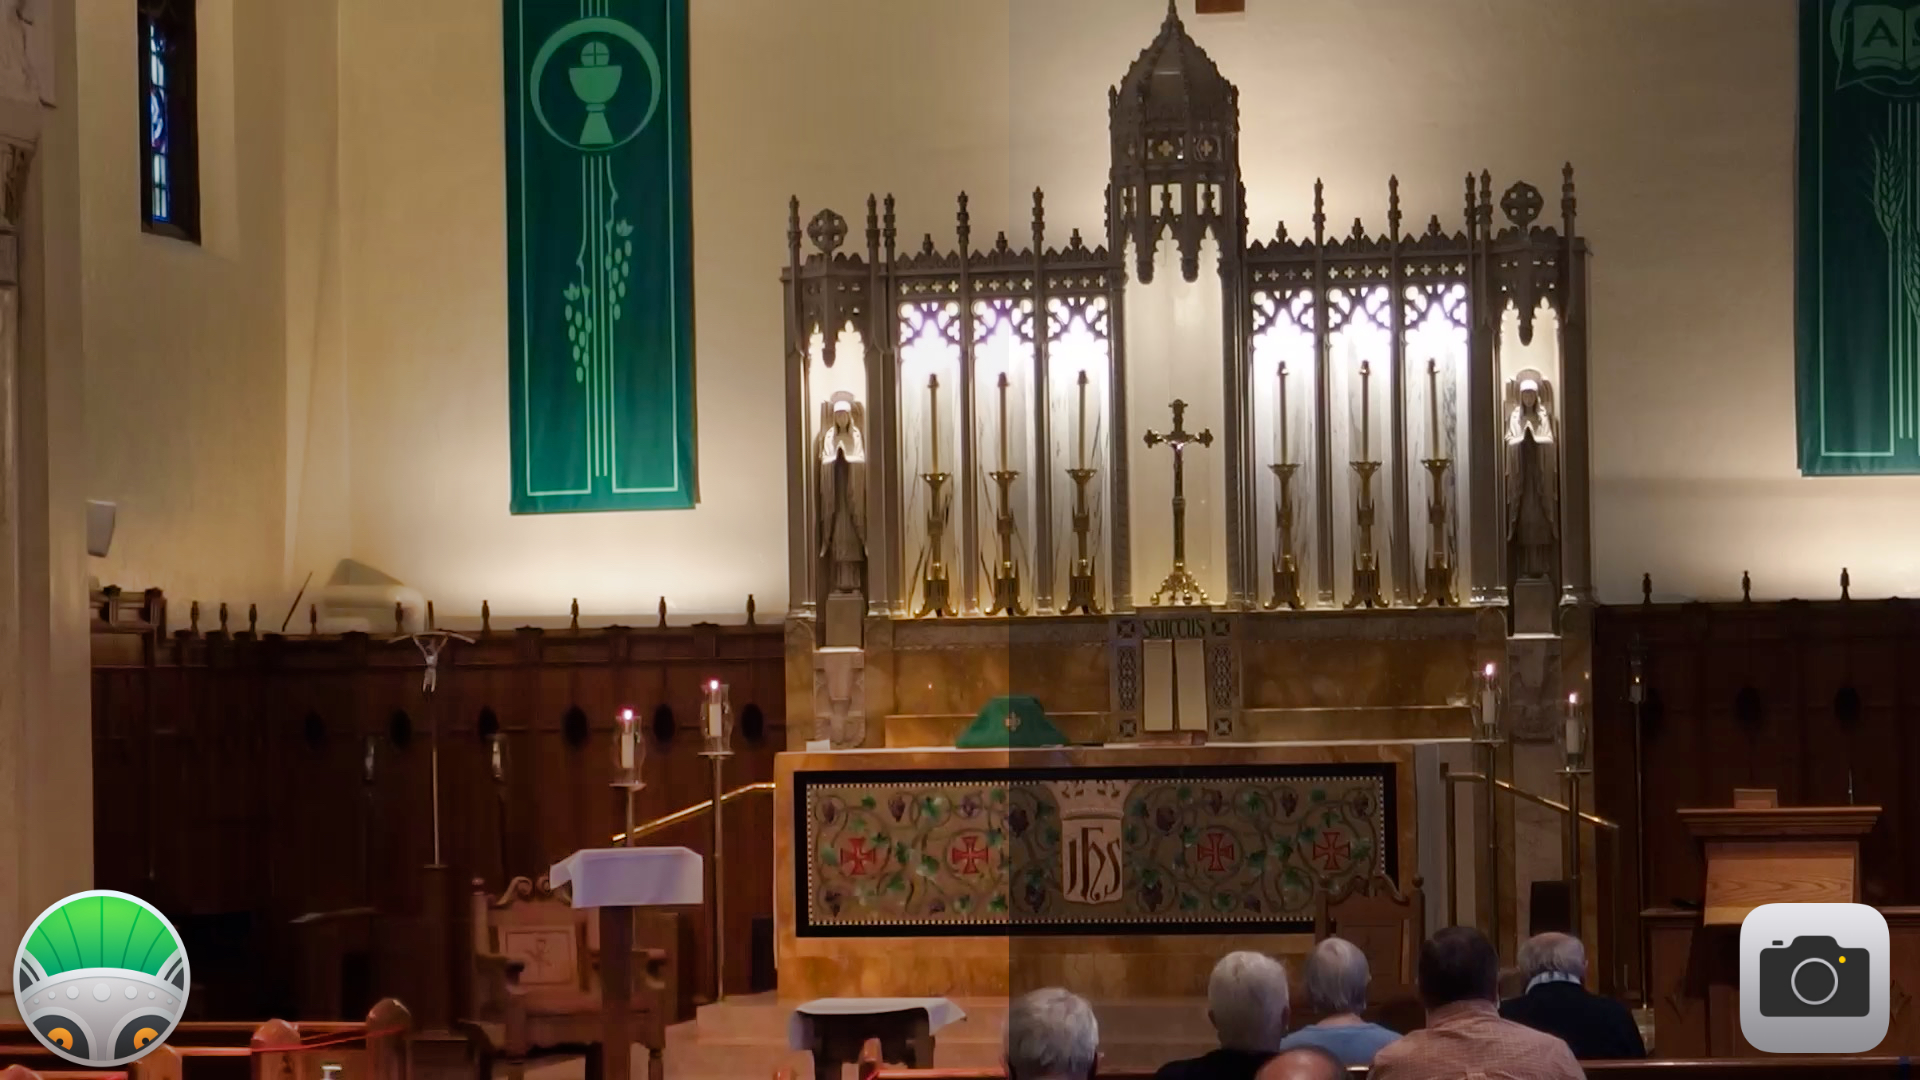
The left side shows Photolemure 3 and the right shows the original image. You can see how the colors on the church's alter stands out in Photolemure than the original photo
When I select the "auto color correction" in Final Cut Pro it doesn't look like the left side.
You can learn all about how to adjust the color in Final Cut Pro in Apple's Use color correction tools in Final Cut Pro X and Motion document
PermalinkAdding Favorites Folders to Import
Add your favorite folder to the Import dialog sidebar
You can easily add your favorite folder to the side menu of the Import dialog box. This will make it easier to connect to common folders that you may frequently use.
For example, it would be useful to put the "Download" folder in the Favorite section.
Apple doesn't really provide clear instructions on how to add folders to the favorite. Not exactly sure why that it.

Steps to add a Folder to the Favorite Section
- Open up the Import dialog.
- Select a folder from the main listing and then drag it to the word "Favorites" in the sidebar.
- When the folder is over the "Favorites" text, the background color of Favorites should change.
- Release the Mouse to add it to the Favorites section.
Unlink from Sidebar
To unlink a folder, simple Control-Click on the item, and a popup menu should appear to "Remove from Sidebar."
Big Brother Watching?
One of the things I noticed was that when I performed the action, the light next to the FaceTime camera went on. I tried this a couple of times with different folders and saw the same results. I used some additional security software and can confirm that the microphone is also enabled.
This happens when you add or remove an item from the favorite sidebar.
What is going on? Why would the simple act of making a folder to a favorite cause the FaceTime camera to snap a picture and the microphone to record the audio?
PermalinkSlow Motion Video
Using the iPhone Slo-Mo videos in Final Cut Pro
Question: When I take Slow Motion videos on my iPhone, how do I take advantage of the features in Final Cut Pro?
Quick Answer: When you put a clip that you know has a higher frame (240 fps), simply click on the clip in the timeline and then set the speed to "Automatic Speed." This will allow you to see the Slo-Mo effect as it was intended on the iPhone.
iPhone Slo-Mo
When you record a Slo-Mo video on the iPhone, the first 3-seconds and last 3-seconds are normal speeds. The remaining time will be at 30% speed.
This is useful to know when recording a Slo-Mo clip. To get the best effect, start recording at least 3-seconds before the event and then stop it at 3-seconds after it's over.
ReTime
The menu "Retime" is short for Real-Time - it gives the Producer the ability to adjust the speed of the selected clip.
The "Automatic Speed" setting keeps the speed as intended on the iPhone.
The ReTime popup menu option is available below the viewer and in the Modify menu.
PermalinkBump Basic Title
Did you know about this Title Effect?
Recently I was looking around at some different text plugins for Final Cut Pro X. I saw one that someone had that blurred out the background and had text in the foreground. The effect made the text stand out and the whole effect took about 8-seconds.
I thought it was a really cool way to present text in front of a video.
I decided against buying it, but bookmarked the website so in the future, I would get it.
It was a good thing that I waited. Turns out there's a built-in effect that works perfectly well for my needs. It's called, "Bump Basic."
Example Video
In this video, the "Worcester Express Train" is using the text effect that I was looking for. This is called "Bump Basic" and located in the Social Category.
Look Around the Text Options
One of the things I learned from this, is to play around more with the text options. I did search for "blur" thinking that it would be under that name.
There are more than 150 built-in titles to choose from. Each one having the ability to change the font style, color, and location on the screen.
PermalinkAbout
This blog series will explore the many different features and tools of Final Cut Pro X. We will cover everything from basic editing techniques to more advanced topics such as color grading and motion graphics. We will also provide tips and tricks to help you get the most out of Final Cut Pro X.
Check out all the blog posts.
Blog Schedule
| Saturday | Internet Tools |
| Sunday | Open Topic |
| Monday | Media Monday |
| Tuesday | QA |
| Wednesday | Veed |
| Thursday | Business |
| Friday | Macintosh |
Other Posts
- Color Wheel
- Split Screen
- Final Cut Duration
- Record USB Cameras in Final Cut Pro
- Getting Live Photos
- White Balance
- Page Curl
- Select Clip Range
- Adding Favorites Folders to Import
- Create a crowd effect in Final Cut Pro
- Best Final Cut Pro Blog Post
- Transparent Background in PowerPoint
- Bright White Background Generator
- Match Color
- Normalizing Audio