
Execute JavaScript in Front Browser
Available in Brave and Edge
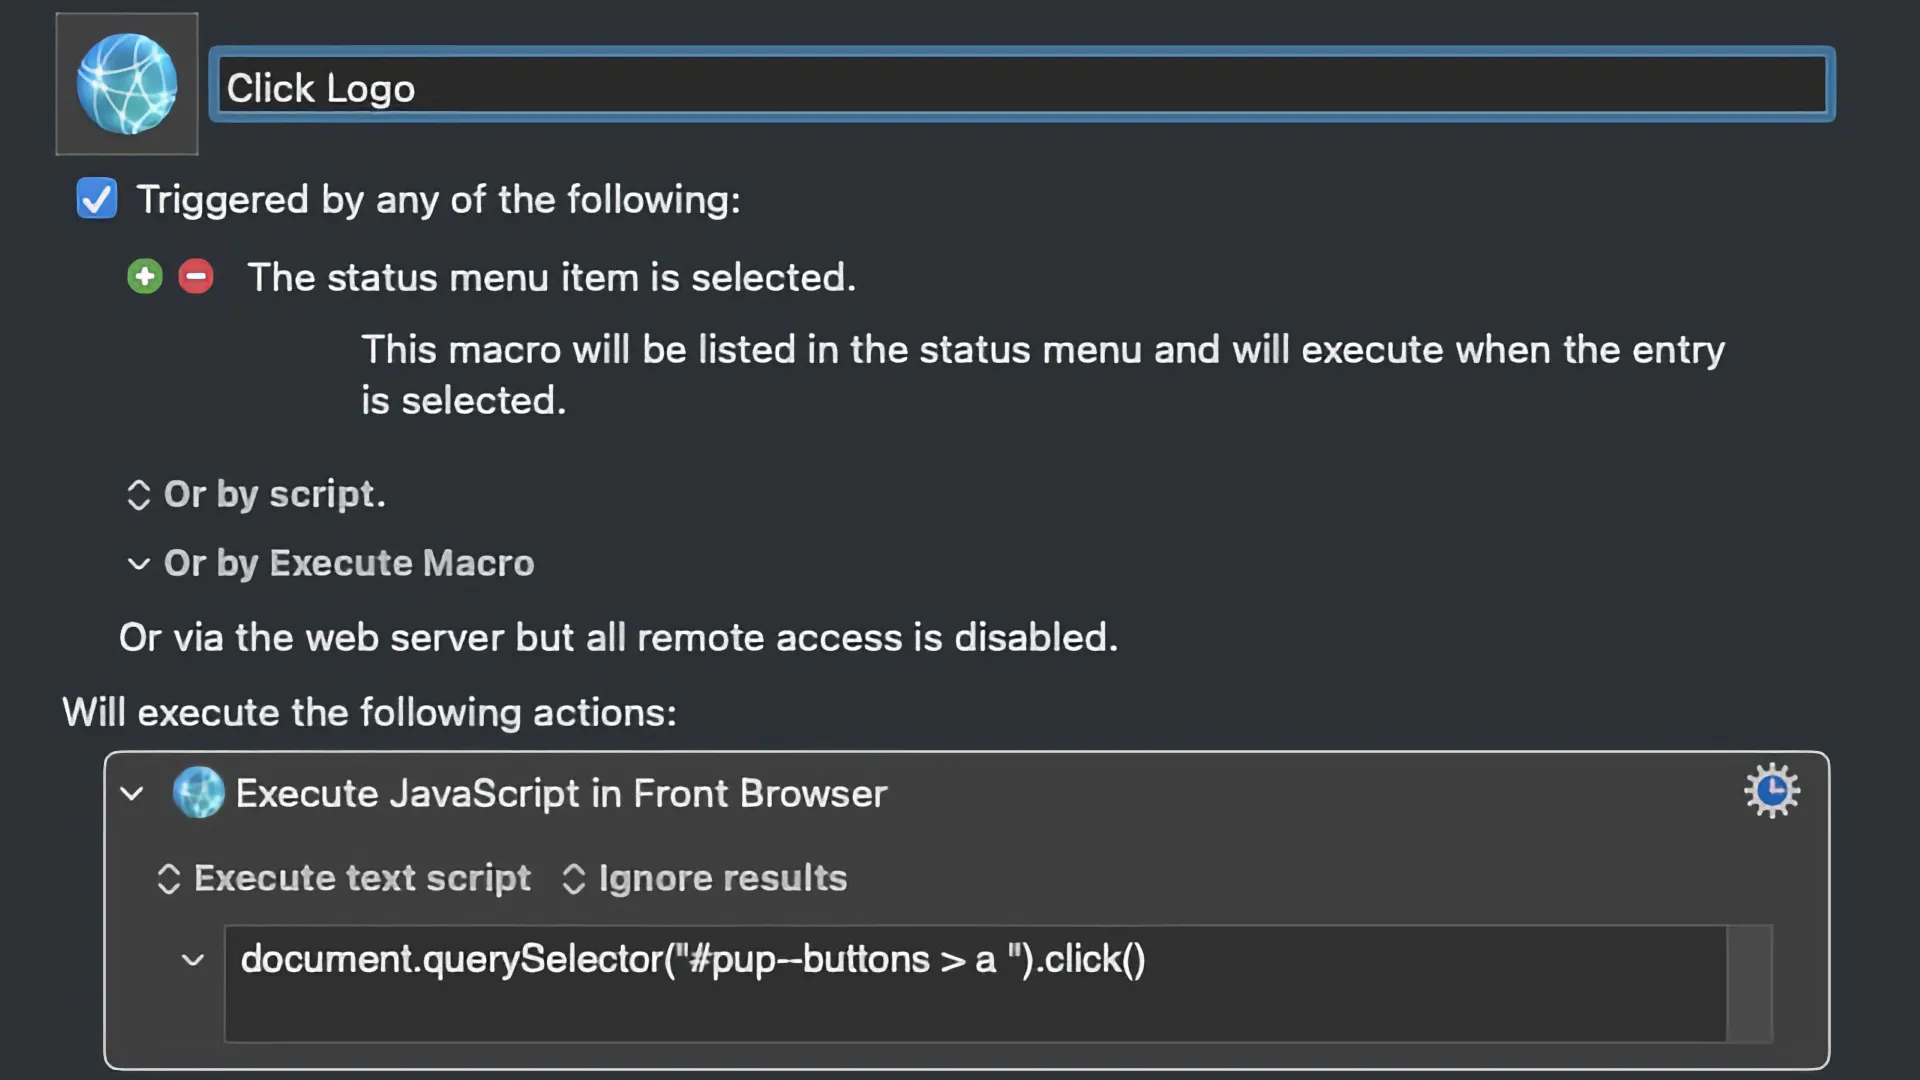
Among its many Keyboard Maestro capabilities, it can execute JavaScript within a web browser, opening up endless possibilities for local-based web-based automation.
Currently, Keyboard Maestro officially supports JavaScript execution in Google Chrome and Safari. However, if you're using Brave or Microsoft Edge as your browser of choice, you'll be pleased to know that these browsers can also be configured to execute JavaScript from Keyboard Maestro macros. Here's how to enable this feature in Brave and Microsoft Edge.
Enabling JavaScript Execution in Brave
To use JavaScript in Keyboard Maestro macros within the Brave browser, you'll need to adjust some developer settings. Follow these steps:
Open Brave Browser: Launch Brave and ensure it's up to date.
Access Developer Settings:
- Navigate to the menu bar and select View > Developer.
- In the developer menu, find and enable Allow JavaScript from Apple Events.
This setting allows Keyboard Maestro to communicate with Brave and execute JavaScript seamlessly.
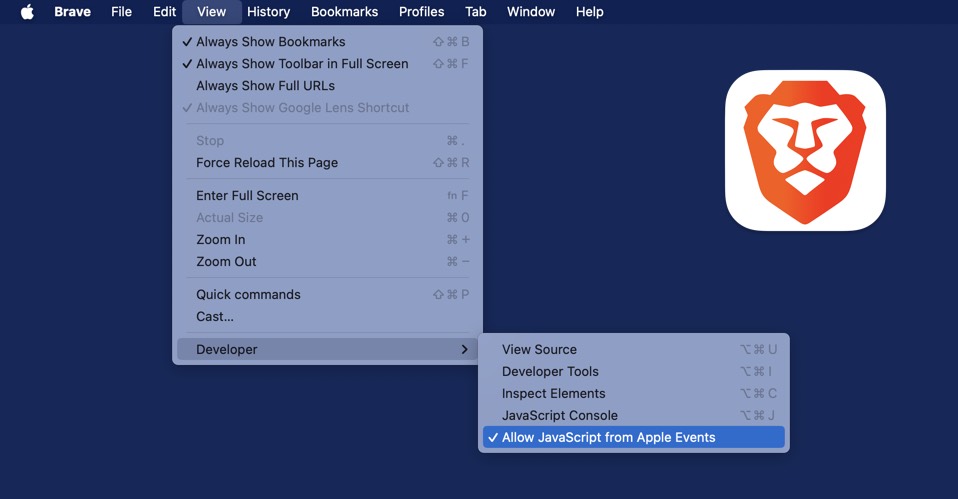
Location of menu item in Brave
Enabling JavaScript Execution in Microsoft Edge
Similarly, you can enable JavaScript execution from Keyboard Maestro macros in Microsoft Edge by adjusting the browser settings:
Open Microsoft Edge: Make sure Microsoft Edge is running and updated to the latest version.
Access Developer Tools:
- Go to the menu bar and select Tools > Tools.
- In the tools menu, check Allow JavaScript from Apple Events.
Once this is enabled, you can use Keyboard Maestro to run JavaScript in Microsoft Edge just as easily as you would in Chrome or Safari.
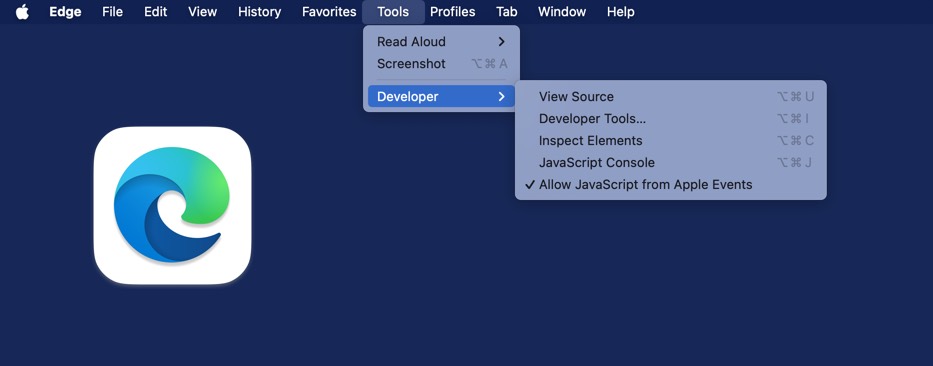
Location of menu items in Edge
Example Use Cases
With JavaScript execution enabled in Brave and Microsoft Edge, you can create powerful macros for various tasks:
- Automated Form Filling: Write a script that inputs repetitive data into online forms.
- Web Scraping: Gather information from websites for analysis or reporting.
- UI Interactions: Simulate clicks, scrolls, and other interactions to automate web-based workflows.
Conclusion
By extending JavaScript support to Brave and Microsoft Edge, Keyboard Maestro becomes an even more powerful tool for web automation. Whether you're filling out forms, scraping data, or controlling web-based applications, enabling JavaScript execution in these browsers allows you to streamline and enhance your workflows. Happy automating!
By following these steps, you can ensure a seamless integration of JavaScript execution in your preferred browser using Keyboard Maestro. Whether you're an avid user of Brave, Microsoft Edge, or any other browser, Keyboard Maestro's versatility has got you covered.
PermalinkName Clipboard Switcher
Better than Favorites in Clipboard History
In the fast-paced world of software development, design, and content creation, efficiency is key. One of the most underutilized tools in a power user's arsenal is Keyboard Maestro's Name Clipboard Switcher, a feature that can revolutionize the way you work.
Farewell to Cluttered Clipboard History
The traditional clipboard history is a useful feature, but it can quickly become cluttered with a myriad of copied snippets, making it challenging to find the specific information you need. This is where Keyboard Maestro's Name Clipboard Switcher shines.
Curate Your Snippets with Ease
With the Name Clipboard Switcher, you can create and organize your commonly used snippets, such as:
- Website form field information
- Company logos
- Graphic stamps for screenshot overlays
- Code snippets
- Boilerplate text
- And more!
By categorizing and labeling your snippets, you can easily access the right information at the right time, without sifting through a sea of unrelated clipboard entries.
Streamline Your Workflow
Imagine the time saved when you no longer have to remember where you stored that crucial company logo or search through your clipboard history for the right address to input. With the Name Clipboard Switcher, your most-used snippets are just a few keystrokes away.
Unleash the Power of Automation
But the benefits of the Name Clipboard Switcher go beyond just quick access to your snippets. By integrating it into your Keyboard Maestro workflows, you can automate repetitive tasks, further streamlining your productivity.
For example, you could create a macro that automatically inserts the appropriate contact information or logo when you're composing an email or creating a presentation. The possibilities are endless, limited only by your imagination.
Elevate Your Efficiency
Whether you're a software tester, graphic designer, or content creator, the Name Clipboard Switcher can be a game-changer. By curating your frequently used snippets and integrating them into your daily workflow, you'll free up valuable time and mental energy, allowing you to focus on the more important aspects of your work.
Start Optimizing Your Workflow Today
Ready to take your productivity to the next level? Dive into Keyboard Maestro's Name Clipboard Switcher and start customizing your snippets. You'll be amazed at how much time and frustration you can save, leaving you more time to tackle your most challenging and rewarding tasks.
PermalinkCapturing Your Workspace with Keyboard Maestro Before Sleep
Remember Your Desktop
In the fast-paced world of technology, efficiency is key, and one of the most powerful tools to enhance your workflow on macOS is Keyboard Maestro. This incredible automation tool allows you to create Macros that simplify your daily tasks, saving you time and energy. Today, we'll explore a practical macro that captures a screenshot of your workspace before your Mac goes to sleep?ensuring you know exactly what files and windows were open when you left off.
Why Capture a Screenshot Before Sleep?
We've all been there: your Mac goes to sleep, and when you wake it up, you're trying to remember what you were working on. Maybe you had important documents open, or perhaps you were in the middle of a creative project. Capturing a screenshot before your Mac sleeps provides a visual reference, helping you pick up exactly where you left off.
Setting Up the Macro
Let's walk through creating this handy macro in Keyboard Maestro.
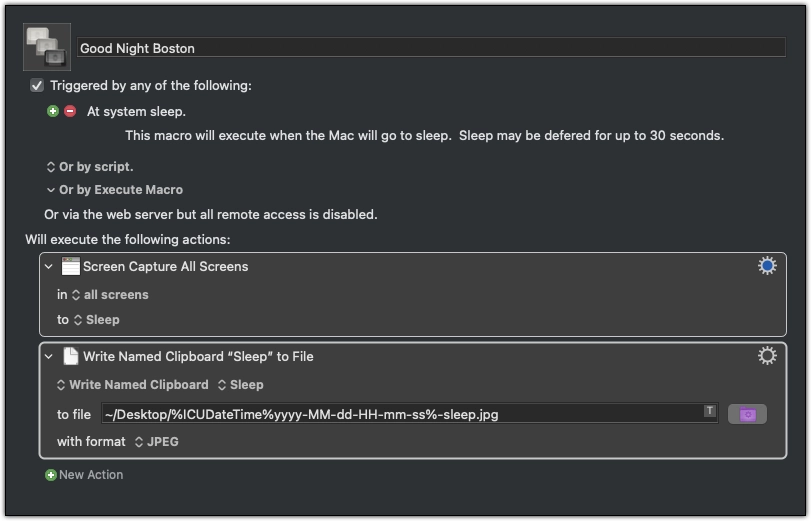
Create a New Macro: Start by opening Keyboard Maestro and creating a new macro. You can name it something like "Good Night Boston."
Add a Trigger: We'll use the "Sleep" trigger for this macro, which activates when your Mac is about to go to sleep. To do this, click on the New Trigger button and select "At System Sleep" from the available triggers.
Capture the Screenshot: Next, add an action to take a screenshot. Click on New Action and search for "Screen Capture All Screens". Select "All Screen" and choose whether you want to capture the entire screen or a specific area.
Save to Named Clipboard: After capturing the screenshot, you'll want to save it to a Named Clipboard for easy access later. Select a new Named Clipboard. This is useful in case the file didn't get saved or you wanted to access the screenshot later.
Save the Screenshot to a File: To ensure you have a physical copy of the screenshot, add one more action to save it as a file. Choose "Write Named Clipboard to File" and set the destination: ~/Desktop/%ICUDateTime%yyyy-MM-dd-HH-mm-ss%-sleep.jpg
Macro Screenshot
Encouragement: Be the Champion of Your Mac
With this macro in place, you've taken another step toward mastering your Mac. Small automations like these empower you to be more organized, more efficient, and ultimately, more in control of your workflow. Remember, every time you create a new macro, you're not just saving time - you're becoming a true champion of your computer.
So, go ahead, set up this macro today, and experience the difference it makes in your daily routine. Your Mac is a powerful tool, and with Keyboard Maestro, you're making the most of it!
Feel free to customize the macro to suit your needs, and as always, keep exploring the endless possibilities that Keyboard Maestro offers. Happy automating!
PermalinkA Revisit to Trigger Macro by Name
Six Years later
Six years ago, I wrote about Keyboard Maestro's Trigger Macro by Name feature, which is a powerful tool for quickly accessing and managing your macros. Given its importance and continued relevance, I decided to revisit this topic for this week's Keyboard Maestro post. If you're interested in my original post from August 7, 2018, you can check it out here. Today, I want to delve deeper into how this feature has evolved, what makes it indispensable, and some insights I've gained over the years.
What is Trigger Macro by Name?
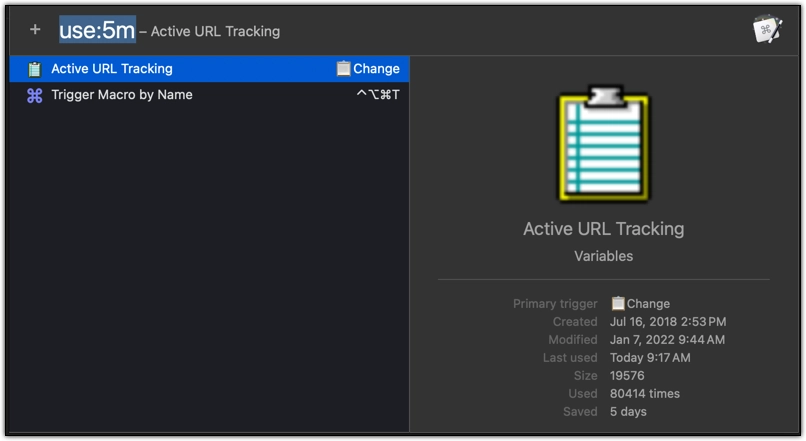
Trigger Macro by Name is a versatile feature in Keyboard Maestro that allows users to search for and execute macros without needing to remember their exact trigger action. This can be incredibly useful, especially when dealing with a large collection of macros where recalling specific triggers isn't feasible. Additionally, it serves as a perfect solution for macros that don't have a set trigger action. By simply typing a portion of the macro's name, you can quickly locate and execute the desired macro.
Four Things I Have Learned
Over the past six years, I've discovered several nuances and techniques that make Trigger Macro by Name even more effective. Here are four key insights I've gained:
1. Useful Information at a Glance
One of the great features of Trigger Macro by Name is the ability to see detailed information about a macro when you select it. This includes data on how often each macro is used, which is particularly helpful for identifying which macros are most critical to your workflow. If you have several macros with similar names or functions, this usage statistic can guide you in choosing the macro that truly matters most to you.
Pro Tip: Regularly review your most frequently used macros. It can provide insights into your habits and areas where automation could be further enhanced or refined.
2. Managing Similar Macros
When dealing with macros that have overlapping purposes or names, it can be challenging to remember which one is the most effective. With the usage data provided by Trigger Macro by Name, you can easily distinguish between similar macros and decide which one best suits your current needs.
For example, if you have multiple macros for formatting text, such as bold, italicize, and underline, knowing which one you rely on most frequently can streamline your editing process. This awareness helps in optimizing and potentially consolidating your macro library to avoid redundancy.
3. Quick Editing with Option-Return
Sometimes a macro doesn't function as intended, or you may need to tweak it to better fit your current project. With Trigger Macro by Name, you can easily access the editing interface of any macro. Simply select the macro you want to modify and press Option-Return. This action will open Keyboard Maestro directly to that specific macro, allowing you to make adjustments without hassle.
Pro Tip: This quick access feature is a lifesaver when debugging or refining macros. If a macro fails to execute correctly, using Trigger Macro by Name lets you find the macro in question, view recent attempts, and seamlessly transition to editing mode.
4. Creating Multiple Trigger Macro by Name Actions
A lesser-known feature is the ability to create multiple Trigger Macro by Name actions. This is particularly beneficial if you want to have a set of macros with different search parameters or if you desire varied trigger actions for specific workflows.
By assigning different triggers to Trigger Macro by Name, you can tailor your macro search experience. For instance, you might have a set dedicated to work-related macros and another for personal projects, each accessible with unique hotkeys.
Pro Tip: Organize your macros into categories and use multiple Trigger Macro by Name actions to swiftly navigate between these categories. This can dramatically increase your efficiency, especially if you work in diverse environments requiring distinct sets of macros.
Why Revisit Trigger Macro by Name?
Revisiting Trigger Macro by Name after six years offers a fresh perspective on its capabilities and ongoing value. As our digital lives grow more complex, the need for efficient tools like Keyboard Maestro becomes ever more crucial. This feature remains a cornerstone for users seeking to automate and optimize their workflows effectively.
By understanding and leveraging the full potential of Trigger Macro by Name, you can ensure that your macros are always just a keystroke away, empowering you to work smarter and more efficiently.
Conclusion
Keyboard Maestro's Trigger Macro by Name continues to be an essential tool in my daily workflow. Its ability to quickly locate and execute macros, provide insightful usage data, and offer editing convenience makes it indispensable for anyone looking to enhance their productivity.
As you explore this feature, I encourage you to consider how it can be tailored to fit your unique needs. Whether you're a seasoned Keyboard Maestro user or just beginning your automation journey, Trigger Macro by Name is a feature that should not be overlooked.
Feel free to share your experiences and tips in the comments below, and let's continue to explore the vast potential of Keyboard Maestro together!
I hope this post offers valuable insights into the Trigger Macro by Name feature in Keyboard Maestro. If you have any questions or need further information, please let me know!
PermalinkNewly Added Macros Smart Group
How to Find Your Recently Created Macros
Keyboard Maestro is a powerful tool for automating tasks on your Mac, but with its potential comes a growing library of macros. To help you keep track of your latest creations, let's create a Smart Group to highlight "Newly Added Macros."
Understanding Smart Groups
Before we dive in, let's quickly recap what Smart Groups are in Keyboard Maestro. Essentially, they're dynamic groups of macros that automatically update based on specific criteria. This is where the "cre:" search string comes in handy.
Creating the "Newly Added Macros" Smart Group
- Open Keyboard Maestro.
- Navigate to the Groups section.
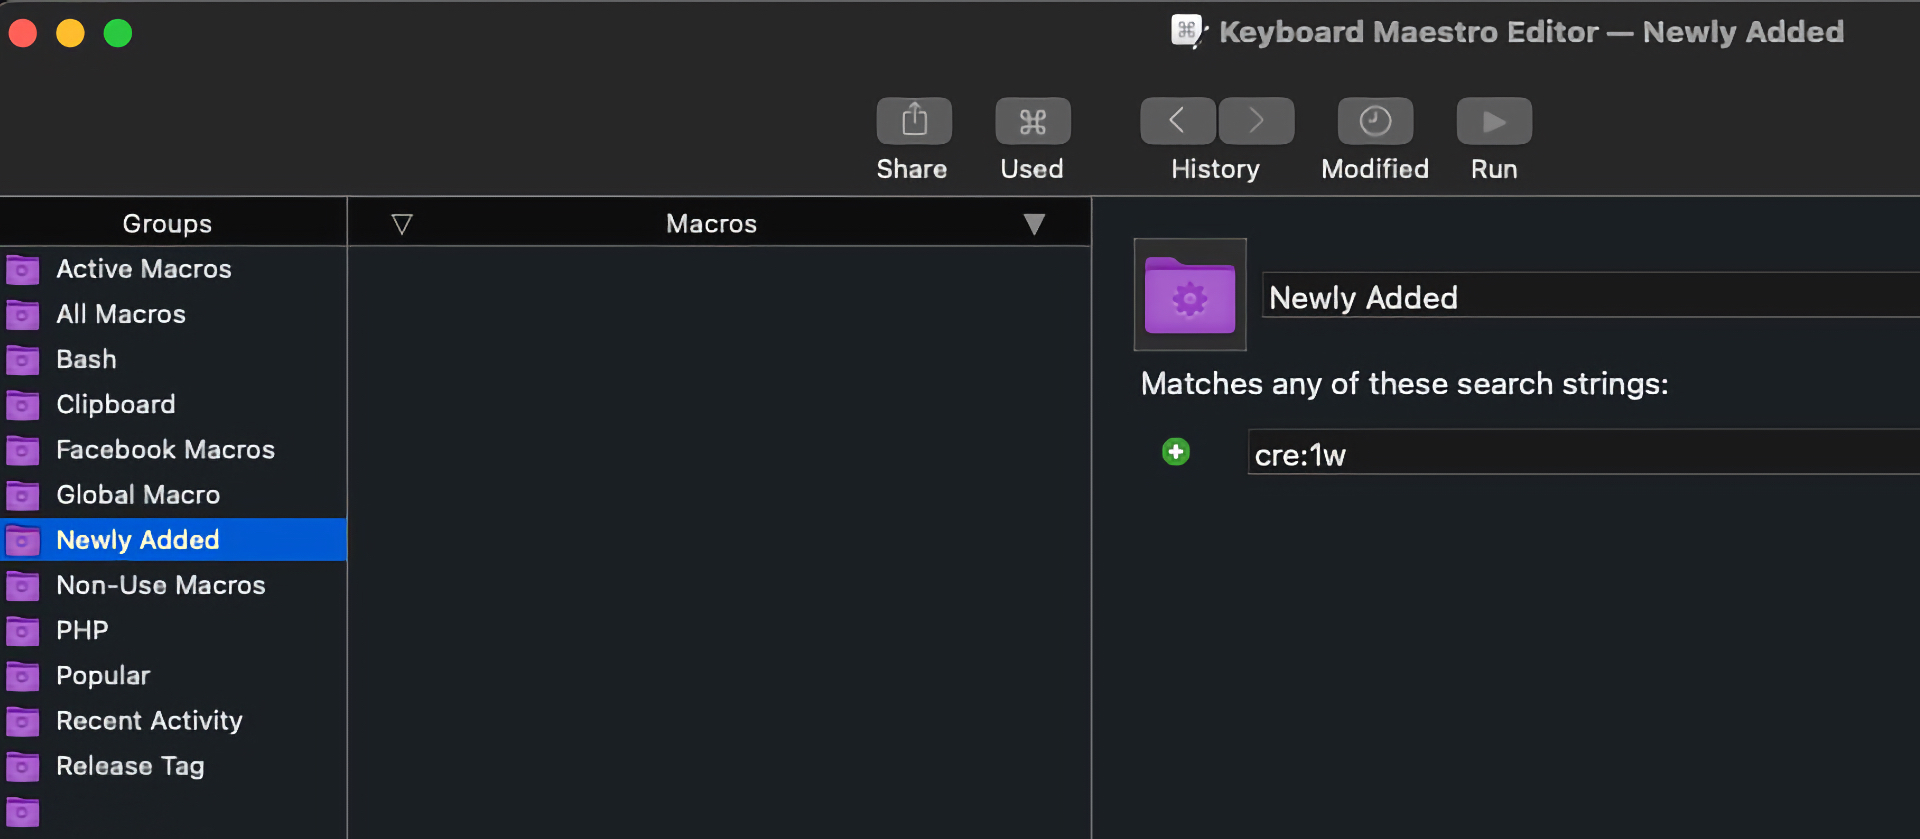
- Click the Cog button at the bottom of the Groups column to create a new Smart Group.
- Name the group "Newly Added" or any name you prefer.
Defining the Search Criteria
Now, it's time to set up the search criteria for your Smart Group. This is where the "cre:" search string will be used.
- In the Smart Group editor, in the search field, type
cre: a week. This will include any macro created within the last week. You can adjust the time period as needed (e.g., "cre: 3 days" for macros created in the last three days).
Using Your New Smart Group
Your "Newly Added Macros" Smart Group will now automatically populate with any macros created within the specified timeframe. This is a great way to:
- Quickly reference new keystrokes: Often, the hardest part of creating a new macro is remembering the trigger. This Smart Group makes it easy to see what you've created recently.
- Review new automation: Use this group to evaluate the effectiveness of your new macros and make adjustments as needed.
- Identify potential conflicts: Checking your newly added macros can help prevent conflicts with existing ones.
Additional Tips
- Experiment with different timeframes: Depending on your macro creation frequency, you might find different timeframes more useful.
- Combine search criteria: You can use additional search strings to further refine your Smart Group (e.g., "cre: a week and tag: Automation").
- Create multiple Smart Groups: Consider creating Smart Groups for different categories of macros (e.g., "Newly Added Utilities," "Newly Added System") for better organization.
By leveraging Smart Groups and the "cre:" search string, you can efficiently manage your growing Keyboard Maestro library and ensure that your latest creations are always within reach.
PermalinkOvercoming Visual Studio Code Snippet Limitations
Keyboard Maestro is the way to go

Visual Studio Code (VS Code) is a popular Integrated Development Environment (IDE) favored by developers for its flexibility, performance, and extensive customization options. One of the standout features of VS Code is its ability to create and use code snippets. These snippets can significantly boost productivity by allowing developers to quickly insert frequently used code templates, thereby reducing the need for repetitive typing.
However, despite the power and convenience offered by VS Code snippets, there are certain limitations that can restrict their effectiveness. This is where Keyboard Maestro, a powerful macOS automation tool, comes into play. In this blog post, we'll explore how Keyboard Maestro can be used to overcome some of these limitations, allowing you to create a more efficient and customized coding experience.
Limitations of Visual Studio Code Snippets
Before diving into the solutions, let's take a closer look at some of the key limitations of VS Code snippets:
Lack of Logic Execution:
VS Code snippets are primarily static text templates. They don't support executing logic or running scripts as part of the snippet expansion. This can be a limitation when you need to generate code dynamically based on certain conditions or calculations.Limited Trigger Options:
Snippets in VS Code can only be triggered by typing specific prefixes, which might not be the most efficient method for all use cases. For instance, you might want to trigger a snippet based on specific UI events or keystrokes.No Interaction with Other Applications:
VS Code snippets can't interact with other applications or system-level features. This means you're limited to the capabilities within the editor and can't leverage macOS-specific functionalities or tools.Dynamic Content Insertion:
Snippets don't allow for dynamic content, such as inserting the current date, user input, or file names, unless manually programmed within the snippet.Complex Snippet Structure:
Complex snippet structures, like multi-line or nested code blocks with various levels of indentation, can be cumbersome to create and manage.
Why Use Keyboard Maestro?
Keyboard Maestro is a robust automation tool for macOS that allows you to create macros to automate tasks across various applications. It excels in situations where traditional shortcuts and snippets fall short. Here are some reasons why Keyboard Maestro can be an excellent complement to VS Code snippets:
Conditional Logic:
Keyboard Maestro can execute complex scripts and logical operations, allowing for dynamic code generation based on conditions or user input.Custom Triggers:
You can trigger macros using a wide range of inputs, including specific keystrokes, mouse clicks, or even system events, providing more flexibility than VS Code's snippet triggers.Inter-application Automation:
Keyboard Maestro can interact with other applications and system features, enabling cross-application workflows that aren't possible with VS Code snippets alone.Dynamic Content and Variables:
Easily insert dynamic content like dates, file names, or clipboard contents into your code with the help of variables and conditions.Complex Code Structures:
Automate the insertion of complex, multi-line code structures without worrying about formatting issues.
Setting Up Keyboard Maestro with Visual Studio Code
Now that we've covered why Keyboard Maestro is beneficial, let's explore how you can set it up to enhance your VS Code experience. Here's a step-by-step guide:
Step 1: Install Keyboard Maestro
If you haven't already, download and install Keyboard Maestro from the official website. Once installed, open the application to start creating your macros.
Step 2: Create a New Macro
- Open Keyboard Maestro and click on the + button at the bottom-left corner to create a new macro.
- Give your macro a descriptive name, such as "Insert Timestamp in VS Code."
Step 3: Set a Trigger
- Click on the "New Trigger" dropdown.
- Choose the desired trigger type. For instance, you might select "Hot Key Trigger" to assign a specific key combination.
Step 4: Add Actions
This is where the magic happens. You can add multiple actions to create complex workflows.
PermalinkUnleash the Power of Your Clipboard with Keyboard Maestro's Clipboard History Switcher
Powerful Tools
Ever copied something and wished you could analyze it before pasting? Struggling to remember that specific piece of text you copied a while back? Keyboard Maestro's Clipboard History Switcher comes to the rescue, offering a treasure trove of information about your clipboard contents.
More Than Just Pasting: A Peek into Your Clipboard
Sure, the Clipboard History Switcher lets you select and paste previous clipboard items, but that's just the tip of the iceberg. When you activate the switcher (by default, with the Command-Control-Shift-V shortcut), you're presented with a window displaying your clipboard history. But here's the real kicker: for each text snippet, the Clipboard History Switcher provides a wealth of metadata:
- Character Count: Instantly see the exact number of characters in your copied text. This is perfect for adhering to character limits in forms, social media posts, or code snippets.
- Word Count: Need a quick word count? No problem! The switcher displays the number of words, giving you a sense of the text's length.
- Line Count: Working with text that spans multiple lines? The switcher shows the line count, helping you visualize the structure of your copied content.
- Clipboard Size: Ever wondered how much space that copied image or text is taking up? The switcher displays the clipboard size, giving you a heads-up on potential memory usage.

Making Informed Pasting Decisions
This information empowers you to make informed decisions about what to paste. Imagine copying a lengthy passage and needing just a specific excerpt. With the character and word count displayed, you can quickly identify the relevant section without manually counting.
Similarly, the line count helps you understand the structure of copied code or formatted text, allowing you to paste it seamlessly into your target destination.
Keyboard Maestro: Your Clipboard Management Powerhouse
The Clipboard History Switcher is just one aspect of Keyboard Maestro's robust clipboard management features. This automation powerhouse lets you not only manage your clipboard history but also manipulate clipboard content in various ways.
So next time you copy something, don't just paste blindly. Use Keyboard Maestro's Clipboard History Switcher to gain valuable insights into your clipboard contents and make informed pasting decisions. It's a simple yet powerful tool that can streamline your workflow and boost your productivity.
PermalinkDisplay Month Name
Quickly type out any month name
Boost your typing efficiency with Keyboard Maestro! No more wasting time spelling out month names. This handy macro automatically inserts the current month's full name whenever you activate it.
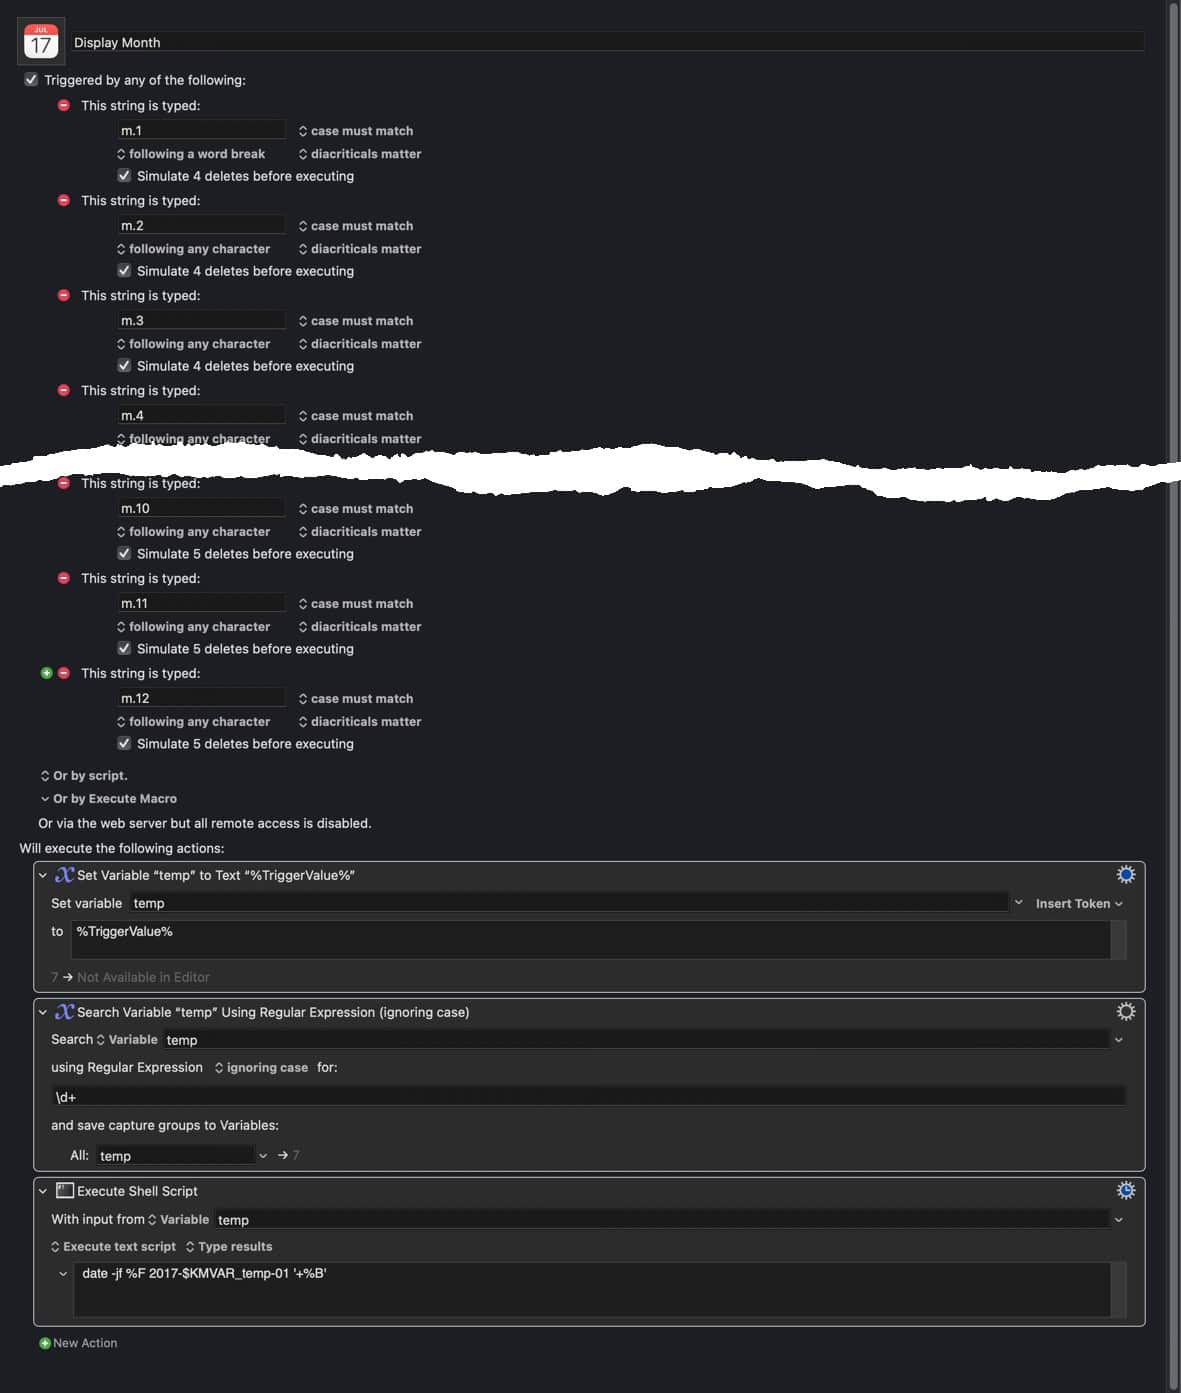
Here's my Display Month Name Macro:
Four Things To Note:
In this Macro, I use multiple shortcuts to execute the same Macro. 1 through 12 -> I type in the m. and then the month that I want to display and then a space.
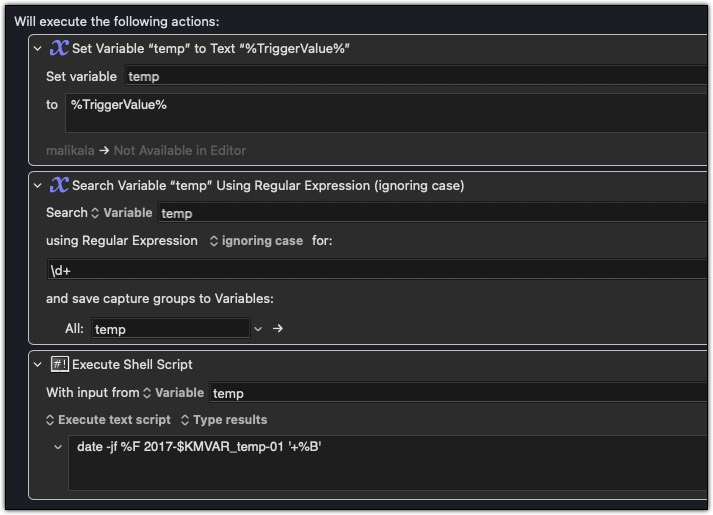
The Macro set the Trigger value (m.6) to a variable, then GREP the Trigger name for the month. So I just get the number.
Then I use UNIX date/time command to get the full month name. (You may notice that 2017 in the year, that doesn't matter.)
The resulting text is typed out.
In Summary
I can easily change the month name format by changing the last command and it will impact all the macro shortcuts - no need to repeat the tast multiple time.
Keyboard Maestro offers a wide range of automation tools to streamline your workflow. This is just a small example of its capabilities. Explore Keyboard Maestro to discover how it can save you time and effort on repetitive tasks.
PermalinkMultiple Words List (Python)
Sample Shell Script in Keyboard Maestro
As part of my testing process, I occasionally require a list of words. To facilitate this, I developed a Keyboard Maestro macro that generates a list of 10 random words. Previously, I had crafted a similar script in PHP, but I've recently updated it to Python 3.
While I didn't observe any performance enhancements between the PHP and Python shell scripts, I did notice a quicker display of results when utilizing the 'Paste Results' feature.
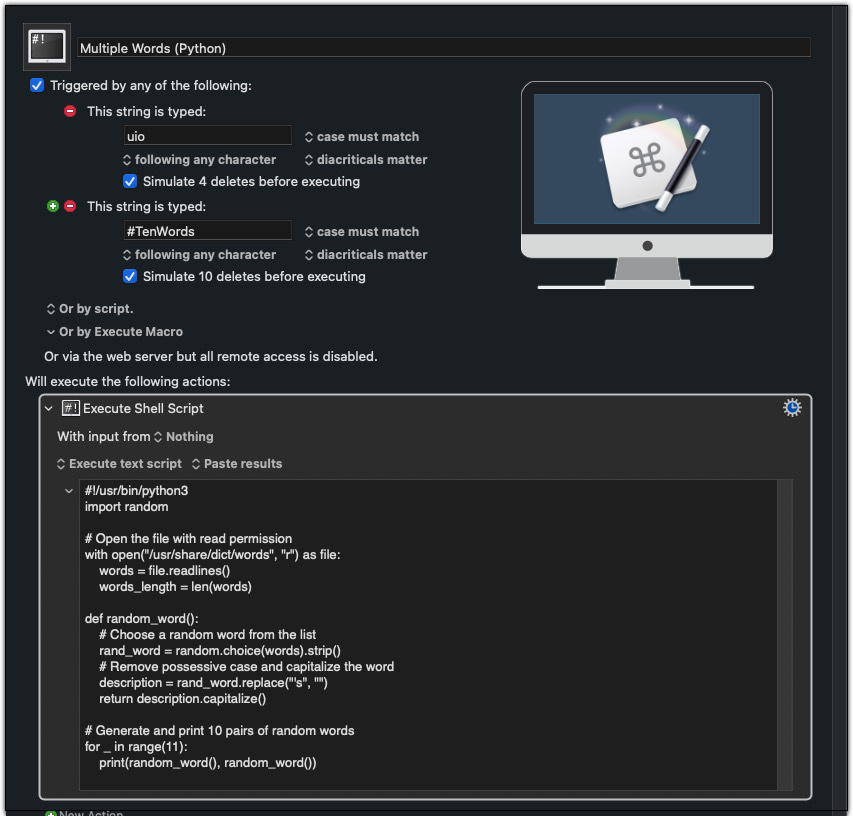
Sample Macro
Python Code
#!/usr/bin/python3
import random
# Open the file with read permission
with open("/usr/share/dict/words", "r") as file:
    words = file.readlines()
    words_length = len(words)
def random_word():
    # Choose a random word from the list
    rand_word = random.choice(words).strip()
    # Remove possessive case and capitalize the word
    description = rand_word.replace("'s", "")
    return description.capitalize()
# Generate and print 10 pairs of random words
for _ in range(11):
    print(random_word(), random_word())
One More Thing
You'll notice that I have two different shortcuts assigned to this macro. This is a neat feature of Keyboard Maestro. You can assign multiple shortcuts to perform the same action. Useful when you may know the shortcut as different things in different projects.
Next week, I'll show you a cool way to take advantage of using multiple shortcuts for the same macro.
PermalinkParse Domain in URL
Sample Parse Functionality in Keyboard Maestro
This is a "basic" macro in Keyboard Maestro to split the URL of a new copy text in the Clipboard. This piece of code demonstrates that you don't have to trigger an action in Keyboard Maestro.
In this example the macro is triggered when a URL is pasted in the clipboard. Keyboard Maestro automatically parses the Domain name in the background.
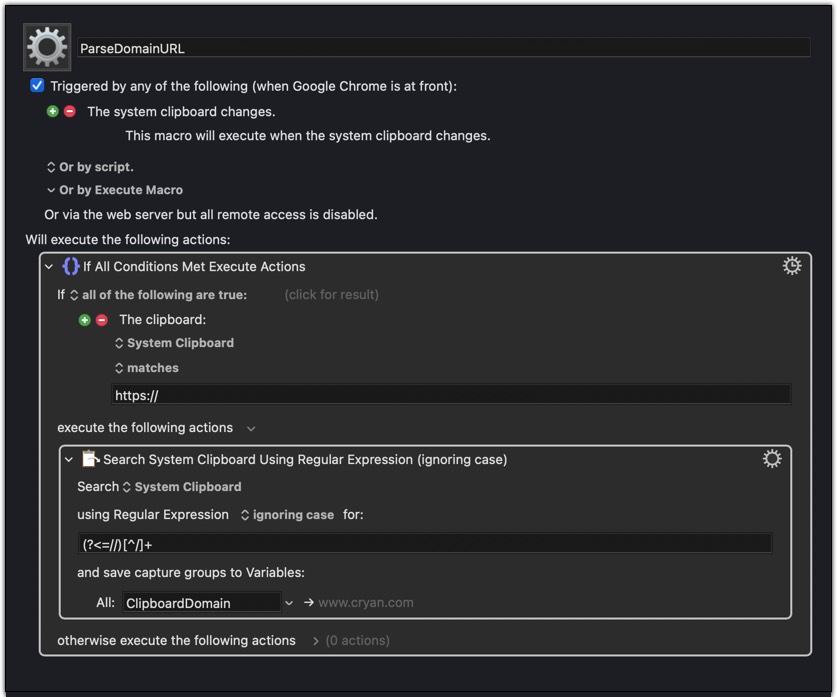
You can change this up to create a hyperlink to this URL or strip everything to the right of the domain name and creates a new entry on the clipboard.
PermalinkAbout
These posts showcase some excellent examples of why Keyboard Maestro is a must-have for every Mac OS user. As a powerful automation tool, Keyboard Maestro helps boost productivity, save time, and streamline repetitive tasks. With its vast array of customizable features and functions, it's the perfect choice for Mac OS users seeking to optimize their workflow.
Check out all the blog posts.
Blog Schedule
| Thursday 3 | PlayWright |
| Friday 4 | Macintosh |
| Saturday 5 | Internet Tools |
| Sunday 6 | Misc |
| Monday 7 | Media |
| Tuesday 8 | QA |
| Wednesday 9 | Pytest |
Other Posts
- Clipboard URL Tracking
- Random Keyword
- Keyboard Maestro Browser Version
- Keyboard Maestro Application Switcher
- Keyboard Maestro Keyboard Shortcut Enhancer
- Keyboard Maestro Control
- AppleScript iTerm2
- Unleash the Power of Your Clipboard with Keyboard Maestro's Clipboard History Switcher
- Apple Keyboard with Numeric Keypad
- MultiMarkdown Utility
- TidBits #259
- Smart Groups in Keyboard Maestro
- Hide Multiple Browsers Bookmarks
- Overcoming Visual Studio Code Snippet Limitations
- Shuffle Filter System Clipboard