
PhotosScape November Update
Information on where to find all the changes in PhotoScape latest update
In late October, Mooii Tech add some new features to PhotoScape X, a popular Macintosh Photo editor. This release has a lot of exciting changes.
Here's a list of changes, and where to find the changes:
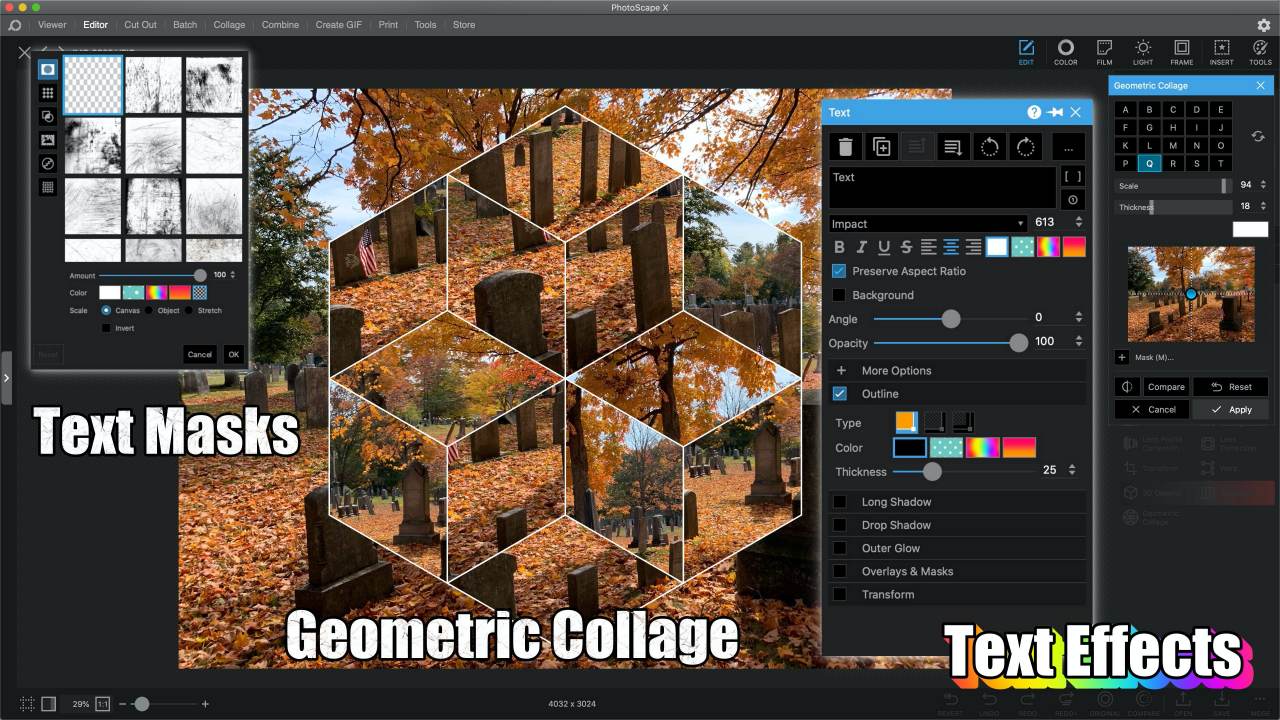
New Text Effects: Long Shadow, Overlays & Masks, Background
These are new select items in the Text dialog, they are located below the opacity selector.
New Object Effects: Long Shadow, Overlays & Masks
These can be applied to objects such as Stickers, Shapes, Figures, Lines, and more.
New Filters: Gradient Opacity, Radial Speed Lines, Lines, Concentric, Geometric Collage
In the Adjustments section: Gradient Opacity
In the Effect Section: Radial Speed Lines, Lines, and Concentric
In the Transformations section: Geometric Collage
New Filter Objects: Mosaic #2, #3, #4, Frosted Glass
These are located under the "Filter" menu. Click on Insert, then on the Filter next to Tools.
New Text Warp: Gradient Upper, Gradient Upper 2, Gradient Lower, Gradient Lower 2
These are located in the Text dialog. On the bottom of the text box, click on Transform then click on the transform button. In the Transform dialog, click on the "None"
Other Additions
Added 119 Film Looks - New Looks category in the Film Section ( Click Film in the top toolbar)
Added 104 Film Extras - New Extras category in the Film Section
Added 150 Nature - New Nature category in the Light Section
Added 108 Comic Stickers - New category in the Stickers section.
Added 4 more Draw Brushes (Stipple) - These are the brushes found when drawing/ they are located at the bottom of the brush selection.
Added 1 more Text Outline Type - In the Text dialog, click on the checkbox next to Outline, you'll see that there are now three different outline types.
Added 6 Object Transform Skew Types - These are located in the Transformation dialog. These are below the object. For example, you can transform text to create a logo.
Added 8 Canvas Grid Types - This is the overlay grid that you see. This is located on the bottom bar, it's the dotted grid icon.
PermalinkArt Text 4 Designs
Halloween designs are free in Art Text 4
Art Text 4 is a pretty powerful tool. It gives you lots of ways to create some creative text and graphic files. However, if you need a boost on the design side, they have a design gallery where you can download some very cool design.

Some of the designs you have to pay for, but the Holloween designs are free! There are 8 themed Helloween templates with multiple objects to help you create some cool social media or blog posts.
These are great to make cool looking designs - people think that you spent hours putting it together.
There is a "Winter Session" where you can get 10 Christmas designs. This collection isn't free as it cost $6.99 - still a bargain for the cool-looking designs.
Sample Designs


I used the Art Text 4 template and changed the center graphic.
Runaway Kernel Task process
My Solution to fix a runaway Kernal Task issue
If you have been experiencing some weird issue with Snagit - like poor system performance. Maybe the kernel_task is more than 100%. There might be a logical problem.
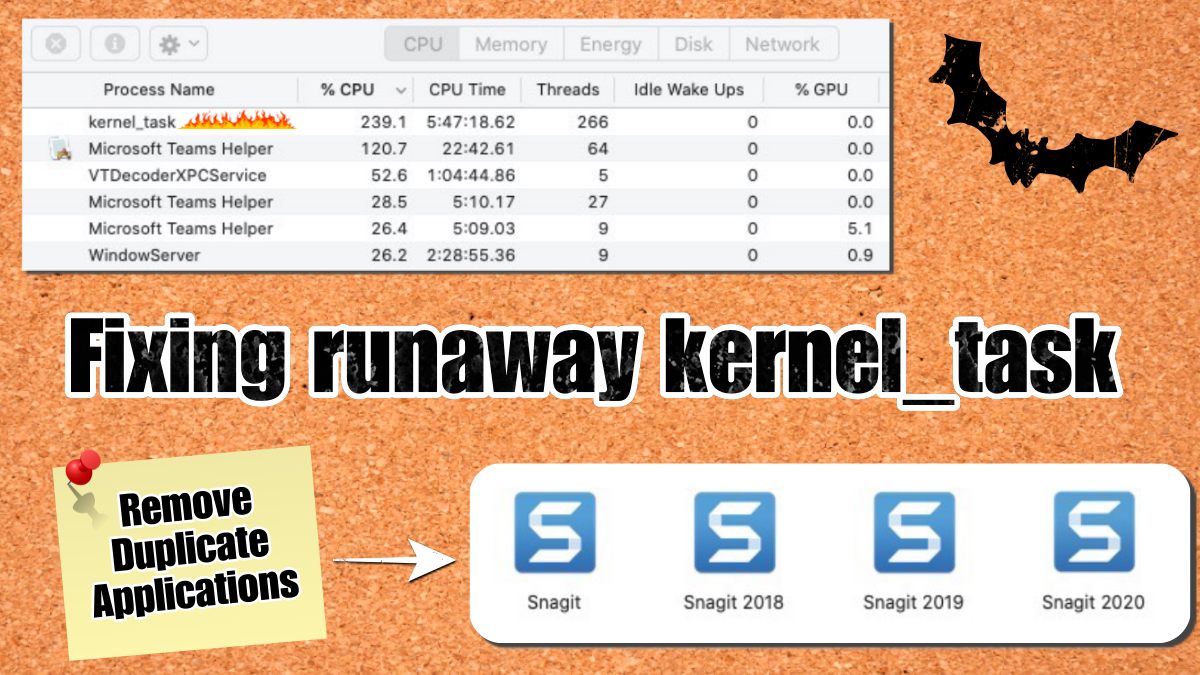
On my computer, I had multiple versions of Snagit installed. This is because every time that I did a major upgrade the computer kept the old version.
When the computer boots up it still uses the Snagit 2019 version and libraries. When I would do capture it would mix up which version to use and get stuck in an endless loop.
The quick solution was to remove all but the current version of Snagit. In my case, it's Snagit 2020. My computer performance had improved since removing the applications. (I also restarted the computer after deleting the apps)
I notice this was a problem when using Microsoft Teams and Zoom. I am not sure why using video apps would cause an issue. I think it's just the amount of CPU that is being used.
Try This Fix!
So if you are having problems related to kernel_task, you may want to check to see if you have multiple versions of Snagit. (I assume this might be true for other system base apps.)
Note: My problem was with Snagit, your situation might be a different application.
Your best bet is to restart the computer to properly test to see if removing the old applications fixed the issue.
PermalinkThunderbolt Display Cable
All is not lost if the the main cable breaks
One of the disadvantages of Apple's Thunderbolt display is that the cable is not all stable. This is the main cable from the back of the computer that is used to connect to a MacBook or iMac.
I have seen many Apple Thunderbolt displays encounter a tear in them because of the angle that you have to put it in a MacBook. Over time,
Unlike the power cable, there is no way to take this cable out. The end of the cable is mounted to the mainboard. So if something happens to the connector cable, you can't replace it.

You can see the cable starting to have a tear. It's only a matter of time before it breaks.
Broken but Not Dead
However the display isn't technically dead. You can still use it as an external display. Simply connect another Thunderbolt 2 cable to the port on the back of the display and then connect it to your computer.
The Apple Thunderbolt Display uses the old Thunderbolt 2 connector, not the new Thunderbolt 3 connector - also known as USB-C.
You can find a Thunderbolt 2 display cable on Amazon for about $40. That's kind of expensive for a cable but it is far cheaper than getting a brand new monitor.
PermalinkApple SuperDrive
Learned that I am better off with a SuperDrive
One of the downsides of the new iMacs is that they don't have a DVD drive. This makes it challenging when you want to access old files or create DVD movies for events.
New External Drive
I thought DVD drives were all the same, so when it came time for me to get one I went cheap and purchased a $30 drive. What’s nice is the drive had both USB 2 and USB-C ports. I was excited because I could connect this to the USB-C port and not take up any other standard USB port.
Going cheap was a big mistake.
When I started burning DVDs I got a lot of failures. Only about 1 out of 4 disks were good. This happened using the USB3 port and the ISB-C port.
I also had this problem using different computers. So the issue was with the drive. The thing is that it works fine some of the time.
Apple SuperDrive
I got a SuperDrive for my birthday and what a difference it makes.
I have burned 20 DVDs and they were all successful. I didn’t encounter and toasted disks.
I have also access old DVDs without a problem. The drive seems much quieter than other external drives I have had in the past.
The morale of the story is to not be cheap when it comes to storage devices. Stick with brands you know.
Couple of complaints
The cable is too short. Basically, the device sits underneath the iMac monitor. Sure I can get a USB extension but that may impact the quality of data going to the drive. Come On Apple, make longer cords.
There is only one cable type - USB 3. It would be nice to have different cable options.
PermalinkQuick Camera
Take pictures using your computer camera.
Have you ever wanted to take a quick picture using your iMac Camera?
You could use Apple PhotoBooth, but it can get tricky switching Cameras.
I like Quick Camera. It’s a simple little app that allows you to easily save pictures.
I like it because I can check out the shot before getting on a Zoom or Microsoft Meeting calls.
If you have multiple cameras connected to your computer, You can easily switch the camera using the keyboard shortcuts. (This is also a good way to validate that the camera is properly connected to the computer. )
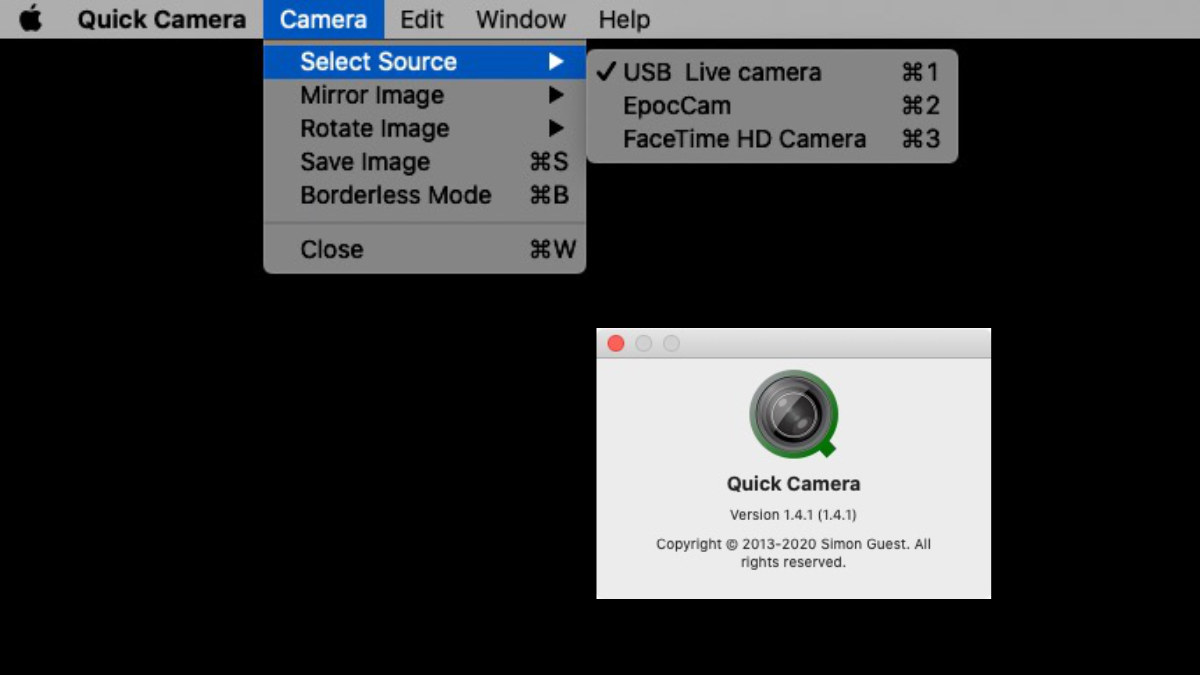
Cool Trick
You can take a picture, when no one is in the picture, and use it as a background in a Zoom call.
This way if someone is actually in the background no one will know. In addition, you can turn off background lighting for those late-night zoom calls.
Getting Quick Camera
Quick Camera is available in the App Store and it’s currently free.
PermalinkDownload Church Bulletin
Using Keyboard Maestro to automatically download the latest church bulletin
Churches in Massachusetts have limited attendance because of COVID-19. I decided to create a new Keyboard Maestro Macro to download the latest church bulletin - that way I know what's going on at mu local parish.
My parish uses e-churchbulletins.com, which generates a PDF file every week. When a new bulletin gets created it overites the file on the server.
So I created the following Macro:
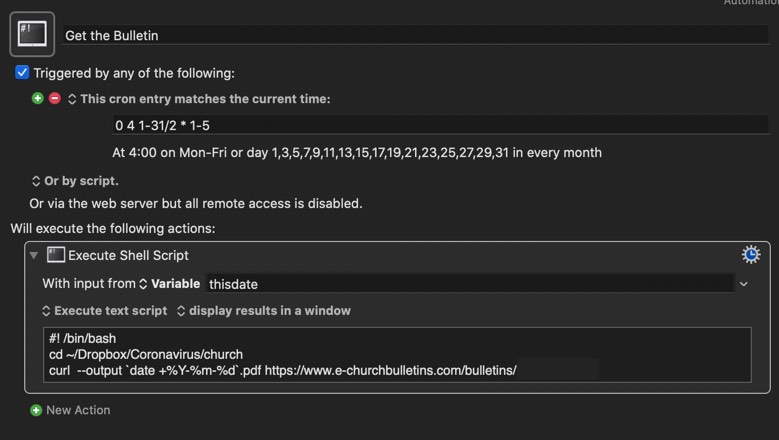
What this does:
Every day at 4 am, it runs a Bash script, using curl and downloads the latest bulletin and saves it to my local computer using the current day. (This way it doesn't wright over any previous downloads. )
Copy of the BASH script:
cd ~/Dropbox/Coronavirus/church
curl --output `date +%Y-%m-%d`.pdf https://www.e-churchbulletins.com/bulletins/
I have this running every day because I never know when the latest bulletin will be released.
The nice thing is that I just set it and forget it. Now I have a copy of all the church bulletins whenever I need to refer back to them.
PermalinkiCloud Drive
Better manage your storage
This week I have been busy cleaning up the storage on my MacBook computer. The "easy" way I have found to backup files is to use iCloud. I create backup folders in my iCloud Drive and move files into that directory. On my iMac, I then move the files to an external drive.
The reason that I am doing this method, instead of just connecting the external drive to the computer, is that I want to make sure that I backup files that are worth keeping. I don't want to just throw everything on an external drive without knowing what it is.
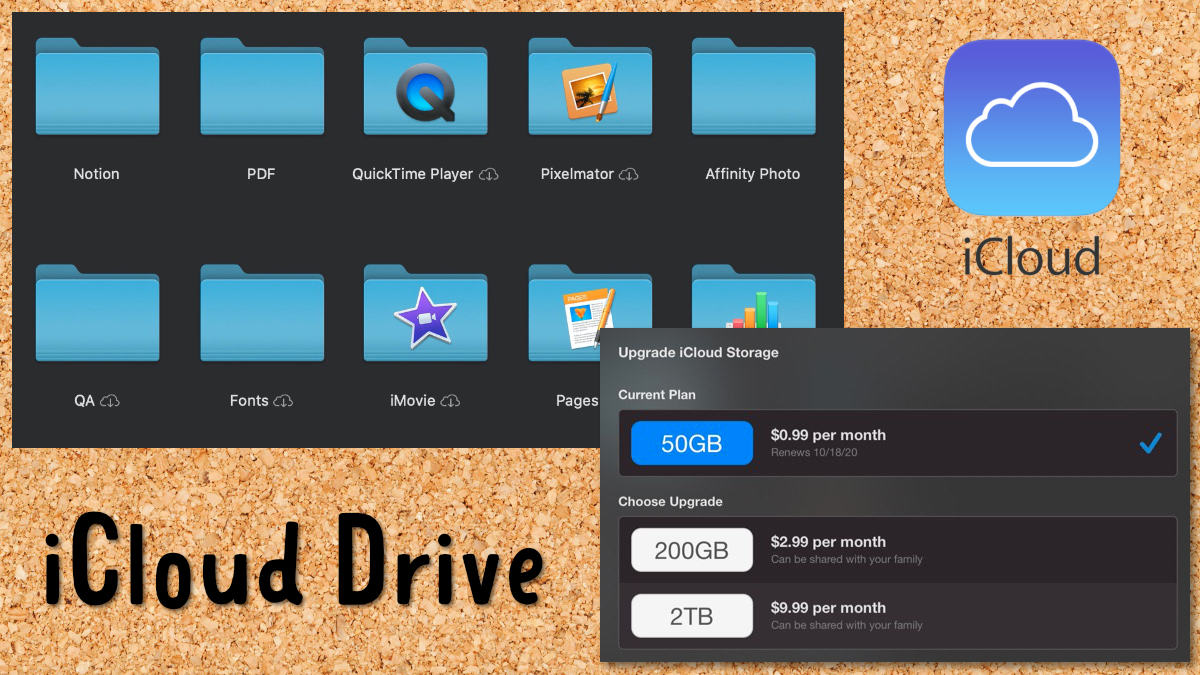
Things I Learned About iCloud
When you move files to the iCloud drive on your computer it doesn't delete them from the computer. It basically moved it to the cloud services but you don't save space.
In order to "save space" you need to move the files of the iCloud service. This concept is the same as DropBox and other cloud services.
Make sure to check the "Optimize Mac Storage" checkbox in the iCloud settings. This will force iCloud to only download files that it needs.
You can add/remove space as needed. For example, you can upgrade to the 2TB plan for a couple of months for storage backups and then downgrade the service.
This is a great service if you are trying to clean up a couple of external drives. In addition, you can backup all your photos and videos taken on a vacation to the iCloud drive and not worry about losing them.
iCloud Icons
Often you may see strange icons next to the iCloud folder name. Here's what the icons mean:
| Cloud | Uploading to Cloud |
| Cloud with Arrow | Backed up to Cloud. Not stored locally. Tap on the folder |
| Circle with Progress | Copying locally |
multcloud.com
Manage Your Cloud Storage
Everyone has multiple cloud accounts. Whether is't Amazon, Google or Drive, things are stored everywhere. The problem comes when you want to manage them.
Multcloud.com makes it super easy to view all your files in one simple interface. No worry about switching browsers or windows. You can move from server to server with a simple click.
The nice thing about Multcloud.com is that you can move files between cloud services. This is awesome when you're running low on space on a particular server.
You can even sync data between cloud services, ensuring that your data is always available.
The Free Plan gives you 30GB Data Traffic/Month. The next step up is $9.90 a month which gives you 150GB Data Traffic/Month.
Five Ways to get the most out of MultiCloud.com
Snapshot Of Your Cloud Accounts - At a glance you can see how much space is available in your cloud accounts.Â
Move Evernote Files - You can backup your Evernote files to a different cloud service. I was able to move images from Evernote to Google Photos.
Automate Database Backups - Perform full MySQL database backups to a cloud to Amazon, Google, Drop Box. You can even schedule the transfers so you don't have to think about doing it every week.
Clean up an old Cloud Account - I setup my Mega account back in 2015 and didn’t do anything with it. I basically had a lot of videos and photos. I used Multcloud.com to move these to Google Photos to free up space on Mega.
Know What You Have and Where - Multcloud.com is a great way to audit your cloud services. You can easily find files and move things around. This helps get the most out of each cloud service.
LaunchBar Image Actions
Latest Update to LaunchBar has cool Image actions.
This week LaunchBar did it's yearly update (Version 6/13). The update include many changes to various features of the application. You can read all about the latest changes in the LaunchBar Release Note.
One of the changes that I wanted to check out is this Action Change:
Updated and improved image conversion actions (rotate, flip, resize, compress, etc.). They are now better chainable with subsequent actions – the resulting images can be immediately sent to another action.
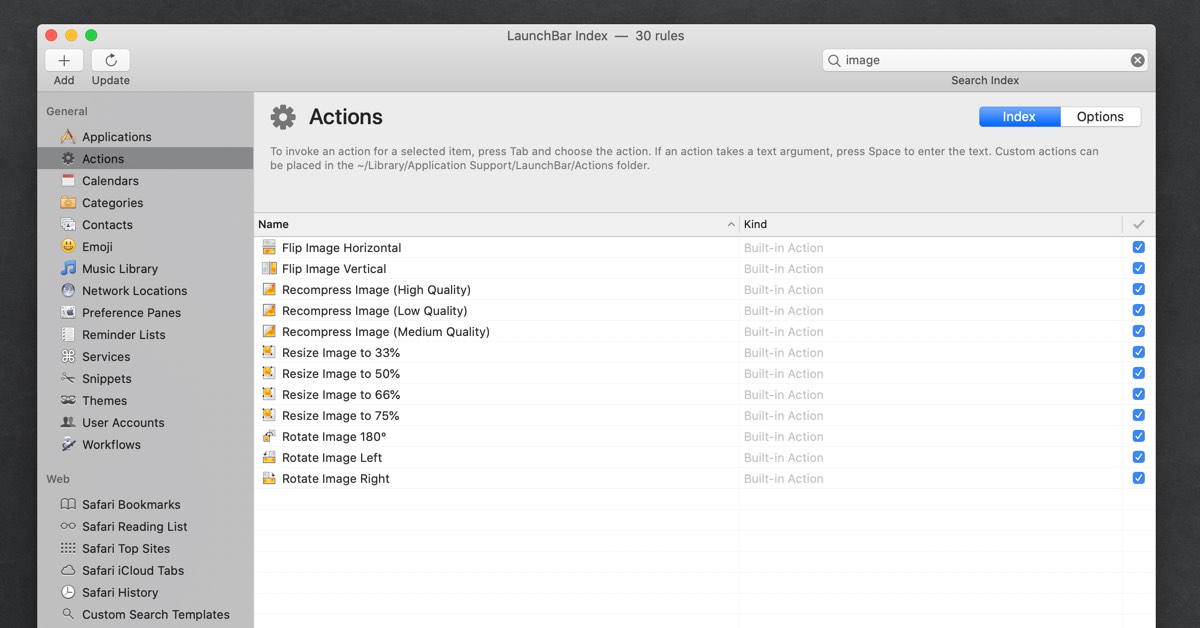
These actions are best using "Instant Send." To use Instant Send, simply select an image and then click on the shift key twice. Now you have the power of LaunchBar in your hands.
Image Conversion Actions
Let's say that you need to flip an image:
- Select an Image.
- Click on the Shift Key twice.
- Type in Flip
- Select Flip Image Horizontal or Flip Image Vertical
- Click Return
- Now You can perform another action, such as Resize or Recompress an Image.
To perform a compression, type in "Recompress." To Resize the image, type in "Resize." You can perform various actions to the same image.
The last task can be to airdrop the file to someone. Simply type in "air" and then
Just keep in mind when you perform these actions, the original image will be modified. If you want to do a comparison of the image, make a copy of the image.
PermalinkAbout
A Mac veteran since 1989, I'm here to share my experience with tips and tricks every Friday. Witnessing the evolution of Mac software and hardware firsthand, I've gained a deep understanding of how these machines work and can help you troubleshoot any issues that may come up.
Check out all the blog posts.
Blog Schedule
| Saturday | Internet Tools |
| Sunday | Open Topic |
| Monday | Media Monday |
| Tuesday | QA |
| Wednesday | Veed |
| Thursday | Business |
| Friday | Macintosh |
Other Posts
- Path Finder 2021
- GIF Annimation Resize
- Panoramic Photo Challenge
- Connecting Apple Thunderbolt Display to a Dell Laptop
- Five Reasons Why Microsoft Edge Belongs in Your macOS Dock
- Preview Bootstrap in BBEdit
- OmniGraffle 2020 Calendar
- Adding Hyperlink in Apple Numbers
- Aldus SuperPaint 3.5
- Viper FTP
- Mastering the "Float on Top" Feature in Stickies
- YouTube Shorts in Final Cut Pro
- Pixel Fonts
- FontDoc
- Airport Express Setup