
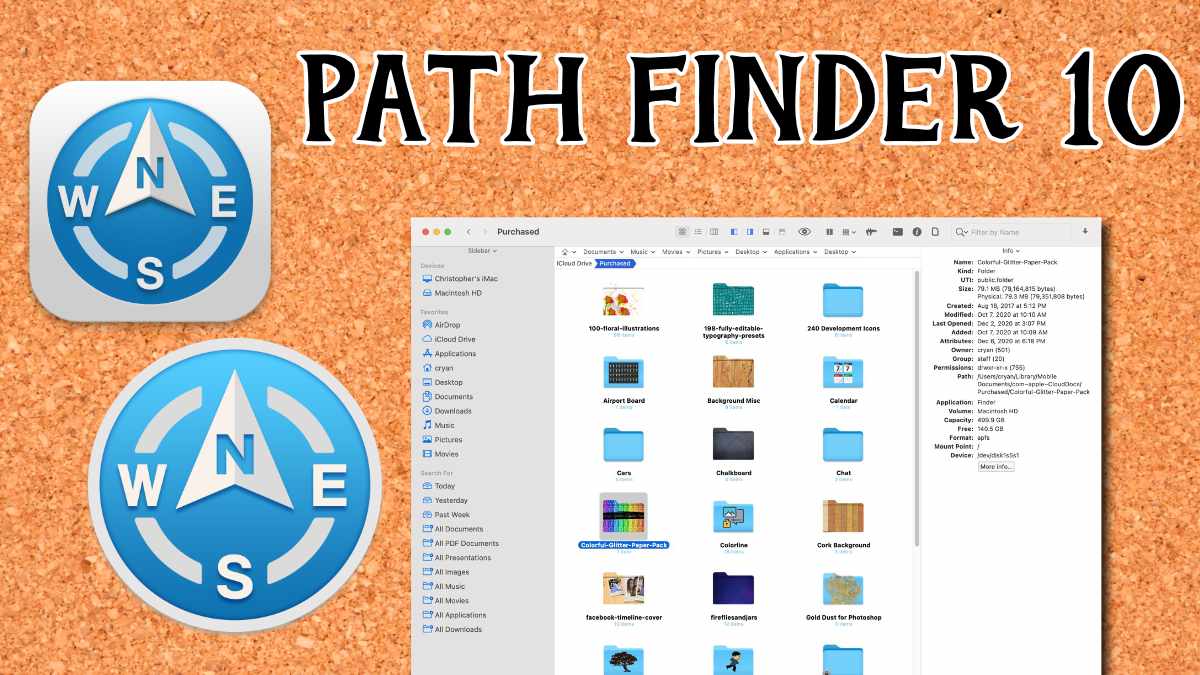
Path Finder 10
December update brings more backend features than front end changes
On December 8, 2020 Cocoatech shipped Path Finder 10. The last major update to Path Finder was October 2019.
New Features
This is the list of the major changes from CocoaTech:
- Airdrop Integration! For devices discoverable by “Everyoneâ€
- Share to AirDrop, Messages, Mail, Notes, etc.
- Fully redesigned for macOS Big Sur with Native support for Apple Silicon.
- Improved Dark Mode.
- File Browsing on and file operations on USB connected iOS devices.
- Improved Drop Stack
- Improved Batch Renamer
- Brand new Big Sur style icon
- Lots of miscellaneous fixes, tweaks and improvements all over the app.
Notes on the Update
Airdrop - Airdrop feature is neat. It's nice to be able to drag and drop files between computers. You can't just drag and drop an object on the "AirDrop" icon. You have to click on the icon, and then drag your object to the device you want to move it to.
Fast AirDrop - You can quickly share an object by right-clicking and selecting the Share option.
Updated Icon - I did notice the new icon, I actually like the old icon. But I understand that particular icon style is where most developers will be using.
Browse Your iPhone or iPad - The iOS device connection is great. You get a lot more information than from iMazing. Very useful when you want to do a manual backup of your device. I particularly like that I can get the folder size, so I can find which areas are taking up the most space.
No More Cover Flow - The Cover Flow Module is gone. This wasn't a module that I used anyway, so I am not disappointed.
Dual Browser Tool - There is a new tool in the toolbar called Dual Browser. This allows you to quickly enable the Dual Browser feature - where you see two folders in one window. This is very cool!
No Other Surprises - I did a side-by-side comparison of Path Finder 9 against Path Finder 10 and don't see any other significant feature changes related to the update. The text seems to be a lot easier to read in Path Finder 10 than in 9. (I see that Kimberly Adams is now on the Marketing team.)
At The End of The Day
Path Finder is a great tool to have when you're doing Disk management. It will save you a lot of time - from finding large files to moving things around.
I like Path Finder and the update to version 10 is a very nice upgrade. Check out some of the cool features that I highlighted in Path Finder 9.
PermalinkBBEdit Canonize Command
Create your own URL Link Library
The Canonize command in BBEdit allows you to do a search and replace based on a user-configured file. Basically, each line is a search/replace statement. This is useful when you want to run the same search/replace job as a weekly task.
Hyperlink Database
If you do a lot of blogging, you may have some external links to certain sites. Usually, you make reference to them at least once in the post.
Using the BBEdit Canonize command, you can have BBEdit automatically put in the hyperlinks. Saving you time in putting in hyperlinks yourself.
You can build different Canonize files for different projects.
Sample URL file:
bbedit	<a href="https://www.barebones.com/">BBEdit</a>
Apple Computer	<a href="https://www.apple.com/">Apple Computer</a>
Google	<a href="https://www.google.com/">Google</a>
FireFox	<a href="https://www.mozilla.org/en-US/firefox/new/">FireFox</a>
Apple ios Store	<a href="https://www.apple.com/app-store/">App Store</a>
Save the file in a commonplace - the BBEdit iCloud folder is a very good option.
Using the Canonize Command
The Canonize Command is located in the Text Menu. (There's no keyboard shortcut.)
Select the transformation file that you wish to use.
Limitations
One of the downfalls of the command is that it does a global search and replace. I am still looking for a way to only replace the first match, not all matches.
I see that there's a way to do it in SED, Perl, and PHP. I just haven't figured it using an external data file.
PermalinkTRRS Cable and iMac
My experience trying to record cassette tapes to my iPhone
This week I was playing around with various cables with my iMac. I was trying to figure out how I can import audio from my Sony cassette player to my iMac using Audacity.
It turns out that using a TRRS cable does not import the audio to the computer.
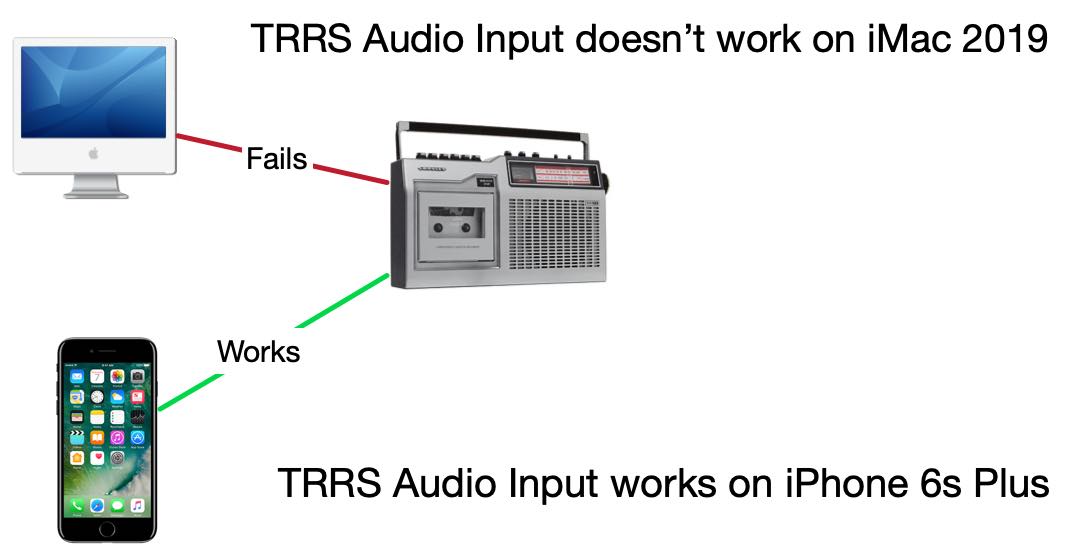
Things I Learned
I used a "Headset Buddy Line-Level Audio Adapter with Built-in Attenuation." I connected one end to the iMac and the other end was connected to a standard audio cable from the cassette audio out.
I tested this cable on my old iPhone and it worked. I was able to record audio from the cassette player.
When I disconnected it from the iPhone and plug it into the iMac it didn't work. No audio was being recorded from the cassette player. I was testing using Audacity.
I tested another device: Ultimate Lavalier Microphone - Lapel Mic Clip-on Omnidirectional Condenser.
The Microphone worked with no problem.
Not Giving Up
I'll test some other cables to see if I can get them working on my iMac. It very well could be that the "Headset Buddy Line-Level Audio Adapter with Built in Attenuation" doesn't work for my iMac.
PermalinkTop 3 Macintosh Posts of 2020
A look back at some of the popular post of 2020
This is the annual top 3 Macintosh Blog post of the year. There were 51 Macintosh Blog post this year, all of them posted on Fridays.
This year I am only going to highlight the top 3 posts. The criteria are based on the usefulness of the information and how I apply the information for my Macintosh experience.
Top 3 Blog Posts
Unlock your Mac using the Apple Watch - (April 3) This was a cool trick to quickly get back to my work after stepping away from the computer. Unfortunately, the IT department didn't like that and disable it for my work computer. However, the trick is still useful for my home computer.
Inkscape Spray Tool - (August 8) I really liked that you could spray any image in a the clipboard. It can create a cool effect.
Missing Disk in Sidebar using Big Sur - There is a bug in macOS 11 that prevents some SD Disks were not showing in the sidebar or in Final Cut Pro. I provide a couple of alternative solutions until Apple comes out with a fix.
PermalinkArt Text 4
Great tool to make Art out of simple text.
Art Text by Belight Software is a great application to transform text into art. You can make some eye-catching brochures and ads in litterly no time.
You can use 100+ text style presets, or be creative and design your own with lots of Fill and Effects.
There is an online store where you can purchase lots of great designs to make your text really stand out.
New in Art Text 4
Spray Fill - You can now add special effects like coffee beans, nuts, stones, glitter, and much more to your text.
Better 3D Reflection Masks
Text Design Store - The cool designs that you see in Letters is now available right in Art Text 4
Make your Facebook post stand out by using the Facebook 3D Photo effects
Shading Materials - There is 150 2D shading material that you can add to make your design stand out.
Sample Images

A touch up version of the Bokeh design

Using the Stone Spray fill
BBEdit Randomize Order
New Sort Feature makes it easy to setup a scrum standup lineup.
Bare Bone's BBEdit is a great text editor tool. Many people use it for programing developement.
I tend to use it for anything text related. When I am writing up some long text for email, Slack, or whatever, I am usually using BBEdit.

New Feature!
One of the new features in BBEdit 13.5 is the Randomize Order functionality.
This feature randomly sorts the selected text. The end result is selected text gets replace by a random sorted collection.
Release Note Description
Added "Randomize order" as an option for "Sort Lines". If turned on, this overrides all other sorting options, and will generate a random ordering for all lines in the document.
Why makes this useful to me?
I manage a team scrum weekly standup. This allows me to sort the speaking order randomly. Prior to this feature, I would go to Random.org and use that sorting functionality. I was concern about the confidentiality of the data. I am not sorting a list of company passwords, but the list of names could be used for someone to cold call into the company. I am not being paranoid, just being cautious.
I can also use the random sort feature in a Text Factory run. In the following example, I apply the random sort and then add a line number.

BBEdit's feature makes it easy to randomly sort my list of names in an application that I already use all the time.
PermalinkPhotoScape Color Picker
Great tool for Front End Web Developers
One of the neat tools in PhotoScape X is the Color Picker. This feature allows you to select a pixel and paste the HEX value into the clipboard. It's an easy way to get some color into an HTML document.
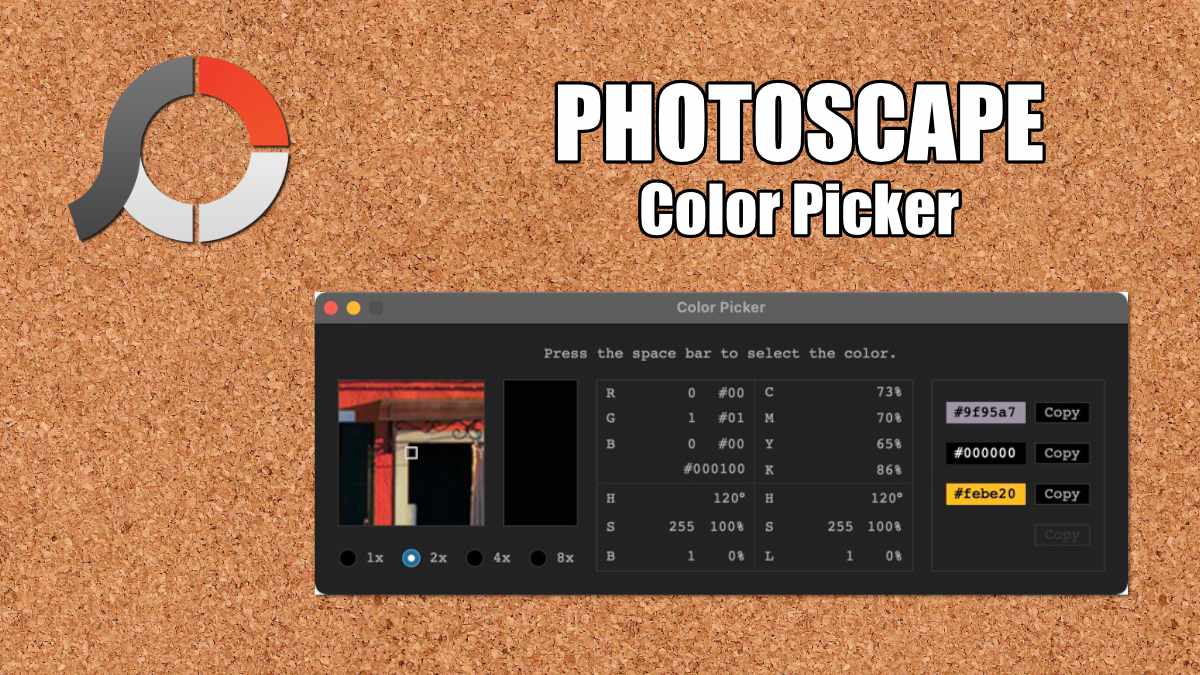
Four Things I Learned
When you find the right color, simply click the space bar to select the color and have the hex value pasted in your clip board
You can change the pixel view to a fine point the color you're looking for - particularly if it's an HD photo.
The Color Picker will save the last four options, allowing you to go back and get any previous selection. The background of the color picker shows the selected color.
The pasted copy doesn’t contain the ‘#’ symbol. This is weird because it shows in the dialog box when you select the color and in the color history section.
PermalinkPaste Clipboard Content as Plain Text
Easily convert Clipboard content with a Clipboard Manager
If you have LaunchBar and Keyboard Maestro there are a couple of tricks on how to paste the contents of your clipboard as plain text.
I have clipboard management is enabled for both applications. I use LaunchBar for my primary clipboard management. I have found LaunchBar interface to be simple to navigate and easy to paste the content I want.
Keyboard Maestro is great, it just a little more powerful than what I need for everyday use. LaunchBar clipboard window is easier to manage.
Paste As Plain Text
When I want to paste clipboard content as plain text, I use Keyboard Maestro. The thing to remember is that when pasting from Keyboard Maestro to hold down the SHIFT key to make the content plain text.
Prior to using Keyboard Maestro, I would paste the content into BBEdit then copy it to make it plain text.
LaunchBar
You can make LaunchBar paste content plain text by enabling "As Plain Text" in preferences. The only downside is that it always paste as plain text. If you want to over-ride that settings, you hold down the OPTION key to paste as Rich Text.
Over the years, I have found that I usually want to keep the RichText formatting as the default. Using plain text, I lose the hyperlink links, which is useful when pasting content in an email or DayOne Journal.
Keyboard Shortcuts
To make it easy to navigate between the two Clipboard management tools, I have a similar shortcut:
- For LaunchBar I use the default Command
- For Keyboard Maestro I set up Shift Command (This you have to set in Keyboard Maestro.)
Missing Disk in Sidebar using Big Sur
How to get around the missing SD card in Big Sur
On Friday, I finally upgraded to macOS 11.0.1 (Big Sur). I have been trying for a week and kept getting an error during the upload process. This is the error that I have been getting:
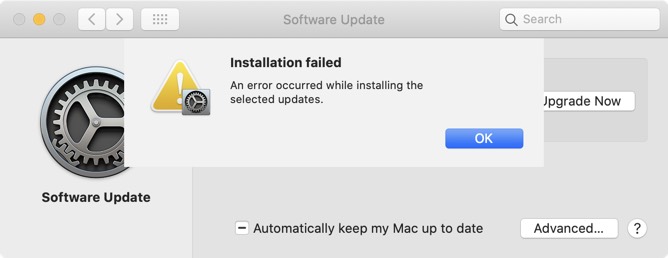
When I tried on Friday the installation process was successful. I think the whole install took about 45-mins.
SD Disk Missing from Finder
One of the things that caught my eye was that an SD disk that I had in the computer wasn't showing up in the finder sidebar. The disk would appear in the Finder when the "External Disks" is selected.
Some reason the Finder sidebar wouldn't show the external device. This makes navigating a little tricky as that's the most common way I access my SD cards. I usually turn off the "External Disks" on the desktop because its just clutter.
Apple is aware of the bug, and a fix will be shipped in a later update.
Alternative Solutions
There are several alternative solutions:
Simply click on the "Computer" in the sidebar (Should be Your Name) and click on that to see all the connected devices.
Learn the shortcut: Command - Shift - C (Which opens up the Computer window.)
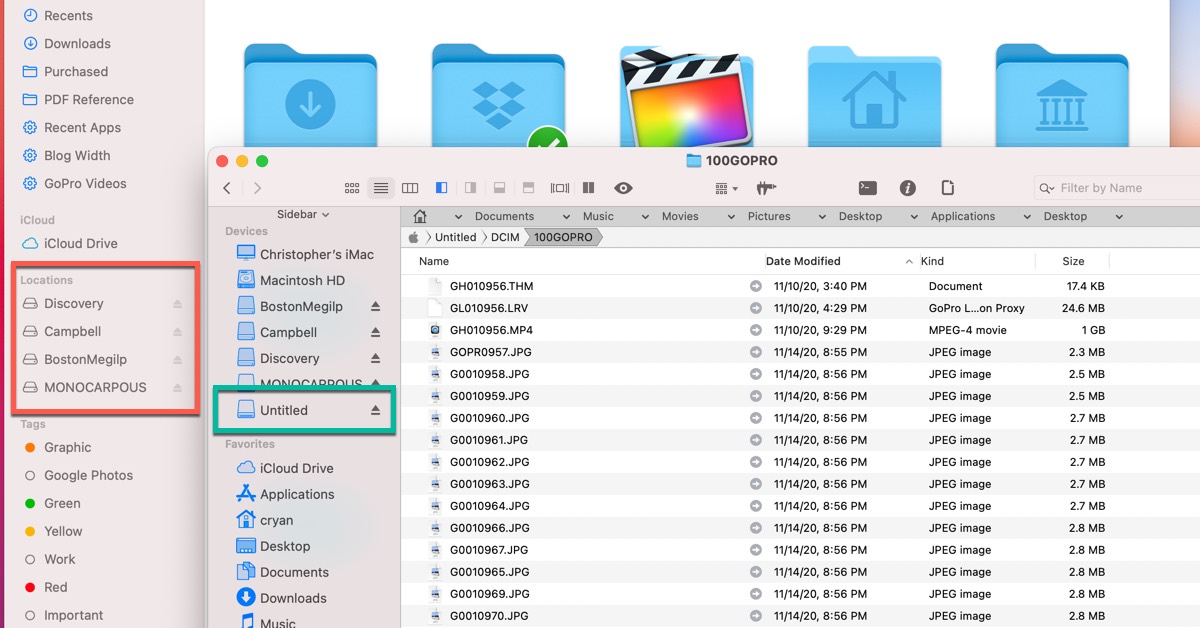
Use PathFinder which doesn't have this issue. All the external devices show up correctly in the sidebar.
PermalinkQuickly Change Wallpaper
Quick tip on how to quickly change the background
When on Zoom calls, I like to have the computer desktop set to White. This allows a little bit of brightness so people can clearly see my face.
When I am not on Zoom calls, I like the desktop dark so that it doesn't blind me when I am working.
The traditional way of right-clicking on the desktop to Change the Desktop background is a lot of steps to do every time I start and end a meeting. There has to be a better way.
Thankfully there is a better way with Keyboard Maestro.

Keyboard Maestro has an action to change the desktop background. Now, I can select the Keyboard Maestro menu item and quickly switch between dark and light mode.
This makes it super easy to switch desktop patterns whenever I need it.
Keyboard Maestro Macro
Here's the Macro I have set up:

For the light version, I just created a small white image and used that as what to set the background too.
I used Dropbox as my source so that the Macro would work no matter what computer that I had Keyboard Maestro installed on.
PermalinkAbout
A Mac veteran since 1989, I'm here to share my experience with tips and tricks every Friday. Witnessing the evolution of Mac software and hardware firsthand, I've gained a deep understanding of how these machines work and can help you troubleshoot any issues that may come up.
Check out all the blog posts.
Blog Schedule
| Saturday | Internet Tools |
| Sunday | Open Topic |
| Monday | Media Monday |
| Tuesday | QA |
| Wednesday | Veed |
| Thursday | Business |
| Friday | Macintosh |