
Day One
Very Useful macOS app to Journal your work day
In the digital age, the quest for the perfect note-taking app can seem endless. Enter Day One Journal, an app initially designed for journaling but with capabilities that make it a robust note-taking tool. Whether you're a professional, a student, or a coding enthusiast, Day One Journal offers features that cater to a variety of needs. Let's delve into how its powerful search, simple interface, and versatile applications can enhance your productivity and organization.
Effortless Search: By Date or Tag
One of the standout features of Day One Journal is its powerful search functionality. Whether you need to find notes from a specific date or tagged under a particular category, Day One makes it a breeze.
Search by Date
For those who prefer chronological organization, Day One's calendar view is a game-changer. You can easily navigate through your entries by month, week, or day, making it simple to locate notes from a specific time frame. This feature is especially useful for tracking progress on projects or recalling important meetings.
Search by Tags
Day One's tagging system is another powerful tool. Tags help you categorize your notes for quick retrieval. For instance, you might tag notes related to a specific project, meeting, or topic. When you need to pull up all notes related to a particular subject, a quick tag search will bring everything to the forefront. This method is incredibly efficient for organizing diverse types of information and ensuring nothing gets lost in the shuffle.
Simplicity Meets Quality
Day One Journal's interface is both simple and elegant, making it easy to create and manage high-quality notes. The minimalistic design eliminates distractions, allowing you to focus solely on your content. Here are a few features that enhance the note-taking experience:
Clean Interface
The app's clean interface is designed to help you concentrate on your writing. With an intuitive layout, you can quickly add entries, insert photos, and format text without fuss. This simplicity makes it easy to jot down ideas, capture thoughts, and document information efficiently.
Multimedia Integration
Day One allows you to add photos, audio recordings, and even videos to your notes. This multimedia capability enriches your entries and makes them more comprehensive. For instance, you can snap a picture of a whiteboard discussion during a meeting or record a voice memo during a brainstorming session.
Performance Reviews and Accomplishment Tracking
Keeping track of your professional achievements and progress can be challenging. Day One Journal simplifies this with its seamless organization and search features.
Documenting Accomplishments
By regularly noting down your achievements, big or small, you can build a comprehensive record over time. Use tags like "accomplishments" or "milestones" to easily compile a list when performance review time comes around. This habit not only makes performance reviews less stressful but also helps you stay motivated by reflecting on your progress.
Preparing for Reviews
When preparing for performance reviews, you can quickly pull up relevant entries, organized by date or tag. This ensures that you don't overlook any accomplishments and can present a detailed account of your contributions and growth.
Storing Commonly Used Code
For those who dabble in coding, Day One Journal can be a valuable repository for storing snippets of commonly used code.
Code Snippet Storage
Create a tag like "code snippets" and use it to save and categorize bits of code you frequently use. This makes it easy to find and reuse code, saving you time and effort. The app's search functionality ensures that you can quickly locate specific snippets when needed.
Annotations and Comments
You can also annotate your code snippets with comments and explanations, making them even more useful. This practice helps you remember the context and purpose of each snippet, streamlining your coding workflow.
Conclusion
Day One Journal transcends its original purpose as a journaling app, offering a versatile and powerful tool for note-taking and beyond. Its easy search functionality, simple interface, and multimedia capabilities make it an excellent choice for anyone looking to improve their organization and productivity. Whether you're tracking accomplishments for performance reviews, storing code snippets, or simply taking notes, Day One Journal provides the features you need to keep your life in order. Give it a try and experience the benefits of a well-organized digital journal.
PermalinkXnView MP
Beyond Just Viewing Your Photos
XnView MP is a free and powerful image viewer that goes way beyond just opening your pictures. It's a one-stop shop for managing, editing, and even batch-processing your photos. Let's dive into some of the cool things you can do with XnView MP:
1. Tame Your Image Zoo:
We've all been there - a disorganized mess of photos scattered across folders. XnView MP helps you wrangle them in. Browse your images in various ways, from thumbnail view for quick scanning to a filmstrip view for a more cinematic feel. You can even sort and filter based on date, size, or even camera model.
2. Batch Editing Power:
Need to resize a bunch of vacation photos for sharing online? XnView MP lets you edit entire folders of images at once. Apply basic edits like resize, rotate, and crop to a whole batch, saving you tons of time.
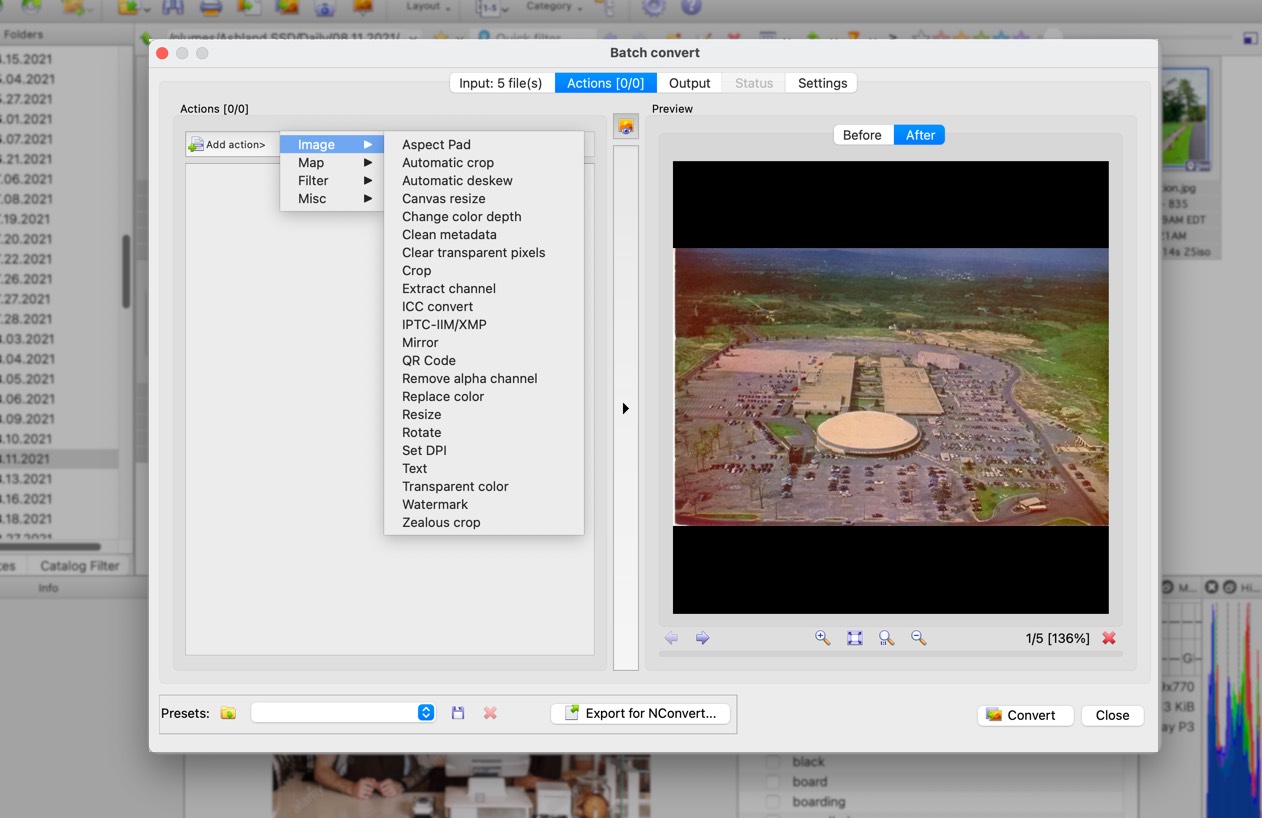
Sample Options available in Batch Convert
3. Enhance and Refine:
Don't underestimate XnView MP's editing tools. Adjust brightness, contrast, and colors to make your photos pop. Apply artistic effects or subtle tweaks to bring out the best in your images.
4. Format Flexibility:
Working with different image formats can be a hassle. XnView MP supports a vast array of formats, from common ones like JPEG and PNG to camera RAW files and even PDFs. This makes it a versatile tool for photographers and graphic designers alike.
5. Conversion Made Easy:
Need to convert a batch of images from one format to another? XnView MP does it with ease. This is handy for preparing photos for specific uses, like converting to a web-friendly format for sharing online.
6. More Than Meets the Eye:
XnView MP offers a surprising number of hidden gems. Want to compare two images side-by-side? No problem. Need to extract text embedded in an image (useful for receipts or scanned documents)? XnView MP can handle it.
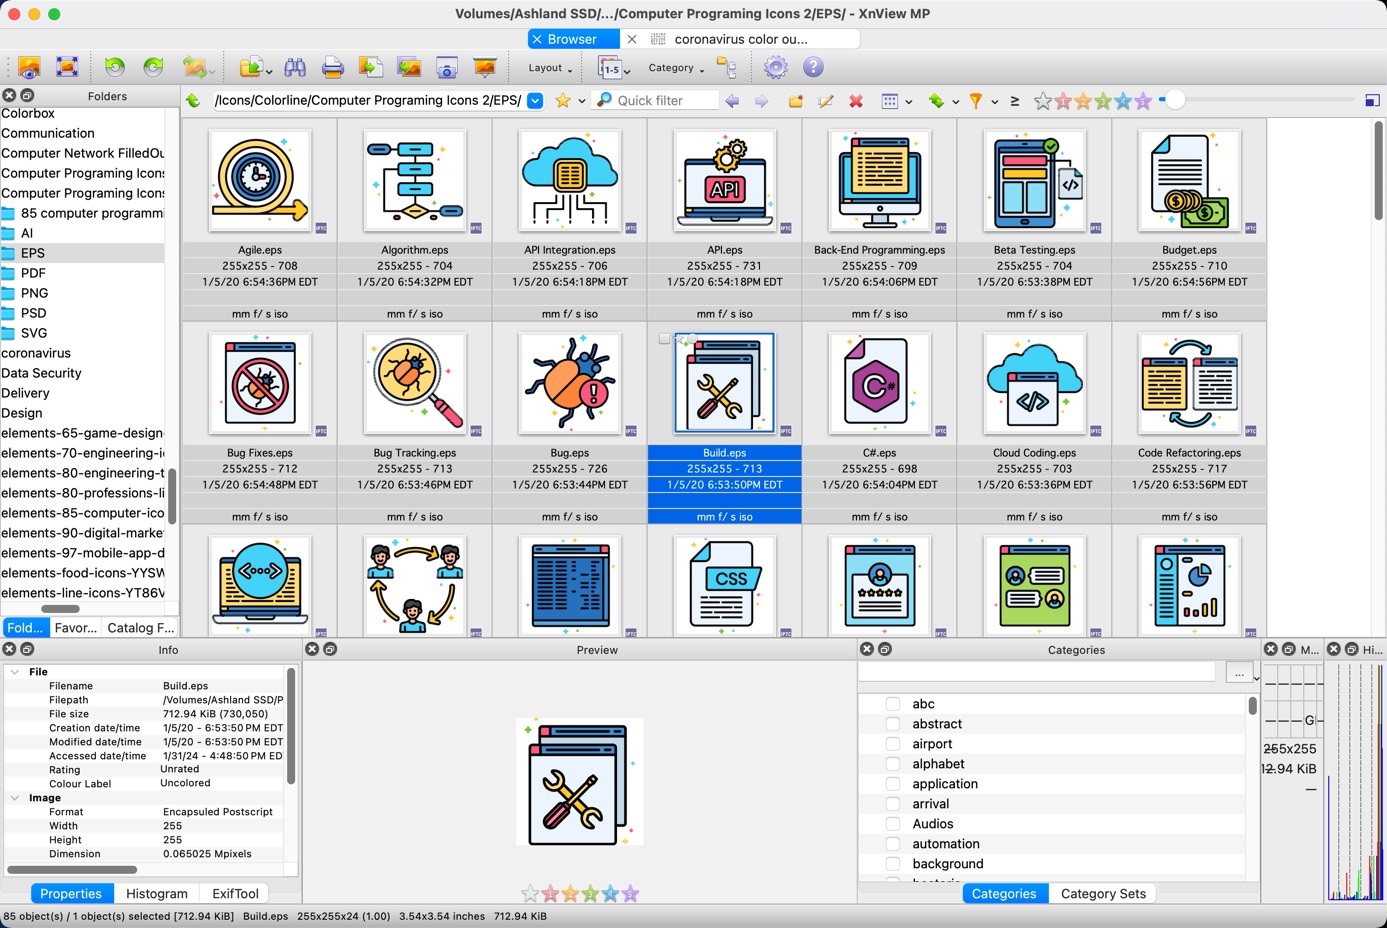
File Browser lets you see detail preview of EPS Files. Very handy when you have a log of them!
7. Free and Feature-Packed:
The best part? XnView MP is completely free and available for Windows, Mac, and Linux. With its user-friendly interface and extensive features, it's a powerful tool that can replace multiple single-purpose software programs. So next time you're looking for an image manager that can do it all, give XnView MP a try!
PermalinkVivaldi Browser
Powerful Browser with Customizations
In the crowded world of web browsers, Vivaldi has emerged as a compelling alternative to the ever-popular Google Chrome. While Chrome continues to dominate with its speed and extensive features, Vivaldi offers a refreshing take with a host of unique features designed to enhance user experience, particularly for Macintosh users. In this blog post, we'll delve into the key differences between Vivaldi and Chrome and explore why Macintosh users should be excited to install Vivaldi.

Key Differences Between Vivaldi and Chrome
- Customization Options
- Vivaldi: Vivaldi is renowned for its unparalleled customization capabilities. Users can tweak almost every aspect of the browser, from the appearance of the interface to the behavior of tabs. The browser allows you to create custom themes, rearrange interface elements, and even create your own keyboard shortcuts.
- Chrome: While Chrome does offer some customization options, they are relatively limited compared to Vivaldi. Chrome users can change themes and add extensions, but deeper interface customization is not as comprehensive.
- User Interface
- Vivaldi: The Vivaldi interface is designed with power users in mind. It includes features like a sidebar (Web Panels) where you can pin your favorite websites or tools, a tab management system that allows for stacking and tiling tabs, and a quick commands menu for efficient navigation.
- Chrome: Chrome's interface is clean and straightforward, designed for simplicity and speed. While this makes it accessible for many users, it lacks the advanced tab management and multitasking features that Vivaldi offers.
- Privacy and Security
- Vivaldi: Vivaldi places a strong emphasis on privacy. It does not track your usage or collect data, and it includes built-in ad blockers and tracking protection. The browser also offers encrypted sync options for your data.
- Chrome: Chrome has robust security features, but it is developed by Google, a company that relies heavily on data collection. Chrome tracks browsing activity to personalize user experience and advertisements, which raises privacy concerns for some users.
- Built-in Tools
- Vivaldi: Vivaldi comes with a suite of built-in tools designed to enhance productivity. These include a notes manager, a screen capture tool, an email client, and an RSS feed reader. These tools are seamlessly integrated, reducing the need for additional extensions.
- Chrome: Chrome relies heavily on extensions to provide additional functionality. While this allows for a high degree of customization, it also means users need to find, install, and manage these extensions themselves.
Users can setup Vivaldi so that it works best for them.
Why Macintosh Users Should Be Excited About Vivaldi
- Optimized Performance
- Vivaldi is optimized to run efficiently on macOS, ensuring smooth performance and low system resource usage. This is particularly beneficial for users with older Mac devices who may find Chrome's resource demands too taxing.
- Native macOS Features
- Vivaldi integrates well with macOS, supporting native features like macOS shortcuts, gestures, and touch bar integration. This makes the browser feel like a natural extension of the macOS environment.
- Enhanced Multitasking
- The advanced tab management and tiling features in Vivaldi are a boon for users who need to multitask. You can view multiple tabs side by side, making it easier to compare information or work on several projects simultaneously.
- Privacy Focused
- Macintosh users who are concerned about privacy will appreciate Vivaldi's strong stance on data protection. With built-in tracking protection and no data collection policies, Vivaldi provides a safer browsing experience.
- Customizable Workflows
- For professionals and creatives who rely on their Macs for work, Vivaldi's customizable interface allows them to create workflows that suit their specific needs. Whether it's rearranging the interface for better accessibility or using quick commands to streamline tasks, Vivaldi adapts to the user's preferences.
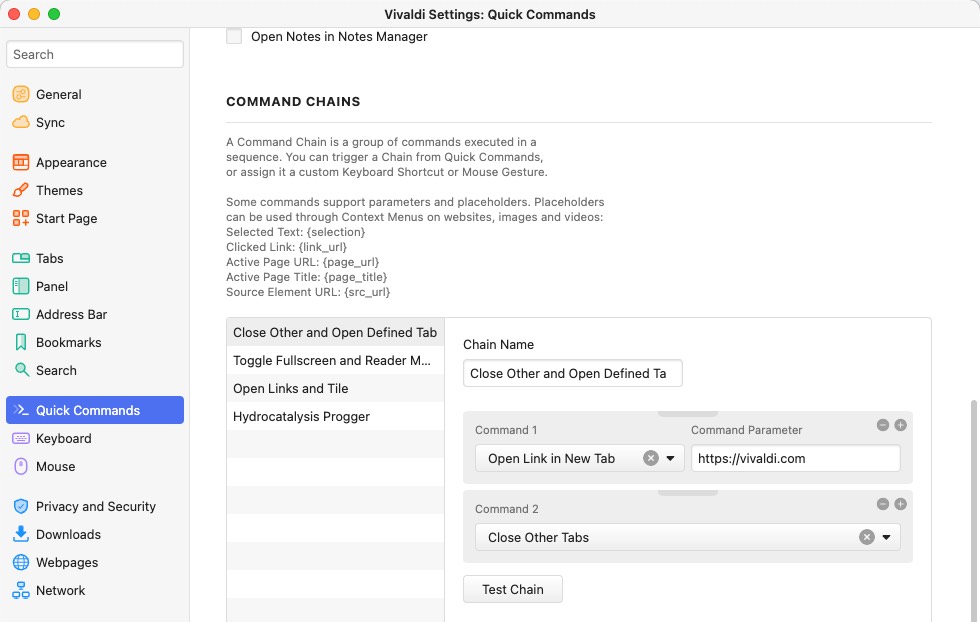
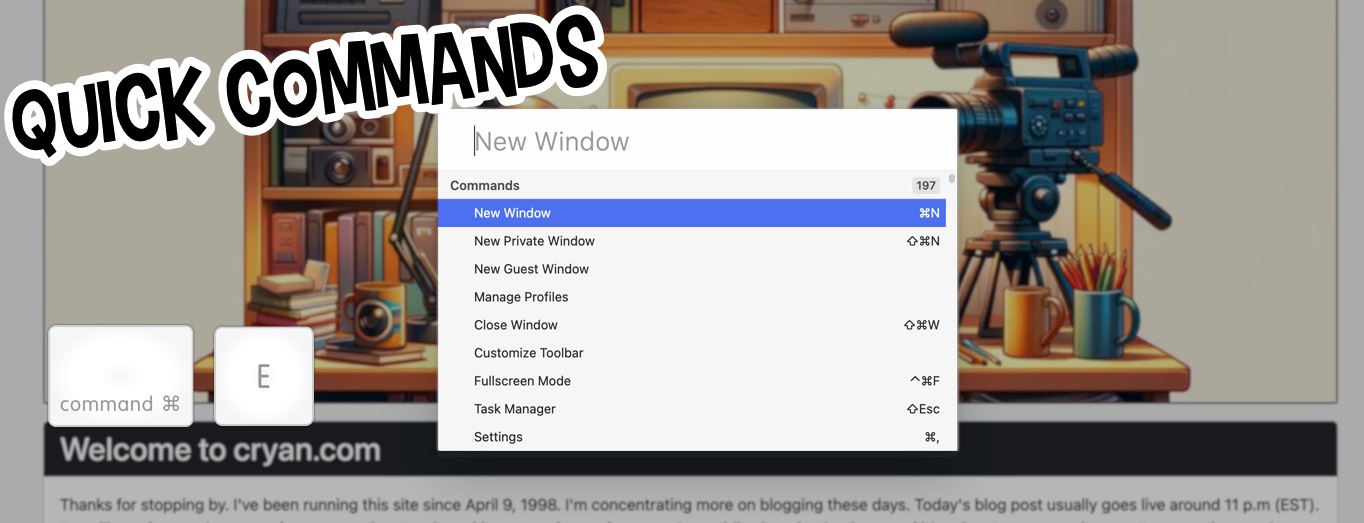
Quick Commands
Quick Commands in Vivaldi are similar to the functionality you see in LaunchBar. You activate Quick Commands and simply type the command you wish to use; instantly, it opens up the desired dialog or functionality. This provides a much faster way to navigate around the browser. Quick Commands can also be used for basic math calculations.
Vivaldi offers 197 actions ready for use when you type in the shortcut Command E.
Conclusion
Vivaldi offers a robust alternative to Chrome, particularly for Macintosh users who value customization, privacy, and advanced multitasking features. Its seamless integration with macOS and efficient performance make it a compelling choice for those looking to enhance their browsing experience. If you're a Macintosh user seeking a browser that adapts to your needs and respects your privacy, Vivaldi is definitely worth a try. Download it today and explore the myriad ways it can transform your browsing experience.
PermalinkAmadine General Review
Vector Base Application with Some Cool Techniques
This week, I decided to revisit Amadine. I last looked at it back in 2019 when it was still in beta. You can read the Amadine Beta Review from February 1, 2019.
Amadine has a very simple interface that makes it easy to create vector images. If you need to make a quick vector, Amadine is the way to go.
Eight Things I Learned
EPS is not supported on macOS 14 Sonoma and later.
You can't import or drag and drop any EPS image. However, you can convert the EPS image to SVG format and open it in Amadine.Clipboard Image Format
When you select and copy an image, the images on the clipboard are in PNG format. You can paste the image into any other app, maintaining the transparent format.Export Formats
Amadine export formats include: SVG, EPS, PDF, TIFF, PNG, and JPG.Icon Libraries
Amadine includes 18 icon libraries: Basic Shapes, Animals, Architecture, Arrows, Doodles, Flora, Food, Hand-drawn, Leisure, Medicine, Music, People, Science, Simple Icons, Stains, Stars, Symbols, and Transport. My personal favorite is the Doodles library.Creating Custom Libraries
You can add your own library by creating a new library using the Library Panel. Select an object on the canvas, then return to the library, right-click, and select "Add Object." If you have multiple objects selected, you may want to group them before adding them to your library.Importing Libraries
You can import libraries, but they must be in the *.amdl file format, which you get when you export a library. The export/import functionality is a useful way to share libraries between users.Access to Image Resources
Amadine has access to Pexels, Pixabay, and Unsplash. While other graphic software programs have stopped supporting Unsplash, you can still access it in Amadine.Clipping Masks and Image Fill
Amadine has excellent support for clipping masks, but in some cases, the image fill is easier to manage. Simply select an object, add a fill property, click on the color, and then select the image tab.
In Summary
Amadine is a great application, and its simple interface makes it practical for everyday use. I highly recommend exploring the application to understand how it works.
Starting next week, I'll be blogging weekly about cool things you can do with Amadine. Be sure to check out this new series and see how this application can become a part of your macOS dock.
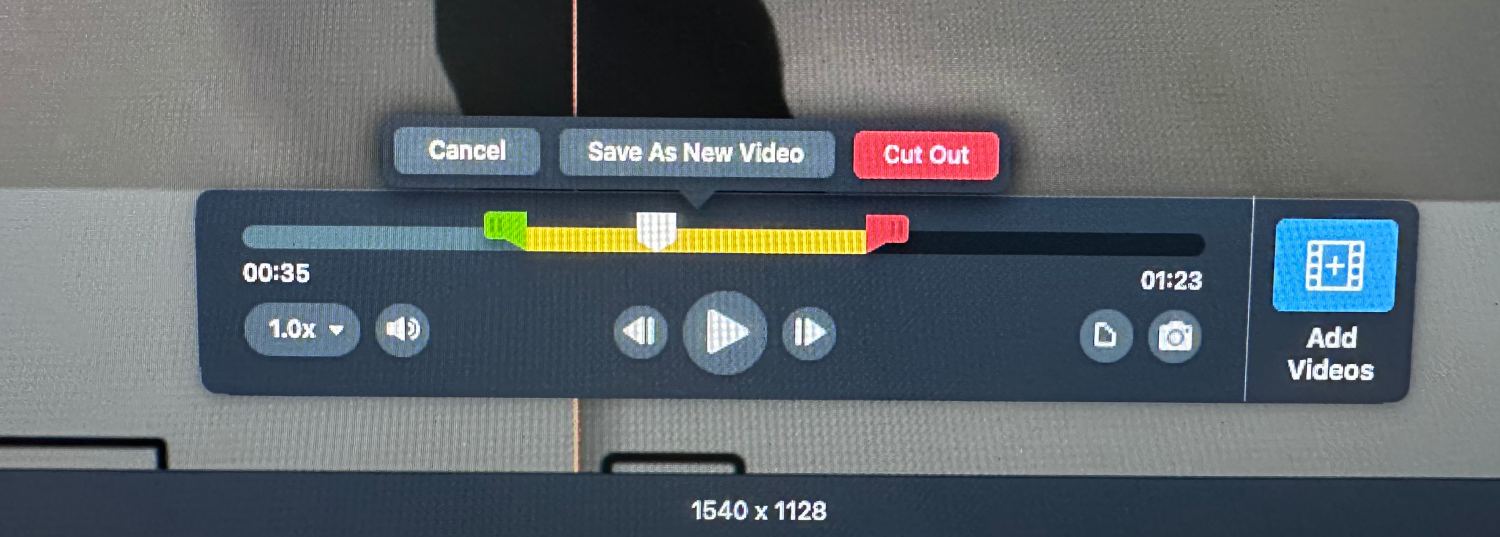
PermalinkInstant Cutter in Filmora
Good Way to Trim Videos
In the realm of video editing, efficiency and quality often go hand-in-hand. For content creators and editors alike, the quest for a tool that offers both is never-ending. Enter Filmora's Instant Cutter a feature that promises to streamline your editing process without compromising on the output quality.
What is the Instant Cutter?
Filmora's Instant Cutter is a specialized tool designed to handle large video files, such as those from 4K action cameras, with ease. It allows users to trim and merge video clips quickly and effortlessly, all without the need for re-encoding. This means you can maintain the original quality of your footage while making the edits you need.
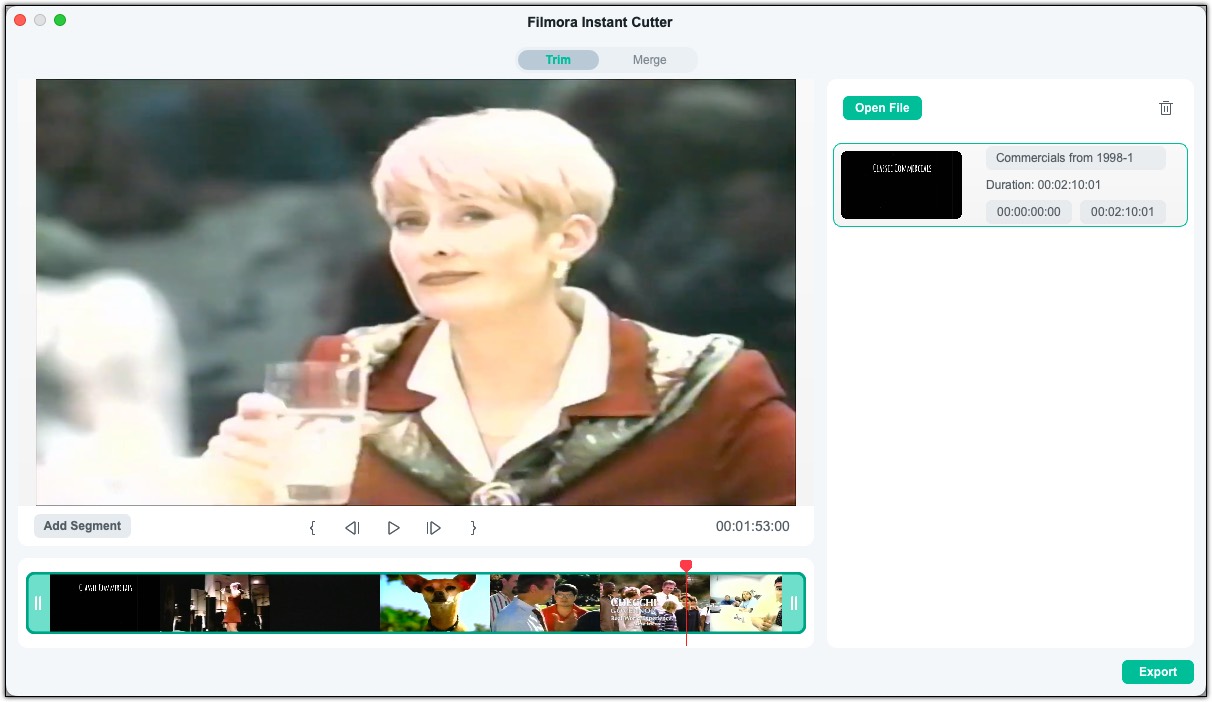
Trimming Made Simple
The Instant Cutter offers three methods for trimming your clips:
- Trimming with Sliders: Drag the sliders in the timeline to select the part of the clip you want to keep.
- Trim by Setting In and Out Points: Click on the 'Set in' and 'Set out' icons to define the start and end points of your clip.
- Trimming by Duration: Adjust the duration of your clip if you know the exact start and end times you need.
Merging with Precision
Merging clips is just as intuitive. Import the videos you want to combine, and the Instant Cutter will do the rest, ensuring a seamless transition between clips.
User-Friendly Interface
Filmora's Instant Cutter tool is accessible directly from the main menu or the top toolbar, making it easy to jump right into editing without navigating through complex menus.
A Tool for All
Whether you're a seasoned editor or just starting, the Instant Cutter tool in Filmora is designed to make your editing process as smooth as possible. With its user-friendly interface and powerful capabilities, it's a valuable addition to any editor's toolkit.
Conclusion
Filmora's Instant Cutter tool is more than just a feature; it's a solution for those who value their time and the quality of their content. By simplifying the editing process, Filmora empowers creators to focus on what truly matterstheir creative vision.
PermalinkPixelmator Super Resolution
Supersize Your Videos!
I recently stumbled on the Super Resolution functionality that's available in Pixelmator Pro. Apparently this has been in Pixelmator Pro since 2019.
I guess I don't use Pixelmator Pro that much to notice it.
Feature Description
The Super Resolution tool harnesses the power and intelligence of machine learning to upscale photos while preserving and even recreating visually important details. Super Resolution algorithm is trained to analyze the patterns and textures in a photo instead of interpolating the values of pixels mathematically as done by the regular scaling algorithms.
Not Just Images!
Did you know that you can Super Resolution Video files?
Yes!
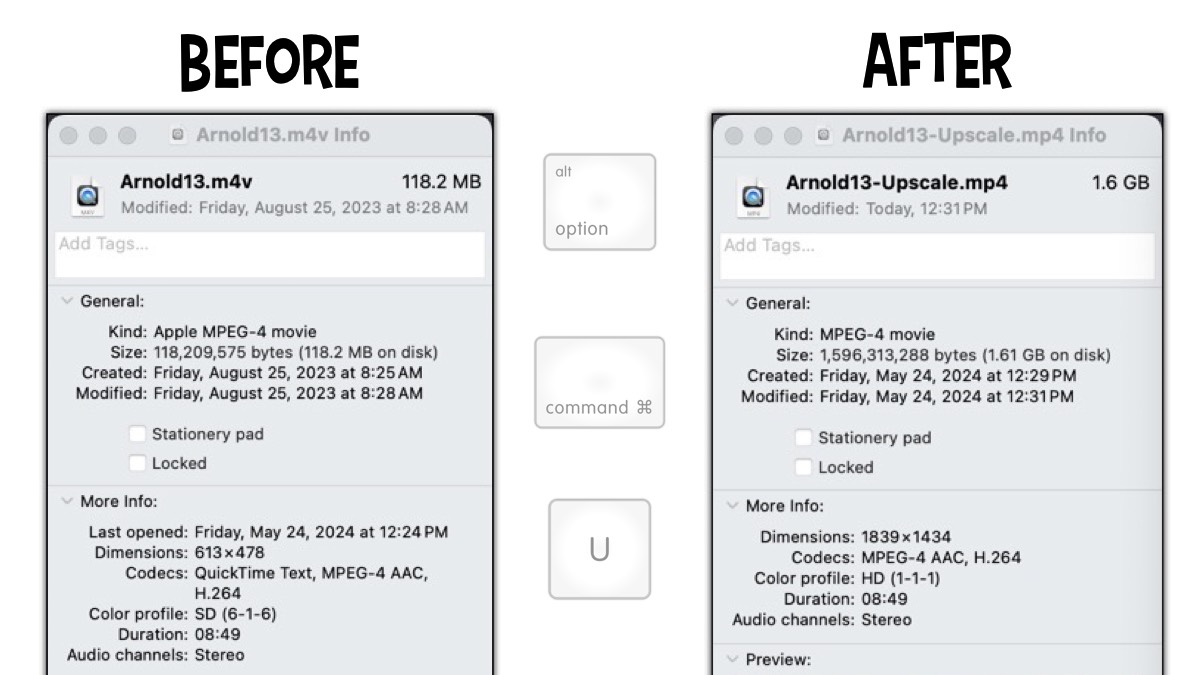
Simply open a video file from Pixelmator Pro, and then Command - Option - U to supersize the video!
Here's a screenshot of what one of the videos looked like when I Supersized it:
Five Things I Learned
The shortcut to execute the Super Resolution to any layer is Command - Option - U.
You can find the Super Resolution in the Image > Super Resolution. In addition, it's available in the window header in the three dots in the circle - next to the "Share Image" icon.
After you apply the Super Resolution you get a before/after preview. You may have to zoom in to see any image improvements. Click Done to apply your changes.
I decided to export the changes so that I don't loose the original video file. To Export, simply type in ( Command - E )
You can also use the "ML Enhance" to fix any lighting issues with your video.
PermalinkFinal Cut Pro for YouTube Shorts
Some things I have learned
YouTube Shorts are the platform's answer to the bite-sized video craze, offering a dynamic way to engage viewers with short, catchy content. But even with short videos, editing is key to a polished and impactful final product. Here's where Final Cut Pro comes in, with its powerful tools to help you create captivating YouTube Shorts.
Setting the Stage: Project Creation
Vertical is Key: YouTube Shorts are vertical videos, so make sure your Final Cut Pro project reflects that. When creating a new project, click "Use Custom Settings" and choose "Vertical" under Video Format. Alternatively, duplicate an existing project, change the format to "Vertical," and use the "Smart Conform" feature to automatically adjust your clips.
Time is of the Essence: Remember, YouTube Shorts have a maximum duration of 60 seconds. To keep yourself on track, add a 58-second gap clip (Option + W) at the beginning of your timeline as a reference point.
Editing Magic: Building Your Short
Embrace the Speed: Final Cut Pro offers fantastic keyboard shortcuts to streamline your workflow. Use "Q" to connect clips to the gap clip, and "Command + G" to create a connected timeline for smooth editing.
Taming Landscape Footage: If you're using horizontally shot clips, select them and go to the Video Inspector. Under "Spatial Conform," choose "Fill" to ensure your content fills the vertical frame. You can further refine the framing using the Transform tool.
Short and Sweet Transitions: Cuts are your friend in YouTube Shorts. Quick cuts keep the pace high and maintain viewer engagement. Experiment with different cut placements to find the rhythm that best suits your video.
Adding Polish: Sound and Text
Music Makes the Moment: A catchy tune can elevate your Short. Explore Final Cut Pro's sound library or import your own music. Remember to adjust the audio levels to avoid overpowering your video content.
Text for Impact: Titles, captions, and call-to-actions add clarity and interactivity. Final Cut Pro provides a variety of text templates to choose from.
Ready for Takeoff: Exporting and Uploading
Exporting for Success: When exporting your Short, choose H.264 video format and ensure the resolution matches your project settings (typically 1080x1920).
Uploading to Shine: Head over to YouTube and upload your masterpiece! Don't forget to add a catchy title, description, and relevant tags to boost discoverability.
Bonus Tip: Embrace the Overlay
While YouTube Shorts themselves don't have on-screen elements like likes and comments, you can use Final Cut Pro to add a custom YouTube Shorts UI overlay (available online) during editing. This gives your viewers a more familiar Shorts experience within your video.
With these tips and Final Cut Pro's powerful tools, you're well on your way to creating captivating YouTube Shorts that will keep your audience hooked. So grab your footage, unleash your creativity, and get ready to take the Shorts world by storm!
PermalinkFive Reasons Why Microsoft Edge Belongs in Your macOS Dock
Great Browser
This post dives into some of the features that make Microsoft Edge a compelling choice for Mac users.
1. Unleash the Power of AI with Built-in Tools:
- Copilot: Get help crafting creative text formats or writing different kinds of content directly within the browser.
- Microsoft Designer: Effortlessly generate stunning visuals for your projects with the help of AI-powered design assistance.
2. Smarter Shopping:
- Microsoft Shopping: Ensure you're getting the best deals while shopping online. Find coupons and compare prices effortlessly.
3. Enhanced Multitasking:
- Split Screen: View two websites side-by-side within a single browser window. This is ideal for tasks like comparing QA and production environments.
4. Organize Your Web Discoveries:
- Collections: Effortlessly save interesting web content, including images, text, or entire web pages. Group your collections for easy organization. Perfect for trip planning – gather potential restaurants and attractions to explore.
By leveraging these features and more, Microsoft Edge can become a valuable addition to your macOS workflow.
PermalinkPixelmator Features: Bento Grid and EPS Support
Cool things in Pixelmator Pro
![]()
Pixelmator Pro recently had some new updates, including Bento Box. This design is famously used by Apple Computer to highlight features of a newly announced product. There's design for Landscape and Story. (I think the story designs needs some work - there appears to be too much white.)
![]()
All the new Bento Grid Designs.
Four Things I Learned
The iPhone image is a mockup feature and you can easily replace the inside image by clicking on the '+'. It's a good way to showcase a website or App.
You can easily replace the colors by double clicking on the shape.
The Landscape version is 1920 x 1080 and the Story version is 1080 x 1920.
There's no video version of the Bento Box template, maybe that's something to come in a future update? In the meantime you can check out some designs on Envato.com.
Illustrator EPS File Support
Pixelmator Pro also introduced Illustrator EPS File Support. This feature allows users to Open and edit Illustrator EPS files in Pixelmator Pro or batchconvert them to other formats using the Convert Image action in Shortcuts.
![]()
Four Things I Learned
It takes a long time to open and use a file that is pretty complications - such as the image above.
The layer previews are good to help identify the various objects in the layer group. Its much easier to navigate than Affinity Designer.
I have some AI files that contain a group of quotes, and it was impossible to select the quotes in the image. In Affinity Designer, I can hold down the Command key to select the region that I want to copy.
While it was neat to play around with EPS and AI files in Pixelmator, I think I stay using Affinity Designer for now.
PermalinkSnagit for Quick Video Editing
Simple Edits in Snagit is the way to go.
In today’s fast-paced digital world, the ability to quickly edit and share videos is invaluable, especially when the content comes straight from your iPhone. Snagit 2024 emerges as a game-changer in this space, offering a suite of editing tools that streamline the video editing process, making it a breeze compared to more complex software like Final Cut Pro or Filmora.
Why Choose Snagit 2024 for Video Editing?
Speed and Simplicity: Snagit 2024 is designed for efficiency. With its intuitive interface, you can perform quick edits without the steep learning curve associated with professional-grade software. This makes it perfect for users who need to make edits on the fly and share content without delay.
Seamless Integration with iPhone Videos: For iPhone users, Snagit 2024 is a match made in heaven. The software effortlessly handles videos shot on your iPhone, allowing you to basic edit your footage without compatibility issues.
Direct Upload to YouTube: Sharing your videos with the world has never been easier. Snagit 2024 allows you to save your edited videos directly to YouTube, streamlining the process of publishing content and reaching your audience faster.
Instant Shareable Links: Need to share your video quickly? Snagit 2024 generates shareable links instantly, enabling you to distribute your content with just a few clicks. Whether it’s for work collaboration or social sharing, you get your message out there without any hassle.
Key Features That Stand Out in Snagit 2024:
- Combine Videos: Merge multiple clips with ease, allowing for flexible editing and rearrangement without the pressure of a perfect single take1.
- Cursor Effects: Highlight cursor movements and visualize clicks with animations, making your instructional videos easy to follow1.
- Blur Webcam Background (Mac): Keep the focus on you by blurring the background during webcam recordings1.
- Microsoft Teams Integration: Share your content directly to Microsoft Teams, facilitating better collaboration and faster decision-making1.
A Tool for Everyone:
Whether you’re a content creator, educator, or business professional, Snagit 2024 caters to all your quick video editing needs. It’s not just about cutting down on editing time; it’s about enhancing the way we communicate and share visual content in our daily lives.
In conclusion, Snagit 2024 is the go-to tool for anyone looking for a quick, easy, and efficient way to edit and share videos. Its compatibility with iPhone videos and direct sharing options make it an essential tool for modern content creation. Say goodbye to the cumbersome processes of traditional video editing software and embrace the simplicity of Snagit 2024.
PermalinkAbout
A Mac veteran since 1989, I'm here to share my experience with tips and tricks every Friday. Witnessing the evolution of Mac software and hardware firsthand, I've gained a deep understanding of how these machines work and can help you troubleshoot any issues that may come up.
Check out all the blog posts.
Blog Schedule
| Saturday | Internet Tools |
| Sunday | Open Topic |
| Monday | Media Monday |
| Tuesday | QA |
| Wednesday | Veed |
| Thursday | Business |
| Friday | Macintosh |
Other Posts
- Affinity Designer Backgrounds
- Irish Icons from Xicons.com
- iMazing
- MacBook Restart
- Aldus SuperPaint 3.5
- Magic Mouse Batteries
- Smart Folders
- 6 Tips That Will Help You Get The Most Out of Affinity Photo
- GraphSketcher
- BlogStomp
- Chrome Mouse Shortcuts
- Panic.com's Transmit
- EPS Thumbnails
- Add Comments to Images/Movies
- Christmas Ideas