
Path Finder 7 Overview
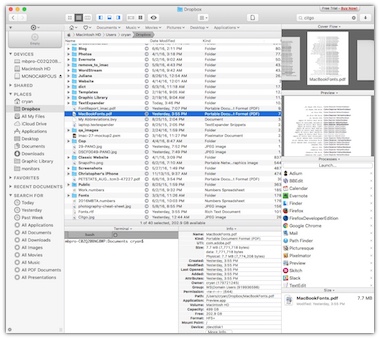
Cocoatech promotes that Path Finder 7 allows you to become the master of file management. It's been in Production since Mac OX X has been part of Apple's system architecture. Cocoa tech and their long-standing customers know a thing or two about what makes a better file system.
I just started looking at this application because I need to better file management on my home iMac computer. My initial reaction to the application is that it's very cool and practical.
Some people may not be aware that the application exists because it doesn't appear in the 'Apple's App Store.' It's certainly worth looking at if you want a little more bang for your computer.
What is so special about Path Finder?
Here are some of the key things that I have found that separates Path Finder from the default MacOS Finder:
- Easier to access Terminal
- Ability to collect files and move/copy them in a single step via Drop Stack
- Easily view and change hidden files
- Application Launcher - Access all your apps with a simple key press
- Ability to Compress Files with Passwords (Stuff or Zip Format)
- Create Font Reports! You can print out the fonts in your system in their typeface.
- Source Control - Easily run GIT/Subversion commands from the Path Finder window,
This is by no means a complete list of everything that Path Finder can do. There's a lot of functionality packed into one application. At first, it can seem overwhelming when your use to the basic features that the Finder gives you.
Did I find a Bug?
One downside to Path Finder 7 is that it doesn't appear to be sorting the file size correctly. In this example, I am sorting by size, but it's clearly not sorting correctly. It's not separating Files and Folders:

Turns out that other people had the same problem and it's not a bug! It's a feature called "Smart Sorting." Smart Sorting allows you to determine the order of the sort. By default, Applications come first, then Packages, then Folder and Files. You can reorder the sort any way you want to.
To view the listing as I would expect it, I had to disable the "Smart Sorting On" in the View Menu.
Window Toolbar Option
Here's one last thing to consider, check out the differences between the window toolbar options. This just shows you how powerful Path Finder is.
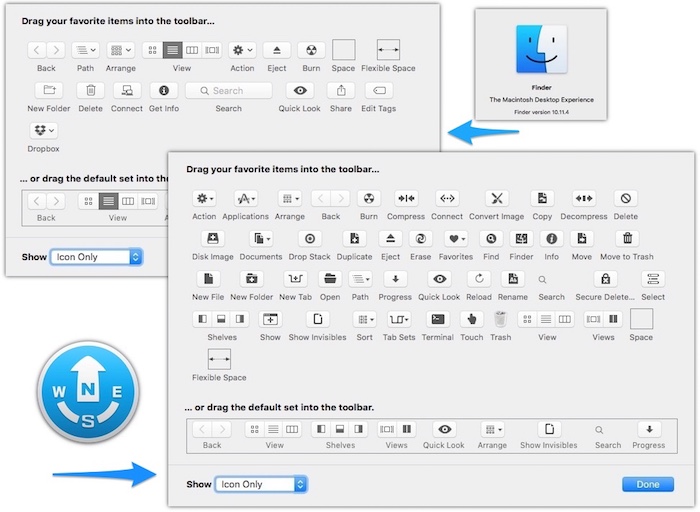
Click on image for a larger version.
I would recommend trying out the Path Finder 7 Demo for 30 days. It will take that amount of time to get use to PathFinder's interface. After a couple of days it will feel like you got a whole new system upgrade.
Note: I am not a paying customer of Path Finder 7 - Yet. I have a few more days of my trial and then I'll purchase the application. I am impress of all the tools that is available.
PermalinkDefault Folder X
![]()
Default Folder X ($34.95)
Last week I briefly covered a bunch of the utilities that were part of the legacy Now Software utility package. I also suggest several applications that we good alternatives for the present day users. Default Folder X kept coming up as a useful utility, so I thought it would be worth a separate post for this week.
I actually purchased the software as part of the MacHeist deal on January 21, 2015. Other software programs that came with this bundle include Little Snitch, VirusBarrier, Control Center, Speedy, Parallels Access, Cocktail, uBar, TotalFinder, and PostBox. The bundle total cost $14.99. It certainly was a good deal.
What is Default Folder?
Default Folder X attaches a toolbar to the right side of the Open and Save dialogs in any OS X-native application. The toolbar gives you fast access to various folders and commands. You just click on the buttons to go to your favorite and recently used folders, manage the folders and files shown in the list, and make changes to your settings. It also fixes a number of problems in Open and Save dialogs, "rebounding" to the last selected file, putting the path listing back in the top menu, and correcting bugs in scrolling column views.
My Thoughts
This is a practical utility for anyone doing a lot of work with multiple folders and projects. This makes it easy to access favorite folders. It does take some time to get used to the overlays on the Save and Open dialog boxes.
A view of the Open Dialog box:
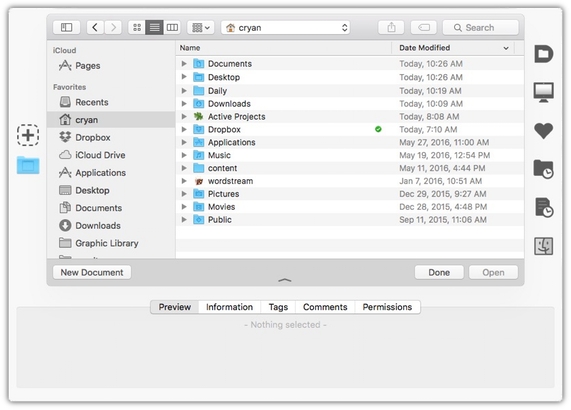
Default Folder X does give you a lot of power to find the right documents. I can preview or get additional information (File Size and Modification Dates) before opening them. I can add comments to a document, this is useful if I want to explain the use of a particular file.
The menubar allows you to quickly access recently file, folder, and windows from any application. This is handy when you're doing a lot of work and need quick access to your files.
Summary
Default Folder X is a great application if you spend a lot of time working with different documents. The license that I got was for version 4. It will cost $14.95 upgrade to the latest version. I am spending some more time playing around with it to see if it's something that I would use on regular bases.
PermalinkNow Utilties

Once upon a time, there was some cool 3rd party utility software on the Macintosh. One of my all time favorites was Now Utilities by Now Software available only for System 7. It made the computer more productive.
MacUser named it one of the "Top 100 Products for 1990."
On November 10, 1997, Qualcomm Incorporated purchased Now Software. In 1999, Power On Software purchased the company. The last known version of Now Utilities was version 6.5
Some of the functionality in Now Utilities has been integrated into Mac OS X. Their are some 3rd party applications that fill in the gap. Default Folder X and Path Finder 7 seem to be good alternatives to Now Utilities.
Here is the list of the seven utilities that were included with Now Utilities 6.0 software and the equivalent replacement available today. (I included a brief description of the original documents.)
Now AutoType
Now AutoType lets you create macros for frequently typed words and phrases. It also watches what you type and creates macros for your frequently typed words and phrases for you automatically.
TextExpander and Keyboard Maestro are the better solutions today. Although, I am interested in learning more about the "create macros" functionality that was in Now AutoType.
Now Tabs
Now Tabs places a tab bar at the bottom of the screen. You can really clean up your desktop by dragging open windows to the tab bar where they're stored as tabs.
Sounds familiar? That's what Launchbar does in MacOs X. There are 1,000 features in one application, certainly worth looking into.
Check out ubar, the dock replacement for the Mac.
Now Shortcuts
Now Shortcuts lets you hold down a modifier key (such as control) and click on a file or folder in the Finder. When you release the mouse button a menu of choices like duplicate, lock, share, and make alias will pop-up - choose an item for a "shortcut" way to manage files and folders.
Today a simple right click is all you need.
Now Super Boomerang
Makes it easy to access the most recent files/folder menus in the Apple Menu or in Open/Save dialog boxes.
Default Folder X - Make your Open and Save dialogs work as quickly as you do
Now Startup Manager
Easy way to manage what extensions should load when you start up your computer. This is useful when your Macintosh crashes during startup.
LaunchControl - With LaunchControl you see all services and their respective status at a glance. Invalid services are highlighted and a problem description is provided. You can enable or disable services with a single click. The same goes for loading, unloading, and ad-hoc starting. A long list of jobs may be filtered.
Now WYSIWYG Menus
Now WYSIWYG Menus lets you see fonts in their actual typefaces when you pull down the Font menu in applications. The Size and Style menus will also display the currently-selected font in the available sizes and styles, so you can always choose fonts and styles quickly said know what the results will look like.
WYSIWYG Font menus is built into many popular Macintosh applications.
Now QuickFiler
Easy way to compress files. Now QuickFiler provides an alternate view of your disks, folders, and files in which you can perform all standard file- management functions. It also has a sophisticated Find command and can compress files on demand or in the background.
Path Finder 7 - Become a master of file management with Path Finder 7! Take full control over your file system! Save your time and work how you want! Say goodbye to the days of weak file management. With Path Finder 7, it's your files, your way.
Now Save
Now Save adds additional functionality to the Save box, including the ability to auto-save in any application. Use the Key Capture function of Now Save to record all of your keystrokes to a text file in case of crash.
Default Folder X - Make your Open and Save dialogs work as quickly as you do
Now Folder Menus
Now Folder Menu lets you "pop up" a menu of any folder's or volumes' content just by clicking on the item and holding down the mouse button. By default, Now FolderMenus displays arrows on the icons of folders and volumes to indicate that you can pop up a menu to view their contents. You can then view the contents of nested folders, and open folders or documents within folders by selecting them and releasing the mouse button.
Default Folder X - Make your Open and Save dialogs work as quickly as you do
Download the official Now Utilities QuickStart guide to see how to use all the above functionality.
PermalinkEasy way to Lock your Mac
In Windows, it's really easy to lock up your computer, simply type in CTR-ALT-DEL and then lock up the computer.
In Mac OS X, you can actually lock up the computer even quicker! With no keys to remember! Simply by using Hot Corners. Just change one of the corners to "Put Display to Sleep" and update your Security & Privacy configurations so it happens immediately.
Make the Computer Lock Immediately
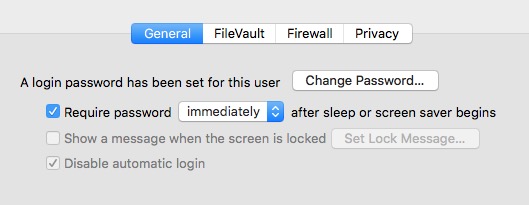
- Under the Apple Menu, select "System Preferences..."
- Then Click on Security & Privacy
- Change the 'Require password after sleep or screen saver begins" to Immediately
Hot Corners

Now to configure one of the screen corners, so that when you move the mouse to the corner the screen will lock.
- In the System Preferences search box, type in 'Hot Corner'
- Select "Desktop & Screen Saver"
- Then select "Hot Corners..." on the bottom right
- Pick a corner where you want to put the display to sleep and pull down the menu and select that option.
- Click 'Ok' when your done.
Now when you move the mouse over to that corner the screen saver will begin and you will need to unlock the computer to use it.
If you want to stick with the keyboard shortcut, simply remember to type in Control + Shift + Power. This will lock your screen but not sleep your computer, so background process will still run.

If you need to sleep your entire computer, simply type in Command + Option + Power. If you have a MacBook, you can simply close the computer's lid. Your computer will go to sleep immediately stopping all background processes.
PermalinkApple's App Store Search
Did you know that you can search the Apple App Store by extensions?
Want to know what applications support EPS format? Simply type in 'extension:eps' in the search bar in the upper right window:
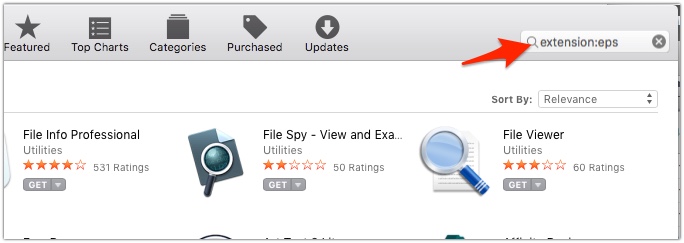
The search query returns a list of all the supported applications!
I don't know of other Apple Store hacks, but I thought the extension: one was pretty neat!
PermalinkEverNote's Skitch Tips and Tricks
EverNote Skitch is a great Macintosh program to add annotation to images. It makes great screenshots and the backup sync to EverNote makes it an essential tool for anyone doing software QA.
Here are some tips and tricks that I have learned using Skitch:
Creating Blank Images
You can easily create a blank image in Skitch. This is useful if you want to create an image from a quote. In the top of the Skitch window, pull down the menu and select ???Blank.??? A new Blank image will be created. The image size will be about 80% of the current window size. You can always crop the image when you are done.
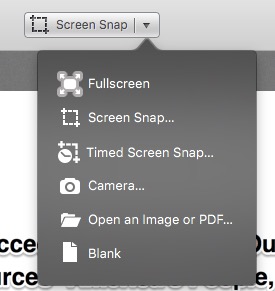
Unfortunately the blank image does function as a canvas tool, where you can combine mulitple screenshots. Pixelmator, Artboard, and OmniGraffle are some of the applications where that is possible.
Blank canvas is great when you need to create a quick image to get the message across.
Changing the Image Type
You can easily convert the image from PNG to JPG and vice versa using the image type selector on the bottom left of the dialog window.
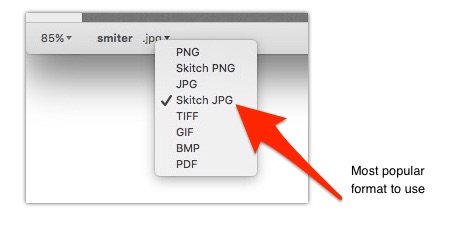
Skitch PNG and Skitch JPG are re-editable files. While in other applications, such as email and chat, they are are regular images. However when the file back in Skitch, and you can make edit to the annotations.
There is a significant file size difference when saving a file in Skitch PNG, as it pretty much doubles the file size than using the standard PNG type. Just something to keep in mind when attaching the file to Jira or emailing.
For most situations, the JPG file format is the best choice. I can't think of a reason why anyone would want to save a file in a legacy BMP format.
Different Menus Options
The Menu Bar and the Dock have different options when you select them. The top Menu Bar is missing Window Snapshot, Menu Snapshot, and Camera Snapshot. The Dock menu is missing the Timed Crosshair Snapshot. I am not exactly sure of the logic of why certain capture tools were excluded from each area.
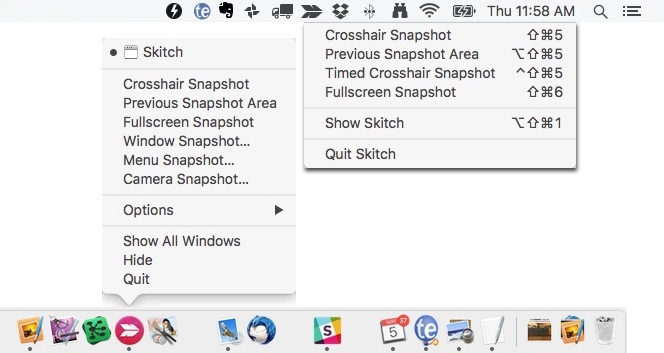
All the capture tools have a keyboard shortcut assigned to it. I would recommend spending time getting familiar with a few of them. Knowing the "Previous Snapshot" capture shortcut is handy when your doing a before and after.
Some of the keyboard combinations are a bit weird, it will take time to get use to it.
Change Text Annotation Size
The text tool is a great way to communicate a message in an image. Did you know there is a simple way to change the size of the Text Annotation in Skitch?
When you have the text selected, simply click on the blue circle and drag to adjust the text size of the text:
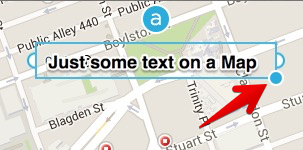
Clicking on the lowercase 'a' above the text field will toggle the text outline. This is useful when you insert text in box as in the following example:
Removing the text outline makes the text in the box a bit easier to read.
I certainly recommend using Skitch. You can download it from the Apple Store for free.
PermalinkYandex.Disk
Yandex is one of the largest internet companies in Europe, operating Russia's most popular search engine and its most visited website. According to LiveInternet, for the three months ended December 31, 2015, we generated 57.3% of all search traffic in Russia. We also operate in Ukraine, Kazakhstan, Belarus and Turkey.
Yandex Disk
Yandex.Disk is a free service that lets you store your photos, videos and documents online and access them from around the world on any device. Disk lets you keep your important files secure and effortlessly share them with your friends and colleagues.
Yandex.Disk is a good secondary backup option to DropBox. If you're dealing with a lot of very important files, it's a good idea to have another provider. Just in case something goes wrong with backing up your primary files.
You get 10 GB to start and can upgrade to three different package options:
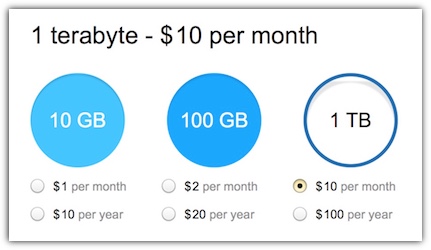
Yandex Pricing is very similar to Dropbox and other cloud services. What makes Yandex unique is that it's a European based company and there's a cool screenshot tool.
The Yandex OS X application has a menu command that lets you take screenshots. Immediately after you take the screenshots an Edit dialog appears where you can add Arrow, Text, Shapes, Marker, Blur and Crop functionality. All screenshots are saved to the Yandex Disk.
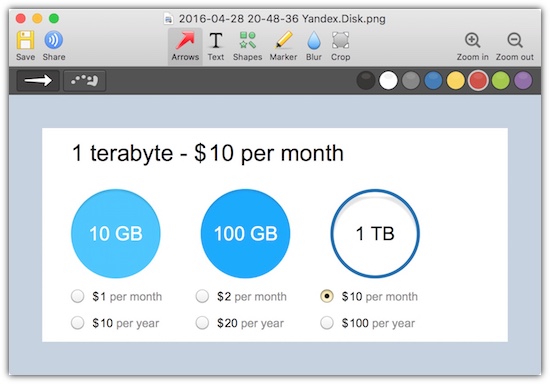
The screenshot does lack some of the functionality in Skitch and Monosnap. For example, the text tool doesn't have a color border around the text. The color border helps make the text stand out in graphic files.
Yandex.Disk seems like a good option if you're looking for another backup strategy. The screenshot tools seem like a good bonus. You could always use Skitch to take screenshots at work, and then use Yandex for screenshots for personal use. Or you can use Yandex for screenshots archives of the website or projects.
I think it's worth giving Yandex.Disk a shot. You get 10 GB to start to see if it's something that you might use.
PermalinkSerif vs Sans Serif
Today's blog posting is to help people select the best font type for the purpose. Do you know the difference between Serif and Sans Serif? I'll show you a cool trick to make it easier to pick the right font when you need it.
First let's go over the difference between the two major font types.
Serif Fonts
Serif fonts are widely used for body text because they are considered easier to read. Some common font families include Cochin, Palatino, Times and Times New Roman.
A Serif font has a small line attached to the end of a stroke in a letter or symbol.
Sans Serif Fonts
Sans-serif fonts are often used for headlines rather than for body text. Some well-known font families include Arial, Futura, Geneva, Lucida Grande, Monaco, Helvetica, and Verdana.
A Sans-serif font is one that does not have the small projecting features called "serifs" at the end of strokes.
Visual Reference (Cheat Sheet)
Here's a clear visual difference between a Times New Roman and Geneva Fonts in 24 points:

Font Book
On the Macintosh computer all the fonts are stored in a central location and control by the Font Book app.

Did you know that you can create a Smart Collection of font classification? This would make life a lot easier when your looking for that perfect headline font.
- Simple steps to create a Sans Serif Font
- Type in Command - . and search for: Font Book
- Under the File menu, select 'New Smart Collection' or 'Headline'
- Under Collection Name, put in 'Sans-serif'
- Change the 'Family Name' to 'Design Style' and select 'San-Serif'
- Click 'Ok'
You should see the new Collection under the 'Smart Collection' group. When you select it you will only see the San-Serif font families. (You could make a Smart Collect for Serif)
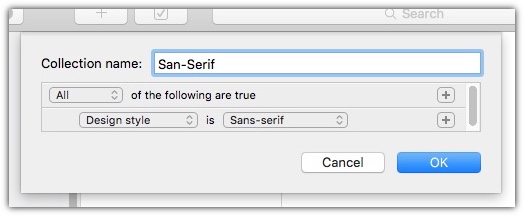
Now when your looking for a Headline font, you know which fonts are the best. By using 'Headline' as the Collection name, you don't have to remember which design style works best for headlines or body.
The good thing about using the Smart Collection is that I don't have to manage the folder. Fonts are automatically selected, even new ones that get added to the Font Book.
You can do some pretty cool things with fonts:

This is a Skyline Font.
Mission Control
Mission Control
Apple created Mission Control in OS X to give users a bird's-eye view of all your open windows, desktop spaces, full-screen apps, and Split View spaces, making it easy to switch between them. Mission Control was first introduced in 2003 as a new feature in Mac OS X 10.3 Panther.
The ultimate goal of using Mission Control is to declutter your main desktop from other Application that your not using now. You could set up a desktop for Mail, and another desktop for Graphics. If you need to do something else, you just switch to a different desktop space. Apple makes this easy with the Magic Mouse and swiping up using three or four fingers, pressing the Mission Control key, or pressing Control-Up Arrow.

Why Would Anyone Use Mission Control?
Mission Control is great when you work in different server environments. You could setup Desktops for Production, Staging, and Development. Which unique desktop backgrounds so that you know which environment that your using. This isn't something that you would do every day, but on deployment days or when you're up late doing testing it can be handy. Also, I find that using multiple Desktop functionality works best when your dealing with a bunch of applications over a few hours.
It will take some time to get used to using multiple desktops, especially if you already have a couple of monitors set up. Try using it for a while, see if it helps you stay more focus at hand.
Some tips and tricks on using Mission Control
Here are some of the things that I have learned using Mission Control:
- To open the Mission Control System Preferences, type Option-F3.
- If you're not using the Dashboard, your should turn it off in the Mission Control Preferences. Dashboard widgets take up memory space, there's no reason to waste any memory.
- If you have a Logitech MX MX518 USB Optical Mouse, you can assign some task to the buttons. For example, you could open Mission Control with the button closest to the thumb. This will make launching Mission Control faster than swiping up using three or four fingers on the Magic Mouse.
- To move any window to a different desktop, simply click on the top window, hold and drag to the top of the screen. (I found that I had to 'bounce' to the top of the screen to enable the Mission Control.) Then move the window to any other screen.
- To create a new Desktop in Misson Control, simply click on the '+' on the top left. Apple did put in a 16 Desktop limit, but I don't think you would need more than 5.
- To remove a Desktop, in Mission Control, hold down the Option key, then click next to space in the Spaces Bar. Any windows in that space will get promoted to another open space. (So you're effectively closing out space, not the application.)
So if you're using Chrome, Firefox, Pixelmator, Evernote, iTerm, pgAdmin and other applications right now, you should think about how Mission Control could help make you more productive.
PermalinkGold Digger Game

Once upon a time Gold Digger was my addictive Macintosh application. I remember coming home from work and spending a couple of hours playing the game, trying to beat my high score. I didn't play it all the time, but it was a lot of fun when I had time to kill.
Oh this was back in the late 1990s. Is it possible to play the game again?
I recently found one of the binary files and decided to see if I remembered how to play the game on my Powerbook G3. I knew that it wouldn't work on my iMac since it needed OS 9 for it to work. Here is the spec from the documentation:
The game runs on any Macintosh or Power Macintosh running System 6.0.3 or later, and with at least 2.5MB RAM available for color or 1.5MB RAM available for black & white. For best performance, a 68030 CPU or newer is recommended. For the best-looking graphics at least 256 colors and a screen 600 X 380 or larger is recommended.
To get this working, I had to adjust my laptop display to use 256 colors instead of the Millions that it was set to. That takes me back to the early days of Macintosh software where I had to adjust the display just to get it working.
Once I did that everything pretty much worked from there. I was surprised that all my high scores were still there.
I did encounter an issue playing the game, looks like that I needed to use an extended keyboard because I wasn't able to move my character. None of the keys would work. When I checked the configurations it looks like that it's looking for Keypad inputs.
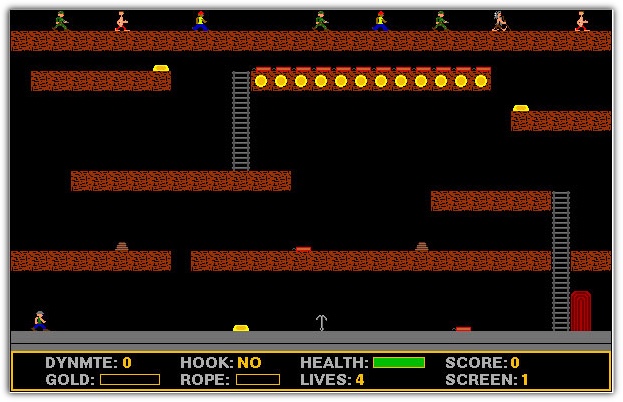
The only way I was able to get this game in my G3 was from a CD that I burned a few years ago. I tried FTPing the file and it wasn't working,the files weren't being copied as Binary files. I tried to stuff it and that didn't work also.
PermalinkAbout
A Mac veteran since 1989, I'm here to share my experience with tips and tricks every Friday. Witnessing the evolution of Mac software and hardware firsthand, I've gained a deep understanding of how these machines work and can help you troubleshoot any issues that may come up.
Check out all the blog posts.
Blog Schedule
| Monday 7 | Media |
| Tuesday 8 | QA |
| Wednesday 9 | Pytest |
| Thursday 10 | PlayWright |
| Friday 11 | Macintosh |
| Saturday 12 | Internet Tools |
| Sunday 13 | Misc |