
Quickly Join Audio Files with OcenAudio
Best Way to Join Files on macOS
If you're looking for a fast and easy way to combine multiple audio files-whether for podcasts, voiceovers, or even pulling audio from a set of video clips - OcenAudio is one of the simplest tools out there.
I recently tested how OcenAudio handled large files, and I was genuinely impressed. It took less than 13 seconds to open a 935 MB video file-a speed that's hard to beat, especially for a free editor.


How to Join Audio Files in OcenAudio
- Drag and Drop your audio or video files into the Audio Sidebar.
- Reorder the files by clicking and dragging them within the sidebar.
- Select all files (use
Shift+ClickorCmd+Click). - Right-click the selection and choose "Join" from the popup menu.
- Select the new join file and go to
File > Save Asto export your new audio file.
Best Method
I've tried other methods, but this gives me the most flexible approach to make sure the audio order is exactly how I want it. No need to worry about importing into a complicated editor or spending time lining up tracks manually.Use Case: Dashcam Audio Extraction
This method is incredibly handy if you want to convert a bunch of dashcam videos into a single audio file. Just load them into OcenAudio, join them, and save. No complicated editing timeline or advanced audio engineering required.
If you're dealing with lots of audio files or want to extract audio from videos without dealing with complex software, OcenAudio is a fantastic lightweight option to get the job done - quickly and for free.
PermalinkMastering Text Sorting with LaunchBar
Quick Tip to Sort any Text
If you frequently work with lists or blocks of text, you know how tedious it can be to manually sort them alphabetically. Fortunately, LaunchBar - the powerful productivity tool for macOS - makes this task effortless with its "Sort Lines" action.
In this quick guide, I'll show you how to sort any text in seconds using LaunchBar.
How to Sort Text in LaunchBar
-
Select Your Text
- Select the text you want to sort (e.g., a list of names, items, or keywords).
-
Open LaunchBar
- Press Shift twice (or your preferred LaunchBar shortcut) to bring up the bar.
-
Find the "Sort Lines" Action
- Press Tab to switch to actions.
- Type "Sort Lines" and select "Sort Lines Ascending"
-
Execute & Paste
- Press Return to sort the clipboard contents.
- Press Command C to copy
- Now, just Command V the sorted text wherever you need it!
Bonus Tip: Reverse Sorting
Want to sort in descending order? Simply run the "Sort Lines" action twice - it will reverse the order.
Why This is a Game-Changer
- No manual editing - No need to manually rearrange text in a text editor.
- Works anywhere - Use it in emails, notes, spreadsheets, or code.
- Super fast - Once you get used to the shortcut, sorting takes seconds.
Try running the command a few times, and you'll see how quickly it becomes second nature. Sorting text has never been this easy!
Audacity Audio Leveling: Normalize vs. Loudness Normalization
Which Reigns Supreme?
When working with audio in Audacity, achieving consistent loudness is crucial. You'll often encounter two powerful tools: Normalize and Loudness Normalization. While both aim to adjust audio levels, they operate on fundamentally different principles. Understanding their distinctions is key to making the right choice for your audio projects.
Normalize works by finding the highest peak (the loudest point) in your selected audio and adjusting the entire waveform proportionally. You specify a target peak level (usually in dBFS - decibels relative to full scale), and Audacity scales the audio so that the highest peak reaches that target.
- Peak-Based: Focuses solely on the loudest point.
- Simple and Fast: Relatively quick processing.
- Ignores Perceived Loudness: Doesn't consider how loud the audio sounds to human ears.
- Can Create Inconsistent Perceived Loudness: Peaks may be normalized, but overall loudness may still be inconsistent.
- Useful for aligning peak levels of similar audio files or preparing audio for further processing.
Loudness Normalization considers the perceived loudness of the audio, aligning it with how humans hear. It uses algorithms that analyze the audio’s overall loudness over time, rather than just the peaks. It targets a specific Integrated Loudness value, typically measured in LUFS (Loudness Units relative to Full Scale).
- Perceived Loudness-Based: Considers the average loudness over time.
- More Complex Processing: Takes longer than Normalize.
- Creates Consistent Perceived Loudness: Results in a more uniform and balanced listening experience.
- Uses LUFS and True Peak values.
- Better for broadcast, streaming, and podcasting where consistent loudness is essential.
- Follows industry standards like ITU-R BS.1770.
Which One is "Better" for Making Audio Louder?
The answer depends on your goal:
- For simply raising the peak level without considering perceived loudness, use Normalize.
- For achieving a consistent and balanced listening experience, use Loudness Normalization.
Why Loudness Normalization is Often Preferred:
Human hearing doesn’t perceive loudness linearly. A short, very loud peak might not sound as loud as a sustained, moderately loud sound. Loudness Normalization accounts for this by analyzing the audio’s overall energy over time. This results in audio that sounds more consistent and comfortable to listen to.
Practical Example:
Imagine you have a podcast recording with a few loud coughs and otherwise quiet speech.
In Audacity:
- Normalize: Effect > Normalize
- Loudness Normalization: Effect > Loudness Normalization
Conclusion:
While Normalize has its uses, Loudness Normalization is generally the superior choice for achieving consistent and professional-sounding audio. By understanding the differences between these two tools, you can make informed decisions and elevate the quality of your audio projects. Choose Loudness Normalization when you want to create a listening experience that is both loud and consistent.
Permalink2019 iMac vs 2025 MacBook Pro
Interesting Comparison
In 2019, I purchased a new iMac. The computer is now six years old. I was thinking if I got a new MacBook pro would there be a significant difference?
I put the question to the test to Grok3, and was surprised to find out that I would notice a big difference. Basically I should see a significant difference. The only downside would be missing the larger screen.
This information is useful for anyone that purchased a computer in the pre-Apple chip days.
2019 iMac
The 2019 iMac came in 21.5-inch and 27-inch variants with Intel processors. For a balanced comparison, let's take a mid-to-high-end model: the 27-inch iMac with a 3.7 GHz 6-core Intel Core i5 (9th-gen Coffee Lake, Turbo Boost up to 4.6 GHz). It typically shipped with 8 GB of DDR4 RAM (upgradable to 64 GB), a Radeon Pro 580X GPU with 8 GB VRAM, and a 1 TB Fusion Drive or optional SSD. Geekbench 5 scores for this model are roughly 1,100–1,200 single-core and 5,500–6,000 multi-core, based on historical data for similar 9th-gen Intel chips. Storage speeds for the Fusion Drive were around 50–100 MB/s for the HDD component and up to 500 MB/s for the SSD portion, while a full SSD option hit ~1,500 MB/s read/write.
Today's MacBook (2025)
As of March 8, 2025, current MacBooks include the MacBook Air (M4) and MacBook Pro (M4, M4 Pro, M4 Max). For a fair comparison, let's use the base MacBook Air M4: a 10-core CPU (4 performance, 6 efficiency cores), 10-core GPU, 16 GB unified memory, and a 256 GB SSD with read/write speeds of ~3,000–5,000 MB/s. Geekbench 6 scores for the M4 are approximately 3,200 single-core and 12,500 multi-core, reflecting Apple's claims of incremental gains over the M3 and real-world tests of early M4 models. The unified memory architecture provides 120 GB/s bandwidth, far outpacing traditional RAM setups.
Speed Comparison
- CPU Performance:
- Single-Core: 2019 iMac (~1,150 Geekbench 5) vs. MacBook Air M4 (~3,200 Geekbench 6). Adjusting for benchmark differences (Geekbench 6 scores are ~10–15% higher than Geekbench 5 for the same hardware), the M4 is roughly 2.5–3x faster in single-threaded tasks. This reflects better architecture (ARM vs. x86) and higher efficiency.
- Multi-Core: 2019 iMac (~5,750 Geekbench 5) vs. MacBook Air M4 (~12,500 Geekbench 6). The M4 is ~2–2.5x faster, thanks to its 10 cores (vs. 6) and optimized design for parallel workloads.
- Memory:
- 2019 iMac: 8 GB DDR4 at ~2,666 MHz (~20–30 GB/s bandwidth), upgradable but still separate from the CPU/GPU.
- MacBook Air M4: 16 GB unified memory at 120 GB/s. The M4's memory is ~4–6x faster in bandwidth and integrated, reducing latency. Even with a maxed-out 64 GB iMac config, bandwidth wouldn't approach the M4's.
- Storage:
- 2019 iMac: Fusion Drive (~50–500 MB/s) or SSD (~1,500 MB/s).
- MacBook Air M4: SSD (~3,000–5,000 MB/s). The M4's storage is 2–10x faster, depending on the iMac's config, slashing load times and improving file transfers.
- Graphics:
- 2019 iMac: Radeon Pro 580X (~1,200–1,500 GFLOPS, good for 2019 gaming/editing).
- MacBook Air M4: 10-core GPU (~4–5 TFLOPS, estimated from M3's ~3 TFLOPS and Apple's claims). The M4's GPU is ~3–4x faster, with hardware ray tracing and better power efficiency, excelling in modern creative workloads.
- Real-World Impact:
- Boot/App Launch: The iMac took ~20–30 seconds to boot macOS Mojave; the M4 MacBook boots macOS in <10 seconds. Apps like Photoshop might open in 5–10 seconds on the iMac vs. <2 seconds on the M4.
- Workloads: Video encoding (e.g., 4K H.264) could take 2x longer on the iMac. The M4's Neural Engine and media accelerators further widen the gap for AI/ML tasks or ProRes editing - tasks the iMac struggles with.
Conclusion
The MacBook Air M4 (2025) is dramatically faster than a 2019 iMac - 2–3x in CPU performance, 3–4x in graphics, and up to 10x in storage speed. The gap widens with higher-end MacBook Pro M4 models (e.g., M4 Max with 40 GPU cores and 400 GB/s bandwidth). The 2019 iMac's Intel architecture and older components can't compete with Apple Silicon's efficiency and integration. For everyday tasks, creative work, or even heavy lifting, today's MacBook leaves the 2019 iMac in the dust - think minutes vs. seconds for complex jobs.
PermalinkMono to Stereo Conversion Made Easy
Create a new Quick Action using Automator
Here's a simple Automator to Convert Mono Audio to a "Stereo" audio.
Why Convert a Mono File?
- Wider Soundstage: Stereo files can create a wider soundstage, making the audio feel more immersive and engaging.
- Improved Depth: Stereo audio can provide a sense of depth, with sounds appearing to come from different distances. Especially when listening to the audio in a car or on airpods.
Keep in mind that simply converting a mono file to stereo won't magically create a true stereo image. The original recording's limitations will still be present. However, conversion can be a useful step in audio post-production, especially when working with archival or legacy content.
Automator Steps
This will create a new action, so when you right click an audio file in the finder, you can just select "Convert Mono to Stereo."
To do this action, I had to use ffmpeg. There's another blog that I wrote on how to install it. It's a cool media utility to install and it's free!
- Open Automator (Finder > Applications > Automator).
- Click New Document, then select Quick Action and click Choose.
- In the Workflow receives current dropdown, select Audio Files in Finder.
- From the Library on the left, search for Run Shell Script and drag it into the workflow area.
- In the Shell: command select /bin/bash
- In the Pass input: use "as arguments"
- Add the Bash Code below.
- Save the file as "Convert Mono to Stereo"
Automator Action ScreenShot
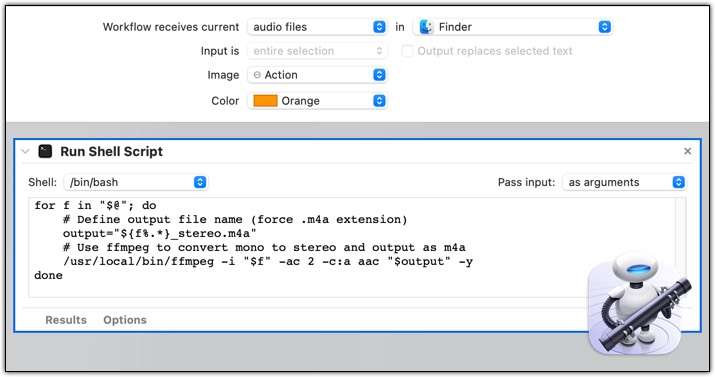
Bash Code Used
for f in "$@"; do
    # Define output file name (force .m4a extension)
    output="${f%.*}_stereo.m4a"
    # Use ffmpeg to convert mono to stereo and output as m4a
    /usr/local/bin/ffmpeg -i "$f" -ac 2 -c:a aac "$output" -y
done
Copy as Markdown
Clean Copy text to DayOne
I've noticed that when I paste text from Chrome into DayOne, it strips away formatting like bullet points and headers, leaving the entry looking messy. To address this, I use a Chrome extension called "Copy as Markdown." It simplifies the process by preserving most of the original formatting - think clean bullet lists and bold headers - making my DayOne entries more organized and visually appealing. It's not flawless (it works about 80% of the time), but it's reliable enough to save me effort.
The only drawback is that I have to right-click and select the extension from a menu each time. This extra step can feel tedious, especially when I'm pasting multiple items in a row. Still, for now, it's a solid workaround.
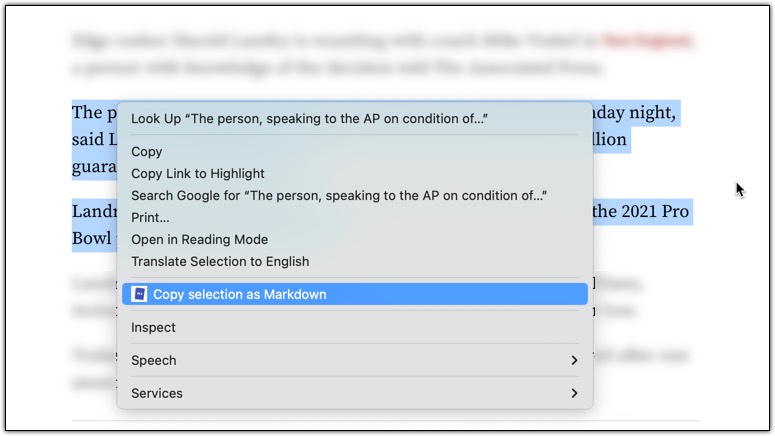
Simply right click to copy the selected content as Markdown.
Extension Info
The extension allows you to copy selected text on a page as Markdown with support for features including the following
- Ability to copy links, images, and selected text as Markdown.
- Linked images, will have options to individually select link or images.
- Formatted text such as Italic, bold, strike-through, and inline code.
- Unordered and ordered lists, with task lists support.
- Tables, with respect to GFM.
- Fenced code blocks, with language detection using info strings.
Note: When copying links and images, Chrome doesn’t let you extract images alt text or anchors text content to be used in Markdown, instead the links themselves are used as link title. Firefox doesn’t have this limitation though.
PermalinkCustomize BBEdit Notebooks in the Dock
A Step-by-Step Guide to Boost Your Mac Productivity
Hello, fellow Mac enthusiasts! If you're anything like me, you probably have a BBEdit Notebook for every project under the sun - blogging, coding, writing documentation, and more. After all, the beauty of BBEdit's Notebook feature lies in its ability to help us stay organized, especially when we're juggling multiple ventures at once.
But here's a little annoyance that has irked me (and possibly you) for quite some time: when you add several BBEdit Notebooks to the right side of your Dock (the "Documents" area), they all show up with the same default BBEdit Notebook icon. It can make it tough to tell them apart at a glance, particularly if you have more than one. So what's a Mac power user to do? Let me walk you through a quick and easy fix to customize those icons - giving each Notebook a unique look - so you can access them without the guesswork.
The Challenge: Identical Icons in the Dock
By default, your BBEdit Notebooks look identical in the Dock's document area. If you keep more than one Notebook down there (and who doesn't?), you'll be left playing "icon roulette" whenever you want to open one. This is far from ideal, especially when you're in the middle of a productive streak and want to jump right into a specific Notebook.
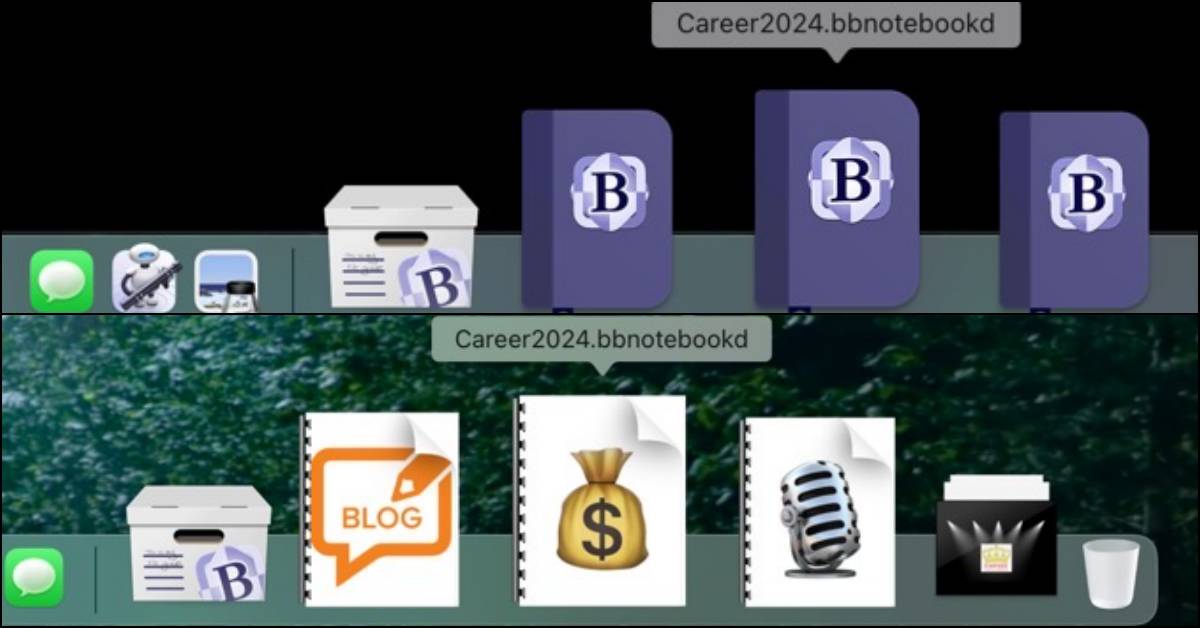
Before/After
The Workaround: Custom Icons
My solution uses a handy little app called Image2icon (though you can use other methods, too). With Image2icon, you can turn just about any image (a logo, a project icon, or even a picture of your cat - hey, you do you!) into a custom icon. It's the same concept as replacing any folder's icon; we're just applying it to the BBEdit Notebooks.
Step 1: Prepare Your Icon
- Install Image2icon (or your preferred icon-editing tool).
You can find Image2icon on the Mac App Store or from its developer's website.
- Choose or create an image for your Notebook icon.
This can be a PNG or JPG. I like to use distinct icons that remind me of each project's theme - like a pen for writing projects or a code bracket for development.
Step 2: Convert the Image to an Icon
- Open Image2icon and drag your chosen image into the app.
- Export the icon in ICNS or Finder icon format (depending on the tool's settings).
Step 3: Replace the BBEdit Notebook Icon
Locate your BBEdit Notebook file in Finder.
Get Info on the Notebook file by selecting it and pressing
Command + I.
Click the small icon in the top-left corner of the Info window to highlight it.
Paste the new icon you created (select the icon in Image2icon's Info panel or drag it from your export, and use
Command + Vin the BBEdit Notebook Info window).- Alternatively, if you used Image2icon's drag-and-drop functionality, you can just drag the new icon onto that small icon in the Get Info window.
Step 4: Refresh the Dock
- Remove the Notebook from the Dock by dragging it out until you see the "Remove" label.
- Drag your Notebook back in from the Finder onto the Dock's document area.
- Voilà! You should now see your shiny new icon in the Dock.
Pro Tips and Extra Ideas
- Keep a Consistent Theme: If you regularly create new Notebooks, it can be helpful to have a common theme or color palette for your icons. It keeps your Dock looking tidy and makes each Notebook icon instantly recognizable.
- Use Short, Descriptive Names: Even though the icons are front and center, a short name or label can go a long way in quickly identifying a Notebook. Right-click on a Notebook in the Dock, select "Show in Finder," and rename the file for clarity (e.g., "Blog Notebook," "Code Docs," "Marketing Plan").
- Drag and Drop for Quick Access: If you're creating a new BBEdit Notebook and already have a set of icons ready, don't forget you can instantly drag it onto the Dock for immediate use. No need to wait until later - get it set up the moment you create it.
Wrapping Up
And there you have it: a simple yet powerful way to distinguish your BBEdit Notebooks in the Dock. By replacing the default icon with a more personalized one, you'll spend less time hunting around and more time being productive in the apps and Notebooks you love.
Got any favorite BBEdit or Dock customization tricks up your sleeve? I'd love to hear about them! Feel free to share in the comments below or drop me a message on social media. Let's keep turning our Macs into the productivity powerhouses we know they can be.
PermalinkHow to Extract Audio from Video on Mac Instantly Using Automator
Turn any video into an audio file with a simple right-click in Finder—no third-party apps needed! Learn how to set up an Automator Quick Action to streamline your workflow.
As a long-time Mac user, I'm always looking for ways to simplify common tasks. One handy trick is extracting audio from a video file using Automator. Instead of launching a separate app, you can create a Quick Action that allows you to right-click any video file in Finder and instantly generate an audio file in the same folder.
Why Use Automator?
Automator is a powerful macOS tool that lets you create custom workflows without needing to know how to code. By setting up a Quick Action, you can convert video to audio without opening an application - just a simple right-click and you're done!
Setting Up the Quick Action
Follow these steps to create a Quick Action in Automator:
- Open Automator (Finder > Applications > Automator).
- Click New Document, then select Quick Action and click Choose.
- In the Workflow receives current dropdown, select Movie Files in Finder.
- From the Library on the left, search for Extract Audio from Movie and drag it into the workflow area.
- In the action settings, choose Audio Only and select your preferred format (e.g., M4A, AIFF, WAV).
- Add the Move Finder Items action to save the extracted audio file in the same folder as the original video.
- Save the workflow as Create Audio from Video.
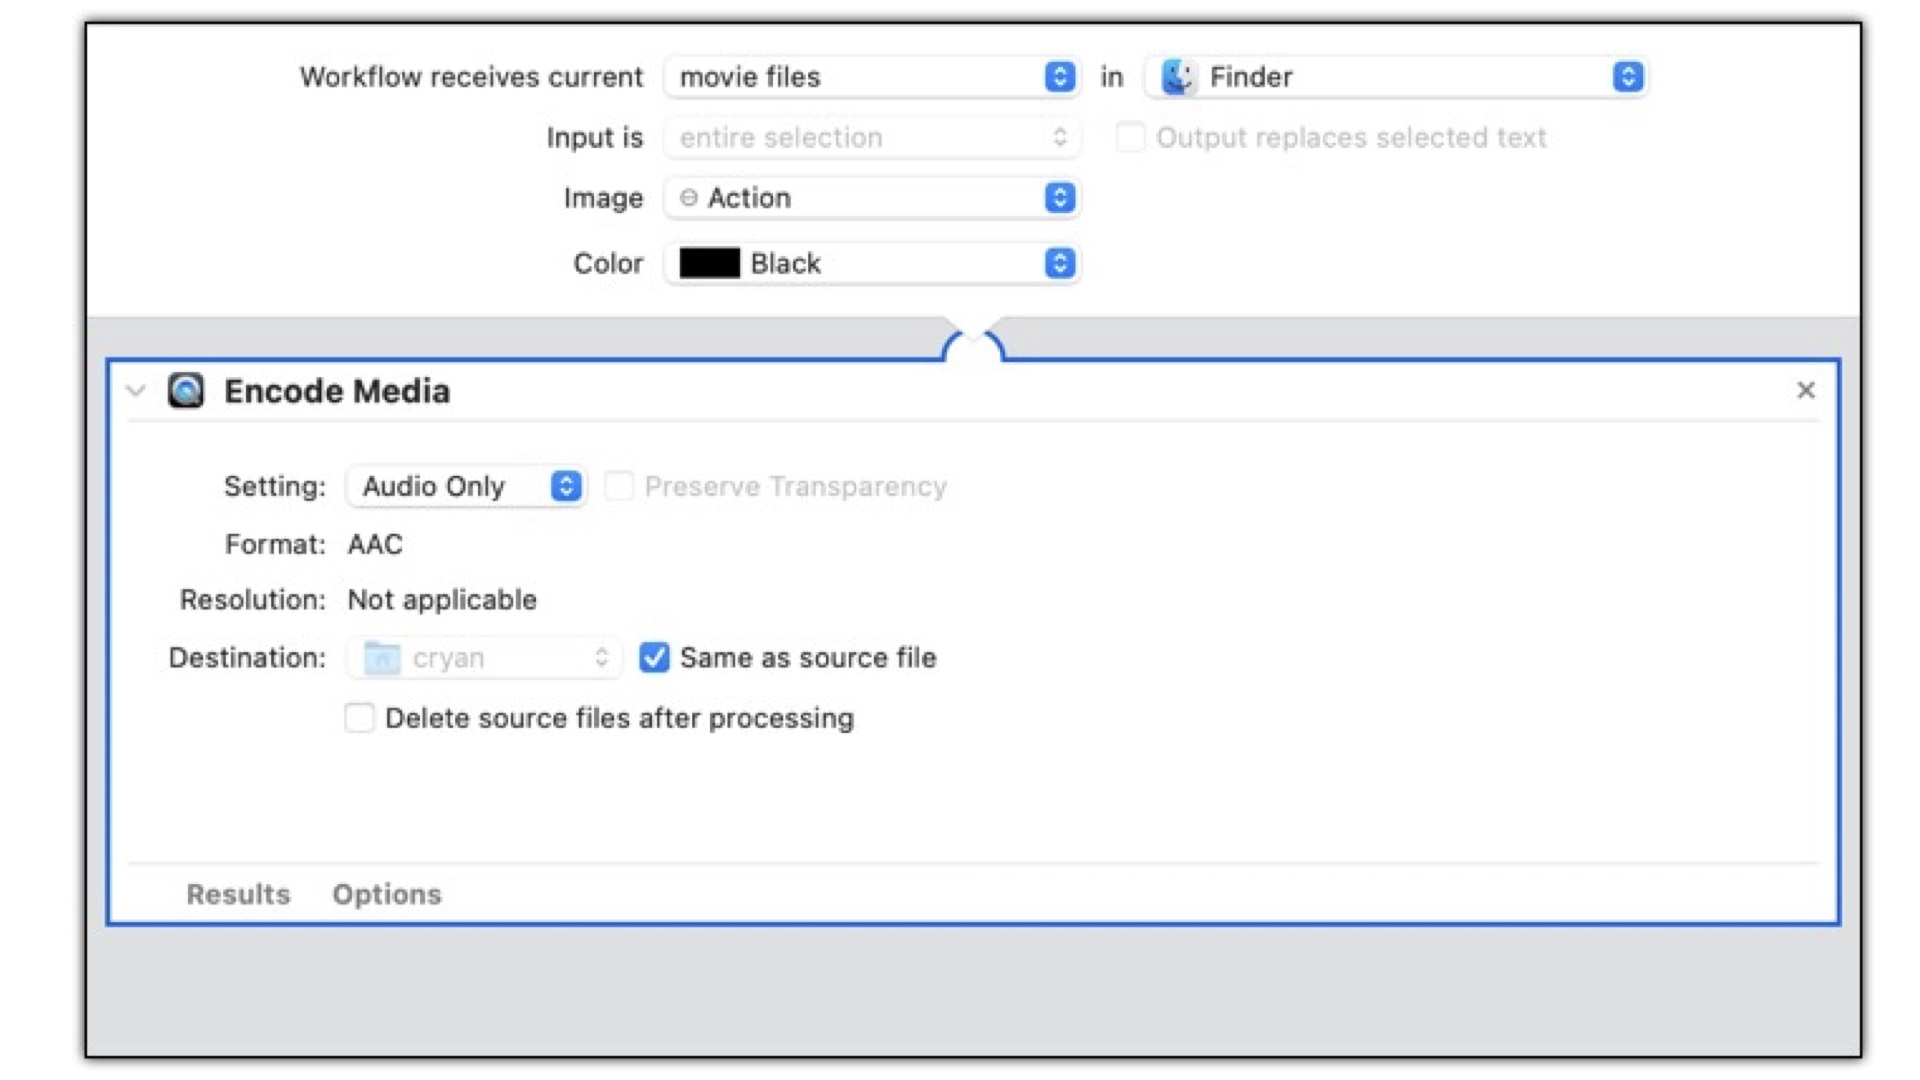
This is what the Automator Action should look like.
Using the Quick Action
Once you've set up the Quick Action, using it is a breeze:
- Locate a video file in Finder.
- Right-click the file, hover over Quick Actions, and select Create Audio from Video.
- Within seconds, the extracted audio file appears in the same folder!

Conclusion
This is a great way to quickly extract the audio from a video file - whether it's a lecture, interview, or music clip - without the need for third-party apps. Automator makes your Mac work smarter, so why not take advantage of it?
PermalinkArt Text 4 AI Features
Cool tool to create amazing images
If you're a designer or someone who loves playing with typography and graphic design, you might be thrilled to know about the latest advancements in Art Text 4, especially with its integration of AI tools. Here’s an in-depth look at how these AI features can revolutionize your design process.
Introduction to Art Text 4
Art Text 4, developed by BeLight Software, has long been a favorite among Mac users for its robust capabilities in creating text effects, logos, and animated text. With the latest update to version 4.4, Art Text takes a significant leap forward by introducing AI-powered tools that not only enhance the functionality of the software but also bring a new level of creativity to the table.
AI Tols Wizard in Art Text 4.
AI Wizard - The Heart of Innovation
The centerpiece of AI integration in Art Text 4 is the AI Wizard. This tool offers users:
- Seamless AI Access: Designers can now leverage artificial intelligence directly within Art Text to enhance or even generate graphics based on text prompts. This means transforming simple text descriptions into complex, visually stunning designs without needing to switch between multiple software tools.
- AI Styles: Art Text 4 introduces AI Styles, which are specially trained models for specific effects. These styles help in creating typography that's not only detailed but also hyper-realistic, pushing the boundaries of traditional design.
- Enhanced Descriptions: When configuring an AI task, the tool encourages users to use descriptive text prompts. Words like "saturated," "vibrant," "dramatic," or "photorealistic" guide the AI to produce outcomes that align closely with the designer's vision.
- Customization Options: The AI Effect Amount and Keep Original Shape settings allow for fine-tuning how much influence the AI has on the final image, balancing between automated creativity and manual design control.

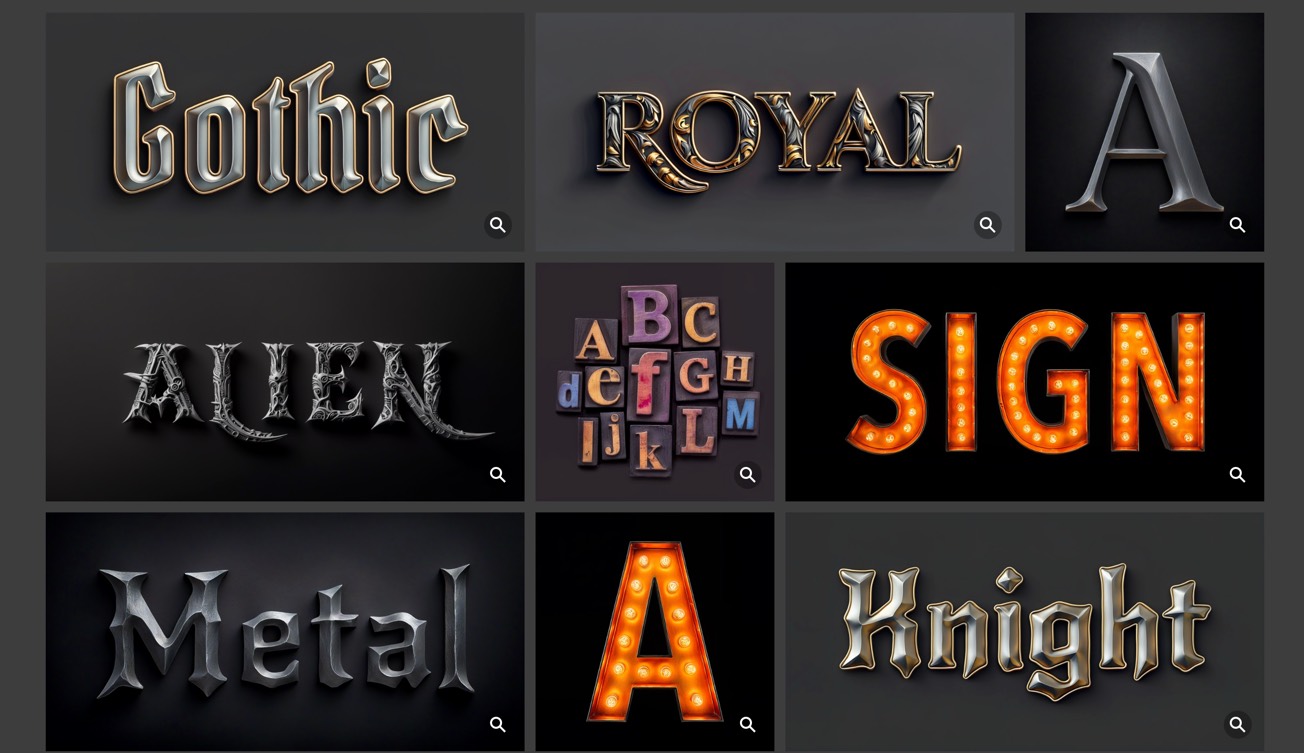
Generated AI Stitched & Knitted Gallery
Practical Applications
- Typography Graphics: With the AI Wizard, creating stunning typography graphics has never been easier. Whether you're looking for a logo with a unique twist or dynamic text effects for marketing materials, the AI tools can generate or enhance these elements.
- Image Upscaling: For those needing higher resolution images, the AI Upscale tool can generate 4K images from your designs, ensuring your work looks sharp across all platforms.
- Design Automation: The AI can automate parts of the design process, like suggesting color schemes or text effects based on the content or theme of your project, saving time and sparking creativity.
Pricing and Availability
Art Text 4.4 is priced at $29.99 and is available both from the BeLight website and the Apple Mac App Store. It requires an Apple Silicon or Intel processor running macOS 10.13 or higher, making it accessible to a wide range of Mac users.
Some of the AI Themes are priced at $24.99 a set (with 40 AI renders) or you can buy a bundle for $99 - which included 640 AI Renders.
The Creative Edge
The introduction of AI tools in Art Text 4 signifies a shift towards more intuitive, user-friendly design software. Here are some of the benefits:
- Increased Efficiency: With AI handling some of the more repetitive tasks, designers can focus more on creativity and less on technicalities.
- Innovation in Design: The AI's ability to interpret and visualize ideas can lead to novel designs that might not have been conceived through traditional methods alone.
- Accessibility: Even those without advanced design skills can create professional-looking graphics, democratizing design to a certain extent.
Letter Craft AI Styles has some many cool applications.
Conclusion
Art Text 4 with its AI enhancements is not just about making design easier; it's about making it more inventive. Whether you're a professional looking to streamline your workflow or a hobbyist eager to explore new artistic avenues, Art Text 4's AI tools offer something for everyone. They exemplify how AI can be a partner, not just a tool, in the creative process, helping to bring visions to life with unprecedented ease and sophistication.
So, why wait? Dive into Art Text 4, explore these AI capabilities, and see how they can elevate your design game to new heights. Remember, in the world of art and design, the only limit is your imagination, and with AI, even that limit expands.

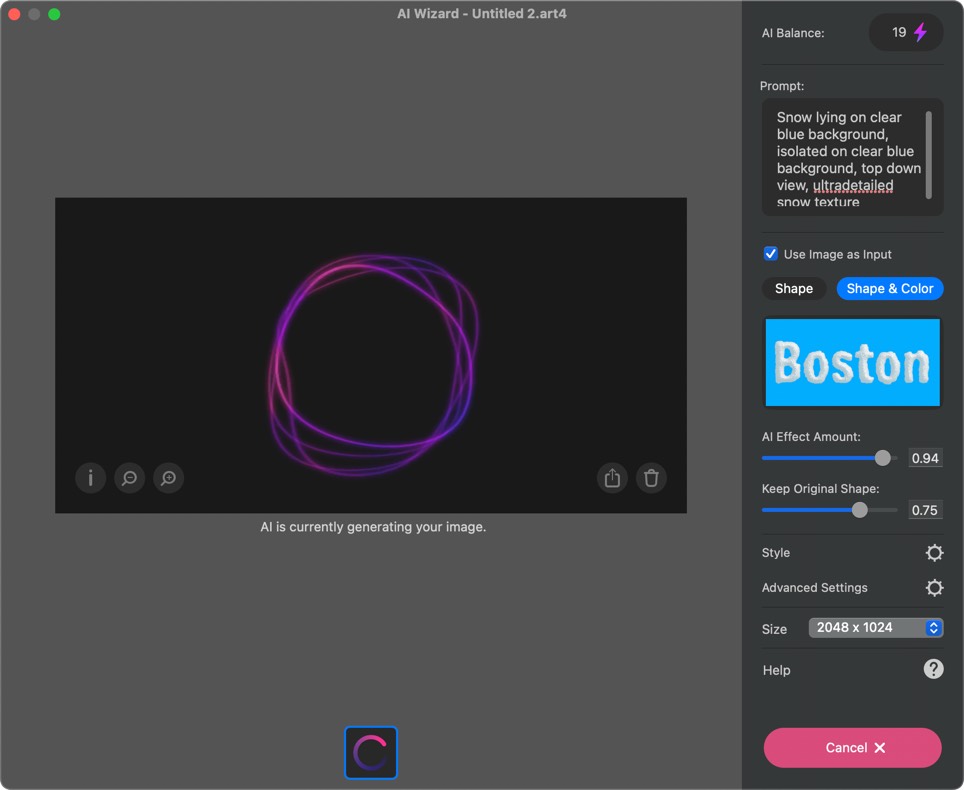
Sample output of the Boston "Snow" using one of the free designs.
Say Command
List of Current Voices
One of the hidden gems in macOS is the say command, a simple yet powerful tool that allows users to have their Mac speak text out loud. While many people know the say command exists, few explore the wide range of voices available and how they can be customized for different purposes.
Basic Usage of the say Command
To use the say command, simply open Terminal and type:
say "Hello, welcome to macOS!"
Your Mac will immediately read the text aloud using the system's default voice.
Listing Available Voices
To see all the voices installed on your Mac, run:
say -v "?"
This command will display a list of voices, their names, and the corresponding language/accent. This is the current list of 175 voices:
Albert              en_US    # Hello! My name is Albert.
Alice               it_IT    # Ciao! Mi chiamo Alice.
Alva                sv_SE    # Hej! Jag heter Alva.
Amlie              fr_CA    # Bonjour! Je mappelle Amlie.
Amira               ms_MY    # Hi my name is Amira
Anna                de_DE    # Hallo! Ich heie Anna.
Bad News            en_US    # Hello! My name is Bad News.
Bahh                en_US    # Hello! My name is Bahh.
Bells               en_US    # Hello! My name is Bells.
Boing               en_US    # Hello! My name is Boing.
Bubbles             en_US    # Hello! My name is Bubbles.
Carmit              he_IL    # ,  .
Cellos              en_US    # Hello! My name is Cellos.
Damayanti           id_ID    # Halo! Nama saya Damayanti.
Daniel              en_GB    # Hello! My name is Daniel.
Daria               bg_BG    # Hello! My name is Daria.
Wobble              en_US    # Hello! My name is Wobble.
Eddy (German (Germany)) de_DE    # Hallo! Ich heie Eddy.
Eddy (English (UK)) en_GB    # Hello! My name is Eddy.
Eddy (English (US)) en_US    # Hello! My name is Eddy.
Eddy (Spanish (Spain)) es_ES    # Hola! Me llamo Eddy.
Eddy (Spanish (Mexico)) es_MX    # Hola! Me llamo Eddy.
Eddy (Finnish (Finland)) fi_FI    # Hei! Nimeni on Eddy.
Eddy (French (Canada)) fr_CA    # Bonjour! Je mappelle Eddy.
Eddy (French (France)) fr_FR    # Bonjour, je mappelle Eddy.
Eddy (Italian (Italy)) it_IT    # Ciao! Mi chiamo Eddy.
Eddy (Japanese (Japan)) ja_JP    # ! Eddy
Eddy (Korean (South Korea)) ko_KR    # .   Eddy.
Eddy (Portuguese (Brazil)) pt_BR    # Ol, meu nome  Eddy.
Eddy (Chinese (China mainland)) zh_CN    # Eddy
Eddy (Chinese (Taiwan)) zh_TW    # Eddy
Ellen               nl_BE    # Hallo! Mijn naam is Ellen.
Flo (German (Germany)) de_DE    # Hallo! Ich heie Flo.
Flo (English (UK))  en_GB    # Hello! My name is Flo.
Flo (English (US))  en_US    # Hello! My name is Flo.
Flo (Spanish (Spain)) es_ES    # Hola! Me llamo Flo.
Flo (Spanish (Mexico)) es_MX    # Hola! Me llamo Flo.
Flo (Finnish (Finland)) fi_FI    # Hei! Nimeni on Flo.
Flo (French (Canada)) fr_CA    # Bonjour! Je mappelle Flo.
Flo (French (France)) fr_FR    # Bonjour, je mappelle Flo.
Flo (Italian (Italy)) it_IT    # Ciao! Mi chiamo Flo.
Flo (Japanese (Japan)) ja_JP    # ! Flo
Flo (Korean (South Korea)) ko_KR    # .   Flo.
Flo (Portuguese (Brazil)) pt_BR    # Ol, meu nome  Flo.
Flo (Chinese (China mainland)) zh_CN    # Flo
Flo (Chinese (Taiwan)) zh_TW    # Flo
Fred                en_US    # Hello! My name is Fred.
Good News           en_US    # Hello! My name is Good News.
Grandma (German (Germany)) de_DE    # Hallo! Ich heie Grandma.
Grandma (English (UK)) en_GB    # Hello! My name is Grandma.
Grandma (English (US)) en_US    # Hello! My name is Grandma.
Grandma (Spanish (Spain)) es_ES    # Hola! Me llamo Grandma.
Grandma (Spanish (Mexico)) es_MX    # Hola! Me llamo Grandma.
Grandma (Finnish (Finland)) fi_FI    # Hei! Nimeni on Grandma.
Grandma (French (Canada)) fr_CA    # Bonjour! Je mappelle Grandma.
Grandma (French (France)) fr_FR    # Bonjour, je mappelle Grandma.
Grandma (Italian (Italy)) it_IT    # Ciao! Mi chiamo Grandma.
Grandma (Japanese (Japan)) ja_JP    # ! Grandma
Grandma (Korean (South Korea)) ko_KR    # .   Grandma.
Grandma (Portuguese (Brazil)) pt_BR    # Ol, meu nome  Grandma.
Grandma (Chinese (China mainland)) zh_CN    # Grandma
Grandma (Chinese (Taiwan)) zh_TW    # Grandma
Grandpa (German (Germany)) de_DE    # Hallo! Ich heie Grandpa.
Grandpa (English (UK)) en_GB    # Hello! My name is Grandpa.
Grandpa (English (US)) en_US    # Hello! My name is Grandpa.
Grandpa (Spanish (Spain)) es_ES    # Hola! Me llamo Grandpa.
Grandpa (Spanish (Mexico)) es_MX    # Hola! Me llamo Grandpa.
Grandpa (Finnish (Finland)) fi_FI    # Hei! Nimeni on Grandpa.
Grandpa (French (Canada)) fr_CA    # Bonjour! Je mappelle Grandpa.
Grandpa (French (France)) fr_FR    # Bonjour, je mappelle Grandpa.
Grandpa (Italian (Italy)) it_IT    # Ciao! Mi chiamo Grandpa.
Grandpa (Japanese (Japan)) ja_JP    # ! Grandpa
Grandpa (Korean (South Korea)) ko_KR    # .   Grandpa.
Grandpa (Portuguese (Brazil)) pt_BR    # Ol, meu nome  Grandpa.
Grandpa (Chinese (China mainland)) zh_CN    # Grandpa
Grandpa (Chinese (Taiwan)) zh_TW    # Grandpa
Jester              en_US    # Hello! My name is Jester.
Ioana               ro_RO    # Salut! Numele meu este Ioana.
Jacques             fr_FR    # Bonjour, je mappelle Jacques.
Joana               pt_PT    # Ol! Chamome Joana.
Junior              en_US    # Hello! My name is Junior.
Kanya               th_TH    # !
Karen               en_AU    # Hi my name is Karen
Kathy               en_US    # Hello! My name is Kathy.
Kyoko               ja_JP    # ! Kyoko
Lana                hr_HR    # Bok, zovem se Lana.
Laura               sk_SK    # Ahoj, volm sa Laura.
Lekha               hi_IN    # ,
Lesya               uk_UA    # !   .
Linh                vi_VN    # Xin cho! Tn ti l Linh.
Luciana             pt_BR    # Ol, meu nome  Luciana.
Majed               ar_001   # !  .
Tnde               hu_HU    # dvzlm! A nevem Tnde.
Meijia              zh_TW    #
Melina              el_GR    # !     .
Milena              ru_RU    # !   .
Moira               en_IE    # Hello! My name is Moira.
Mnica              es_ES    # Hola! Me llamo Mnica.
Montse              ca_ES    # Hola! Em dic Montse.
Nora                nb_NO    # Hei! Jeg heter Nora.
Organ               en_US    # Hello! My name is Organ.
Paulina             es_MX    # Hola! Me llamo Paulina.
Superstar           en_US    # Hello! My name is Superstar.
Ralph               en_US    # Hello! My name is Ralph.
Reed (German (Germany)) de_DE    # Hallo! Ich heie Reed.
Reed (English (UK)) en_GB    # Hello! My name is Reed.
Reed (English (US)) en_US    # Hello! My name is Reed.
Reed (Spanish (Spain)) es_ES    # Hola! Me llamo Reed.
Reed (Spanish (Mexico)) es_MX    # Hola! Me llamo Reed.
Reed (Finnish (Finland)) fi_FI    # Hei! Nimeni on Reed.
Reed (French (Canada)) fr_CA    # Bonjour! Je mappelle Reed.
Reed (Italian (Italy)) it_IT    # Ciao! Mi chiamo Reed.
Reed (Japanese (Japan)) ja_JP    # ! Reed
Reed (Korean (South Korea)) ko_KR    # .   Reed.
Reed (Portuguese (Brazil)) pt_BR    # Ol, meu nome  Reed.
Reed (Chinese (China mainland)) zh_CN    # Reed
Reed (Chinese (Taiwan)) zh_TW    # Reed
Rishi               en_IN    # Hello! My name is Rishi.
Rocko (German (Germany)) de_DE    # Hallo! Ich heie Rocko.
Rocko (English (UK)) en_GB    # Hello! My name is Rocko.
Rocko (English (US)) en_US    # Hello! My name is Rocko.
Rocko (Spanish (Spain)) es_ES    # Hola! Me llamo Rocko.
Rocko (Spanish (Mexico)) es_MX    # Hola! Me llamo Rocko.
Rocko (Finnish (Finland)) fi_FI    # Hei! Nimeni on Rocko.
Rocko (French (Canada)) fr_CA    # Bonjour! Je mappelle Rocko.
Rocko (French (France)) fr_FR    # Bonjour, je mappelle Rocko.
Rocko (Italian (Italy)) it_IT    # Ciao! Mi chiamo Rocko.
Rocko (Japanese (Japan)) ja_JP    # ! Rocko
Rocko (Korean (South Korea)) ko_KR    # .   Rocko.
Rocko (Portuguese (Brazil)) pt_BR    # Ol, meu nome  Rocko.
Rocko (Chinese (China mainland)) zh_CN    # Rocko
Rocko (Chinese (Taiwan)) zh_TW    # Rocko
Samantha            en_US    # Hello! My name is Samantha.
Sandy (German (Germany)) de_DE    # Hallo! Ich heie Sandy.
Sandy (English (UK)) en_GB    # Hello! My name is Sandy.
Sandy (English (US)) en_US    # Hello! My name is Sandy.
Sandy (Spanish (Spain)) es_ES    # Hola! Me llamo Sandy.
Sandy (Spanish (Mexico)) es_MX    # Hola! Me llamo Sandy.
Sandy (Finnish (Finland)) fi_FI    # Hei! Nimeni on Sandy.
Sandy (French (Canada)) fr_CA    # Bonjour! Je mappelle Sandy.
Sandy (French (France)) fr_FR    # Bonjour, je mappelle Sandy.
Sandy (Italian (Italy)) it_IT    # Ciao! Mi chiamo Sandy.
Sandy (Japanese (Japan)) ja_JP    # ! Sandy
Sandy (Korean (South Korea)) ko_KR    # .   Sandy.
Sandy (Portuguese (Brazil)) pt_BR    # Ol, meu nome  Sandy.
Sandy (Chinese (China mainland)) zh_CN    # Sandy
Sandy (Chinese (Taiwan)) zh_TW    # Sandy
Sara                da_DK    # Hej! Jeg hedder Sara.
Satu                fi_FI    # Hei! Nimeni on Satu.
Shelley (German (Germany)) de_DE    # Hallo! Ich heie Shelley.
Shelley (English (UK)) en_GB    # Hello! My name is Shelley.
Shelley (English (US)) en_US    # Hello! My name is Shelley.
Shelley (Spanish (Spain)) es_ES    # Hola! Me llamo Shelley.
Shelley (Spanish (Mexico)) es_MX    # Hola! Me llamo Shelley.
Shelley (Finnish (Finland)) fi_FI    # Hei! Nimeni on Shelley.
Shelley (French (Canada)) fr_CA    # Bonjour! Je mappelle Shelley.
Shelley (French (France)) fr_FR    # Bonjour, je mappelle Shelley.
Shelley (Italian (Italy)) it_IT    # Ciao! Mi chiamo Shelley.
Shelley (Japanese (Japan)) ja_JP    # ! Shelley
Shelley (Korean (South Korea)) ko_KR    # .   Shelley.
Shelley (Portuguese (Brazil)) pt_BR    # Ol, meu nome  Shelley.
Shelley (Chinese (China mainland)) zh_CN    # Shelley
Shelley (Chinese (Taiwan)) zh_TW    # Shelley
Sinji               zh_HK    #
Tessa               en_ZA    # Hello! My name is Tessa.
Thomas              fr_FR    # Bonjour, je mappelle Thomas.
Tina                sl_SI    # ivijo, ime mi je Tina.
Tingting            zh_CN    # Hi my name is Tingting
Trinoids            en_US    # Hello! My name is Trinoids.
Whisper             en_US    # Hello! My name is Whisper.
Xander              nl_NL    # Hallo! Mijn naam is Xander.
Yelda               tr_TR    # Merhaba, benim adm Yelda.
Yuna                ko_KR    # .   .
Zarvox              en_US    # Hello! My name is Zarvox.
Zosia               pl_PL    # Hi my name is Zosia
Zuzana              cs_CZ    # Hi my name is Zuzana
About
A Mac veteran since 1989, I'm here to share my experience with tips and tricks every Friday. Witnessing the evolution of Mac software and hardware firsthand, I've gained a deep understanding of how these machines work and can help you troubleshoot any issues that may come up.
Check out all the blog posts.
Blog Schedule
| Saturday | Internet Tools |
| Sunday | Open Topic |
| Monday | Media Monday |
| Tuesday | QA |
| Wednesday | Veed |
| Thursday | Business |
| Friday | Macintosh |
Other Posts
- The Best Journal Tool for Developers on macOS
- ArtBoard and Ortelius now Free!
- Expanding Polygons Beyond the Default in Keynote
- Navigating the Legacy of Sorenson Video Codec
- Tot
- Adding Custom Songs and Clips to the Apple Loop Library
- iTunes ArtWork
- Stitch Effect in Pixelmator
- Cable Marker
- New iPhone 14 Max
- Test Audio Input Quality
- AirDrop with iMac Mid 2011
- Thumbscrew
- AppleScript Script Menu
- Skitch and Evernote