
QuickTime Audio
Use Quicktime to quickly digitalize audio
Apple Quicktime has the ability to record video and audio files. This is a quick way to digitalize audio. For example, if you want to send an audio message in an email or a social media post.
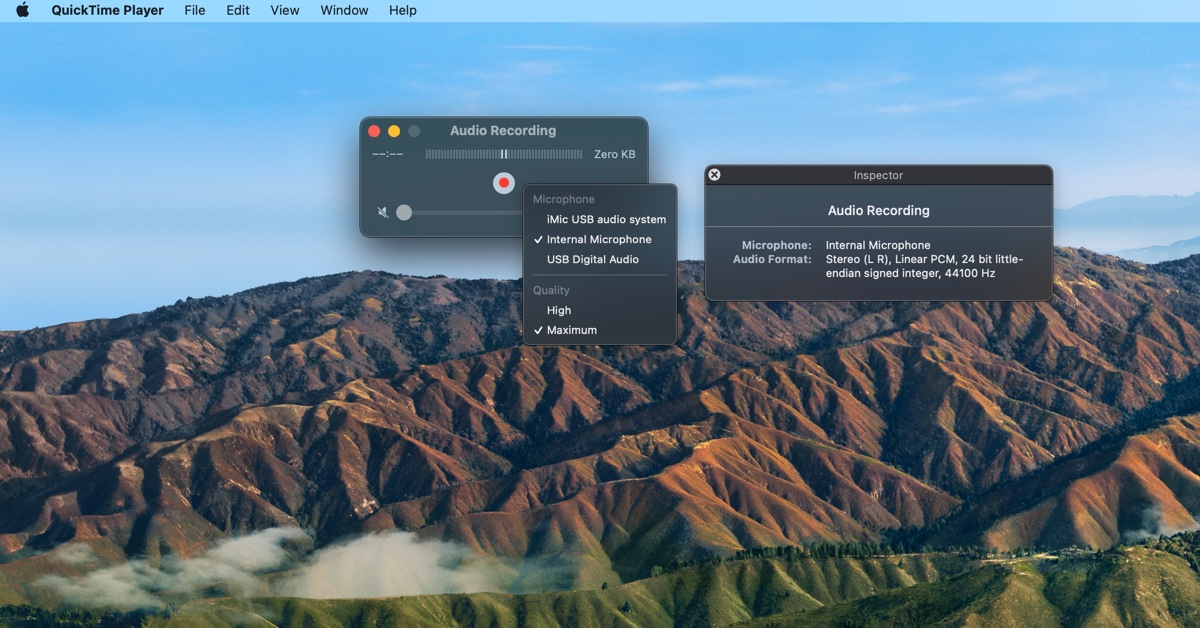
There are two settings for audio:
| Setting | Description | |
|---|---|---|
| High | 44100 Hz AAC audio | |
| Maximum | 44100 Hz, uncompressed Linear PCM 24-bit AIFF-C audio |
Four Things I Learned
The output audio is off, by default. You have to adjust the volume to hear the recording.
Shortcut for creating a new audio recording is Shift Command N
The recording settings that Quicktime starts with are the same as the default sound input. This is defined in the System Preferences - select Sound.
When you have the QuickTime Inspector open, it shows you the current settings that you have set up.
Three Reasons to Use Quicktime
- Fast way to record audio. Pretty much hit record and you're on your way.
- Installed on all Macintosh computers. If the computer has Quicktime, you have the ability to record audio. (Seems like a tool that Mission's Impossible's Ethan Hunt might use to record a confession.)
- Apple Script Support! You can write Apple Script or Automator action to record audio based on an action - such as setting up a recording to listen to mystery sounds at the office at midnight.
Three Reasons Not to Use Quicktime
- Limited recording scope. You can't define recording by application. For example if you want to record audio from Safari. This can be done using Audio Hijack.
- No Menu Bar or Dock Record Option. You have to have the App open and then type the keyboard shortcut and then record. Too many steps to record something quickly. Best solution to this is Simple Recorder.
- Limited Audio Configuration - You can only record using two settings High and Maximum. Use apps like Audacity for more configuration options.
Combine Files using BBEdit
Easy way to Combine Files in MacOS
Earlier this week I had a bunch of Apache log files that I wanted to combine into a single file. I was trying to figure out the best way to do it. A quick Google search showed me a solution from 2014. The purpose of this post is to say that it still works!
In BBEdit
Here are the steps to quickly merge a bunch of files:
- Open up BBEdit
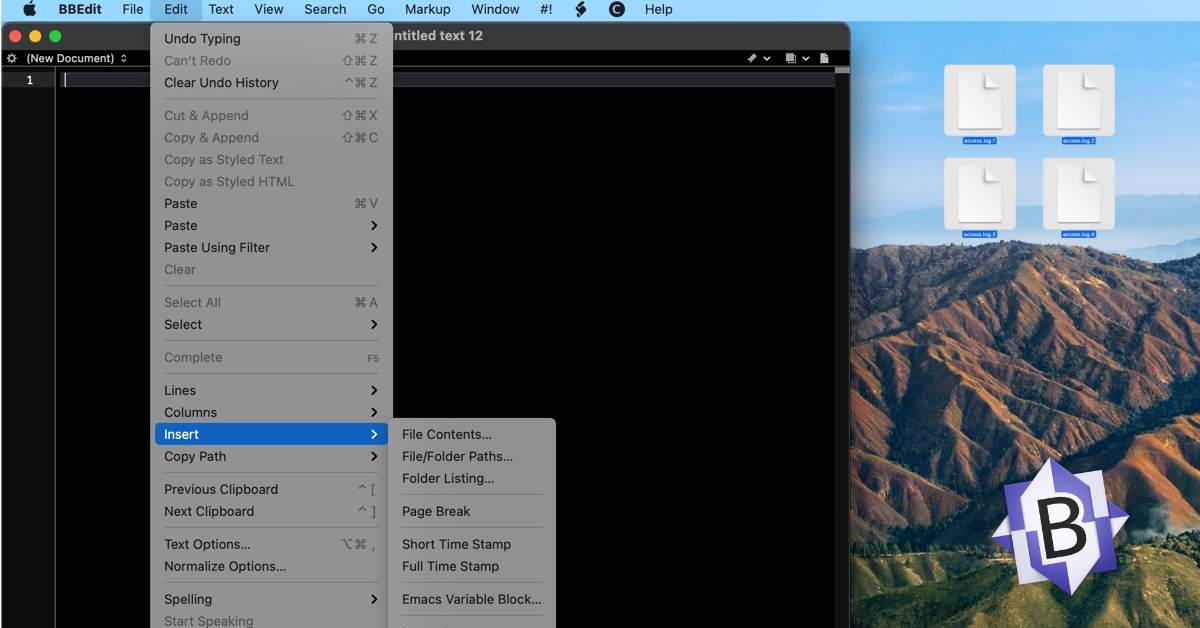
- Create a new Text Document (Command N)
- Go Under Edit menu and select Insert then “File Contents...â€
- Select the files that you wish to add then click Insert
Alternate Way
- Open up BBEdit
- Create a new Text Document (Command N)
- In the Finder drag and drop the text files into the BBEdit window
Using the Command Line
Another solution is to use the Cat Unix command in Terminal. Here's a sample of what that would look like:
cat access.log.* >> website.log
Sleep via Keyboard
Useful LaunchBar Action
One of the complaints that people have with Apple's Mouse is the location of the charging port. It's located underneath the mouse. This means that you can't use the mouse when you charge it.
So people end up just setting up a reminder to charge the mouse at night - once a week.
The problem with that is, if the computer is on, there's no way to quickly put the computer to sleep using the keyboard.
There's is if you have LaunchBar.
LaunchBar to the Rescue
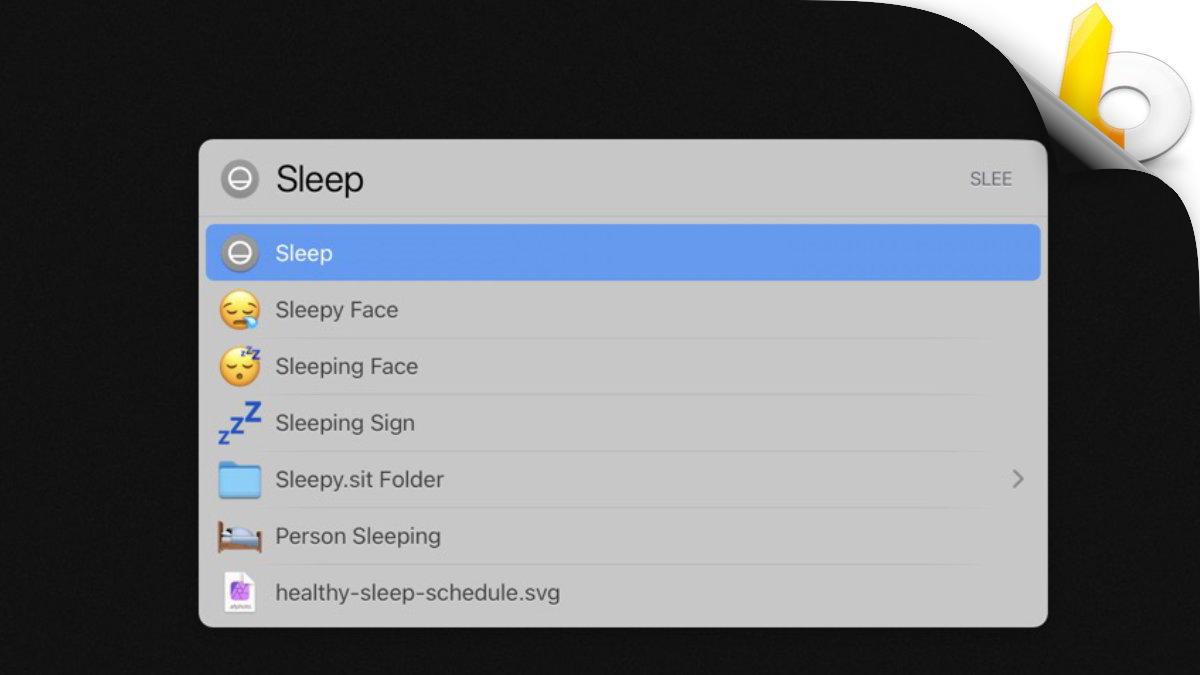
LaunchBar has a built in action for Sleep. Simple type in the Command Space short cut and then type in Sleep and hit return.
Your computer goes to sleep.
Want to shut it down instead, Simple search for Shut and then hit return.
This is just one of many cool things that makes LaunchBar useful. I would highly recommend getting it.
Not in Spotlight
There's no action available in Spotlight. When you search for Sleep and select it, you are presented with the Energy Saver System Preferences.
PermalinkMicrosoft Teams Performance
Tips on how to make teams work better
Are you experiencing serious performance issues with Microsoft Teams? Are you having to close out applications like Slack and Chrome before you connect to a meeting?
Is Microsoft Teams maxing out the computer CPU?
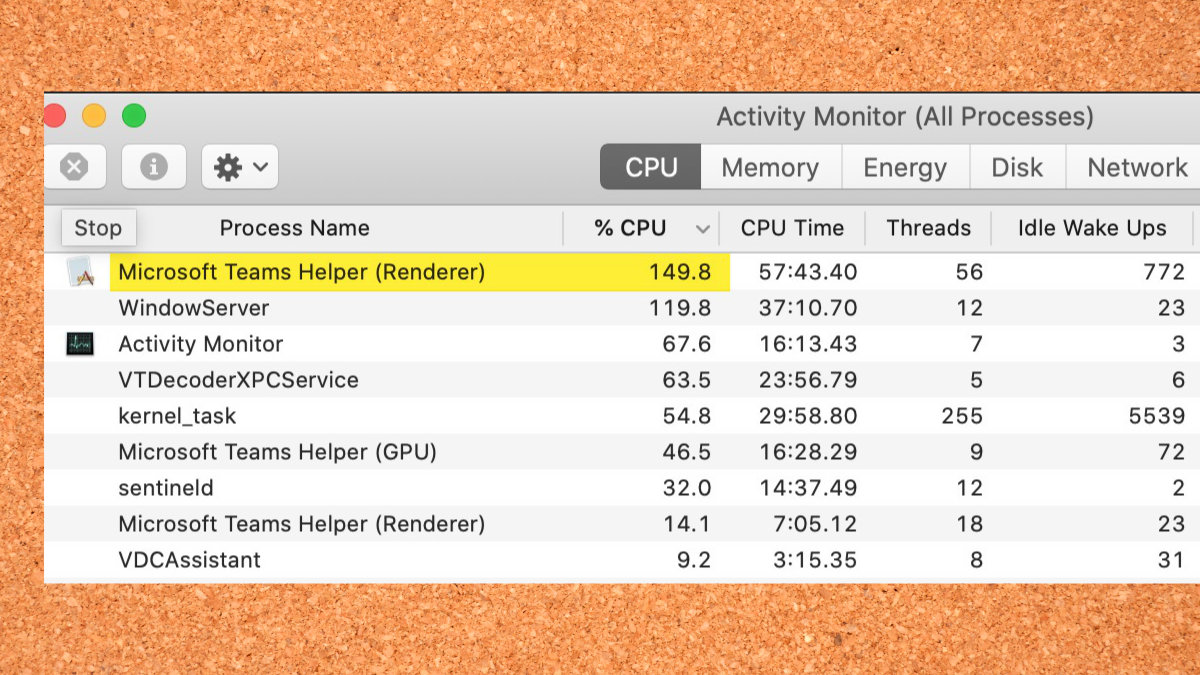
Chances are that there's a simple settings adjustment that should be done. You'll need to disable the GPU hardware acceleration. On some older Macs, this may cause a considerable amount of slowness.
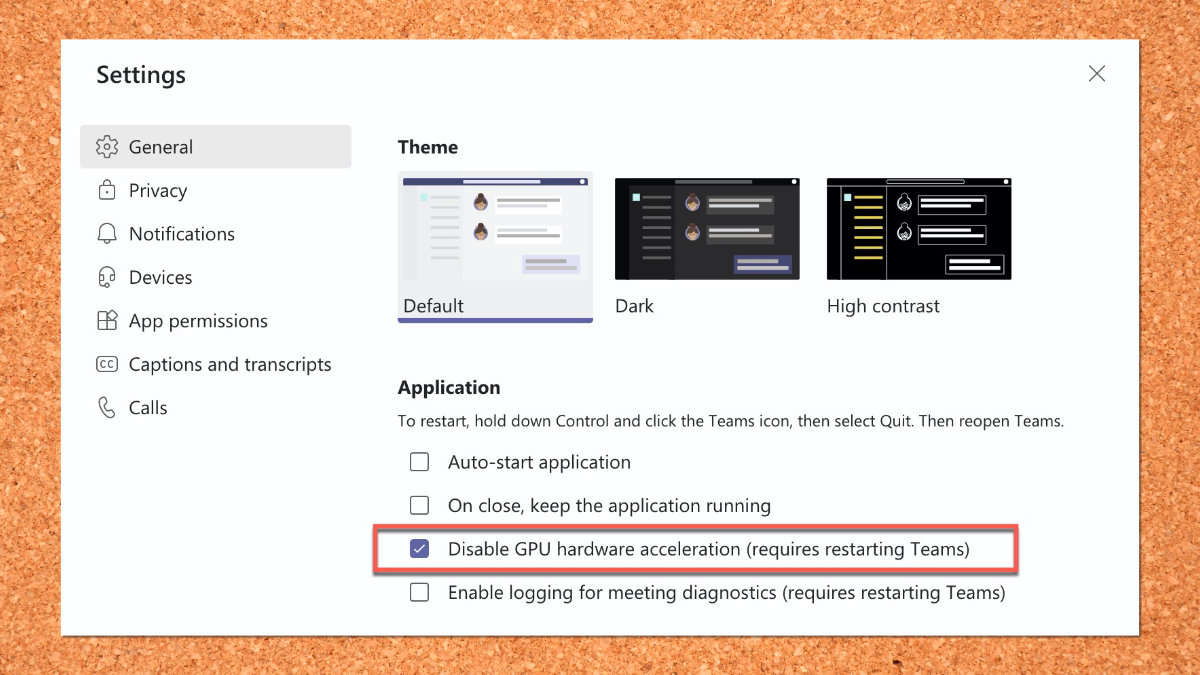
How to Disable GPU Hardware Acceleration
The GPU Hardware Acceleration is done in the settings panel of Microsoft Teams. Here are the steps:
- Open up Teams
- Click on your name on the top right and select settings
- Check the "Disable GPU hardware acceleration"
- Restart Microsoft Teams
This is what it should look like when completed:
One More Thing...
I would suggest restarting the computer. It's not necessary as part of the steps, but it couldn't hurt.
You should see improvement in the next meeting. Your computer won't go to a crawl and you shouldn't have any drop frames during the meeting.
PermalinkCamera Permissions
Finding the Apps that use the Camera
Recently I connected a new camera to my iMac. After it was connected, I was wondering what applications had camera support that I could try out the new camera.
I know that Apple has apps like Quicktime, Facetime, and Photo Booth that support the camera. What about other Apps on my computer?
The easy way to find out what apps have Camera support is to look at the Camera permissions.
Finding Camera Access
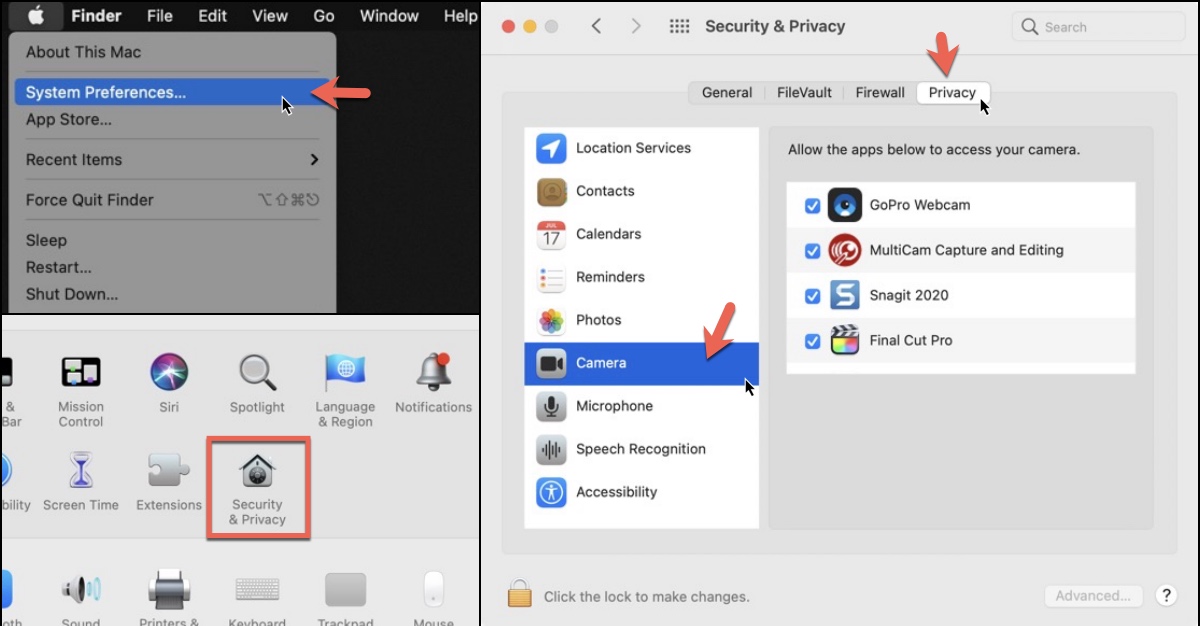
Simple steps to find what Apps have Camera access:
- Go to System Preferences.
- Select the Security & Privacy category
- Select the Privacy Tab
- Select Camera.
Note: That you have to allow Applications to have permission to access the camera. If you haven't used the camera functionality in some apps, you may not have been asked for permission to use the camera.
Quicktime
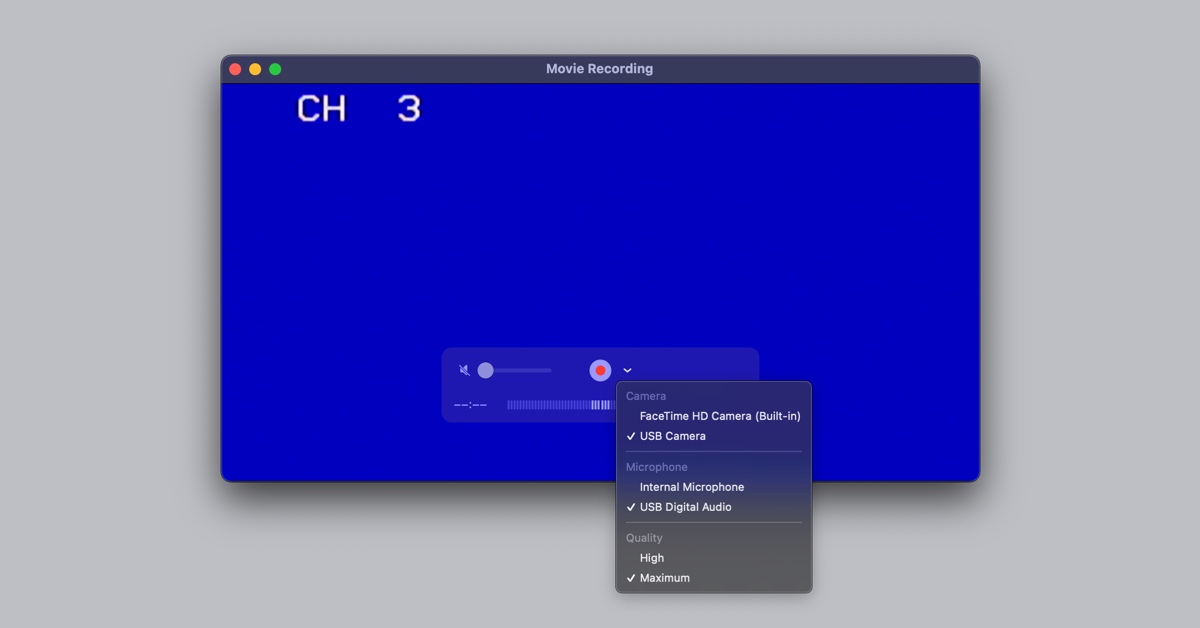
Using the "New Movie Recording" in Quicktime Player was the fastest way that I found to get RAW video on the computer.
The keyboard shortcut: Option Command N is good one to remember.
This is the capture options that you have:
| High | H.264 video and 44100 Hz AAC audio |
| Maximum | Apple ProRes 422 video and Linear PCM audio |
Zephyr Font
Old Font that Still Works today
Every now and then, I like to look back at some fonts in my CD collection. Some of the fonts that I have are outdated and can't be used in the latest macOS. There are a few that are still usable.
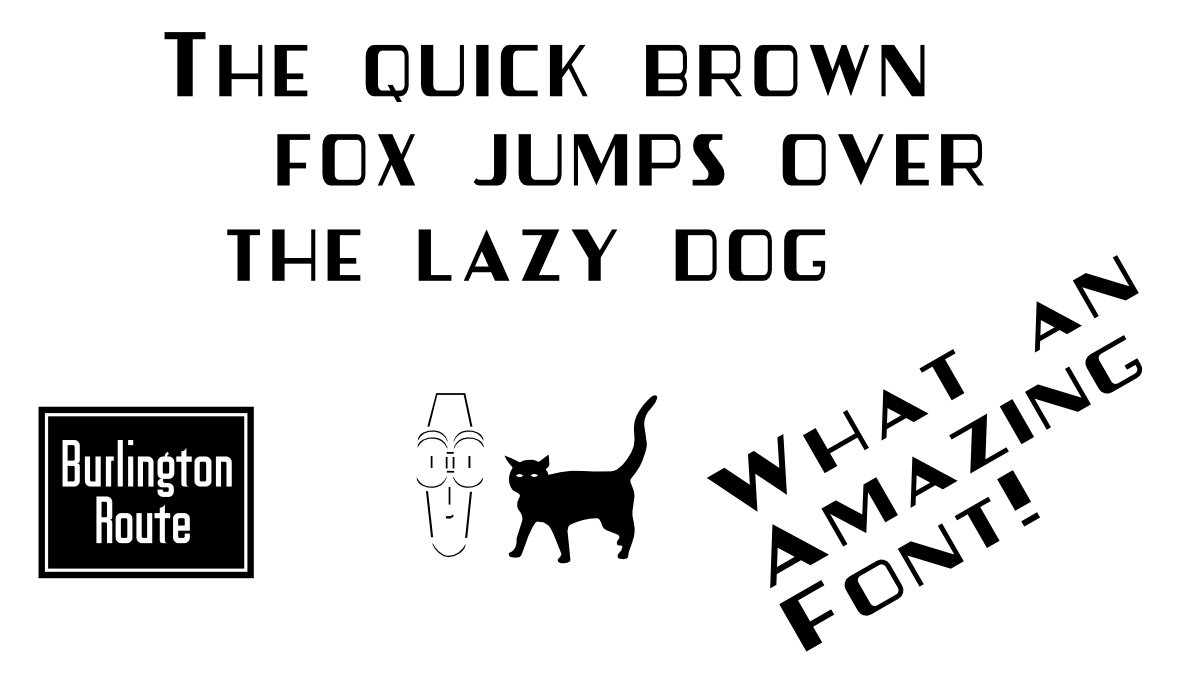
One of the fonts in my collection that I found interesting is the Zephyr Font. Benn Coifman, the developer, named the font after the Zephyr trains.
What caught my eye about the font is that it is very similar to the GoPro Logo font. Here's an example of the font:
Font Description
After you have installed the files, "Zephyr.suit", "CZHer", and "CZHeralds.bmap" in your font folder, restart your word processor and print out a copy of "Zephyr Legend" (If you don't have Microsoft Word, I hope your translator can handle the new fonts). The top 2/3's of this file demonstrate the Zephyr font. At the bottom, you will see a couple of special characters that are in CZHeralds font. Note that the California Zephyr logo is split into three letters so it will have a lower probability of crashing your printer.
Zephyr font, all of its accompanying files, and train icon are © 1994-5 Benn Coifman. (that looks so nasty now that I typed it)
Three Things I Learned
This still works in MacOS 11.3 even though it is 27-years old (Created July 24, 1995). In fact, the copy I had was from a CD that was also about 27-years old. This means that I installed the same font that was released 27-years ago - I didn't just download it.
There is a similar font called Rail RoadRoman available on FontFreak. I wasn't able to find the Zephyr.suit font. There are other Zephyr fonts, but they didn't look the same.
Font was created using Altsys Fontographer 4.0.4D2 7/24/95
There are a couple of Easter Eggs in the font collection:
- There is a Burlington Route logo when you type in # - this is a reference to the Chicago, Burlington and Quincy Railroad. To get this simply type in Shift 8.
- There is a Face and a black cat. These are found by typing in Shift 2 for the face and Shift 3 for the cat. No clue on why these are there.
TypeFace
A tool to manage your Font collection
I am a huge fan of FontDoc - an application that lets you see the various font faces that you have installed. You can select the preview word, and copy and past the content into any document while maintaining the font format.
Recently I became aware of another Font Manger called TypeFace. So I thought I check it out and see how it might be better than FontDoc. TypeFace cost $19 and FontDoc is Free.
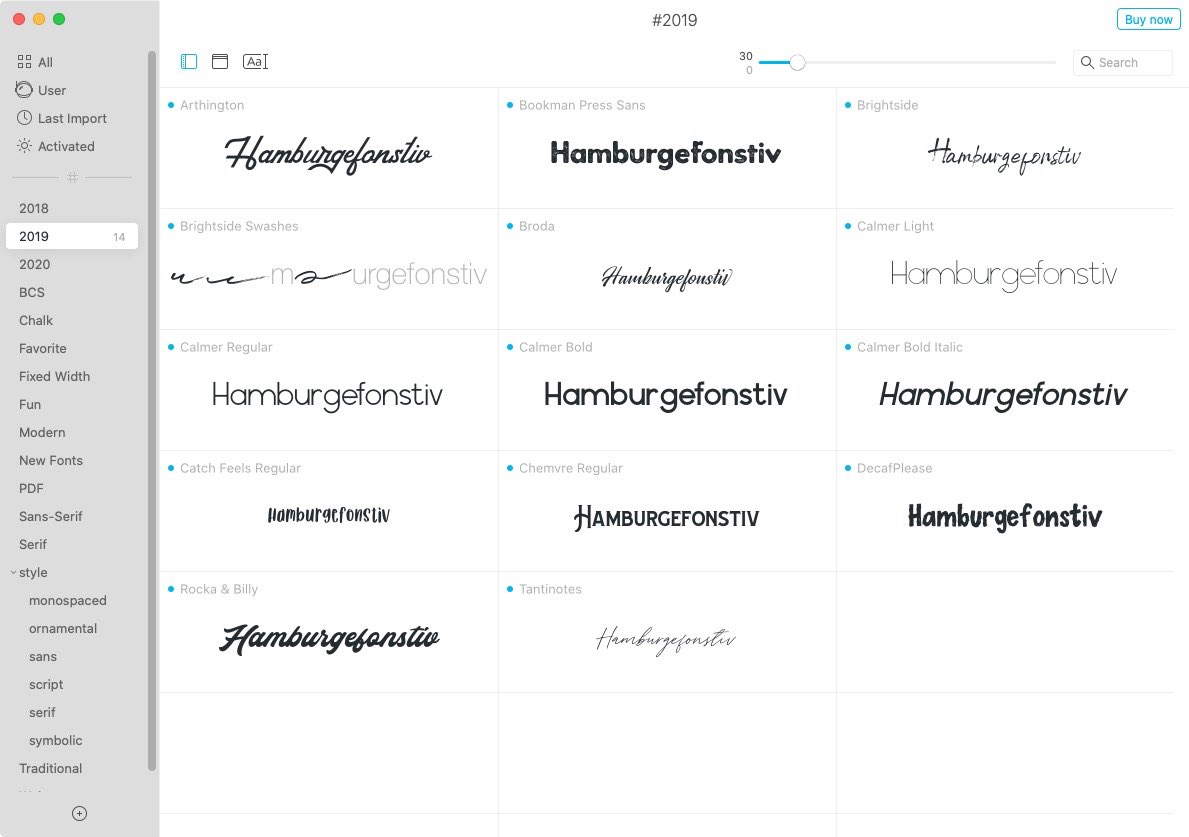
Six Things I Discovered
By default TypeFace uses "Hamburgefonstiv" as the preview word. This is a "filler text" use to test the appearance of a typeface. You can easily change it by toggle preview input.
I can "dig down" in the fonts and see all the characters.
There's no way to copy the preview text and font style into another document.
You can tag fonts! This is a nice way to organize fonts that you use for different projects. This way when you select a collection on the left, you can see all the fonts that is used. For example, you may have a collection for Facebook Posts, Holidays, or Videos.
You can easily import fonts from folders, this makes it easy to identify which fonts you want installed. When you find the one you want, right click on it and select Activate.
When you are done with a font, perhaps it's something that you don't use anymore, you can also deactivate it. This will remove it from the system font menu making it easier to find the fonts you want.
Will I Purchase this?
I am not going to purchase this application. It looks great and works great too! However, I really don't need this kind of font management.
I am more interested in finding font styles that work great for the text I am using right now. I don't think I'll be needing to create various collections.
Maybe someday, but not now.
This is a cool application, and I had fun playing around with it.
Available in SetApp
If you have an active SetApp subscription, you can just download TypeFace.
PermalinkNSMenuItem
What is the NSMenuItem functionality in the Finder?
I was looking for something unique to blog today. Since this day "N" of the A-Z April challenge, I was looking for something that started with the letter "N." Here are some of the topics that I was thinking about:
- Apple Notes - I have been using it a little and thought it would be a useful topic, as maybe I can find some new feature.
- Notion - Great note application. Its a tool that I use a lot since I stopped using Evernote.
- News App - I don't use it that much, maybe its something that I should use?
- Numbers - Maybe I'll discover a new feature or a tip?
None of those applications really sounded interesting to write about. So I decided to head over to the finder and do a search in Help for the letter "N."
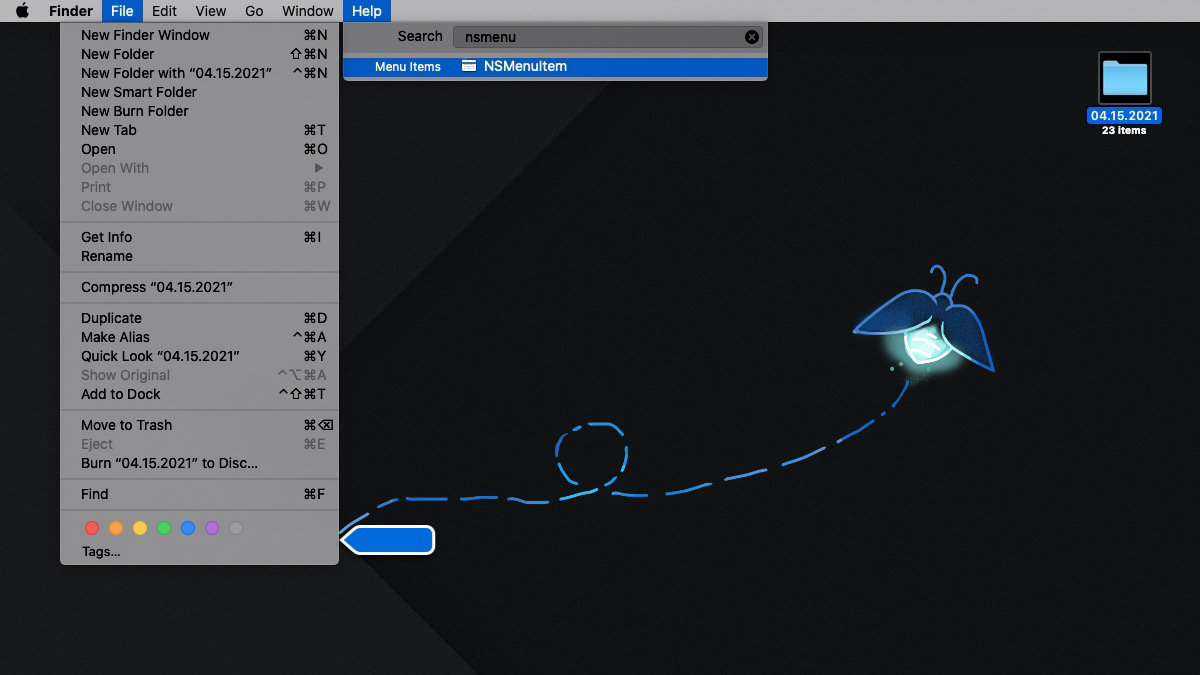
To my surprise. I found something interesting. One of the search results was for NSMenuItem. I thought it was a weird menu name, so when I selected it, the help arrow pointed to an empty area above the word "Tag" in the File menu.
Is this a Bug??
I checked a couple of computers and they had the same results. There is no NSMenuItem in the File menu, yet it appears when you do a search for in. (Only in the Finder)
According to the Apple Developer site, the NSMenuItem is a command item in the app menu.
Apparently this is a legitimate item, but whoever worked on the Finder's File menu didn't hide the feature properly. This bug appears in macOS Catalina, so it's been there for a while.
Check It Out!
If you have a Mac, try this:
Select the Finder, then the Help menu. Type in NSMenuItem, or simply 'N.'
You'll see one of the search results will be the mysterious NSMenuItem, select it and you'll see that it points to the same place as the above screenshot.
PermalinkHemingway App
Useful Application to create Blog post that reads better.
Do you want to write better blogs?Â
One way, is to use a program like Hemingway. Its purpose is to help you write better sentences.Â
How Hemingway Works
Information From their website:
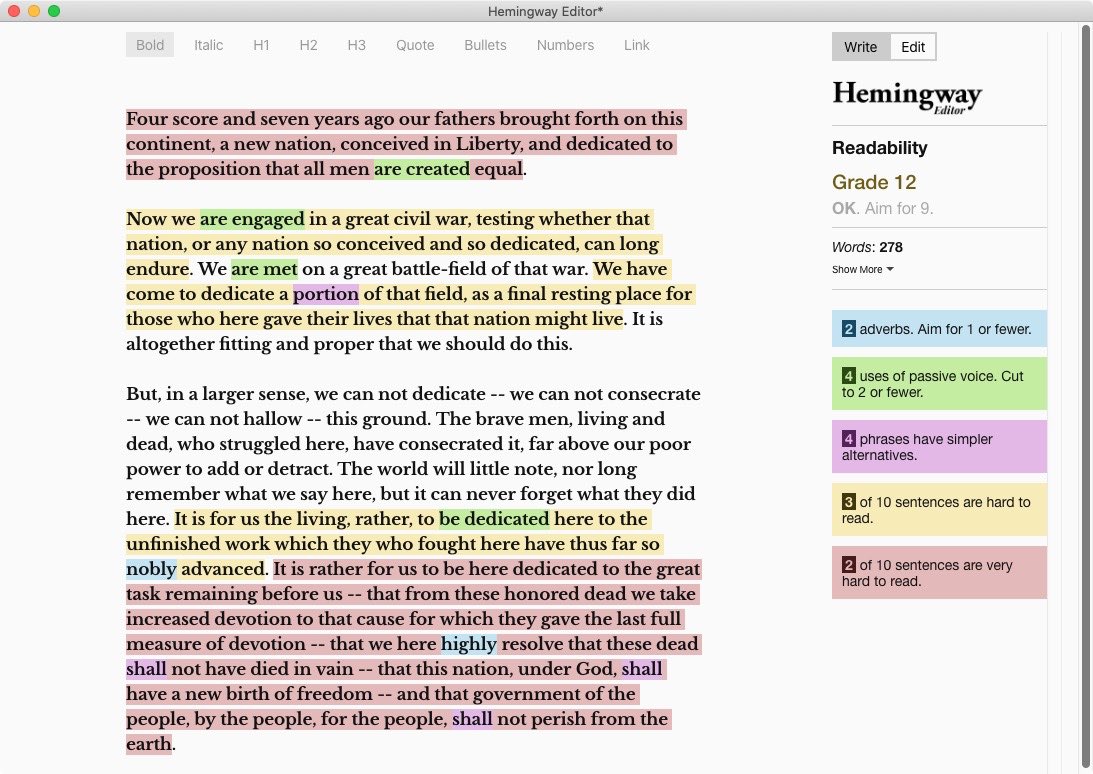
Hemingway makes your writing bold and clear. It's like a spellchecker, but for style. It makes sure that your reader will focus on your message, not your prose.
Too often, our words are like our thoughts — innumerable and disorganized. Almost any bit of writing could use some cutting. Less is more, etc.
So, the Hemingway Editor will highlight (in yellow and red) where your writing is too dense. Try removing needless words or splitting the sentence into two. Your readers will thank you.
Abraham Lincoln would have benefited from the Hemingway App.
Seven Things I Learned
- The Hemingway Application cost $19.99 via the company store. This is a one-time fee, there is no subscription. I purchased it in August 2015 and in January 2017 got a free update.
- You can export the text into 4 formats: Plain text, Markdown, HTML, Word Doc, PDF Document and PDF.
- You can also Publish the document to Medium or WordPress.
- You don't need internet access to use Hemingway - which is the case with Grammarly.
- The sidebar can give you interesting statistics about your content. One stats that I find interesting is the Reading Time. So if you are into SEO, you'll be able to create content that matches the desired reading time. You can get information on the Adverb, Passive Voice, Phrases, and sentence readability.
- Hemingway Editor didn't catch some basic grammar errors. For example, when composing this blog post, I wrote the words better twice, it was caught by Grammarly.
- Hemingway Editor is a good last step in the editing process. I don't see it as a good writing environment to composed content. The Markdown export is really good and clean.
Bokeh Effect in PhotoScape
Photoscape has some cool Bokeh effects
There are a lot of websites that sell Bokeh overlays that you can apply to any image. If you have Photoscape X, you already have some cool Bokeh effects.
What are Bokeh?
Bokeh is adding a lighting overlay on an image to give it a bit more flair effect. It is supposed to show additional lighting towards the camera.
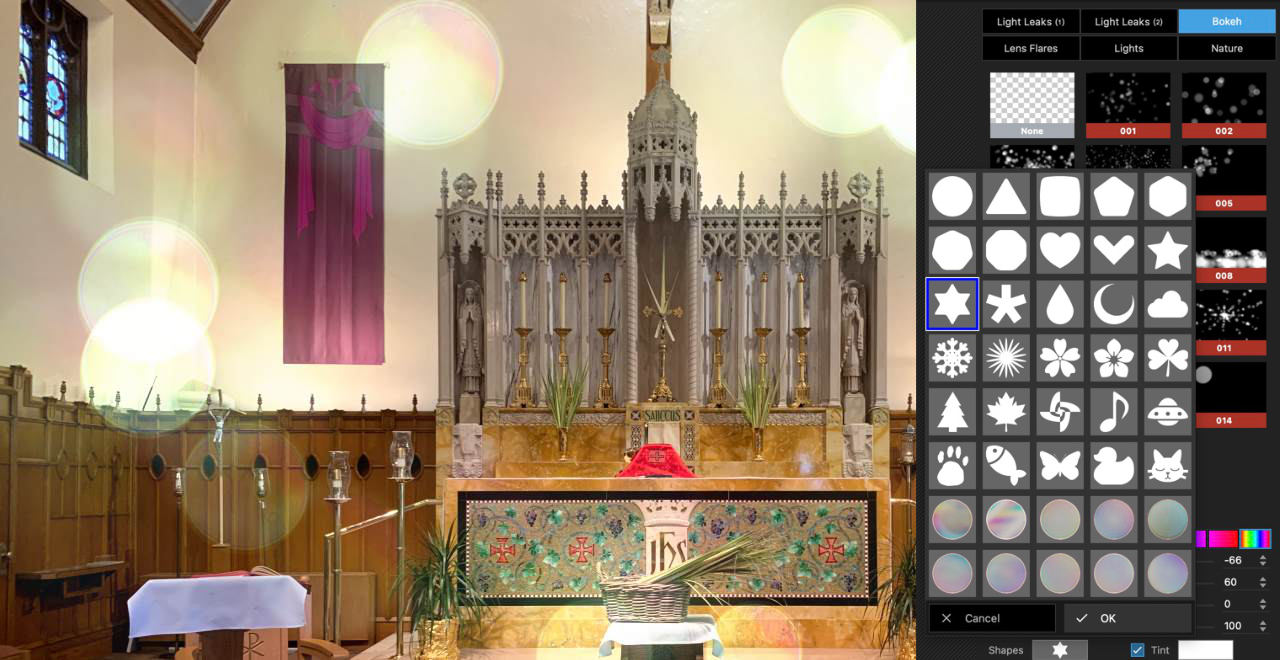
Sample Bokeh with the menu in Photoscape.
Bokeh in Photoscape
You can find all sorts of Bokeh in the Light -> Bokeh section of the editor. There are 17 default tools, with all sorts of configurations. You can change the Light, Scape, Angle, Aspect Ratio, and Shapes.
Five Things I Learned
There are 40 different shapes to choose from. Everything from stars, hearts, snowflakes to mix color circles.
You can adjust the center of the Bokeh light by using the controller in the center.
The bokeh is also available in the Batch mode, so you can apply the same unique effect to a group of images.
If your really good at applying bokeh, you can always use the scatter brush to create your own.
There is a Bokeh Blur in the Adjustments section, but that is to make the background out-of-focus. This isn't the same as adding a group of lights as an overlay on a photo.
PermalinkAbout
A Mac veteran since 1989, I'm here to share my experience with tips and tricks every Friday. Witnessing the evolution of Mac software and hardware firsthand, I've gained a deep understanding of how these machines work and can help you troubleshoot any issues that may come up.
Check out all the blog posts.
Blog Schedule
| Saturday | Internet Tools |
| Sunday | Open Topic |
| Monday | Media Monday |
| Tuesday | QA |
| Wednesday | Veed |
| Thursday | Business |
| Friday | Macintosh |
Other Posts
- How to Download Large Files from iCloud
- iCloud Storage
- Mosaic
- Photo Size Optimizer
- MicroWave Express vs Fission
- BBEdit 12
- iResize
- Apple Magic Keyboard with Numeric Keypad on Windows 11
- Skitch
- TechSmith's Snagit Editor
- Keyboard Maestro Command in BBEdit
- Biff 2.0
- Free Up 30GB in 30 Minutes
- Brackets vs BBEdit
- GraphSketcher