
Image Borders in Affinity Photo
Tips on quickly adding a border in Affinity Photo
Here's a quick way to add an image border to any image in Affinity Photo. This is a useful step to remember. Once you do it a couple of times, it becomes second nature.
The Background Layer
First create a new Background Layer, this will be where the image border color will go:
- Type in Command - shift - N (Create a new Layer)
- Type in Command - [ (This will moved that command to the background layer)
Try it:
- Command shift N
- Command [
This is a useful shortcut combo to remember for various tasks.
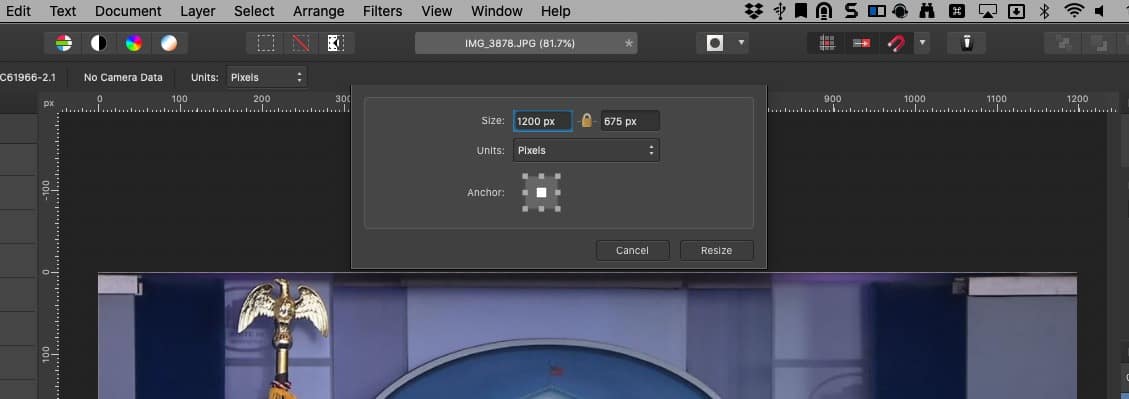
Now Let's resize the Canvas.
- Type in Command - Option - C ( This opens the Canvas Setup Dialog)
- Type in a percent, such as 105% for a 5% border.
- Type the Tab key and Click the space bar if the lock isn't connected. (This makes sure that the percent is the same for the hight.)
- In the Anchor section make sure that the large white box is in the middle. This ensures an equal distribution of the resizing.
Now you have the ability to do anything you want with the main image.
- Use the "Knock on Wood" Styles to add a Wood Background
- Use simple solid color backgrounds
- Use Layer Effects to add an Outer Shadow or Outer Glow for a nice drop shadow effect.
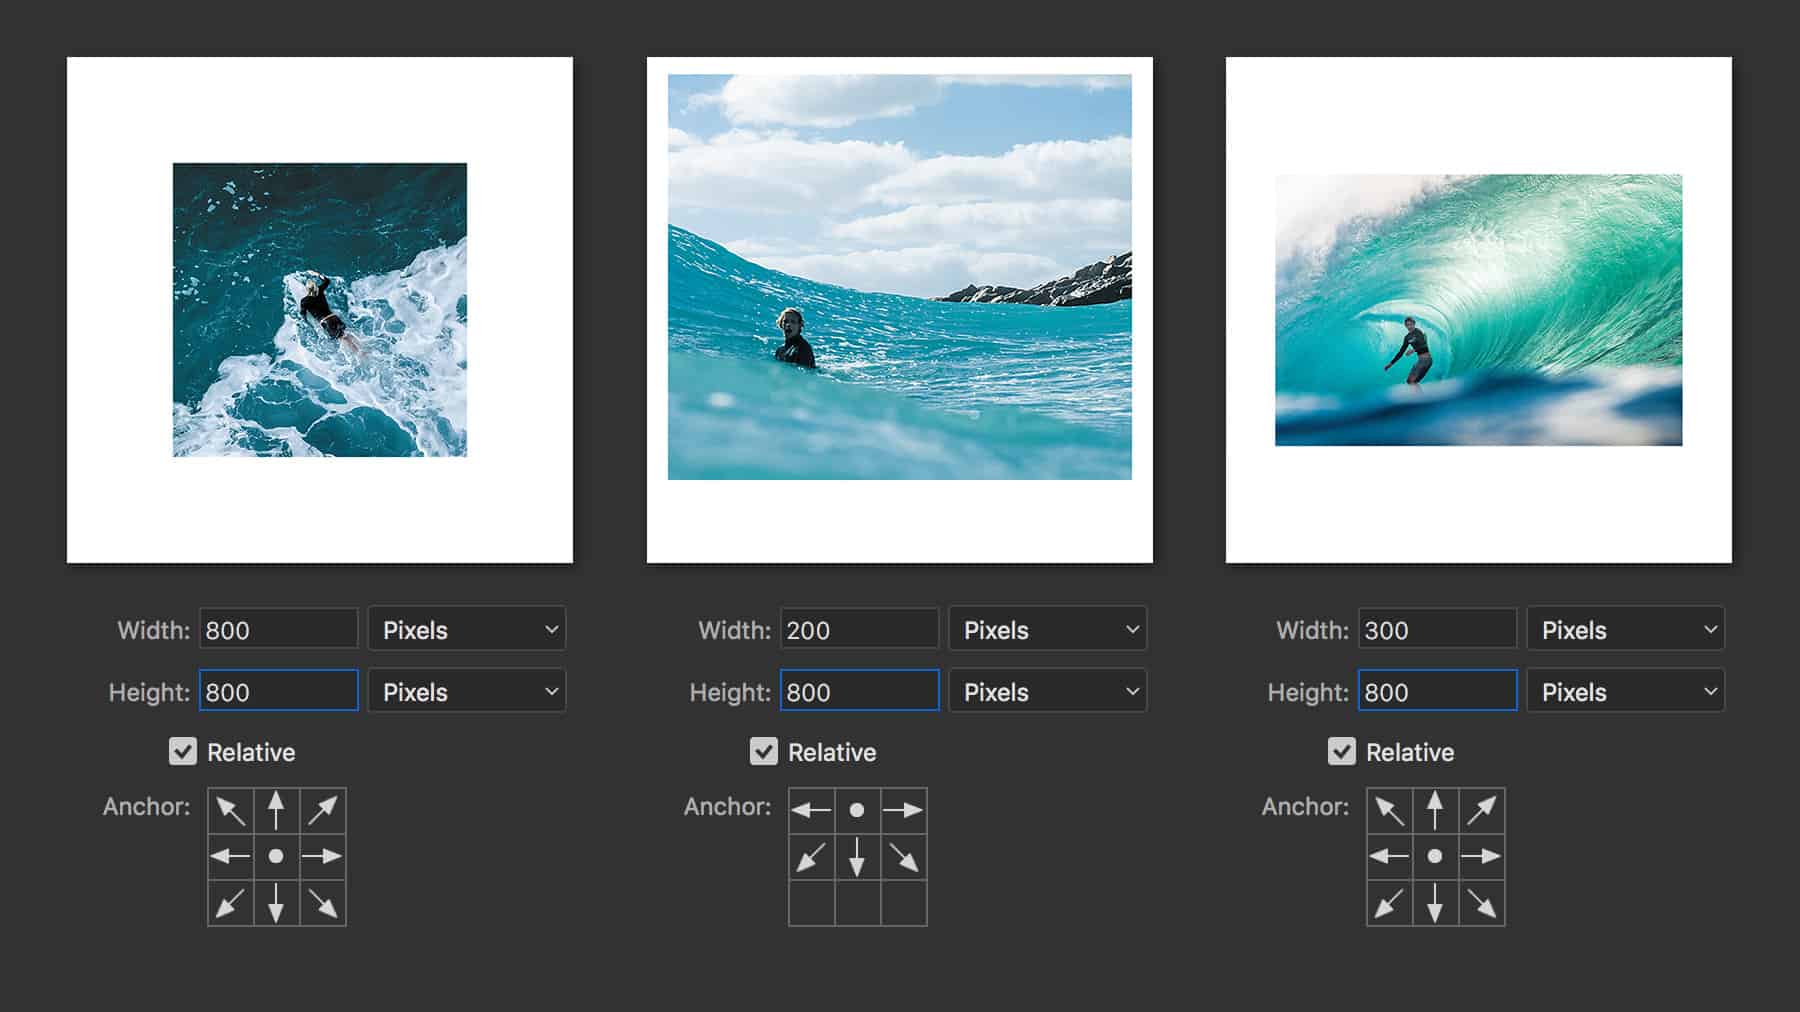
Adobe Tip and Trick
Adobe has a cool graphic on their help site. Many of these can easily be applied in Affinity Photo.
Unlock your Mac using the Apple Watch
Cool feature of having an Apple Watch
Did you know that you can unlock your Macintosh computer with your Apple Watch?
This is a very cool feature of the Apple Watch because when you wake up the computer, it will check your watch for authentication and pretty much "instant on" your computer
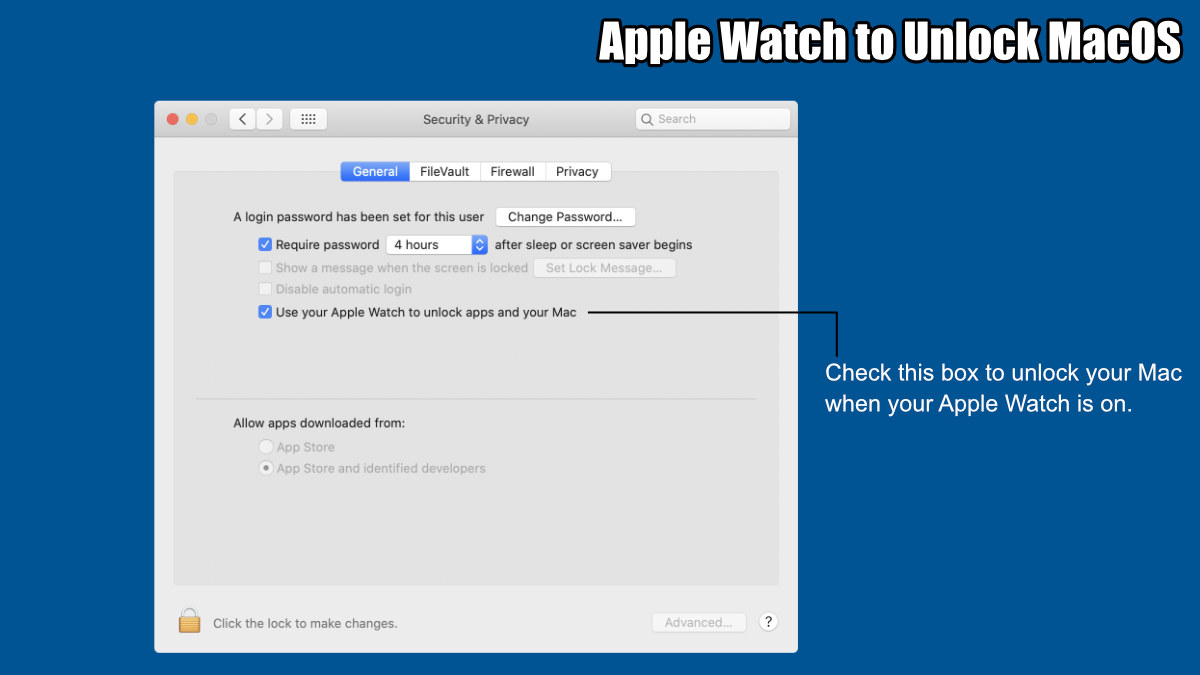
How to Enable
Simple steps to enable the Apple Watch:
- Go to System Preference under the Apple Menu.
- Select the Security & Privacy option (Its the Home icon with a Safe dial on the front.)
- Go to the General Tab
- Check the box, "Use you Apple Watch to unlock apps and your Mac"
Three Things I Learned
This is great, now you don't have to remember your password - especially useful after a long vacation.
Your Apple watch has to be connected to your account that you're using on your Mac. Note: Look at the System Preferences default screen to make sure you're using the right account that is sync to your Apple Watch.
Using the Watch is a secure way to unlock your computer because it will only work if you unlock your Watch - so if you leave your watch next to the computer it won't unlock your computer. You would have to put it on, enter in the password for the watch and then it will be enabled for your computer until you take it off your wrist.
PermalinkPath Finder 9
Path Finder has been updated to version 9
On October 1st, 2019 Cocoatech release a major update to their file management application - Path Finder 9. This is the first major update since Path Finder was released in May 20th, 2018.
This is the third time I written up about Path Fincder. You can read my reviews on Path Finder 7 and Path Finder 8. Check out those post to learn about the capabilies of Path Finder.

Four Major Features
Path Finder 9 brings back collapsible module shelves - which were missing in Path Finder 8. There are 17 modules - basically utility and info based on the selection. For example, you can have the "trash" module at the bottom of the window making it easy to delete files. You can now collapse these so they are out of the way when you don't need them.
More Robust and Stable Functionality - The big part of this release is to fix a lot of code for future enhancements. If you're a long time user of Path Finder, you should see some speed improvements when performing some transactions. Specifically, it shouldn't crash as much.
Improved compatibility with macOS 10.15 Catalina
Other small features, which hasn't been identified even in the release note.

Search Feature
While playing around with the Path Finder 9, I found a few features that I didn't see before. One cool thing is the search feature. You can search in specific volumes - even multi-volumes.
This means that I can select all the external USB thumb drives for files and move them to my main computer. For example, I can search for all EPS files, and simply copy the ones I want to my main computer.
This isn't something you can do with the regular finder. You can even save the searches so that you can find the files in the future.
PermalinkBroadcast to AppleTV
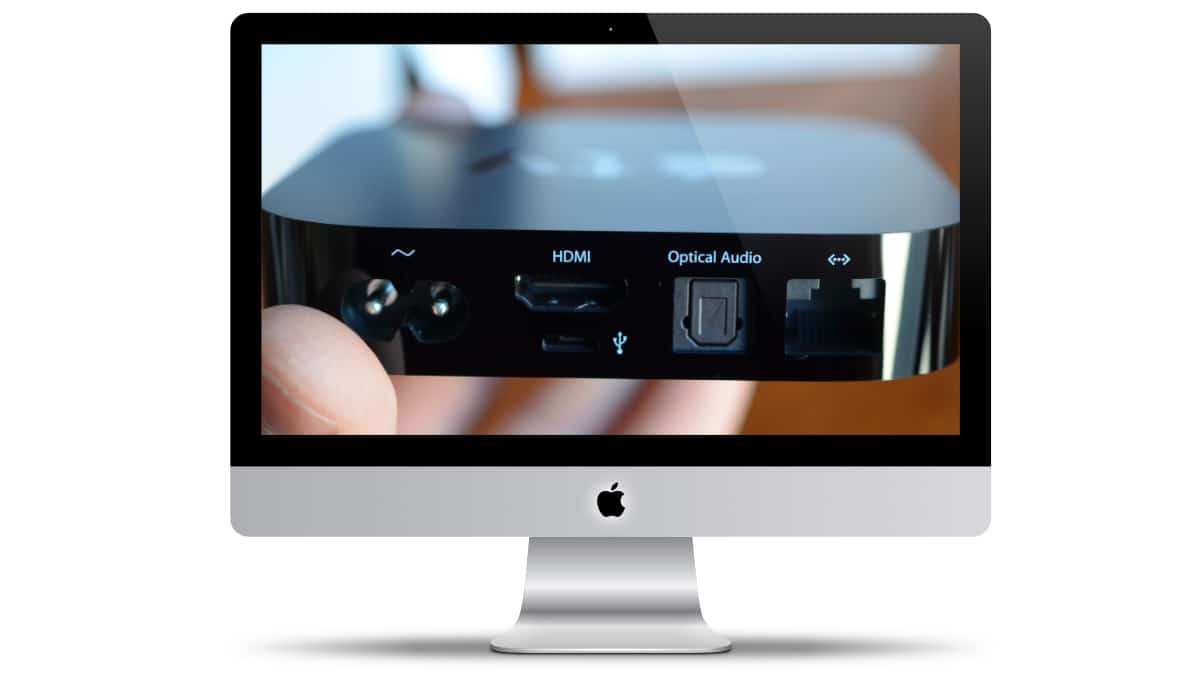
Simple instructions to Broadcast your iMac to the Apple TV
Did you know that you can broadcast anything on your computer to an Apple TV? This means that you can play DVDs and show them on your large screen TVs.
This is all possible via Apple's Airplay Mirroring. You can enable this in the System Preferences > Display and check the box next to "Show mirroring options in the menu bar when available."
Five Things I Learned
In order for this to work properly the computer and AppleTV have to be on the same WiFi network. So if you have multiple WiFi networks both devices have to be the same network.
It doesn't matter where in the house the two devices are. So you can play a movie from wherever your devices are.
To enable the Airplay, click on the status icon and select the Apple TV. When you're sharing the screen contains the icon in the toolbar turns blue.
You can set it up so that only music to the Apple TV. This is done via System Preferences > Sound. Select the Output and you should see the Apple TV there. Note: This applies to all audio from your computer, so the Slack notifications would play on the Apple TV
In the Safari app on your Mac, navigate to the web video you want to play. Compatible web videos have an AirPlay icon. Click the AirPlay icon, then select your Apple TV.
PermalinkDisk Inventory X
Useful application to generate a summary of the content on a thumb drive
Do you have a bunch of USB thumb drive around? Ever wanted to get a glimpse of what on the device? How about finding out what files are taking up the most space?
Disk Inventory X makes it all possible. It's a good way to get a snapshot on what's on your device and what's taking up the most space using a nice color layout.
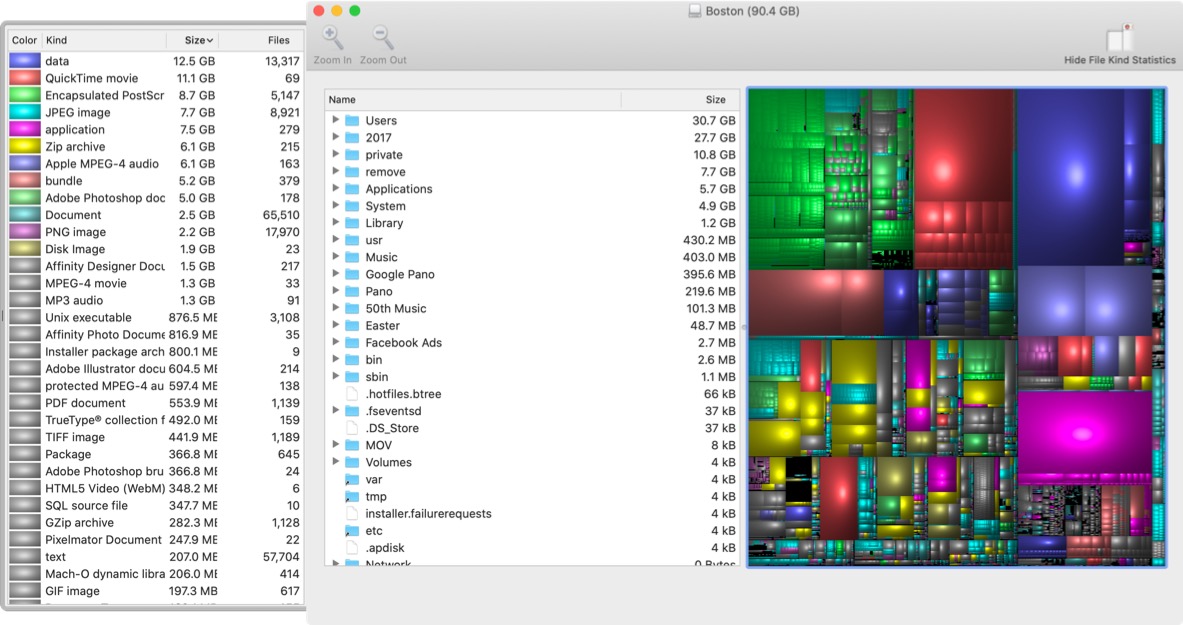
Sample Output from one of my thumb drives.
Five Things I learned
It takes a while to do a scan on a thumb drive. Some of my tests took upwards of 10-minutes. I found that Mac OS Extended formatted thumb drives scanned faster than MS0DOS (FAT32)
You can not save/print the scan results. So you have to generate a scan the directory every time you want a breakdown of your device.
Disk Inventory is very useful to figure out what's on the device and to plan backup. I can see that I have a lot of videos and can offload some to the cloud as they don't need to be taking up space on my thumb drives.
If you right-click on the toolbar you can add some cool tools, such as "Reveal in Finder" where you go directly to the file/folder or "Move to Trash" to delete files you don't want.
The application gets frequently updated with the latest update on December 8, 2019. The application is not signed, so you will get a warning when you first open it. Simply use the "Open" menu command to proceed forward.
Disk Inventory X
The nice thing is that Disk Inventory X is free. If you find the application useful, you can make a donation on the website.
PermalinkGetting a Screen Grab of a Video Clip
Simple Keyboard Maestro Action to Video Clip
The best way that I have found to grab a snapshot from a video clip is to use Quicktime Player.
I have found that using the Copy Command is the best way to get an image. Simply paste the image in Affinity Photo or PhotosScape X and your done.
The problem comes if you want to grab multiple shots. It's a lot of work to copy/paste the image.
Keyboard Maestro
That's when Keyboard Maestro comes in handy. It's a quick setup that works every time.
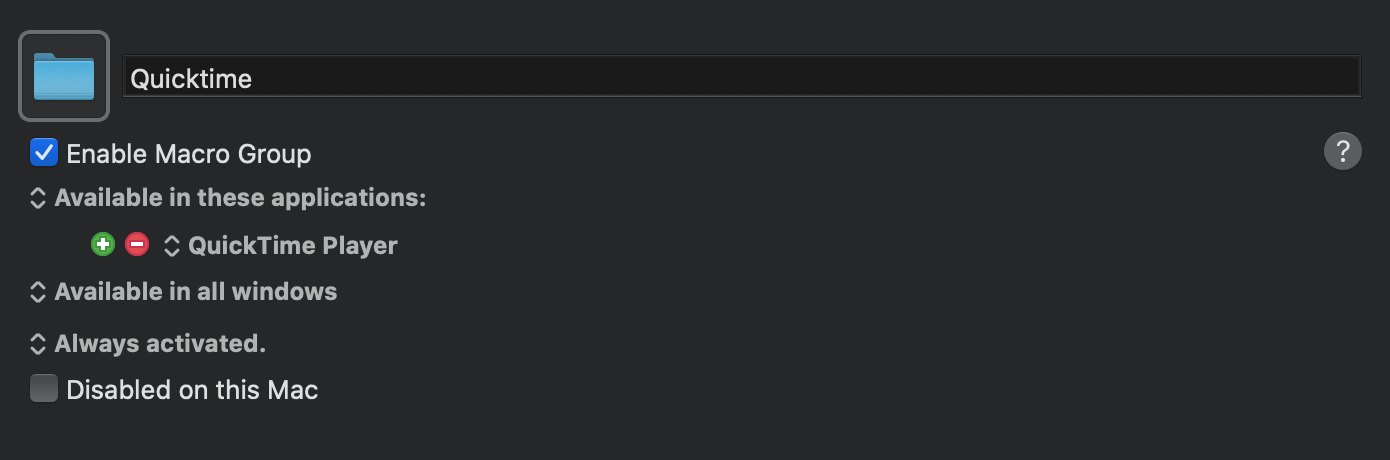
First I created the group called Quicktime so that any Macro in the group will only run when I am running Quicktime:
Then I created simple Macro:
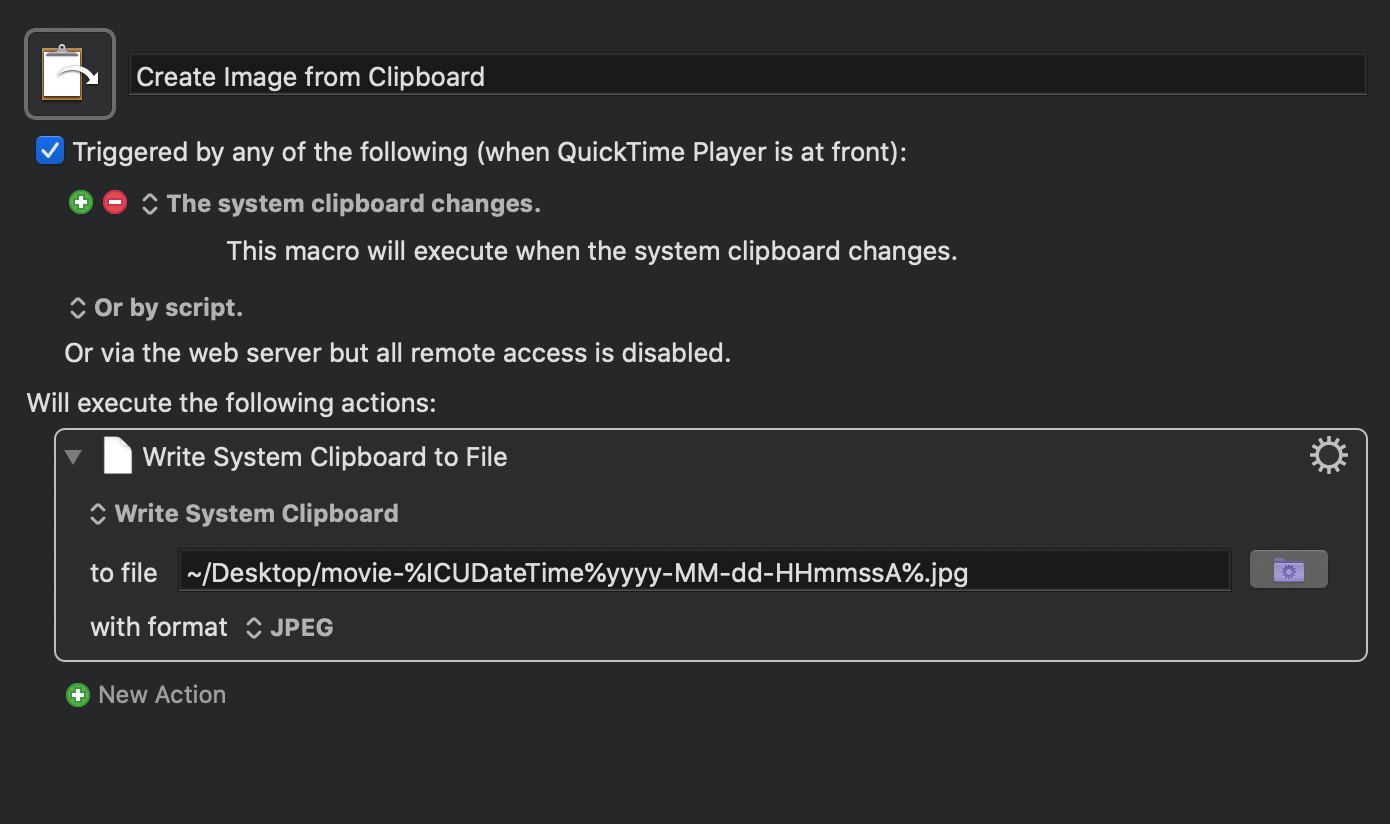
Screenshot of my Macro in Keyboard Maestro
Here's what happens, anytime you Copy a movie clip in Quicktime Player a new file gets created on the Desktop. The file has a unique name.
This is the file location I used, you can simplify this to match whatever format you want:
~/Desktop/movie-%ICUDateTime%yyyy-MM-dd-HHmmssA%.jpg
Obviously you can change this to copy the image to where you want, and change the format to match whatever type you want - PNG, TIFF, JPEG, BMP or GIF.
This works fine Quicktime Player as the only thing I would every copy in the Clipboard would be an image. Otherwise, I would have to add a condition to check to see if the clipboard content has an image.
The nice thing about this solution is that it works for any video types. I have found that other applications, will downsize 4k Videos.
PermalinkFix GoPro FishEye on a Mac
Tips on how to fix FixEye on Mac
Using GoPro as a photo camera is cool because you can get a lot more in the shot. The downside is that you have a FishEye effect. Just about every graphic program has some solution to fix the problem.
Here are the useful solutions that I have found for PhotoScapeX, Affinity Photo and Graphic Converter.
I did a test against a photo taken of Copley Square in Boston. I used my GoPro Silver 7 camera.
PhotoScapeX
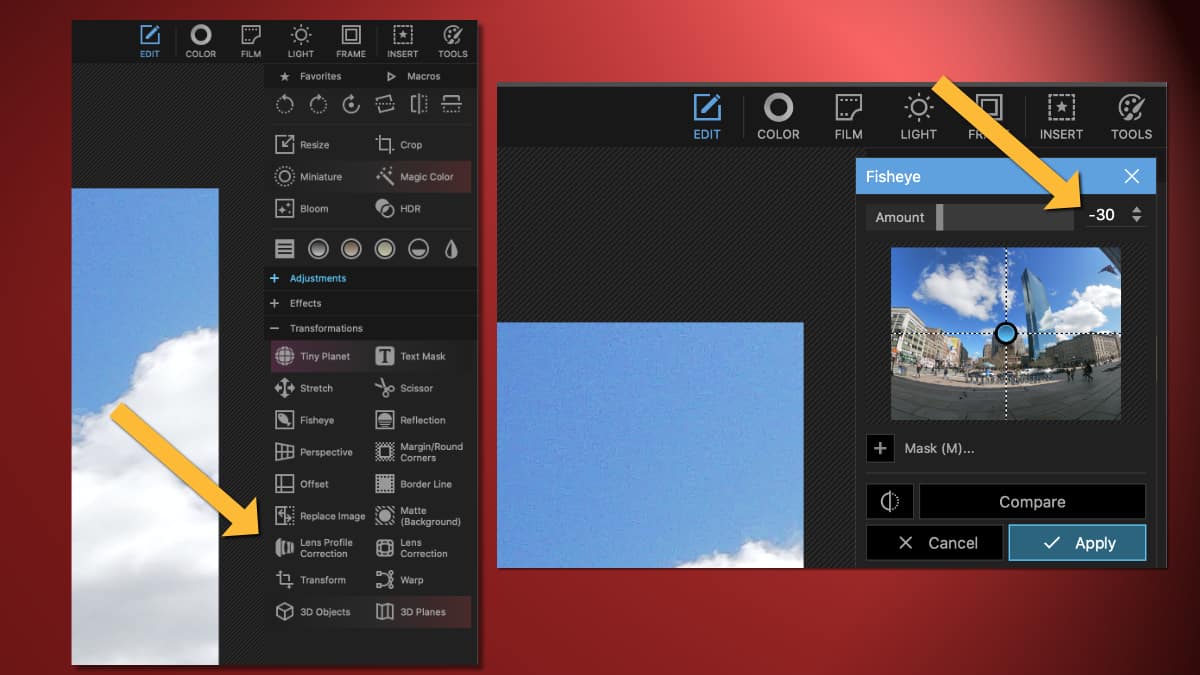
Use Lens Profile Correction.
Under the Transformation section is the "Lens Profile Correction."
Select "GoPro" and then HERO5 Black - as that's the latest model available. It works pretty well.
Affinity Photo
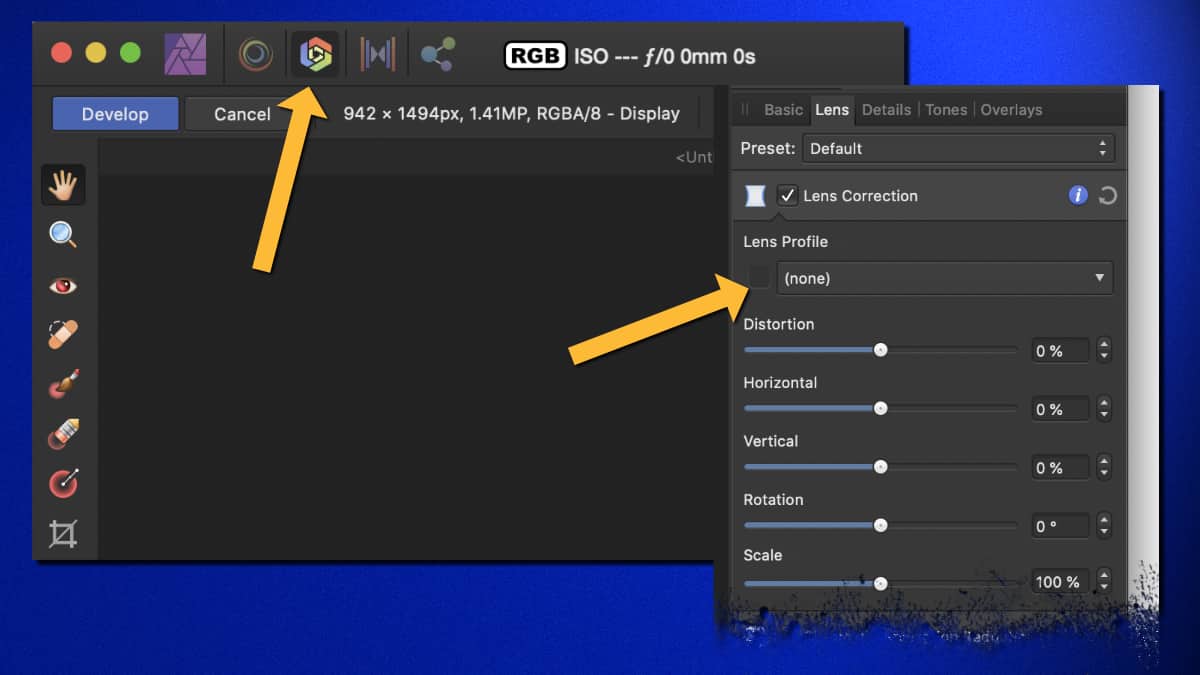
Use the Lens Correction Preset.
Use the Develop Persona. On the right, you should see a Lens tab. (If it's not there, enable it by going under the View menu, select Studio and then Lens.) Select the Lens Correction checkbox. Under Lens profile search for GoPro. I like the "GoPro Hero 3+ black & compatibles".
The nice thing is that you can make it a favorite by clicking on the heart. So in the future, you can just go to the Favorites section without having to search for GoPro.
Graphic Converter

Inverse FishEye Effect
Under the Effect Menu, select "Lens Geometry"", then "Inverse Fish Eye." I found that the "Method 4" produced the best look for my photo.
PermalinkDropZone 4
DropZone 4 is out, and I am not upgrading!
Three years ago I wrote a short blog post about a cool utility that I found called DropZone. It menu utility that makes it easy to perform some operations on the Mac.
On January 29th, DropZone 4 was officially released. According to the Developer's Blog post, the biggest change is that DropZone is now a subscription-based application. To use the App premium features it will now cost $1.99 a month or $24 a year.
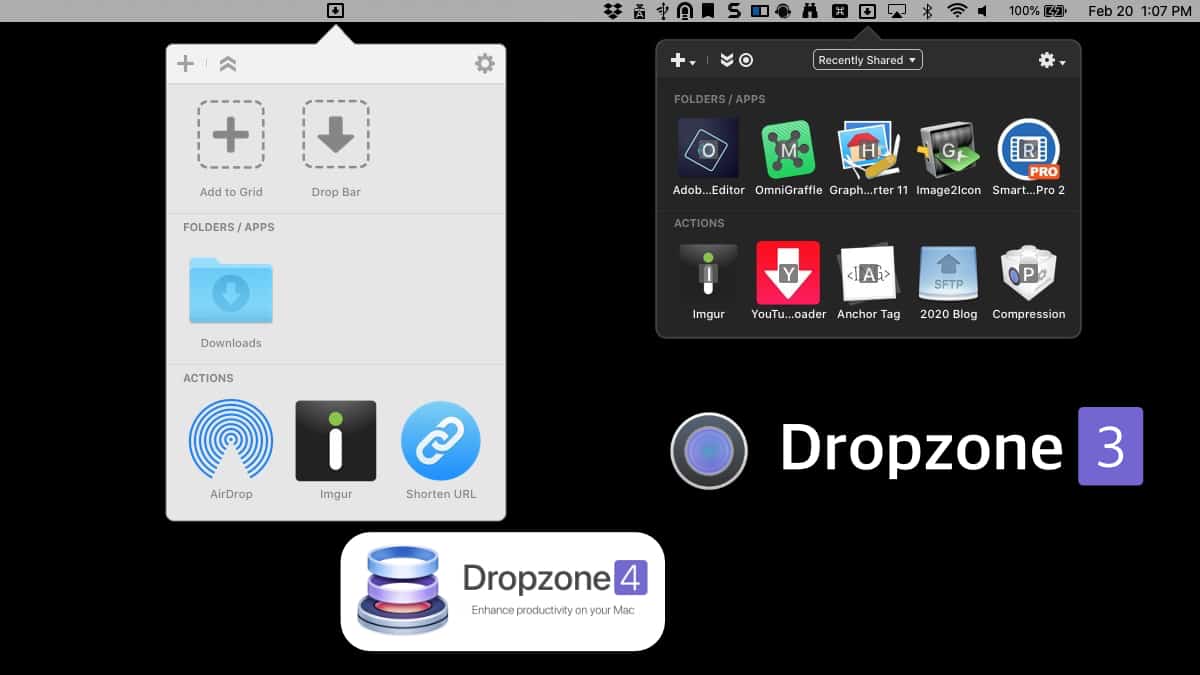
DropZone 4 vs DropZone 4
5 Things I Have Learned about DropZone
- I use the application to transfer images to this Blog. It's very easy to simple drag an image up to the menu bar and drop it to the right location on my server via SFTP.
- As much of the application is useful to everyday tasks, I don't think I'll upgrade to version 4. There's nothing special that prompt me to upgrade at this time. I am not happy about the subscription service.
- At somepoint, I'll have to upgrade to use the latest features. I did see that SetApp service has DropZone 4. It costs $8.99 per month (annual). This has support for more applications. This might be a better way to go.
- The Applications that I have in DropZone are handy to have when I need them. They are miscellaneous apps that don't merit always being in the system dock, but having them in DropZone makes it easy to access.
- I started writing an Anchor Tag action. DropZone scripts are written in Python - which isn't a programing language that I am familiar with. DropZone provides a reference teaching at CodeCademy where you can learn more. I just haven't had much time to work on the script.
Error in DropZone 3
If your running DropZone 3 and running into the following error, let me know. There'a an easy fix to get this working again.
/System/Library/Frameworks/Ruby.framework/Versions/2.6/usr/lib/ruby/2.6.0/rubygems/core_ext/kernel_require.rb:54:in `require': cannot load such file -- net/scp (LoadError)
Leave a comment below or send me an email: Webmaster@cryan.com. I'll help you out.
New Videos Coming!
I have gotten several requests to add video examples to the Macintosh Posts. Starting next week, I'll add a 5-minute YouTube clip for the Macintosh Posts.
Thanks for the feedback!
PermalinkGraphic Converter Collage Tool
Neat Tool with some functionality not in Photoscape
Graphic Converter is a popular graphic program. It's been around for a year, and has a very strong user base. The application keeps getting a better and great application for anyone doing graphics - even if you have PhotoShop, Affinity Photo or PhotoScape.
Inside Graphic Converter are some cool graphics utilities - one of them is the ability to create photo collages. It's a neat feature that some regular users may not know exist.
Since I use PhotoScape Collage tool every day, I thought I look into Graphic Converter to see if it's something that I should use instead.
Five Things to Know
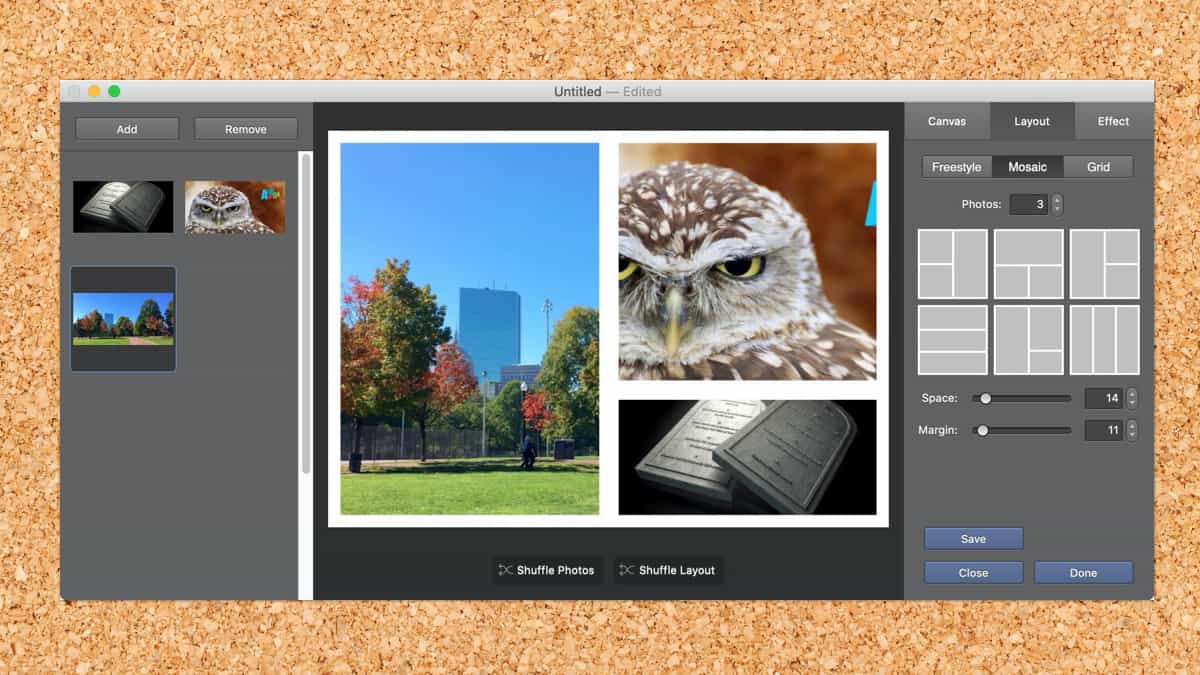
- You can find the Collage feature under the File > New > Collage...
- Three different layout types: Freestyle, Mosaic, and Grid. Use the Shuffle layout to see more layout options.
- Custom Canvas Size doesn't save previous use - there's no way to save settings. Which is a problem for me since I send out a Collage photo every day using a particular size.
- There are three different ways to add borders; In the Layout: Space and Margin and in the Effect, there's Frame Width. So if you reduce the Space and Margin and don't see a change, it's probably the frame width.
- There are 111 Frame Image effects. These are the exact same that's available in the Effect > Frame > Edge and Frame. You apply the effect to all the images in the Collage. It's not possible to select an effect per image in the Collage. To do this you would have to apply it to the image before setting up the collage.
My Take-away
While it was very cool to use Graphic Converter Collage tool, I didn't like how I would have to manually insert the page size every time.
I liked the graphic effects - that's pretty neat. It was neat to play around with the application to see all the capabilities.
So, for me, I'll stick with PhotoScape Collage tool for my "Photo of the Day" Collage work. Maybe if I am doing a special collage for print or for social media, I'll use Graphic Converter.
PermalinkBCS 13 Font Collection
Using FontDoc I was able to see what Fonts are on the CD
FontDoc was updated last October to work with the latest MacOS.
The application is now a 64-bit application that also supports Dark Mode. There are some additional fixes with how fonts were printing out.
Boston Computer Society PD CD
In the 1990s the Boston Computer Society would produce yearly CDs of Public Domain software. This CD would be packed with all the best shareware and freeware applications.
For many people it was the only way to check out the latest and greatest apps for the Macintosh.
The CD was broken down into many categories - Developer, Graphics, Games, Business and Fonts.
Fonts
Could Fonts that were on that CD still be able to be used today? Could Fonts that were made for System 8 be useable in MacOS 10.15?
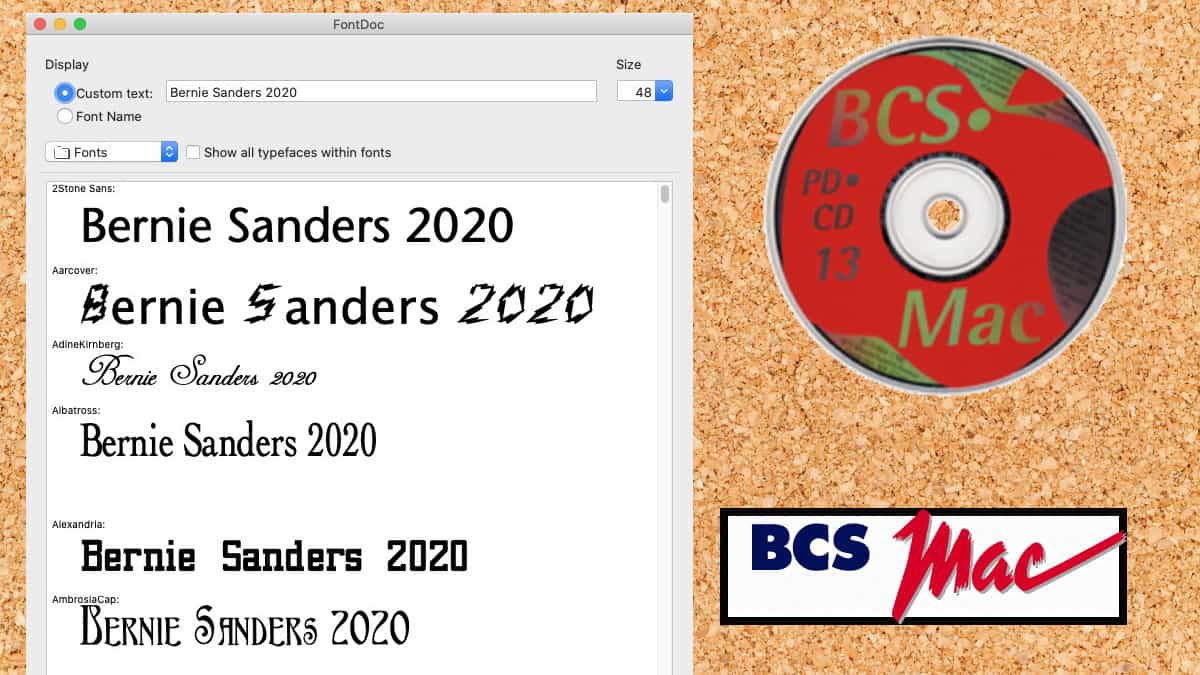
There best way to find out is to open up FontDoc and point it to the Font folder on the BCS Font Disk. (In this case, I used BCS v13 disk)
After a few minutes of waiting, FontDoc was able to successfully preview 313 fonts! Wow!
I am impressed that many fonts were available to me. Many of these are Shareware Fonts, but I don't think the developers still live in the same location - or have the same Compuserve address.
Example of one of the Read-Me file:
This font, Townsend, is based on Tuscan Egyptian, a wood type font collected by Rob Roy Kelly in his book "Wood Type Alphabets" (Dover Pictorial Archive Series,1977). The font dates from the Hamilton Co. in the 1880s. No attempt has been made to remedy small defects in the letters, to preserve the feel of wood type. Punctuation symbols have been improvised since they were missing from the font as collected.
This font is shareware. If used, it must be registered by the payment of $5 to the address below. Registering the font brings a disk containing ten Tuscan wood type fonts, also registered.
This program is copyright © 1992 by Sidney Bowhill, 555 Annursnac Hill Road, Concord MA 01742. It may not be modified or translated into another format without the permission of the copyright owner. It may be freely distributed or published, provided this notice is attached.
Try it YourSelf
If you have an old Font CDs around, use FontDoc to quickly see what fonts are still usable in the latest MacOS.
PermalinkAbout
A Mac veteran since 1989, I'm here to share my experience with tips and tricks every Friday. Witnessing the evolution of Mac software and hardware firsthand, I've gained a deep understanding of how these machines work and can help you troubleshoot any issues that may come up.
Check out all the blog posts.
Blog Schedule
| Saturday | Internet Tools |
| Sunday | Open Topic |
| Monday | Media Monday |
| Tuesday | QA |
| Wednesday | Veed |
| Thursday | Business |
| Friday | Macintosh |