
Advantage of Snagit 2020 over MonoSnap
Snagit is way better than MonoSnap
If your a frequent user of MonoSnap, you should consider upgrading to Snagit. It's a much more powerful application that offers a lot more capabilities. It's certainly a step up to making screen captures.
While MonoSnap might be an attractive solution because MonoSnap is free. For some, Snagit seems a "bit pricey" at $49.95 (one-time fee). However, when you see the overall features it becomes clear that Snagit is the screen capture for champions.
Editor Windows
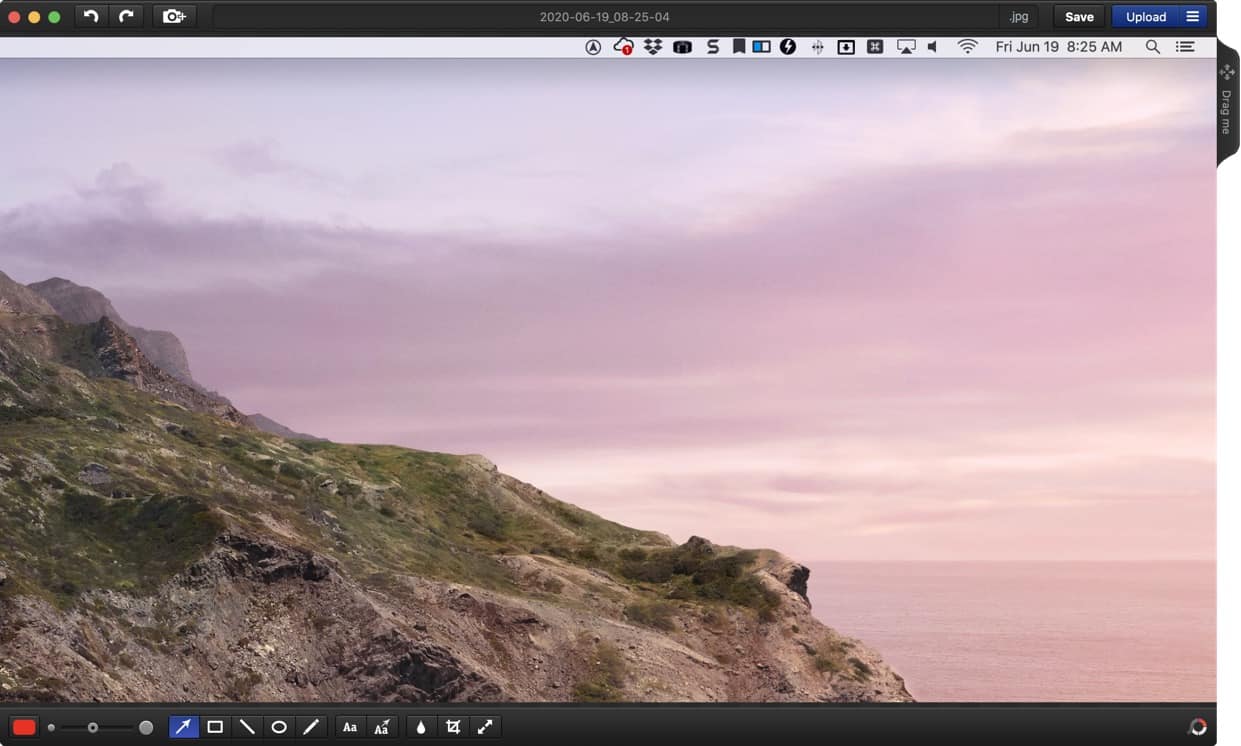
MonoSnap Editor Window
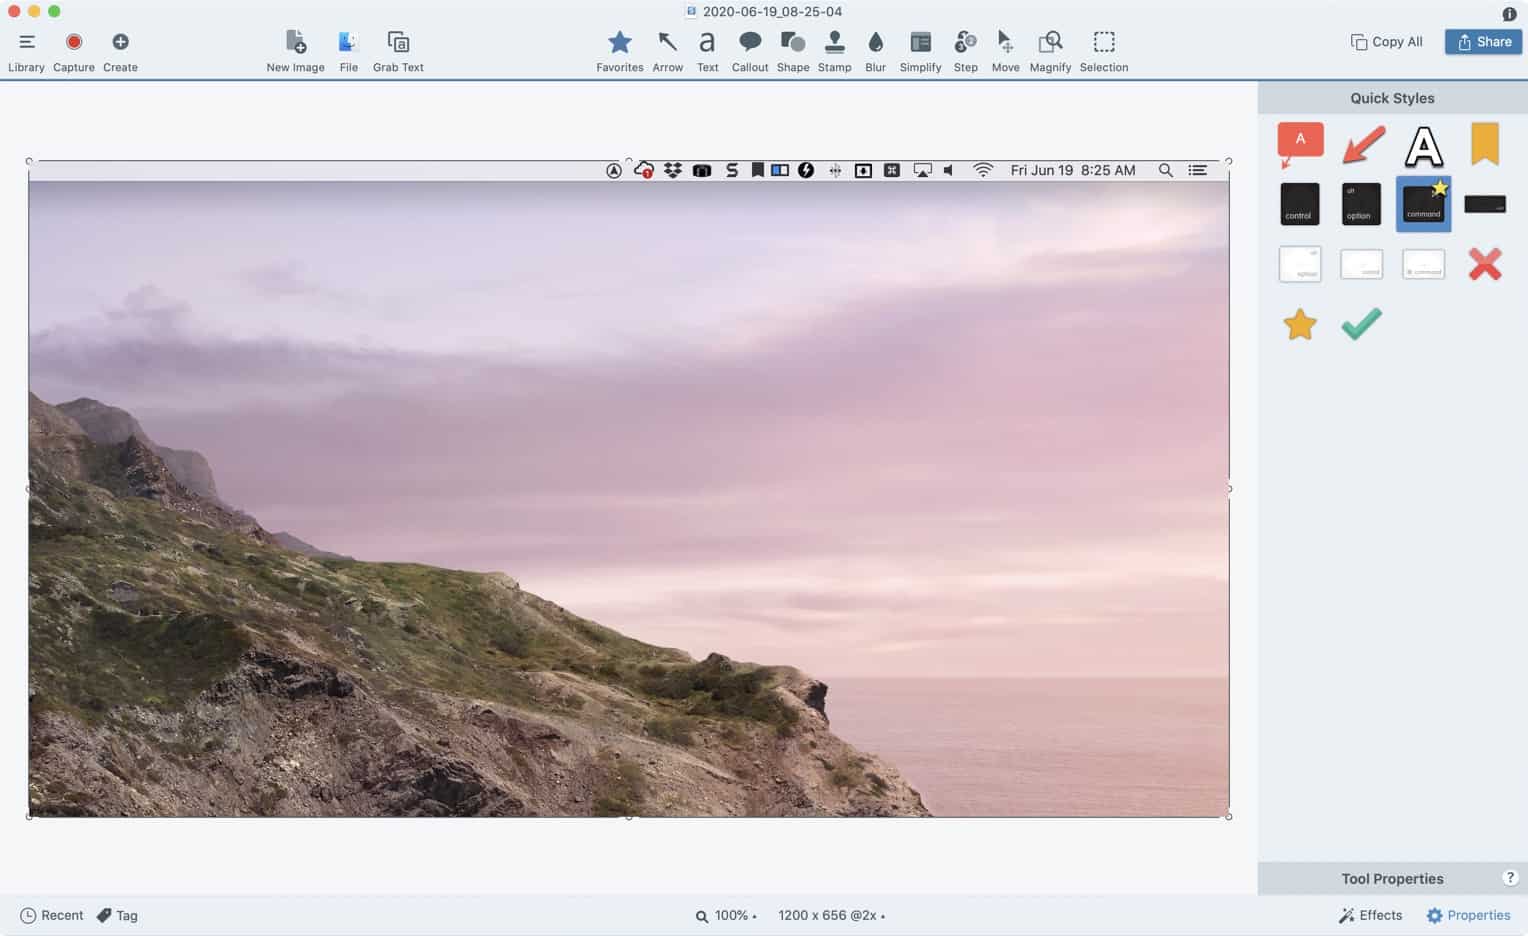
Snagit 2020 Editor Window
Five Reasons to Upgrade to Snagit 2020
There are a lot of reasons to use Snagit. Here are just some of the ones that I have come up with:
Better Annotate Tools - A lot more annotate tools. MonoSnap has 11 tools, while Snagit has 19 - including Stamp, Step, Simplify, and more that are not in MonoSnap. The nice thing is that you can create your own theme. This means that you can create company color styles for any arrow or shape tool. In addition, you can share those themes with other Snagit users.
Advance Editor - Ability to combine screenshots, add effects and more. Basically the editor has everything you need to modify a screenshot so that you can communicate your message. You can even combine screenshots into a video and dictate over it.
Snagit Full page Capture with Chrome - Snagit makes it easy to capture a full page in Chrome. Simply click on the arrow for Scrolling Capture. If the scrolling capture doesn't work, you can always use the Panoramic Capture to capture full web pages, long documents and more.
Time Delay Captures - You can set the record to start whatever duration you want. In Monosnap you can only do a 10-second delay for full screens. Snagit allows you to set a delay in any capture type - Image, Video or Panoramic.
Advance Video Functions - You can record your WebCam and/or Microphone while recording videos. This makes it easy to talk over the video and explain more about what is going on.
PermalinkRotate Images in the Finder
Cool Keyboard Shortcut to rotate any image in the Finder
A cool hidden trick in the MacOS Finder is the ability to rotate an image or video without having to open up an application. There are 2 hidden keyboard shortcuts - rotate right and rotate left.
Simple Steps
- Select any image or video.
- Type in Command R to rotate the file 90-degrees to the right.
- You can Command R several times to keep rotating the file.
Note: Using this method will change the modified date of the file, it won't change the Created date.
PermalinkInstalling legacy Font Suitcase files
You can still install old fonts in Font Suitcase in macOS Catalina
Do you have any old CDs/DVDs of old fonts? Wonder if it's still possible to use them? Are they in the legacy Font Suitcase format.
Good News! You can still use them in the latest version of macOS (macOS version 10.15.5). When you double click on the file it won't be discovered by any application in the system.

How to import Fonts in legacy Font Suitcase into your computer
- Open the Font Book application
- Go to File > Open
- Find the file that you want to import
- Select it and click Choose
That's it!
I have found that my Fontographer fonts work well in any application. I was able to use them in Affinity Designer, Swift Publisher and OmniGraffle.
PermalinkGriffin iMic
Legacy USB Audio Tool still works on the latest iMac
One of the downsides of a new iMac is that it doesn’t come with an audio import. You can no longer connect audio devices as imports - such as microphones or cables connected to a radio.
A long time ago I purchased a Griffin iMic to record audio with my G3 Macintosh . So I thought I take it out and see if it still works for the 2019 iMac computer.
Product Description
iMic is not a microphone, but rather an Input/Output device using a 3.5mm jack, that lets you connect standard audio products such as microphones, headphones, home stereo equipment, VCRs, musical instruments and virtually any other line-level or mic-level audio device. It’s basically a “sound card on a cable†that allows you to record and play digital audio using your USB-equipped computer. Some computers (like the Macintosh iBook, G4 Cube, Titanium PowerBook, and numerous PC laptops) rely on USB for complete audio support; others have limited or no audio hardware. For these computers, iMic can be used for audio input and output.
Snagit 2020
Worth Getting the Upgrade to Snagit 2020
TechSmith release Snagit 2020 officially on October 22, 2019. There has been five updates since then with the latest update on May 12, 2020.
This week I have been playing around with Snagit 2020, and thought it would be interesting to see what changes were not announced from Snagit 2019.
Here are some of the new things I have found
Snagit Library
Right Clicking on images in the Snagit Library has 3 new options:
- New Share Options - Share Images to Microsoft Word, PowerPoint, Outlook, Pages, Keynote, Messages, AirDrop, Add to Photos. Additional options are available if they are configured (DropBox, Box and Slack)
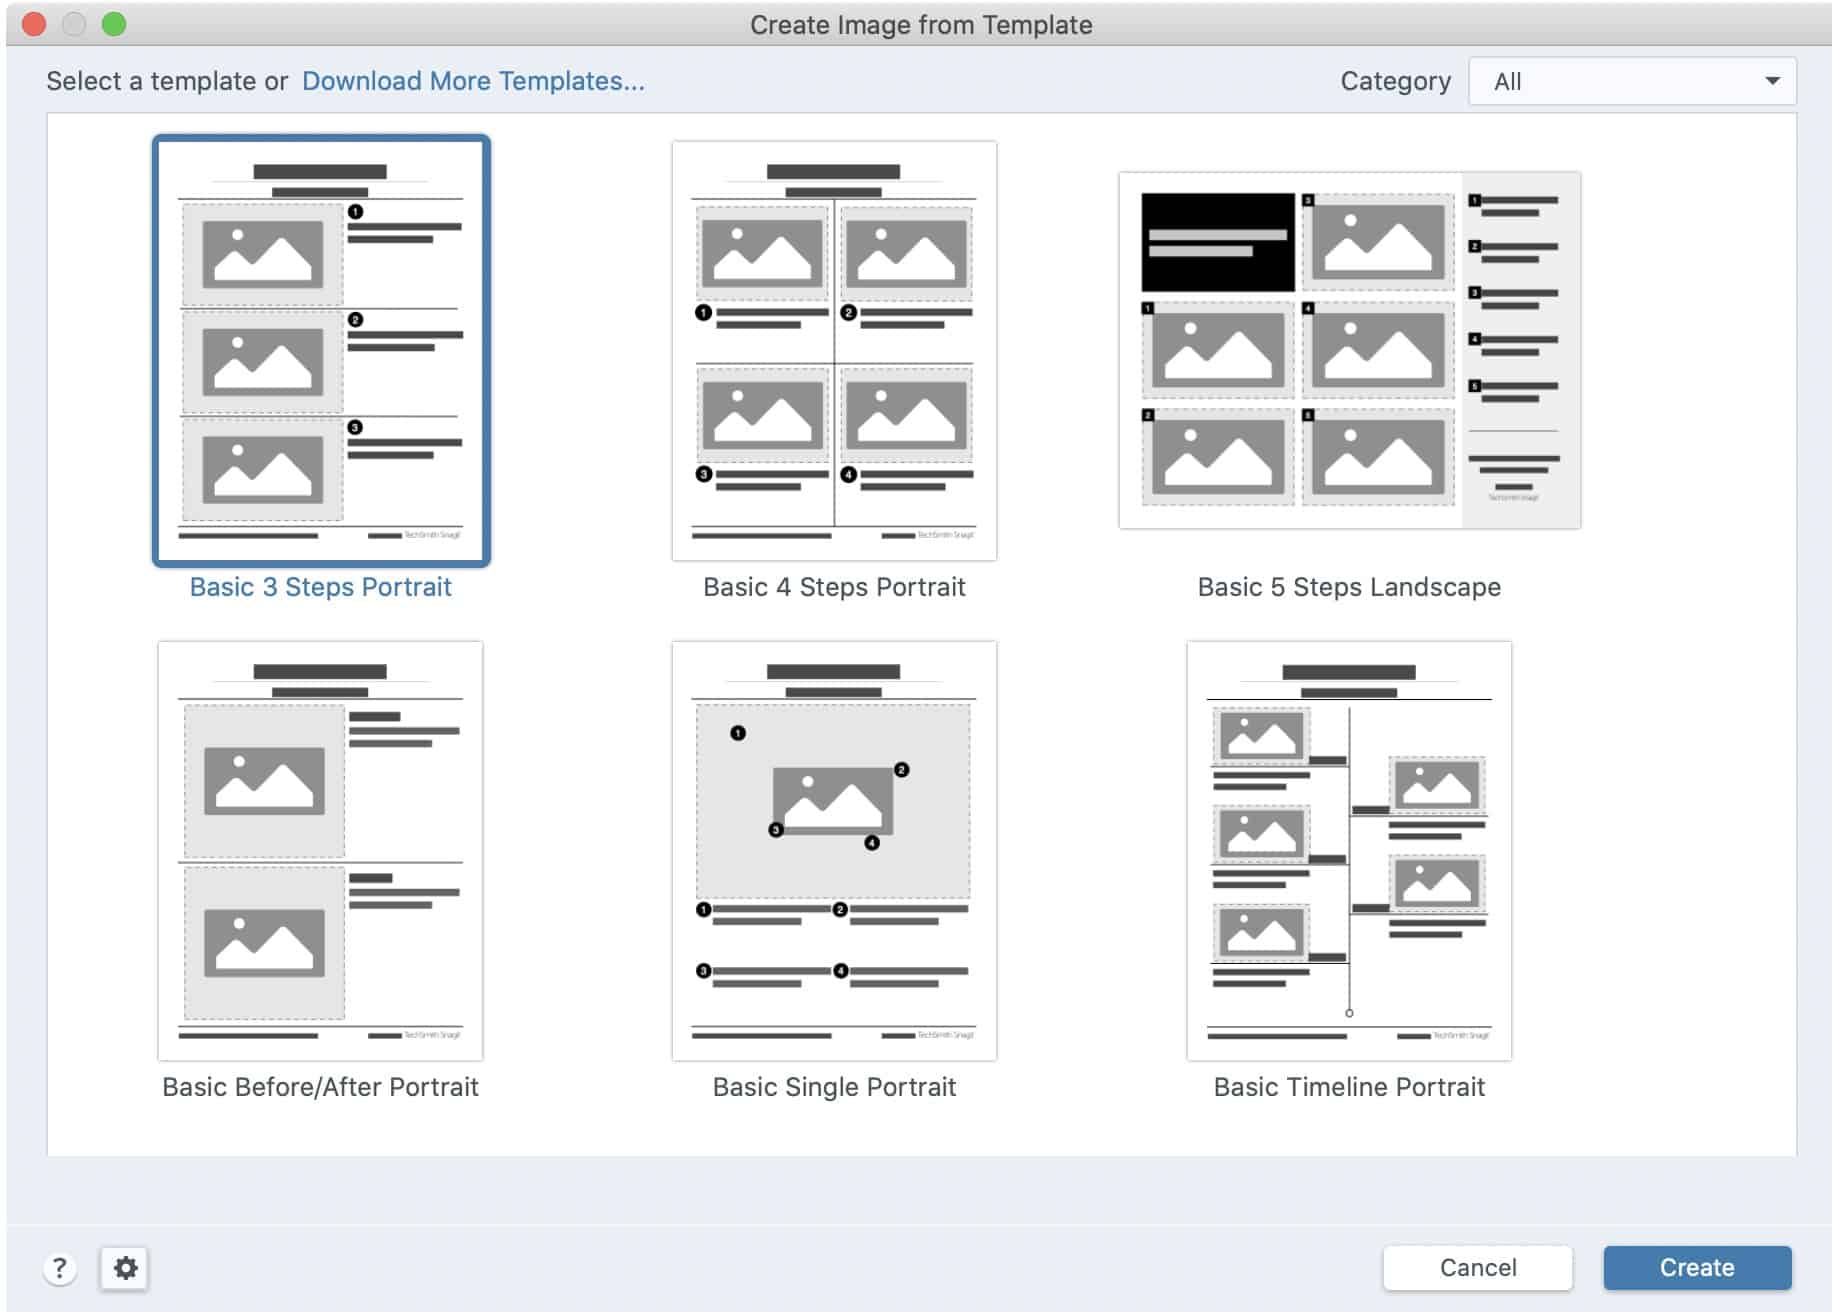
- Combine in Template - Users can now pick from layout options to showcase multiple images. Only the templates that match the number of images selected are displayed.
- Create Video from Images - You can now voice over screen shots so you can explain the error.
Output Settings
Snagit has a share feature that makes it easy to share a modified image within the application. In this release, they add a few new locations to easily share to Microsoft Word, Microsoft PowerPoint, Microsoft Outlook, Pages, Keynote, Box and Slack.
For Slack and Box, you will need to configure your account options in the Preferences panel. Slack integration will require permissions from the App Manager before installing it.
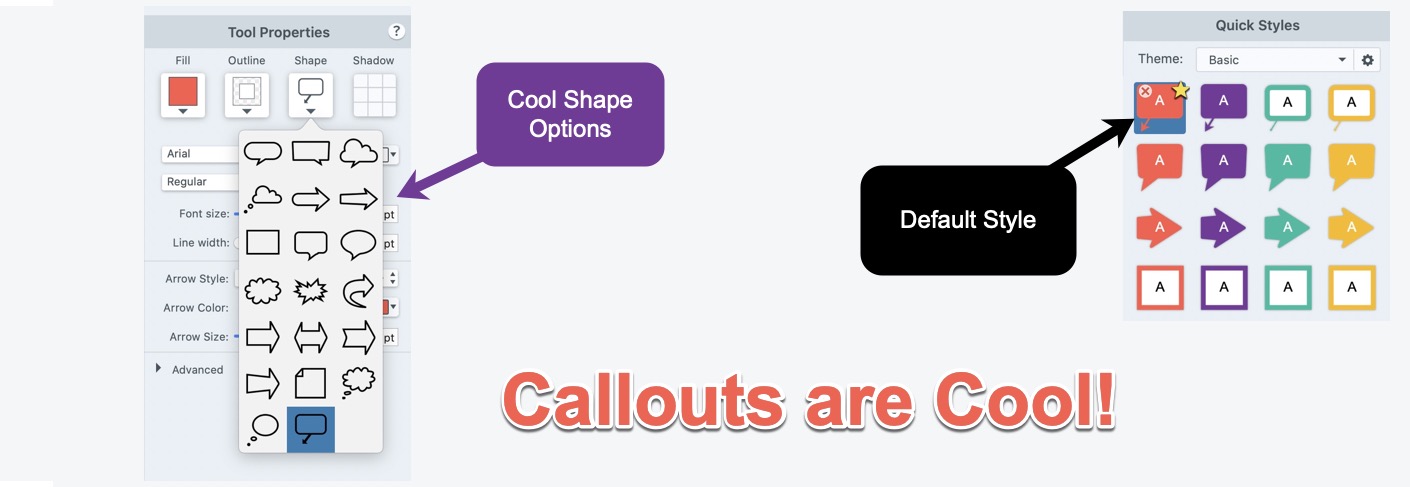
Callout Shape
There is a new Callout Arrow shape. This means you can have a text box with an arrow pointing to a place on the image. It's a simple feature that I can see using a lot. It saves the trouble of having two objects - an arrow and a text box.
You can have the arrow be a separate color than the text box.
Visual Guides
Visual Guide Templates are an exciting feature in this release. Basically they allow you to combine images to tell the story of your bug/feature.
In this release there are 13 different templates. You can download the additional template as part of the TechSmith Assets for Snagit for an annual fee of $49.
One template that I think will be useful is the Meme one. Now it will be easy to create Memes and instantly share in Slack.
Better than 2020?
I would recommend getting Snagit 2020, just for the templates and the new callout. I don't use the Shared Library feature much. Most of the time I drag images out of the library to the desktop.
The slack integration is cool, but I'll need to have an administrator enable that. For me, it's just as easy to drag/drop the image to the Slack window.

AirFoil
Cool MacOS app to connect sound to any OS device.
Have you ever wanted to play audio on your Mac to your iPhone? You can't simply connect the phone as a Bluetooth device.
You need AirFoil
Things I Have Learned Using AirFoil
AirFoil is not the best tool for video playback. The sound will always be out of sync to the video clip, even if you use the audio delays.
The iPhone and Mac have to be on the same wireless network. If you don't see your iPhone in the device window it's most likely because it's not on the same WiFi network.
In addition, your iPhone has to have the iOS Satelite app open in order to be discovered.
You can pick the sound source to be from a specific application to the System Audio. The application is neat because you can play music from iTunes to an external device while keeping the local system sounds to the computer.
AirFoil allows users to adjust the sound volume on the device on the computer, so you can play music on the Apple TV on the other side of the house and control the volume.
PermalinkGriffin PowerMate
PowerMate is a new USB accessory to control your computer
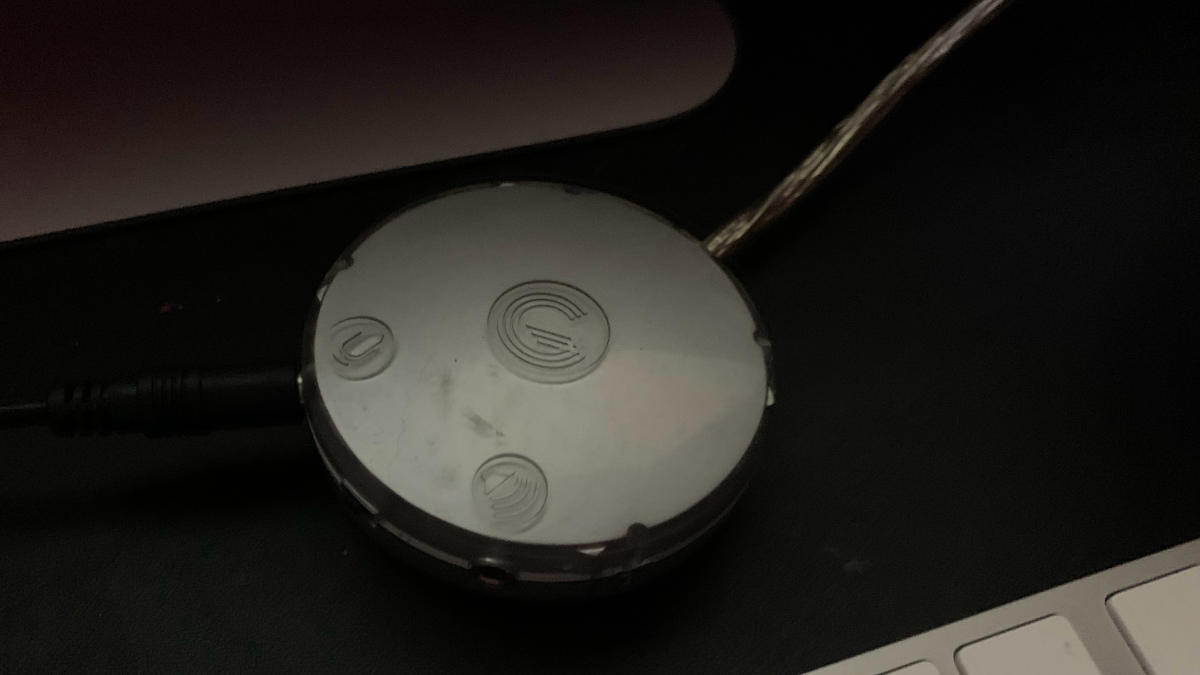
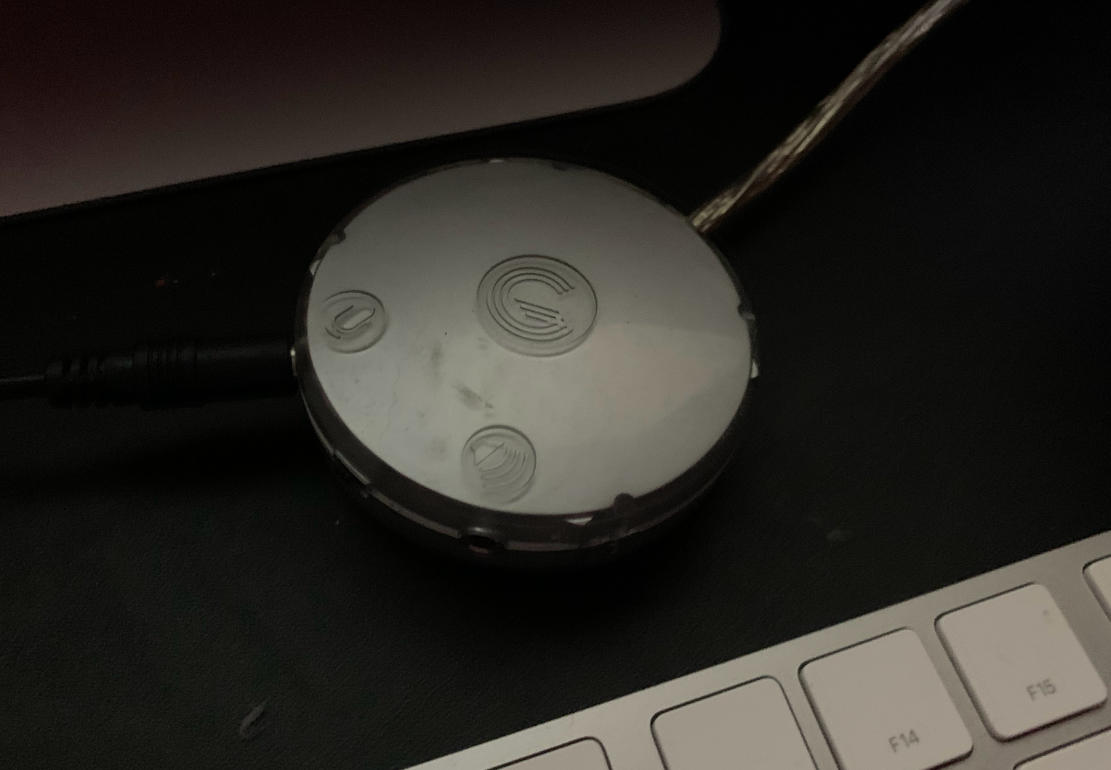
Griffin PowerMate is a programable USB Multimedia Controller. Its a neat tech toy that makes it easy to adjust the volume no matter what application you are in.
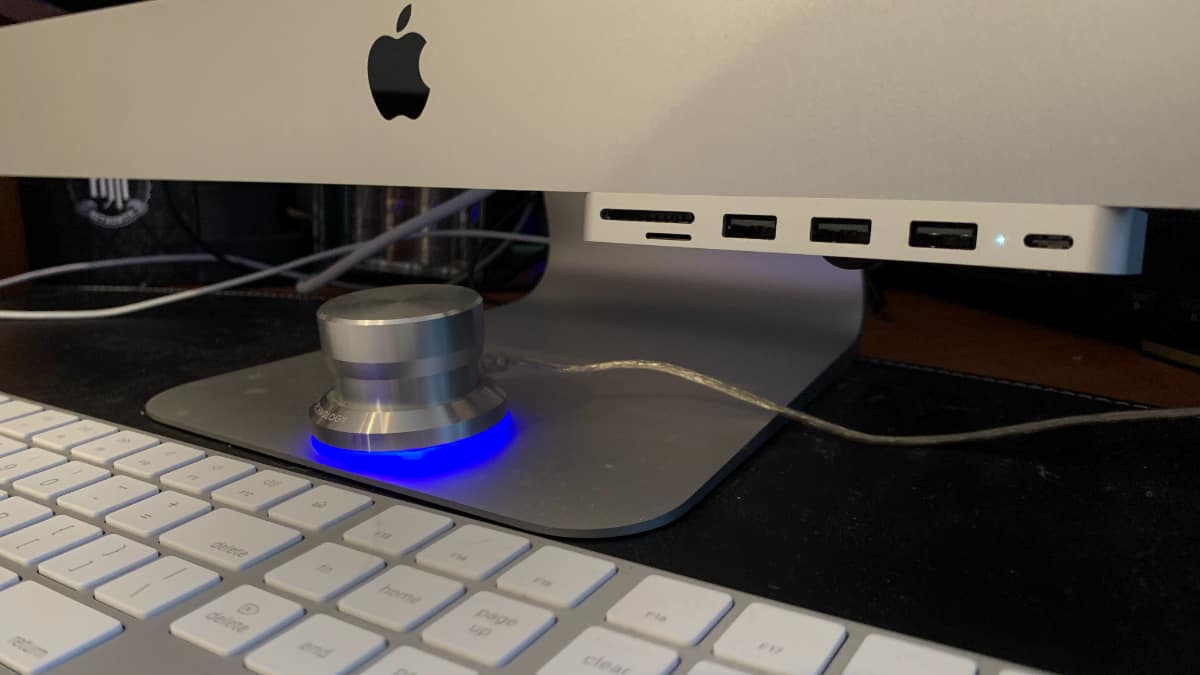
Griffin PowerMate has a LED light that can be turned off
Four Things I Have Learned
- Released in 2001 as a UBS device, an upgrade wireless version came out in 2014. The entire product line was discontinued in 2018. You can still buy them on eBay for around $25.00
- My USB PowerMate still works fine in macOS Catalina (version 10.15.4)
- Griffin PowerMate Support website is still available with links to the latest User Guide.
- When I add a Keyboard Shortcut it appears to not to save.
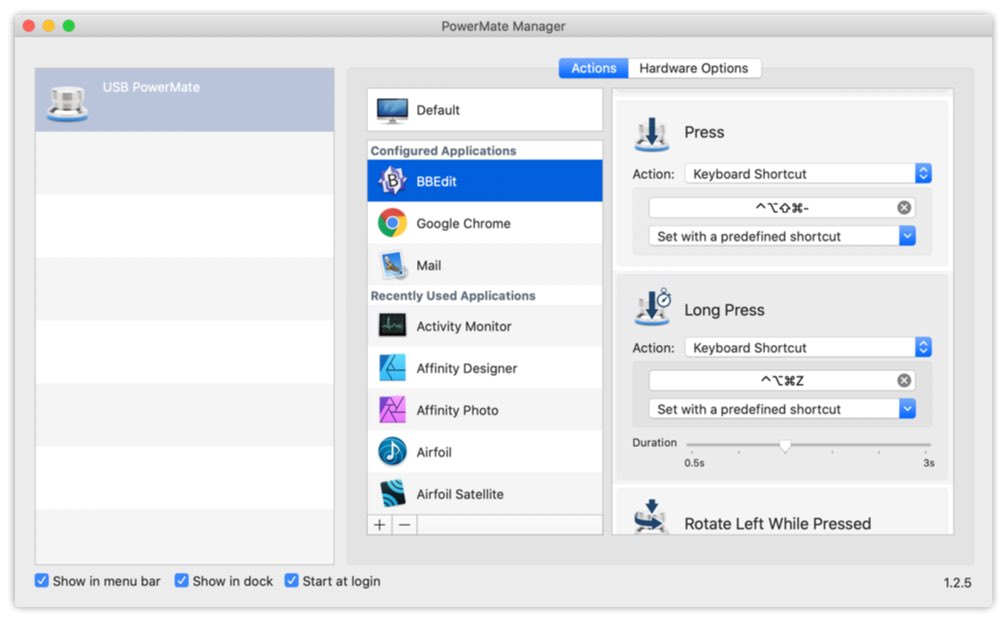
Device Actions Available
- Rotate Left
- Rotate Right
- Press
- Long Press
- Rotate Left While Pressed
- Rotate Right While Pressed
Types of Commands Available
- None
- Keyboard Shortcut - Speed up actions by adding application specific shortcuts.
- Scrolling - Scroll through webpages quicker.
- System Event - Available Events: Volume Up, Volume Down, Mute, Play/Pause, Next Track, Previous Track, Power, Eject, Show Desktop, Application Switcher.
- AppleScript - Select an AppleScript file.
Satechi USC-Clamp Hub
Cool Hub that puts makes key ports available
Last Fall, I installed a Satechi USC-Clamp Hub on my new iMac Computer. This is a cool mini-hub that puts a bunch of ports on the front of your iMac.
Satechi USC-Clamp Hub connected to my iMac.
You get:
- 3 USB 3.0 Ports
- Micro Card Reader
- SD Card Reader
- USB-C Port
Plug and Play
It was easy to attach this to the computer and easy to remove if needed. There's no software to install, simply connect the USB-C cable and then tighten the clamp to secure the hub.
Things I Learned
- Quick Install, really easy to do. Once installed you don't have to worry about it. I have moved my computer around plenty of times in the past 6-months and the clamp has never come off.
- Very handy to connect/disconnect thumb drives
- When inserting a Micro Card the card has to be upside down, which seems weird.
- There's a small light to let you know it's connected. It's very tiny and doesn't distract me when I am working with the lights down low.
- I don't have many USC-C devices, so I haven't had the need to use that port. The nice thing is that you don't lose the port on the back since it's in the front.
- The look and feel seems very natural - doesn't look out of place.
Want One?
It cost $49.99 on Amazon.com. (Non-Affiliate Link!) According to Camel Camel Camel that's been the same price for about a year. For some unknown reason, it dropped to $34.87 for a day last July.
I would recommend anyone getting this for their computer. This also makes a great gift for that Macintosh User who seems to have everything. Note: It only works on the latest iMacs.
PermalinkUnarchiver
Cool Utility to uncompress anything you have
If you have any ZIP, Tar or Stuffit archives in your collection. The best application to uncompress these is the Unarchiver by MacPaw Inc.
Product Description
The Unarchiver is the only app you need to open RAR on Mac. It’s times more powerful than the native macOS utility and supports infinitely more archive formats.
The Unarchiver aims to be the only unarchiving program you will ever need and to stay out of your way.
Four Great Reasons to Use Unarchiver
- Its there when you need it. You don't need to remember the name or where the application is. Simply double click on an archive collection, and Unarchiver goes to work. Install it once and let it work it's magic
- It works fast. In my test the application works way faster than Archive Utility (Apple's unarchive application.)
- Supports a lot of different Archive formats, Zip, Rar, 7-Zip, Lha, Zipx, Stuffit, Binhex, MacBinary, AppleSingle, GZip, GZip Tar, Bzip2, X2, Tar, ISO, CDI, NRG, MDF, GNU Tar, Unix Compress, Unix Tar and so much more..
- It's free and is updated frequently.
Useful Tip
In the Application Preferences Extraction, set the "Extract archives to:" to the Desktop. That way when you extract content from flash drives and CDs you don't get prompt that there isn't enough disk space or the space is write-protected. It's a simple step now that will save you trouble later.
PermalinkOpen Search via LaunchBar
LaunchBar makes it easy to search
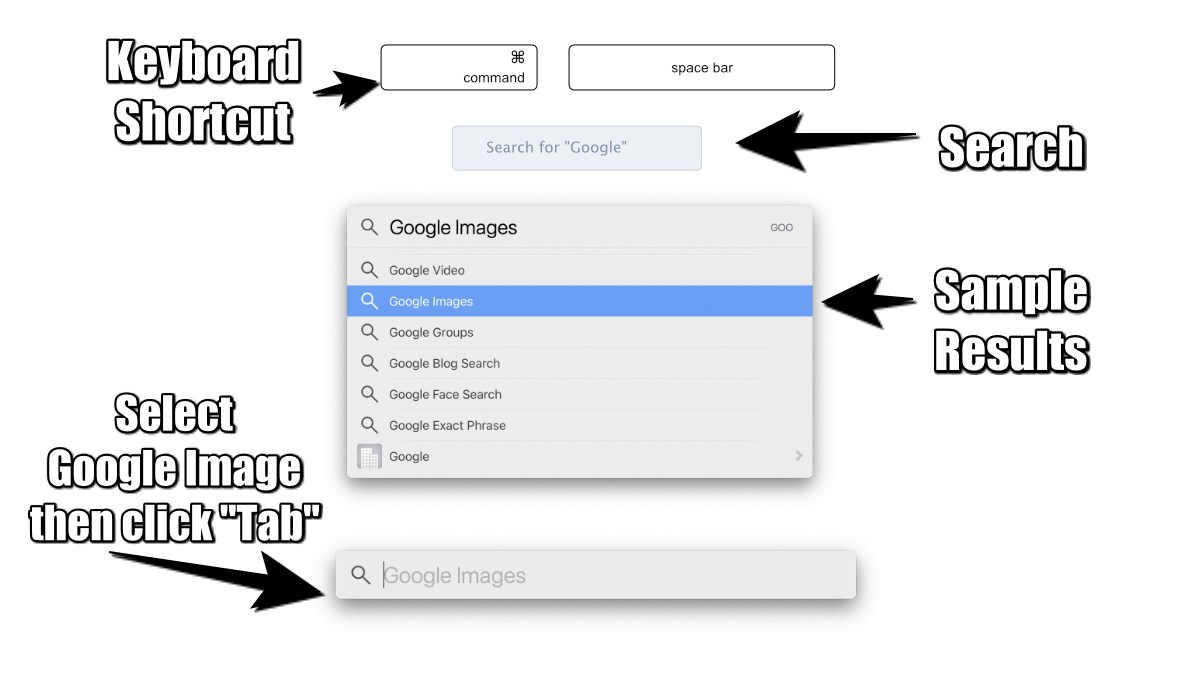
LaunchBar Makes it easy to search 48 different sites. You simply involke the keyboard shortcut and then type the search engine that you want. It’s quick and easy way to perform searches between different search engines.
Sample Search
Here's a quick overview of using LaunchBar to do a search. I use Google Image in this example because it's a fast way to go to Google Image section.
Available Search Sites in LaunchBar
Abbreviation Search, Amazon Deutschland, Apple Developer Connection, Ask.com, Bing, Bing Images, Cocoa Mailing List Archive, Connect to Local AFP Server, Convert EUR to USD, Convert USD to EUR, DuckDuckGo, ebay, Excite, Go to, Google Blog Search, Google Exact Phrase, Google Face Search, Google Groups, Google Images, Google Japan, Google Maps, Google Videos, Internet Movie Database, last.fm, LEO English-German Dictionary, Linguee, Lucky Google, Mac OS X HInts, MacUpdate, Make TinyURL, Manual Page, Merriam-Webster Dictionary, Merriam-Webster Thesaurus, OpenThesaurus, PHP Documentation, Search Amazon for Books, Search Amazon for DVDs, Search Amazon for Music, Search Amazon.com, Search iTunes Store, Search iTunes Store for Album, Search iTunes Store for Artist, Search iTunes Store for Composer, Search iTunes Store for Song, Technorati Search, Wolfram Alpha, Xcode Mailing List Archive, Yahoo!, Yahoo! Images, Yahoo! Japan, Yahoo! Stock Quote, Yahoo! Video, YouTube
PermalinkAbout
A Mac veteran since 1989, I'm here to share my experience with tips and tricks every Friday. Witnessing the evolution of Mac software and hardware firsthand, I've gained a deep understanding of how these machines work and can help you troubleshoot any issues that may come up.
Check out all the blog posts.
Blog Schedule
| Saturday | Internet Tools |
| Sunday | Open Topic |
| Monday | Media Monday |
| Tuesday | QA |
| Wednesday | Veed |
| Thursday | Business |
| Friday | Macintosh |
Other Posts
- Affinity Designer Backgrounds
- Swift Publisher 5
- JPEGmini Lite
- Apple Pages vs Google Docs
- Skitch
- Snagit 2023
- Using Microsoft Shapes and Smart Art in Affinity Designer
- AVIF Support
- Mission Control
- Location Base Smart Albums in iPhoto
- Private File
- Magnifier Annotate Tool
- PhotoLemur Update
- Stitch Effect in Pixelmator
- iTerm2