
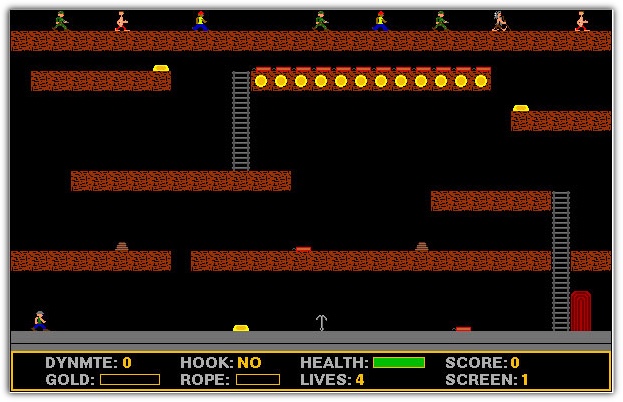
Gold Digger Game

Once upon a time Gold Digger was my addictive Macintosh application. I remember coming home from work and spending a couple of hours playing the game, trying to beat my high score. I didn't play it all the time, but it was a lot of fun when I had time to kill.
Oh this was back in the late 1990s. Is it possible to play the game again?
I recently found one of the binary files and decided to see if I remembered how to play the game on my Powerbook G3. I knew that it wouldn't work on my iMac since it needed OS 9 for it to work. Here is the spec from the documentation:
The game runs on any Macintosh or Power Macintosh running System 6.0.3 or later, and with at least 2.5MB RAM available for color or 1.5MB RAM available for black & white. For best performance, a 68030 CPU or newer is recommended. For the best-looking graphics at least 256 colors and a screen 600 X 380 or larger is recommended.
To get this working, I had to adjust my laptop display to use 256 colors instead of the Millions that it was set to. That takes me back to the early days of Macintosh software where I had to adjust the display just to get it working.
Once I did that everything pretty much worked from there. I was surprised that all my high scores were still there.
I did encounter an issue playing the game, looks like that I needed to use an extended keyboard because I wasn't able to move my character. None of the keys would work. When I checked the configurations it looks like that it's looking for Keypad inputs.
The only way I was able to get this game in my G3 was from a CD that I burned a few years ago. I tried FTPing the file and it wasn't working,the files weren't being copied as Binary files. I tried to stuff it and that didn't work also.
PermalinkApple's Panic Screen
This past week, I turned on my PowerMac G3 and encountered the ultimate "Uh Oh" - I saw Apple's panic screen:
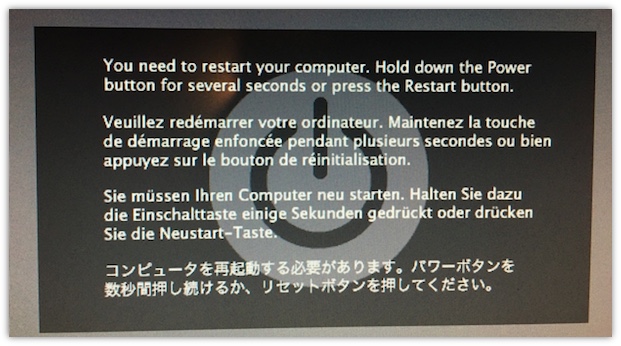
I restarted the computer a couple of times and kept getting the same panic screen. This is telling me that something is wrong with the hardware. (I'll need to reset the pram and that should get the computer up and running.
However, this got me thinking: I haven't used this computer in a long time, did I really back everything up? What about all those photos, audios? What is on this old computer? I am sure that I backed up the files, but where are they in my vast DVD collection? It's time to consider my backup strategy on some of my legacy computers and hard drives that I have around.
One thing that I will do, is to get a sheet of paper and an envelope and tape both of them to the computer. I'll write down what files are currently on the computer and in details. No more general labels like: "Photos from 2003." Instead, I'll write something like Fenway Park photos and photos from June 1st - August 4th, 2003. This will help me in the future to find critical photos that I might be looking for.
In the envelope, I have a 64 GB Sandisk Ultra Fit Flash Drive and all the critical files that are on the computer. No more spreading files over multiple DVDs. The flash drive goes for about $16 on Amazon and it has a lot of great reviews! 64GB may not seem like a lot but that's going to save me from search through 15 DVDs. Again, I am only concern about the top critical files that are worth saving on the Flash Drive.
Now I am cooking with gas!
By doing this, I'll have all the files in one place and it will be much easier to find the files I may need in the future. I think the best envelope to use is in this case is the Tyvek envelope. For additional protection, I could put the flash drive in a sandwich bag, that would help keep out any humidity from being in the basement.
PermalinkEncoding old Video Files
Do you have some old Videos that are using old Codec, say SorensonVideo3, that makes it hard to watch the videos. When you click on a video you have to go through a "conversion" process before you can watch your video. The video gets transcribe to the H.264 format so that you can watch it.
You have a couple of options to fix this problem:
Short Term: Enabling Legacy Codecs in QuickTime Player
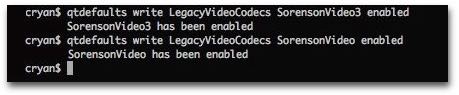
You can enable SorensonVideo3 by using a Terminal command
- Open a Terminal window Applications > Utilities > Terminal
- Type:
qtdefaults write LegacyVideoCodecs SorensonVideo3 enabled - Press enter and you will get a message stating "SorensonVideo3 has been enabled"
- Note: You must type this for each codec you want enabled, perhaps this would be a good time to add SorensonVideo.
- Type:
qtdefaults write LegacyVideoCodecs SorensonVideo enabled - Press enter and you will get a message stating "SorensonVideo has been enabled"
- You can get a list of current legacy codecs by typing:
qtdefaults read InstalledLegacyVideoCodecsand press Enter
Long Term: Converting the Videos to the H.264 codec standard
Nobody knows how long Apple will keep including the SorensonVideo3 or SorensonVideo format as part of the Quicktime installation? Why not convert your old videos to the H.264 standard, which appears to be staying around for a while. Fortunately, it's very easy to convert multiple videos, and the best part - it's free!
There is an Apple Service called "Encode Selected Files" that will convert the video in a background job.
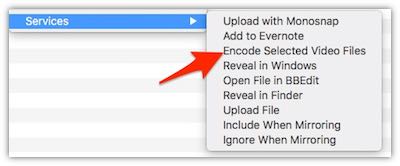
Here's are the steps:
- Identify what files that you need to convert.
- Select the files and then right-click and select the Services menu
- Select the 'Encode Selected Video Files'
- Under the Setting category use the 1080p option (Use the other options if you only want the videos to work on older iPods.)
- Click Continue
- The converting is now being doing in the background, and new files will be created in the same directory as the original files.
- That's it! Select as many files as you want and sit back and enjoy!
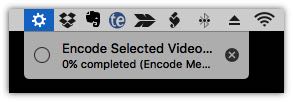 In the Finder menu bar, you'll see a spinning wheel showing you that the background process is running. Your computer might be slow during this time.
Note: This will only convert eligible video files. .WAV files will not work and will actually fail the batch job forcing you to restart the Encoding process. If you are having problems with this, check your video files and try a smaller sub-set. Any bad video file will stop the 'Encode Selected Video Files' from running.
After all these years, I can't believe that I never saw this Service. I supposed that this means I should pay more attention to the features in the Services menu.
PermalinkMoving Files from OS 9 to OS X
I have an old Macintosh PowerBook G3, and I was trying to figure out how to move some old files to my 2011 iMac. Unfortunately, a USB flash drive isn't an option because the PowerBook G3 doesn't have a USB port.
I can’t use a USB stick since the Powerbook G3 was before the USB technology. To get it working I enabled FTP on my iMac, and then used Anarchie (version 3.1!) on my Powerbook G3. I simply logged into the iMac via FTP.
This worked perfectly fine! I don't really need to work on applications as the newer computers can't run them anymore. If I did need to move things, I could always use Stuffit.
How to get this working
Start the FTP Server in OS X
This will start a generic FTP and FTPS server on the Mac, but not an SFTP server.
Launch the Terminal (/Applications/Utilities) and enter the following command to start the FTP server:
sudo -s launchctl load -w /System/Library/LaunchDaemons/ftp.plist
Confirm the FTP server works by typing:
ftp localhost

If you see the familiar FTP login:
$ ftp localhost
Trying ::1…
Connected to localhost.
220 ::1 FTP server (tnftpd 20100324+GSSAPI) ready.
Name (localhost:Vladislav):
That is how you know the server is running. If you don’t see that, then the server either hasn’t finished starting yet or you didn’t enter the command properly.
You can find your IP address of your iMac by typing the following in the command line:
ifconfig en0|grep 'inet '|cut -d ' ' -f 2
Tip: Check out my TextExpander snippet on getting your IP address.
Getting the files over
Connect your PowerBook to the same network as your iMac and load up your FTP program. I just plugged my Powerbook to the network using an Ethernet Cable. ( I didn't want to have to run into any wireless configuration issues.)
I opened up Netscape, to make sure that I was successfully connected to the Internet, and checked out cnn.com's website. (It's neat to see what websites look like using an old browser. Plus it shows up in their server logs that someone visited their site using Netscape.)
I then open up Anarchie and then created a new FTP connection to my iMac using the IP address that I found earlier.
192.168.0.5
In the username/password field I entered the username and password of a user on the iMac.
Once connected, I then moved to the Users folder, then my name, then Desktop. Then start copying files to that location. I select my desktop so I can see the files are being copied. I can do a double check to make sure they are alright. After everything is finished, I just copy all the files to a folder and file it away.
Cleaning up
Once your done, make sure to run the following command on the iMac to stop the FTP service. You don't want to accidentally have a port open which hackers could use to exploit your computer. Simply run this command:
sudo -s launchctl load -w /System/Library/LaunchDaemons/ftp.plist
That's it! That's how easy it is to move files from an old computer to a new one. It's a good idea to backup some of your data on a secondary source because you never know, one day that computer may not boot up.
Did you know that Western Digital Password drives have FTP access? You can also set up FTP access to a Western Digital 'My Passport.' This will give you the option to upload the files to a remote drive and you don't have to configure your main computer.
PermalinkMacintoshman Song
MacHack was an event that challenge developers to come up with some cool application in a 48 hour period. The events were held in Ann Arbor, Michigan from 1986 through 2003.
In 1996, a song, titled "Macintoshman" was created to play during a video montage of the previous year. The video was distributed via various Macintosh CD collections.
Here's a brief transcript of the song:
First time I saw it, I said come here quick.
No DOS commands, I just point and click
It got some icons and doddle and things
Then I said the faithful words…How do I program this thing?
Now I am a Macintosh man...
Now I am a Macintosh man
This is a 30 second clip of the song:
PermalinkEDUCORP Catalog
In the early 1990's there were three ways to get shareware software; Bulletin Board Services, Computer Societies such as Boston Computer Society and catalog companies such as Educorp. Catalog companies were a popular choice because people didn't have to use dial up to download software.
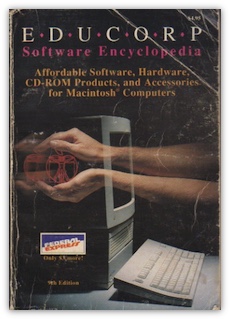
One of the most popular companies was EDUCORP. Every year they would mail a catalog of the currently available disk packages. I still have the 9th Edition, which is 347 pages longs and distributed in early 1990. This is the "About Us" information that they have in their catalog:
Who we are and What we do
We are EDUCORP, a division of Gazelle Technologies, Inc. Our goal is to provide high-quality public domain and Shareware software at almost-free prices. We also sell CD-ROM drives, our entire library of software on our highly-rated EDUCORP CD-ROM, as well as many other CD_ROM titles. We have very low prices on blank SONY disks, computer accessories, and commercial software. This catalog describes and illustrates over 550 disks packed with over 9,500 programs at very low prices. Our prices start at $6.99 and go down the more you buy, as low as $2.49.
Here's a sample of one of their packages from the 9th Edition: 2110 - Utilities, Volume 6 - which featured AutoBlack, CLIM, CursorWrap, DTStartup, FaceLift, Forked Tongue, Gone Fishing, Hyper, Immortality, Initializer, JClock, Layout, MacProtect, MacSnoop Demo, MacWait, Nest, Preview, ReMountHD20, ResPreloader, ReverseScreen, RAMTest, SkipStartup, StartMac, SysAlerts, TEXT Ranger, UDS/M, Verify.
This is a screenshot of part of page 41 in the catalog, click on the image to see the full page view, I highlighted some of the application names because I was interested in that software:
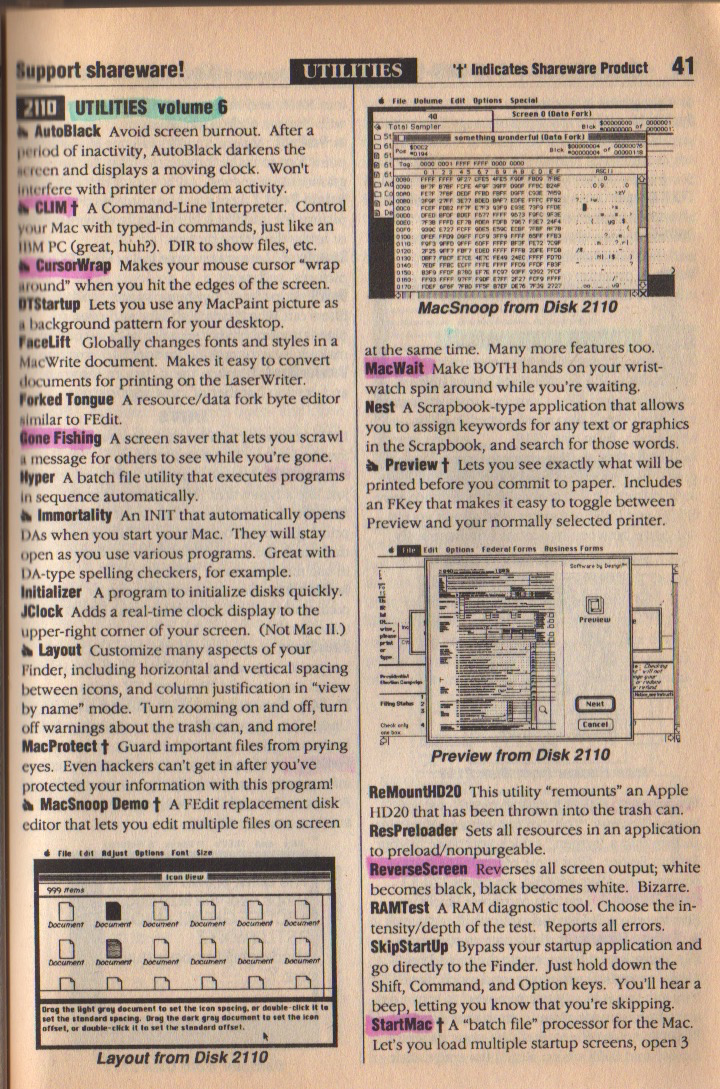
One of the downsides of ordering from EDUCORP was that you didn't always know what you were getting and had to rely on the brief description to convince you that it was a disk worth ordering. They did a good job with combining common shareware packages.
I can't find any information on when EDUCORP closed it doors, but I am sure it was the results of how easy it was to get shareware from AOL and other online providers. Today it's a lot easier to get Macintosh shareware software via the MacUpdate, Tucows.com, macshareware.com, Pure Mac and many more.
PermalinkHow to Scan to Evernote on a Mac
If you do a search around the internet for instructions on scanning documents directly to Evernote on a Macintosh, you'll find that many are out of date. You may think it's no longer possible. Well it still is...and it's very easy to set up.
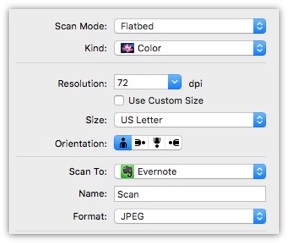
Here's my simple instructions on how to capture scan images and put them directly into Evernote using Image Capture version 6.7 (OS X El Capitan)
- Open Image Capture
- Click on the "Show Details" button on the bottom right window
- On the pull down menu next to the "Scan To: text, Select "Other..."
- Select the 'Applications' Folder and then find 'Evernote'
- Click 'Open'
- You'll see the EverNote now appears in the pull down menu
Scan file items will appear as individual notes in Evernote. Immediately after the scan, you will have an opportunity to make some notes. This is a good time to comment on why you scan the item.
Evernote recommends to use Color as the "Kind:" and to scan at 72 dpi resolution. (See the example screenshot)
If you have Evernote Premium, the text in the scan items will be searchable. This includes photos. This means if you have a photo with an inspirational quote, you can search for it.
Note: This is backward compatible, which means that if you upgrade to Premium today, anything that you already have in Evernote account will be searchable. Make sure to give Evernote some time to scan and index all your document and photos after you upgrade.
PermalinkQuickDraw picture
There is a weird display when viewing screen captures in older versions of OS X. For some odd reason, some of the images have alignment issues. Here are a couple of examples with the fix. (More on that later)
The image on the right is what it looks like when I open the original file, the image on the left is the fixed up version.
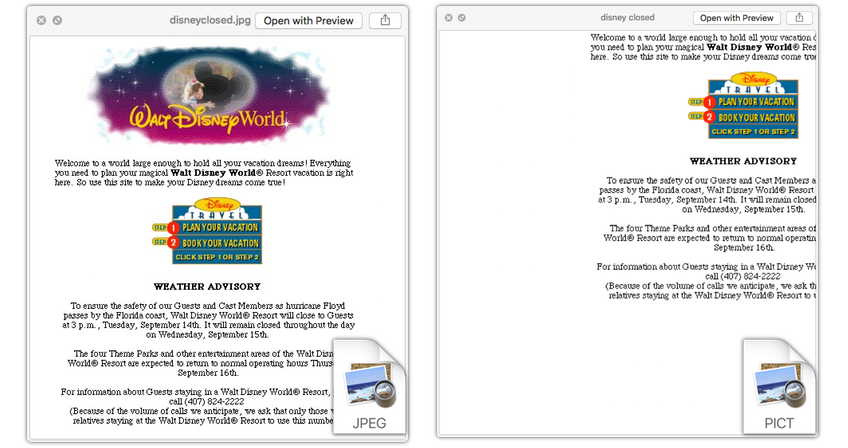
Click on image for a larger version.
All is Not Lost
The good news is that data isn't lost and you can easily see the screen shot as it was taken, with a little bit of work.
The solution to viewing this file correctly is to open up the file in Mac OX 10.3 "Panther" or earlier. Yes you will need your old computer, you saved it right?
Once you have the file open in Preview, save the file as a JPG or PNG file format. Once the file is in a standard format it can be correctly viewed in non-legacy system.
Any filename that starts with "Pictures" followed by a number and dated earlier than 2000 will most likely encounter this problem.
If you're a long-time Macintosh user, with lots of old Picture files, you can do a file search for images that are using the PICT format in the Finder.
Why is this happening?
It turns out that Apple's original screen capture tool was using Apple QuickDraw.
Wikipedia says, "With the change to OS X and discontinuation of QuickDraw, PICT was dropped in favor of Portable Document Format (PDF) as the native metafile format, though PICT support is retained by many applications as it was so widely supported on Classic Mac OS."
In other words, it is because the screen capture was done with an old version of QuickDraw. Apple no longer supported QuickDraw after 10.3. This was an indirect result of Apple eliminating support for the "Classic environment" with 10.4 Tiger.
Did you know that QuickDraw was part of the core graphic concept of the original Macintosh Plus.
PermalinkGIF Annimation Resize
Last week I was trying to figure out a way to reduce the size of some animated GIFs that were generated from Google Photos. I wanted to put together a collection of them on my website.
I thought I would share how easily this can be done in Apple's Preview application. Don't use Preview that much? I did hear someone say that Apple Preview is a very powerful app and they were going to write a book about it. I believe they didn't for some other productivity book.

This is useful if you have a GIF that is 850x638 and wants to make it 425x319. This won't do any advanced compression, it will simply resize the image while maintaining the quality.
Simple Steps
- Make a duplicate of the image if you want to keep the original size.
- Double click on the GIF to open the image in Preview,.
- You should see a drawer with the thumbnails on the left.
- Select all the images by doing a Command-A
- Under the Tools menu, select 'Adjust Size...'
- Make a change to the size, make sure that Scale proportionally is selected.
- Save the image. (Technical you don't have to do, since Apple will save it when you quit the application)
Check out the Animation page of a few animated GIFs that I put together of the MBTA commuter rail. Some of them at the Framingham Station and a couple on the train itself.
PermalinkOld Macintosh TCP Applications
Remembering some of the classic Macintosh TCP Apps.
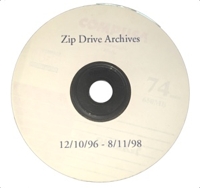
I was going through an old CD this past weekend that I found in a CD spindle that I had on my desk. The CD was labeled on the top with "Zip Drive Archives" with the date range of "December 10, 1996 - August 11, 1998." It's one of my oldest CDs that I have in my collection - the data is 19 years, 1 month and 25 days old.
Zip Drive CD Collection
I archive some of my Zip collection to the CD because back in 1998 it was a novelty to back things up to Zip disks, but after a while, it became a pain to have to find things on various disks. When CD burning became more mainstream, I decided to combine some of my more popular disk to a CD so that I only had to go to one place to get my data.
Looking at the CD got me thinking. What data did I value enough to back up almost 20 years ago? Back then CDs were pretty expensive and it took a long time to back up the data. I can remember that it would take 45 minutes to burn a data CD. This doesn't include the time it takes to organize the data on the disk before burning it.
Getting the Data
My first challenge was reading the disk. So, It turns out that the backside of the disk wasn't exactly clean. I had to use a dry microfiber cloth to clean the disk. My lesson learned: Use proper disk storage to extend the life of optical media.
The data was more accessible on my older PowerMac G4 than my iMac. I am thinking that the older CD drives weren't as sensitive to some of the scratches that were on the disk. Yet another reason to have the older computers available.
I found a few surprises on the disk, but most of the things that I put on the Zip Drive really have very little value to me today. I found some applications, but they were all pre-MacOSX apps and couldn't use today. There were some old sound data files for some old audio apps, I can see if Audacity or Handbreak will be able to convert them.
Classic TCP Applications
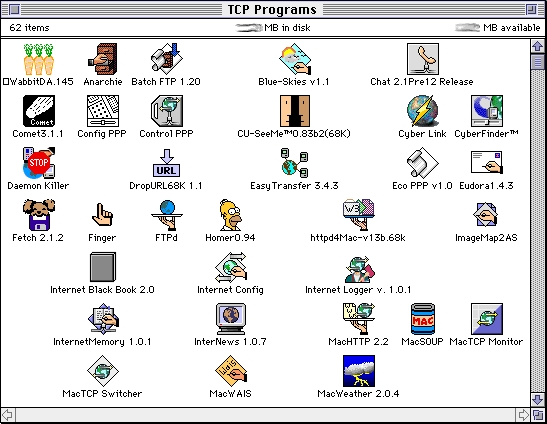
One of the things I wanted to do on my website feature some Internet applications. So back in 1998, I created a 'Macintosh TCP' folder and put in all the popular Macintosh Internet Apps. Here're a couple of screen shots that I found of that folder. This is kind of a good time capsule of Macintosh Internet users in 1998.
Do you remember these classic Macintosh TCP Programs:
WabbitDA, Anarchie, Batch FTP, Blue_Skies, Chat 2.1, Comet 3.1.1, Config PPP, Control PPP, CU-SeeMe, Cyber Link, Cyberfinder, Daemon Killer, DropURL68k, Easy Transfer, Eco PPP, Eudora 1.4.3, Fetch 2.1.2, Finger, FTPd, Homer 0.94, httpdMac-v13b.68k, ImageMap2AS, Internet Black Book 2.0, Internet Config, Internet Logger v 1.0.1, InternetMemory, InterNews, MacHTTP, MacSOUP, MacTCP Monitor, MacTCP Switcher, MacWAIS, MacWeather 2.0.4
Here's a screenshot that I took of a page one of my "TCP Programs" folder:
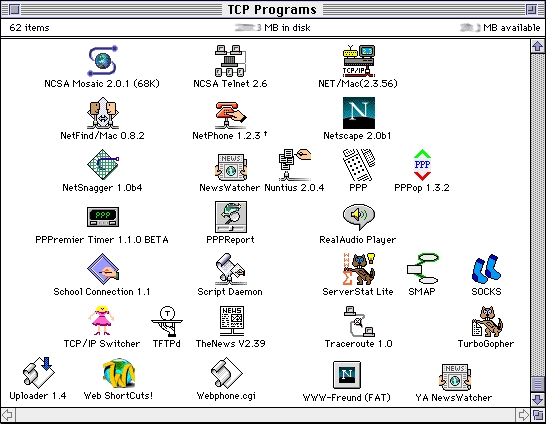
The "second page" had these classic files:
NCSA Mosaic 2.0, NCSA Telnet, NET/Mac, NetFind/Mac, NetPhone, Netscape 2.0b1, NetSnagger, NewsWatcher, Nuntius, PPP, PPPop, PPPremier Timer, PPPReport, RealAudio Player, School Connection, Script Daemon, ServerStat Lite, SMAP, SOCKS, TCP/IP Switcher, TFTPd, TheNews, Traceroute, TurboGopher, Uploader, Web ShortCuts, Webphone.cgi, WWW-Freund (FAT) and YA NewWatcher.
As you can imagine there were a lot of data on the CD, I'll post some other things that I found. It was fun going through the disk and taking a brief step back in time. Just think, Twenty years from now people will be amazed at the various applications that we use to access the internet.
One of the lessons learned during this project that I learn was to use old CD/DVD hardware to read data off the CDs. I copied the files from the disk and then moved them to a USB drive. The plan is to only backup important data, I don't think there is a need to back up old applications that I can't use anymore.
PermalinkAbout
A Mac veteran since 1989, I'm here to share my experience with tips and tricks every Friday. Witnessing the evolution of Mac software and hardware firsthand, I've gained a deep understanding of how these machines work and can help you troubleshoot any issues that may come up.
Check out all the blog posts.
Blog Schedule
| Saturday | Internet Tools |
| Sunday | Open Topic |
| Monday | Media Monday |
| Tuesday | QA |
| Wednesday | Veed |
| Thursday | Business |
| Friday | Macintosh |
Other Posts
- Posterino postmark Effect
- How to Use the Limiter in Ocenaudio to Make Audio Louder
- Paste Clipboard Content as Plain Text
- Wondershare FIlmora 13
- Location Base Smart Albums in iPhoto
- Remove Drop Shadow from Screenshot
- Top 3 Macintosh Posts of 2020
- Editing EXIF Data
- ResEdit
- DragThing
- Say Command
- Happy Birthday Macintosh
- Intensify CK
- Top 8 Macintosh Post of 2018
- Unix Yes