
Affinity Easter Egg
Some common Easter Eggs found in Affinity software
In Affinity Designer and Affinity Photo there is a cool Easter Egg that appears on Friday the 13th and on April 1st:
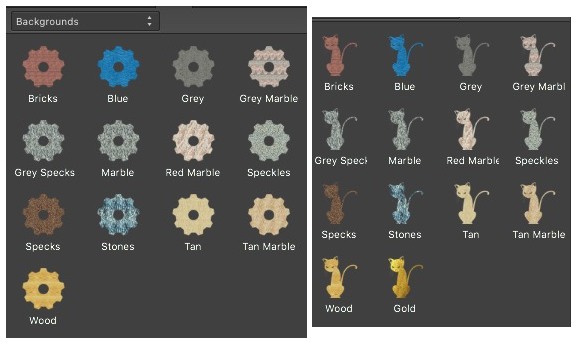
The Style Menu changes to Cats!
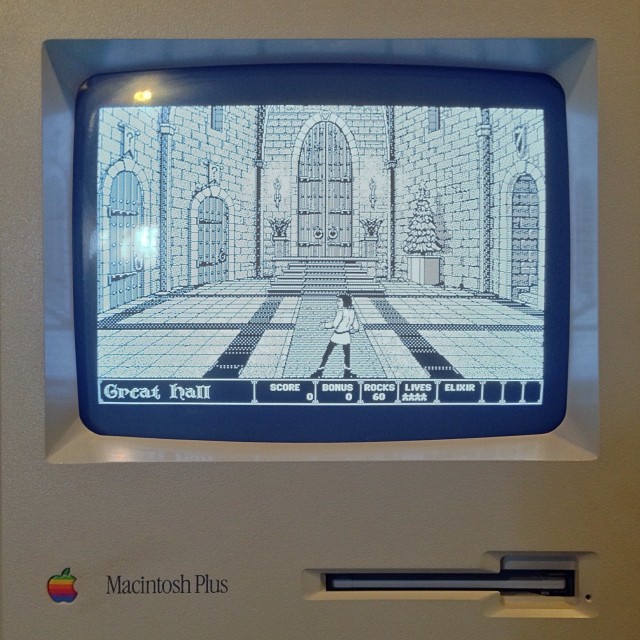
In the late 1980s and the 1990s Macintosh Applications had all sorts of Easter Eggs. Most of them occurred when you performed certain actions. Every once in a while one would happen because of a date.
Some apps had Easter Eggs that would only be accessable via ResEdit. Check out my ResEdit blog post from a couple of years ago
My personal favorite was Dark Castle's Christmas Tree that would only appear on Christmas Eve and Christmas Day. I remember playing around with the system clock so that I could see it. I'll have to search my archive to see if I have some photo of it.
Thanks to RolandJuno on Flickr for sharing this classic Easter Egg:
LaunchBar Instant Send
Some sample task on using LaunchBar
LaunchBar is a useful tool to make users more productive. Here are some sample tasks using Instant Send to demonstrate some of the capabilities of LaunchBar.
LaunchBar description of Instant Send:
The most efficient way to send files or text selections to LaunchBar, and then hand them over to applications, folders, email contacts, search templates, services and more.
- Select a text.
- Enable Instant Send -> Hold down the Command Space for a couple of seconds
- Press the Tab key
- Search for an Action: Join Lines with Comma and then click return
- Type in Command C to Copy the converted text or type in Shift Return to immediately paste the results in the current active window.
Now you can Command V the converted text to any document.
How many times have you need to sort a list of items? It's super easy with LaunchBar:
- Select a list of text.
- Enable Instant Send -> Hold down the Command Space for a couple of seconds
- Press the Tab key
- Search for an Action: Sort Lines Ascending and then click return
- Type in Command C to Copy the sorted text
Easy Way to remember is just type in "Sort" after you Tab...
For this to work, you need to first install Brett Terpstra's Markdown Service Tool.
- Select a text.
- Enable Instant Send -> Hold down the Command Space for a couple of seconds
- Type in "md -" to search for the "md - Convert - MultiMarkdown to HTML" services.
- Click the Return key
- Type in Command C to Copy the converted text or type in Shift Return to immediately paste the results in the current active window.
Once you do this a couple of times, the "md - Convert - MultiMarkdown to HTML" will be one of the options you'll immediately see when you tab, so it will be even quicker.
You can get information on any file using the Info Browsing feature.
Simple Task: Find the image demensions of an image
- Drag/Drop an image to the LaunchBar icon in the Dock
- Click on the right-arrow key
Keyboard Maestro Command in BBEdit
Control Multiple Actions with one shortcut
I have been using BBEdit as my daily note tool. Why BBEdit? Here are my three reasons:
Three Reasons I use BBEdit as a Note Tool
- Clean Simple Interface. I have it set as the "Right third" of the screen, and add notes when needed.
- I use Markdown as my note formating - so I can focus on notes and not formating. At the end of the day, I can easily import to DayOne, or Evernote (For Evernote, I preview the contents in BBEdit and then copy/paste the contents of the preview into Evernote.)
- I have BBEdit always open, so why not just use it.
Keyboard Maestro Implementation
Part of the problem with using BBEdit is that I don't need to see the Line Numbers or Gutter tool. BBEdit allows you to assign keyboard shortcuts, but I need to type in two separate commands.
Thankfully, with Keyboard Maestro, I can create a one-step command to show/hide the the Gutter and Line numbers. Note: This is more of a proof of concept than a real issue that was bothering me - can I create a Keyboard Maestro to trigger two menu item at once.
Keyboard Maestro Macro
This is the Keyboard Maestro Macro that I have setup so that it will Show/Hide the Line Numbers and Gutters.
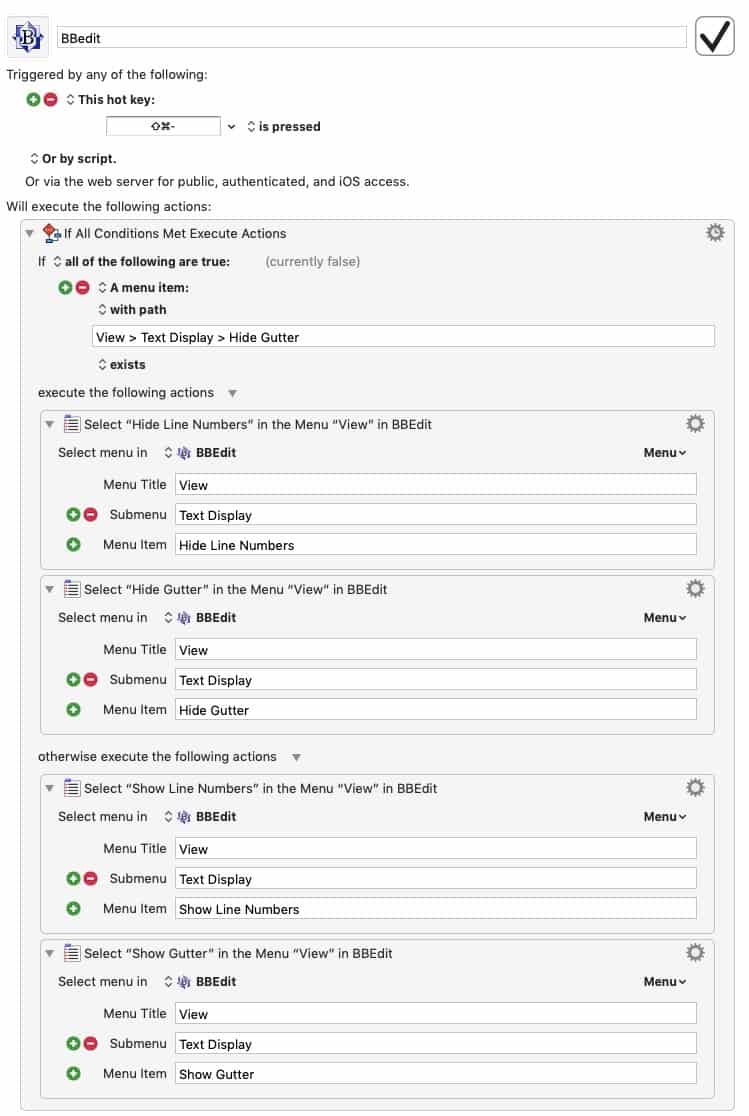
Click on image for a larger version.
Some Notes:
- I set this up so that I type the same command to Hide/Show the Gutters/Numbers.
- I have this in a Group so this command only works in BBEdit. That way I don't mistype the command in another application.
- It was a bit tricky to figure out how to set up the condition statement with application menus.
- I need to wait a few seconds before hiding/Show command. I can't quickly Hide/Show. Not sure if the issue is with BBEdit or Keyboard Maestro. But if I type in the shortcut fast twice, I'll get an error.
Download the Macro
If you have Keyboard Maestro you can download the Macro. It will save time typing in all the above information.
Default Language as Markdown
Since I start my day with using Markdown in BBEdit, I changed the BBEdit Settings to default every new document to Markdown. This is simple config change done using the Terminal Editor.
Simply open up Apple Terminal or iTerm and paste the following:
defaults write com.barebones.bbedit DefaultLanguageNameForNewDocuments -string "Markdown"
BlogStomp
Good Image Batch tool
Blog Stomp allows you to get your images ready for your blog. It's an easy way for bloggers to display their images perfectly.
The goal of the application is to allow bloggers to focus on the content and not spend a lot of time getting their images ready for the blog post.
Five Things I Learned about BlogStomp 3
- I liked how easy it was to create a gallery of photos from a group of photos - you can pick the layout that works for you. You can even rearrange the pictures by double-clicking and moving images around. There are styles to add text below the gallery.
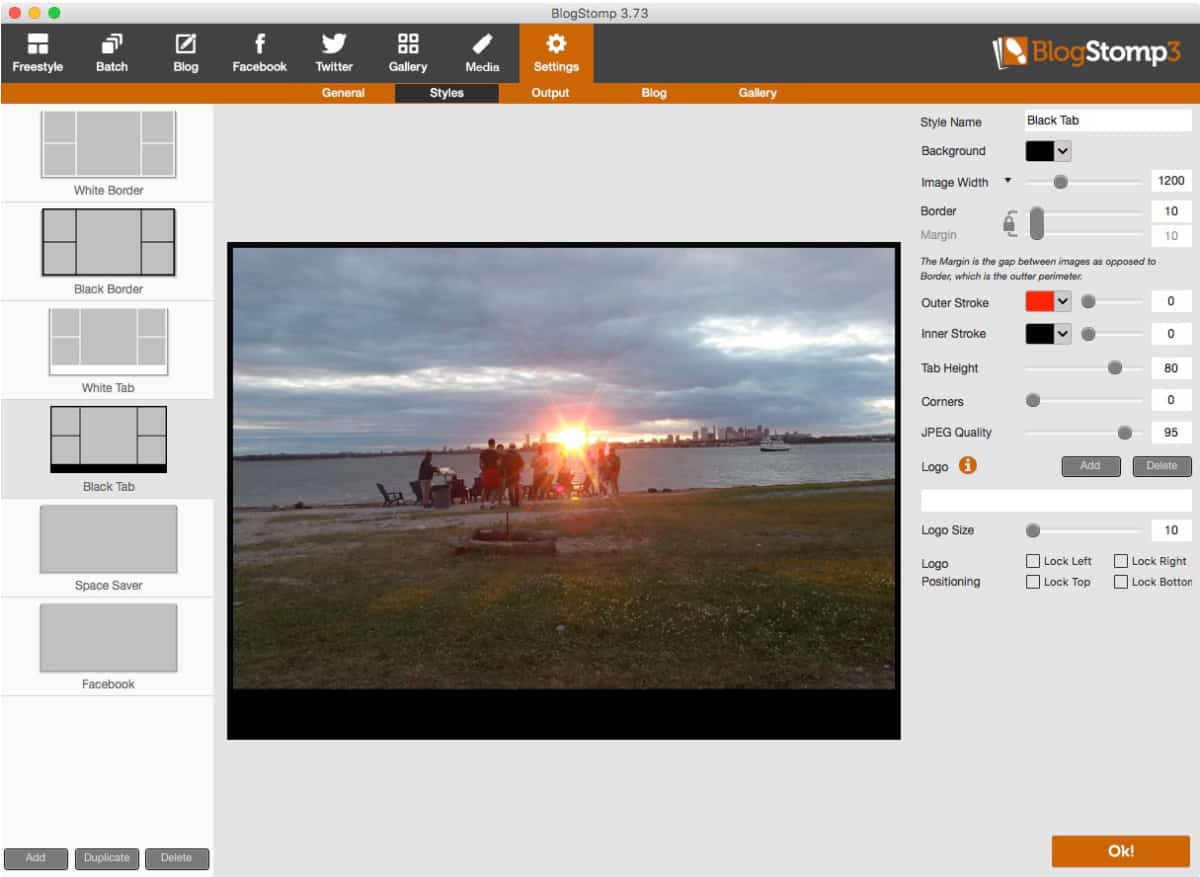
- You can define your own custom Style name - perfect when you want to keep the images the same on your blog - or social media posts. You can set border margins, background colors, Outer/Inner Strokes, Tab Heights, Rounded Corners, JPEG Quality. You can even add your Blog logo. There's no limit to the number of styles, so you can create similar styles with and without the logo. These come in handy when your batch processing images.
- Quik Mode is enabled when you drag and drop a bunch of images to the BlogStomp icon. You then select the style to apply and then click "Stomp It!" Super Easy way to get the images in the right size for your blog.
- You can sync up BlogStomp with all the popular blogging applications - WordPress, Tumblr, Blogger, ExpressionEngine, and LiveJournal. More connections are coming soon.
- Social Media Posting - You can easily post your Stomped! images to Twitter with a text message. The Facebook connection was available until Facebook took away the API access. Now BlogStomp opens your Image Gallery in your Web Browser to make it easy to upload the images to Facebook.
Software Recommendations
This is a very cool tool to have if you post a lot of images - such as a photographer or food critic. It's certainly a good way to keep your images the same throughout the website.
I don't publish enough images in the blog posts to justify getting this software. The more I played around with it, the better understanding of how cool it would be to have. It's certainly a great solution to standardizing the images on your blog.
Try Before You Buy
Download a trial version of BlogStomp 3 from Stomp Software website.The trial is unlimited - just the output images contain a watermark.
If you choose to purchase BlogStomp, it cost $49 for a single user or $89 for a studio.
PermalinkBBEdit Shortcuts
A list of the most popular shortcuts I use on BBEdit
BBEdit is one of my favorite applications. I have tried other applications, but more often I come back to the power and flexibility that BBEdit provides.
I have a lot of shortcuts set up to make it easy to use. This is the list of the most popular shortcuts that I use every day.

Top Ten Keyboard Shortcuts
| Shortcut | Action | Description |
| Save Current Selection as a Clipping | This quickly creates a BBEdit Clipping. BBEdit Clippings are snippets that appear as I am typing words. These save a lot of time typing the same thing over and over. I can go into the Clipping Folder to remove them if I don't think I'll use it again. This comes in handy when I am working on a short term project and need to type a name or phrase over and over. | |
| Preview in BBEdit | By default, Command-P is Print. I find that in BBEdit I don't print that often. However, I do preview a lot, so I changed the default Print option to Preview, as I am more likely want to preview a page than Print. This is very helpful when previewing | |
| ScratchPad | Sometimes I just need to jot something quick down. | |
| Live Search | Quickly find something on the page. Note the search matches are highlighted on the right of the window, making it easy to scroll to find similar matches. Simply type the shortcut and then search. | |
| Backup File | I created an AppleScript which basically sends the the contents of the current window to Evernote. This is a super quick way to back up files. No more backup files cluttering the desktop. | |
| Zap Gremlins | Remove any unwanted characters that may cause problems. For example the curly brackets that Microsoft Word creates. The text is replaced with ASCII equivalent. | |
| Show/Hide SideBar | BBEdit automatically opens the sidebar when you have more than one file open - such as working on a project. Sometimes the sidebar can be distracting. | |
| Hide/Show Line Number | Usually I have line numbers on by default, but when I am writing Markdown, line numbers don't cut it. So this is useful when I don't want to see them. | |
| Hide/Show Gutter | Sometimes having a gutter is useful, sometimes it's not. Usually I combine the Gutter/Line numbers actions. That's why I have the shortcuts setup with one off numbers. | |
| Process Lines Containing | Great way to filter out a log file. I can extract the lines that I care about into another file. |
Haunted Mansion Wallpaper
Enjoy some personal Haunted Mansion Wallpapers
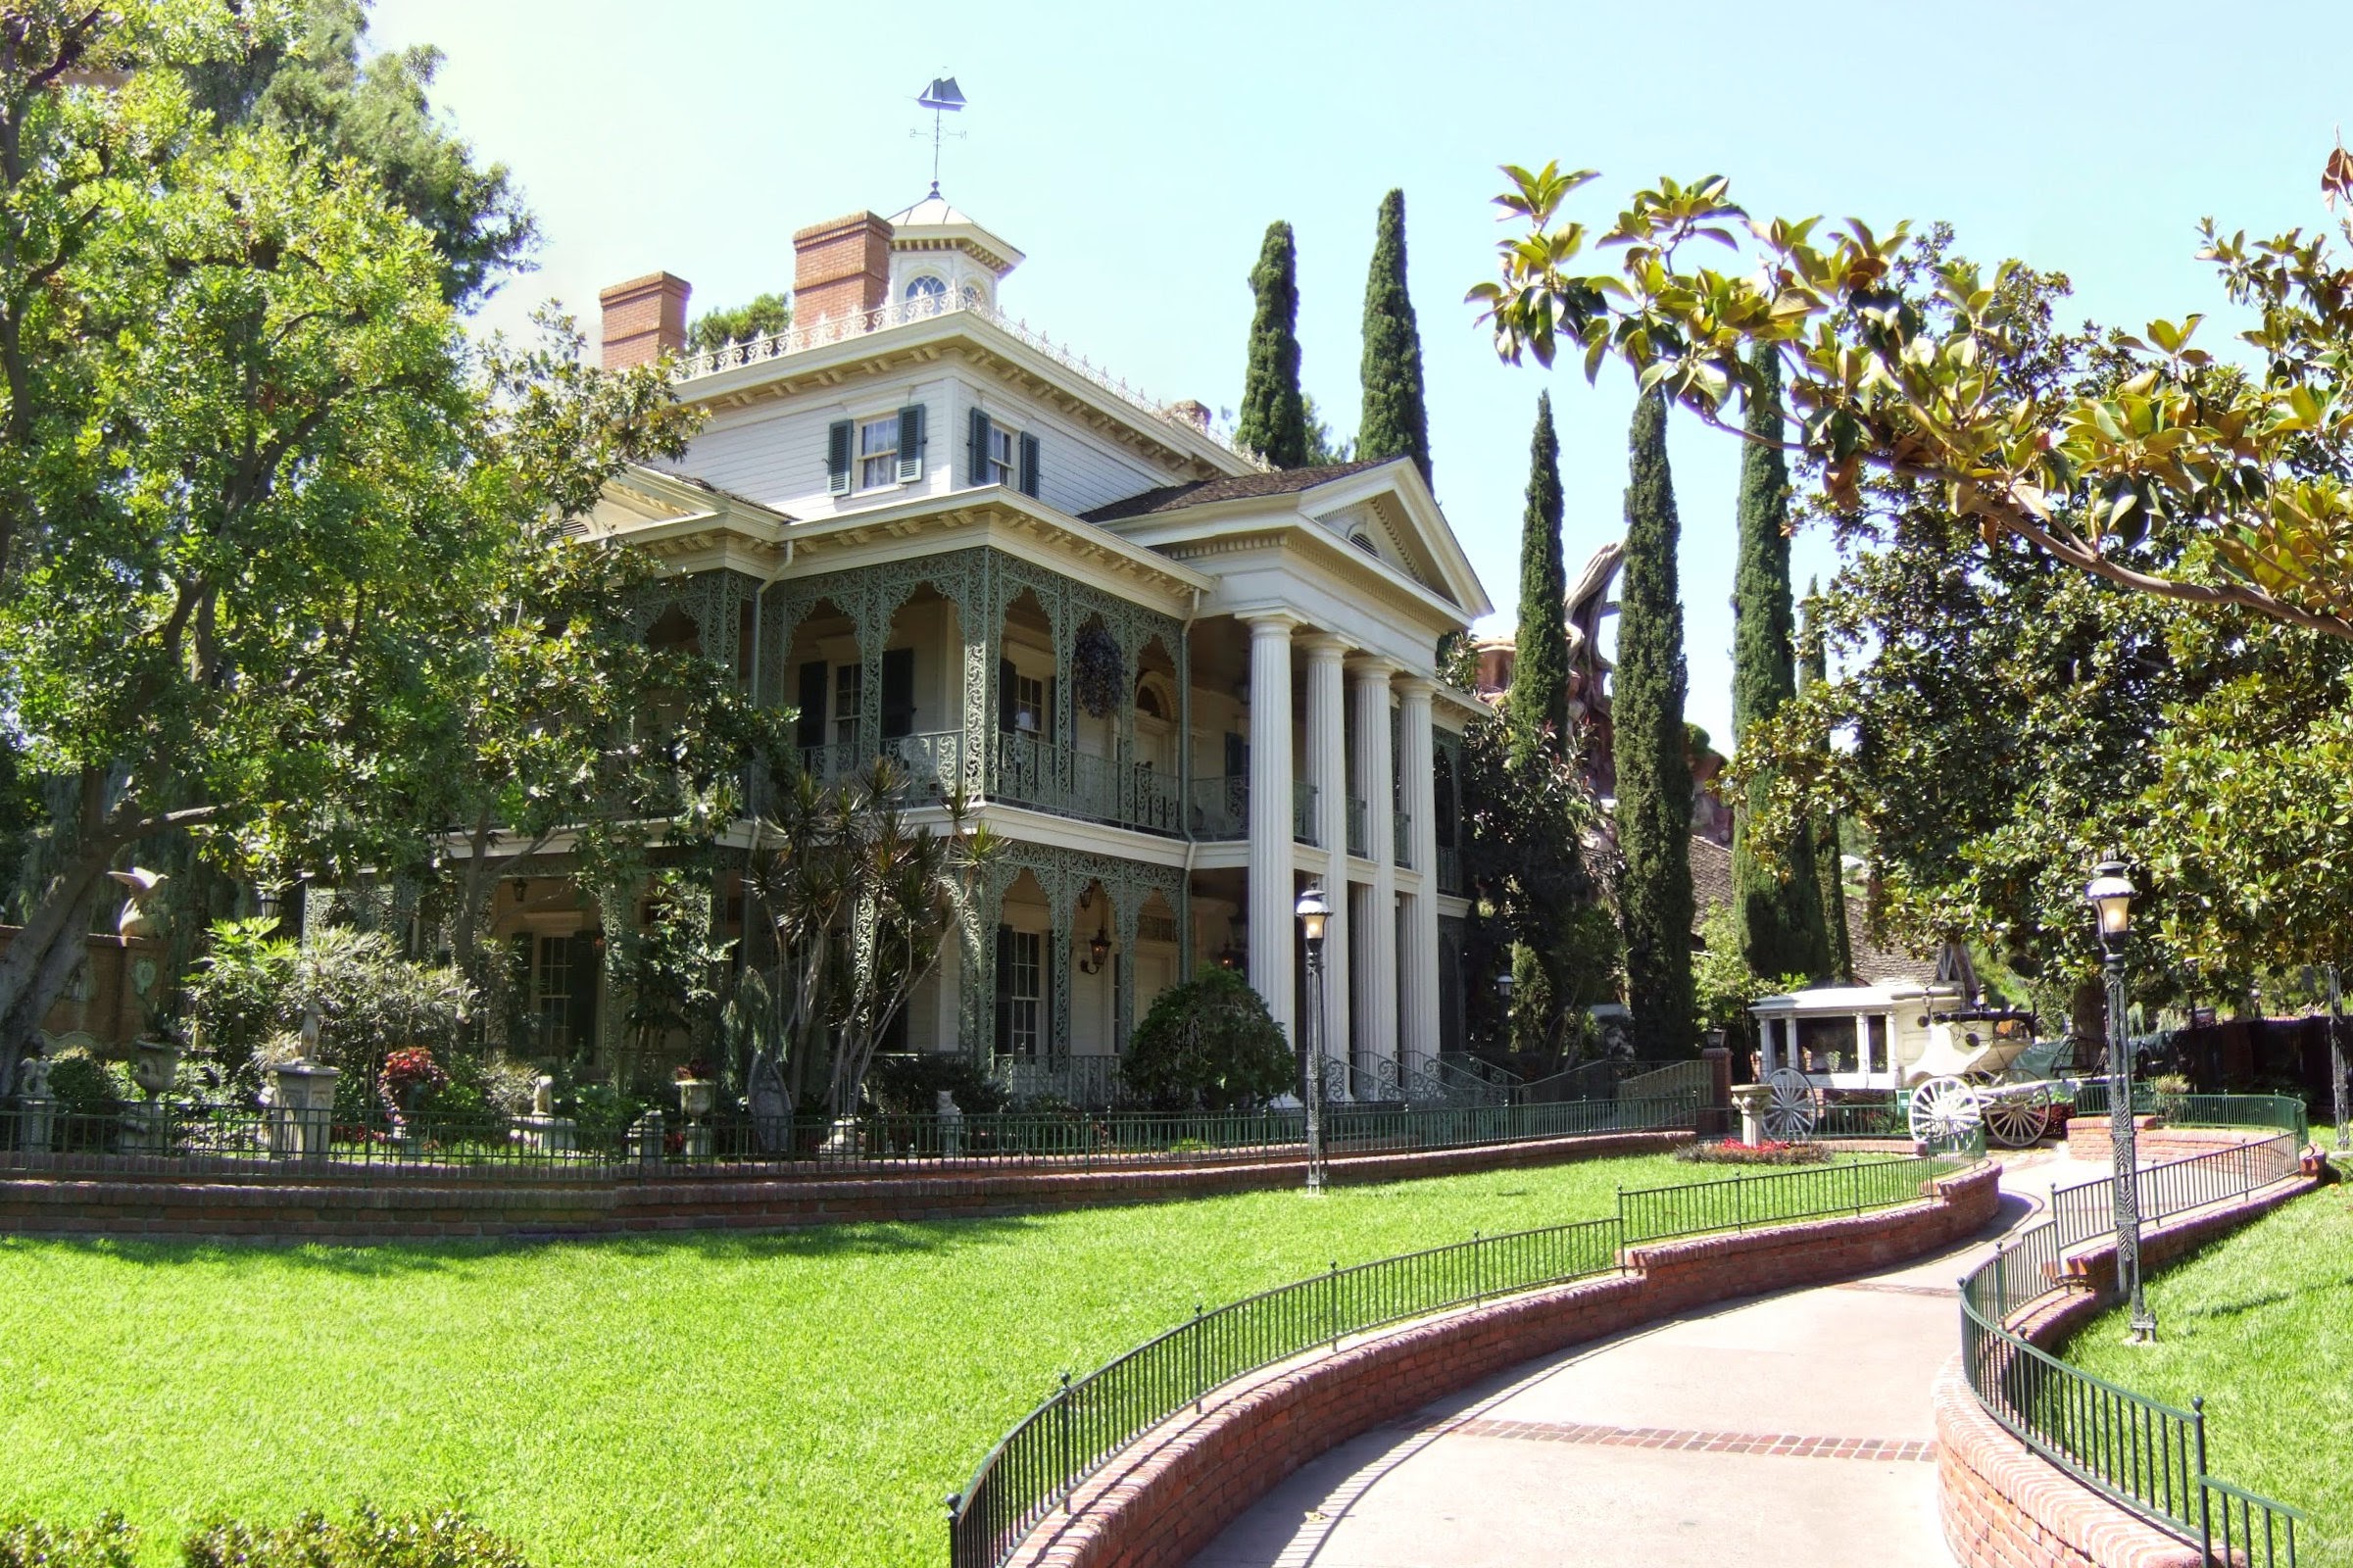
In celebrating Disneyland’s Haunted Mansion 50th Anniversary today, here’s a couple of Personal Haunted Mansion Wallpaper images for your Macintosh.
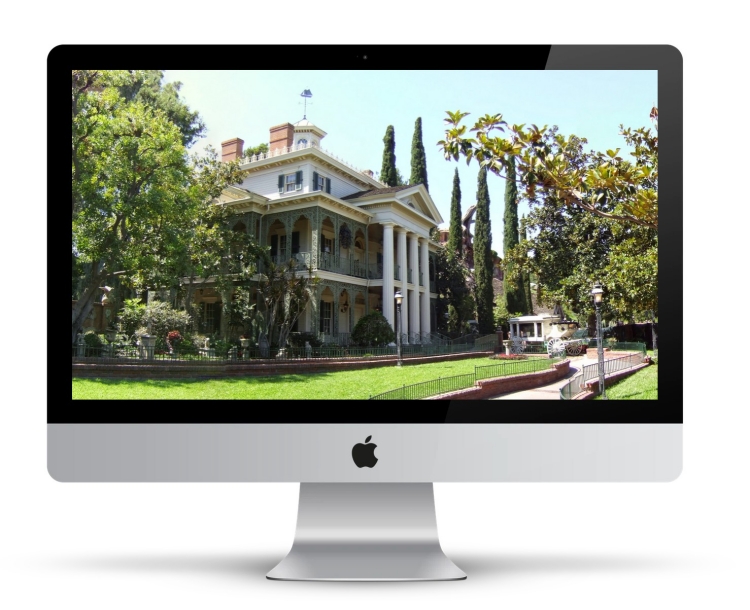 http://www.cryan.com/daily/2019/DisneyLandHauntedMansion.jpg
This was taken on September 2009, when the Haunted Mansion was closed. It’s a rare opportunity to get a picture of the Mansion with nobody in it.
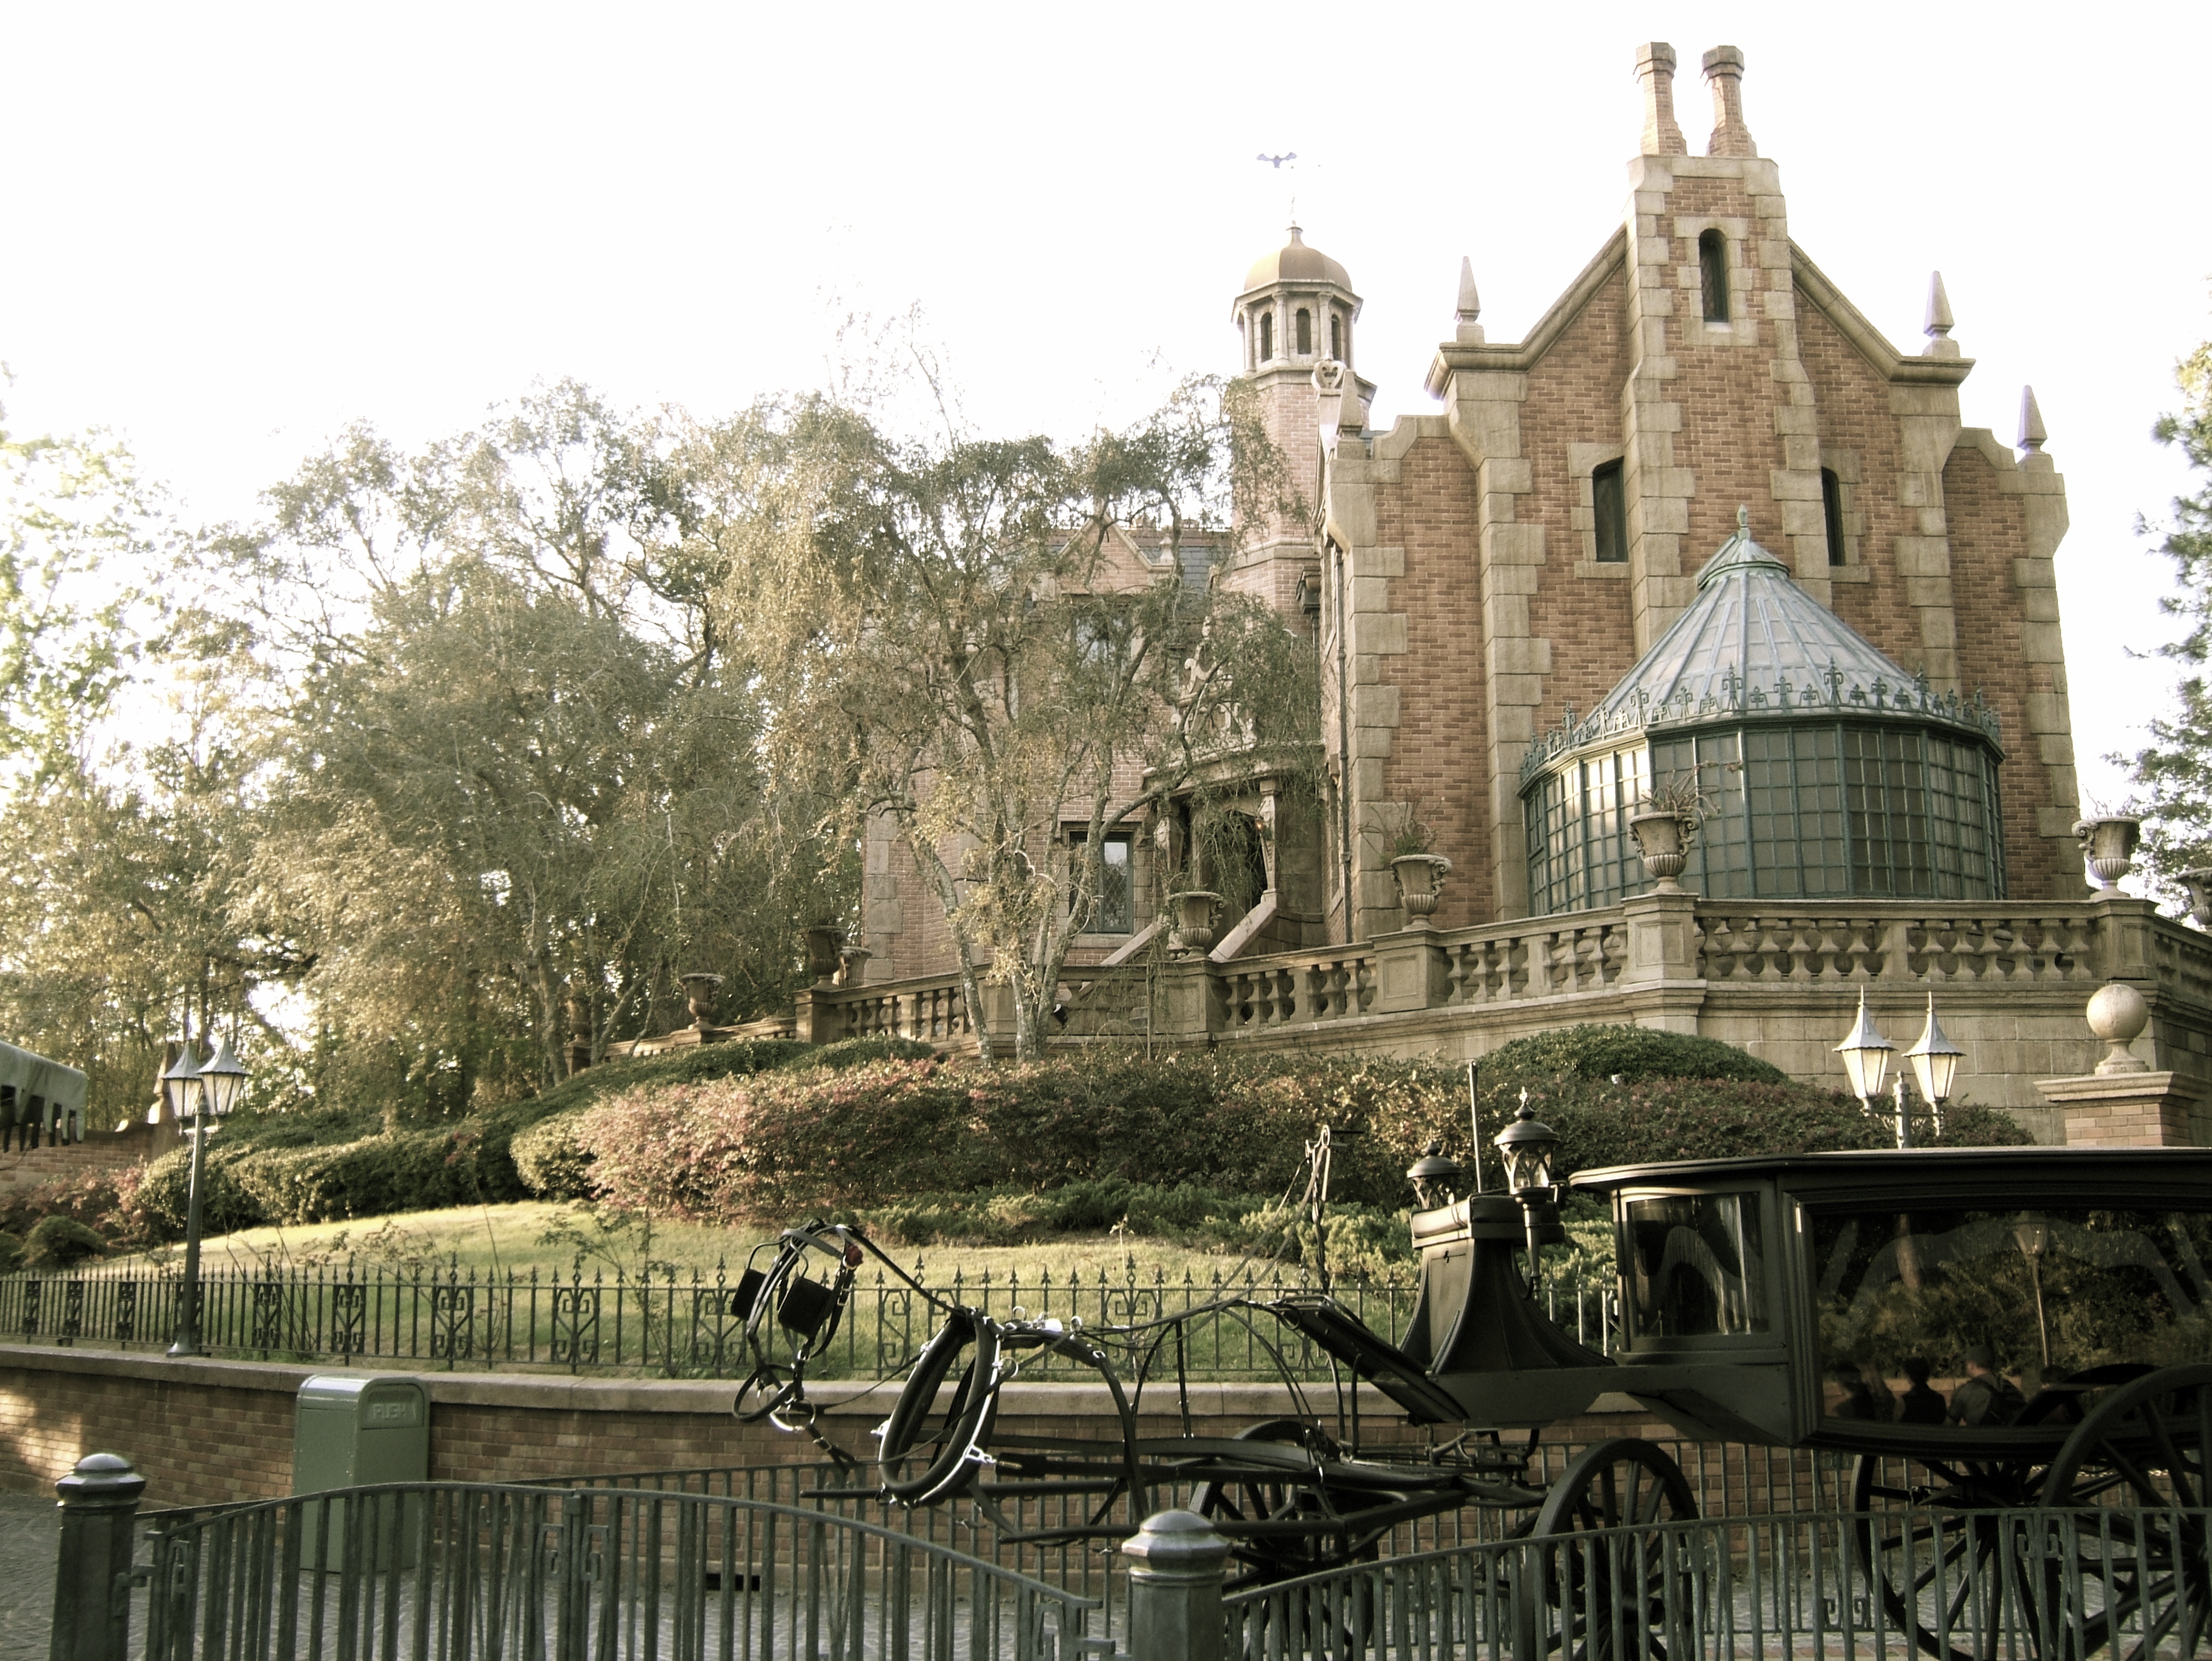
 http://www.cryan.com/daily/2019/DisneyWorldHauntedMansion.jpg
This is one many image that I took at Disney World's Haunted Mansion. It's a very simple image to use as a background as it's not a distraction. I have other dark photos that I will upload at a later time.
How to Install the Wallpaper
Simple instructions to get this Wallpaper image on your computer.
- Click on the above image to download the image to your computer
- Right click on the dashboard and select "Change Desktop Background..."
- Drag and Drop the downloaded image to the box in the top left.
You can use the drop-down to adjust how the image appears. The "Fit to Screen" option works best for me on my 2560 by 1440 monitor.
Enjoy!
PermalinkMacinCloud
Get your own Macintosh Server in the Cloud
MacinCloud is a cool service that let's you have access to a real Macintosh. While it may seem silly if you own one, but if your doing some development work and need to make sure the application works in different environments it can be very useful.
Each box comes pre-installed with various developer tools including the latest Xcode, Microsoft Visual Studio for Mac with Xamarin components and more.

MacinCloud can be useful when testing software and figuring out why some applications are working and not working in different environments.
Description from the Website
MacinCloud provides managed and dedicated cloud Mac servers, hosted private cloud solutions and DevOp pipelines. Users can access on-demand Mac servers for app development, Mac tasks, and enterprise builds. All of our plans and solutions are backed by genuine Mac hardware hosted in 7 professional data centers around the globe.
This isn't a free service, you have to pay to access the boxes - which can be a lot cheaper than straight out owning your own box at a colocation center.
PermalinkCreate your Own Blueprint pattern
PhotoScape has some cool tools that work great together
PhotoScape is a great photo tool. It's my go-to application when I need to do anything graphic.
Recently I wanted a make a blueprint for a background. I was surprised how easy it was to do using the Replace Color tool in PhotoScape. The nice thing is that I can create this blueprint in any size that I want.
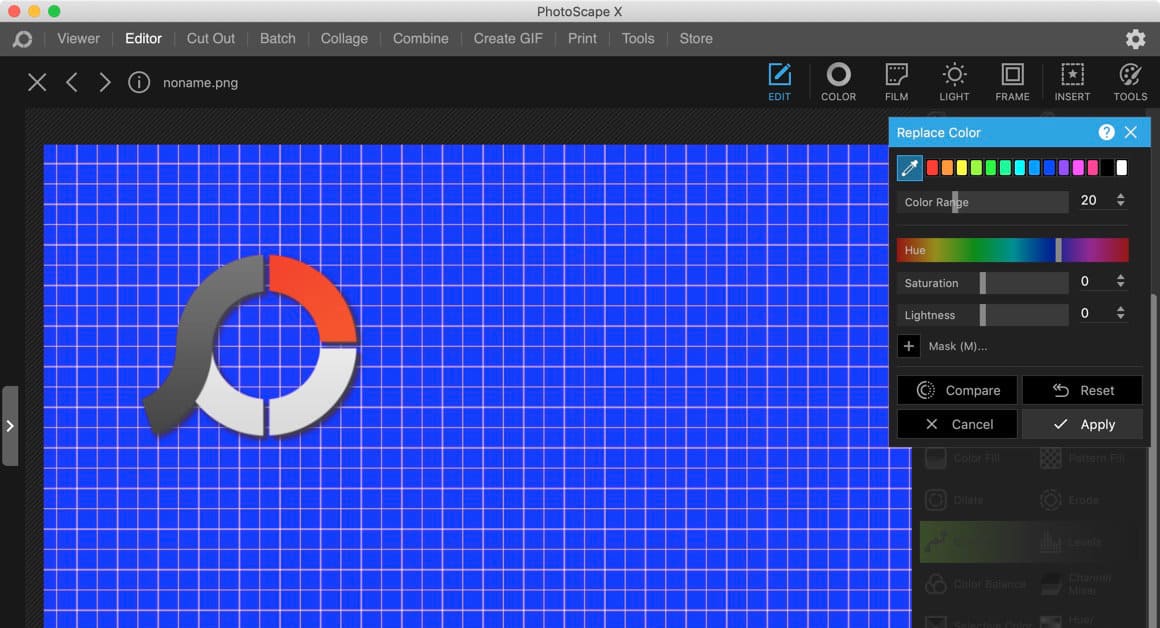
Making a Custom Blue Print
Here are the steps to make an awesome blueprint:
- Open up PhotoScape X and Create a new document (Command - N)
- Define any size and then select the middle box for the pattern.
- Select the 'etc' group and a graph design. (I selected white with the black borders)
- Click the 'OK' button.
- Once the file is in the Editor, select Adjustments and then scroll all the way down to "Replace Color."
- Use the color picker to select the white in the image.
- Then use the Hue color picker to the right color blue you want.
- You can use the "Color Range" to sharpen the image a bit more.
The nice thing is that you have the flexibility make whatever "blue print" color you want. Red, Pink, Green - whatever works best for your design.
PermalinkRepeat Last Capture (SnagIt)
Capture Better with the Repeat Last Capture
TechSmith Snagit is a great screen capture tool. It has lots of features that can help make touch up a screenshot to help tell more of the image.
Additional Capture Items
Snagit has a capture tool in the menu bar - making it easy to capture the screen. You can select from different options, include making your own preset.
One thing that users may not notice is that there are additional short cuts available - beyond the menubar options. These are located in the Snagit Preferences.
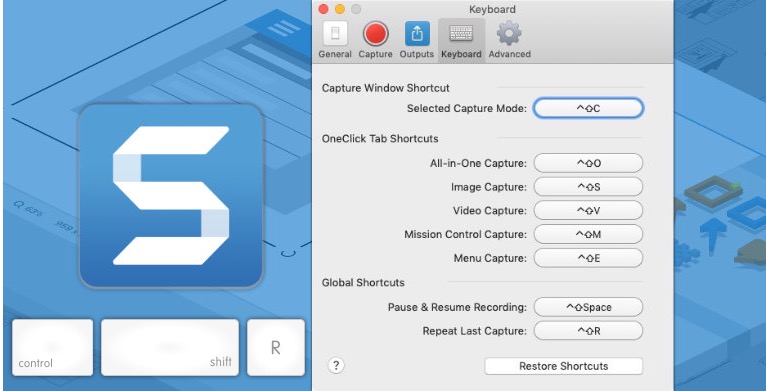
Repeat Last Capture
The "Repeat Last Capture" is a great way to quickly take a screenshot of changes on a webpage - or application. Simply define the capture area using the "Select Capture Mode" then use the "Repeat Last Capture" to capture a change.
This is useful when capturing steps on a website, from page to page.
The nice thing about the "Repeat Last Capture" is that it's silent. The capture goes right into Snagit Library without opening up the application window. This allows distraction-free capture.
PermalinkBootstrap 4 BBEdit Tools
Some tools to help use BootStrap 4 with BBEdit
Recently I upgraded the website from Bootstrap 3 to Bootstrap 4. This was a big upgrade as there were a lot of files that needed to get changed.
No more Panel or Wells
One of the biggest changes is that Bootstrap 4 no longer supports panels or Wells. Instead, Bootstrap 4 now puts emphasis on Card types.
Slight Problem
This site used both types extensively. Which means that I had to do multiple search and replace. So I would need to edit multiple files with various changes.
BBEdit TextFactory to the Rescue
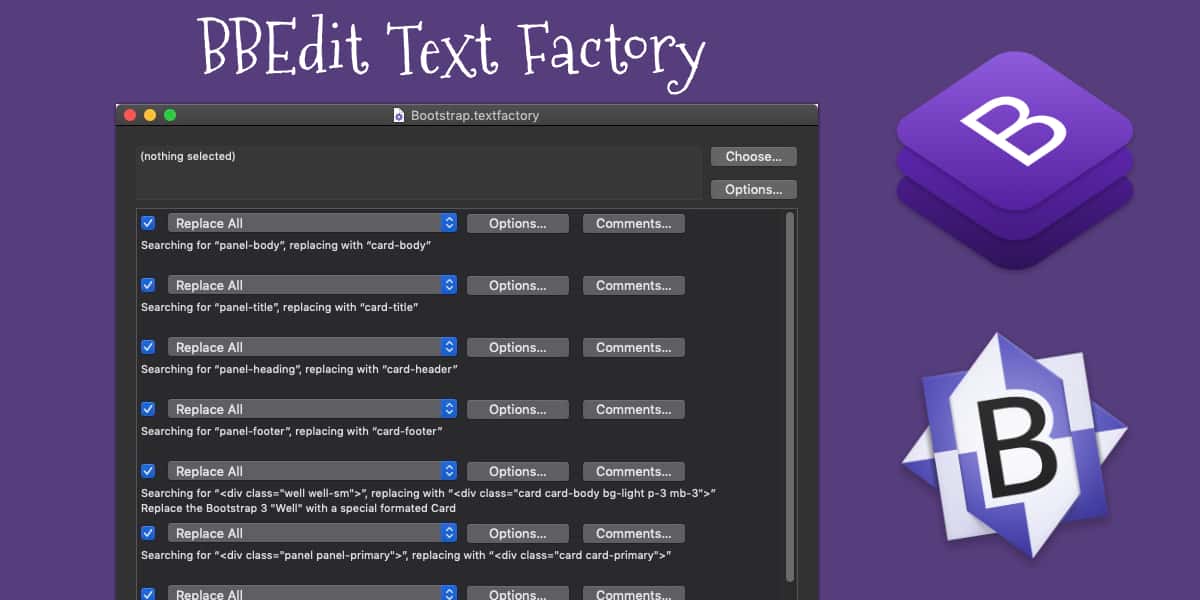
Download the BootStrap 4 Text Factory File
BBEdit Text Factory is the only tool that I have found that will perform multiple Search/Replace on a group of files.
I simply created a TextFactory will all the search and replace rules and the run it against various files on my site. It was easy to set up and certainly made the migration a lot easier than I thought.
TextFactory File
If you're migrating to Bootstrap 4, from Bootstrap 3, you should download my TextFactory file. I think you'll find it helpful with the migration process.
To install this into BBEdit, simply double click on the BootStrap.textfactory file, it should open in BBEdit. Then save the file in the ~/Library/Application Support/BBEdit/Text Factory/ folder.
Make sure to check out all the various search/replace options. You may need to adjust them based on your how your files are set up. BBEdit has more information about using the Text Factory.
Bonus: BBEdit Text Clippings
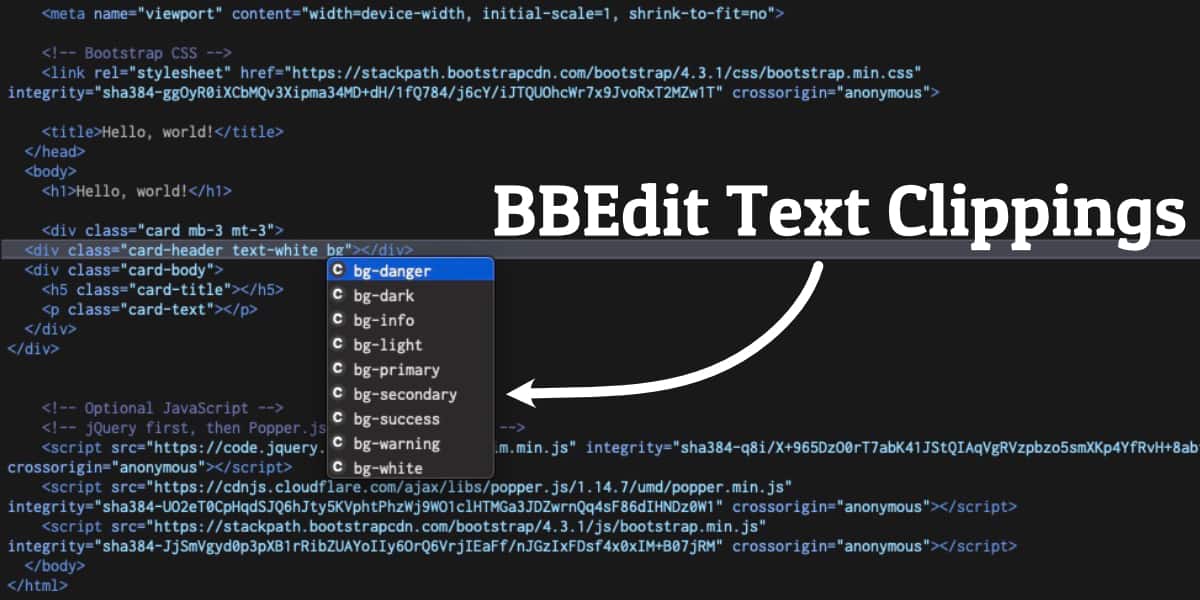
Download the BBEdit Bootstrap Text Clipping Library
I put together 60 Text Clippings for BootStrap 4. I separated them into two groups, Bootstrap and Bootstrap Colors. These will make it easy to use BBEdit to edit and create Bootstrap files.
To install these clippings, simply download the BBEdit BootStrap 4 Clippings file. Unpack it and move the BootStrap and BootStrap Color folder to your Clippings Folder. The easiest way to find your BBEdit Clipping folder is to open BBEdit and select the Clipping Menu - it's the C next to Help. Then select the "Open Clipping Folder." Drag the folders to the Clipping Folder.
PermalinkAbout
A Mac veteran since 1989, I'm here to share my experience with tips and tricks every Friday. Witnessing the evolution of Mac software and hardware firsthand, I've gained a deep understanding of how these machines work and can help you troubleshoot any issues that may come up.
Check out all the blog posts.
Blog Schedule
| Saturday | Internet Tools |
| Sunday | Open Topic |
| Monday | Media Monday |
| Tuesday | QA |
| Wednesday | Veed |
| Thursday | Business |
| Friday | Macintosh |
Other Posts
- Soundtrack Pro
- YouTube Shorts in Final Cut Pro
- External Monitor for iMac
- Refurbished Macintosh
- Amadine
- AppleScript Sample
- MacWeek Review
- Roxio Audio Assistant
- Repositioning an Image with a Mask in Pixelmator Pro's Bento Grid
- Panic Nova
- Customize BBEdit Notebooks in the Dock
- Wondershare Filmora's Auto Reframe
- DragThing
- Editing EXIF Data
- iCloud Storage