
GraphSketcher
GraphSketcher integration Affinity Designer
Have you ever needed to make a simple line chart in Affinity Designer? Wish there was a simple way to create a vector base graph?
Thankfully there is an app for that and it's free!
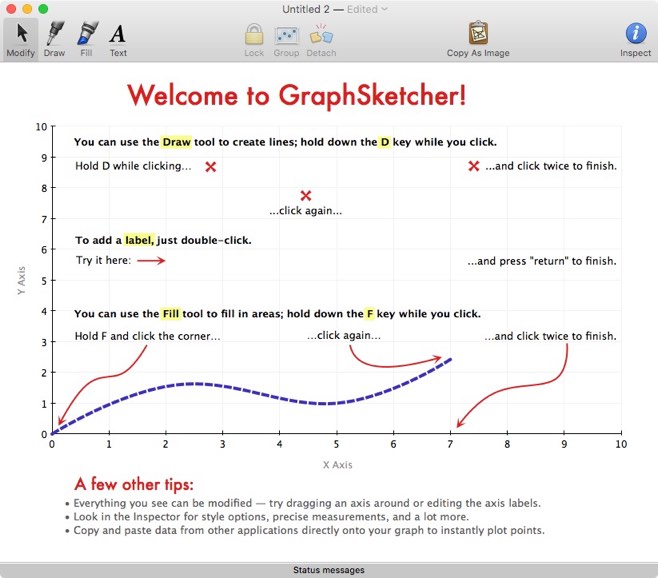
GraphSketcher is a simple, elegant tool for quickly sketching graphs and plotting data -- but you don't even need data to get started. It's perfect for reports, presentations, and problem sets where you need to produce sharp-looking graphs on the fly.
It's really easy to create charts for whatever data point that you want. Anytime you want a quick line graph, GraphSketcher is perfect.
Integrates Smoothly with Affinity Designer
What's nice about GraphSketcher is that you can copy the Graph in GraphSketcher and then paste it in Affinity Designer. All the objects are put in their own layers and in their respective types. So you can still change the text and points on the chart!
This is really cool when you want to put together a quick chart and use the power of Affinity Designer to touch it up.
GraphSketcher History
The application was created by Robin Stewart in 2007 and refined by the folks at Omni Group. In 2014, the application was retired from the product line and the code was put into open-source.
There's only been one update since the code was put into open-source. That was to fix a bug with comma separated values.
Getting GraphSketcher
Download the Binary file from GitHub and place the file into the Application folder. Double click to open and start creating charts.
Check out all the Inspector settings and see the capabilities of the application.
Once your done, click on the 'Copy as Image' and then paste it into your Affinity Designer document. Now you can do additional modifications to make the chart look better. (Try putting the chart on a chalkboard for a unique look!)
Pro-Tip
After you paste in the chart, I would recommend grouping the objects together (Command-G). That will make it easier to manage all the objects. So after you, Command-C, do a Command-G.
PermalinkDealing with the Grayed out song Listing in iTunes
A solution to that dreaded Grayed out song Listing in iTunes
Do you manually move music to your iPhone or iPod? Have you ever encountered an issue where a song didn't get copied and you end up with something like this:
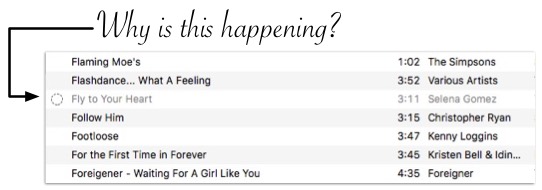
This has happened to me a lot and after playing around with the iTunes and the phone, I figured out why it's been happening.
Here's the possibilities:
iCloud song already there
Apple doesn't want you to copy a song that you already have available in the iCloud. So the grayed out song means that the song already exists in the Cloud or you downloaded to the phone. You don't see it on iTunes because iTunes is only showing downloaded music.
You Copied a Set of Song/Playlist and a Song Existed
When you copy a playlist and a song exists in the cloud it will stop all the other songs that were to be copied over. You may see the grayed out song in the Playlist and not in the regular Song grid.
Quick Solution
I usually encounter this when I copy a playlist to my iPhone and not all the songs got copied over.
The solution that I found to work: delete the grayed out song and try copying the other songs. For example, I would select the next four songs that didn't work or at least one at a time.
If the grayed out song is something that I downloaded from someplace else, I found that renaming it also worked.
PermalinkMacintosh Cyber Deals Watch
Things to watch for this Christmas season
Last year I had my list of software that I was going to watch for, so I thought I repeat the "Watch List" for this busy shopping season.
My budget is pretty tight this year. Chances are that I won't be making any big purchases on "Black Friday" or on "Cyber Monday." Here are the software and services that I'll be checking out this year:
Software Watching
- Belight Software - Art Text and Swift Publisher are pretty cool. Currently Belight Software has 30-70% off sale in the Mac App Store. The sale doesn't cover Art Text or Swift Publisher. I have seen Art Text in some recently announced bundle packages, but they are more than what Art Board sells.
- PhotoStyler - Great for presenting photos online, Social Media and Blogs. (Single User license is $29.99)
- Art Board - Didn't upgrade to 2.0, wonder if they will have a special deals. (Single License is $39.99)
- Movavi - I think 2018 will be the year of multimedia. I am always looking for a different solution to compliment iMovie.
Services Watching
- Creative Market - Love all the package deals. Certainly expect to see a good teaser for this year.
- DropBox - Great service. Currently at 60% at 6.2 GB
- StoryBlocks - Usually have a $99 year membership sale, this time of year they discount to nearly $45.
- Font Awesome 5 - Wonder if they will have one last sale before they go live.
- UDemy - there are a few courses that I want to watch but they are outrageously expense. I'll be checking frequently to see if they are discounted. They currently have a 55,000+ online courses at $10 for a limited time!
- Go Daddy - perhaps they will have discount domain name or hosting plans.
Hardware
Not watching any hardware deals this year. At the moment, I have enough disk space and don't really need a new Flash storage devices or cables.
It will be interesting to see what Apple deals are announced. I suspect that they include iTunes gift card with some purchases of MacBooks and iPads.
PermalinkPage Curl in Graphic Converter
I wasn't able to find any information about Graphic Converter Page Curl Effect, so I thought I write a blog post on how to use the functionality.
Core Image Filters
The 'Core Image Filters' actually filter that is provided in Apple Swift 3. They are available for any Developer to use. The Core Image Filter Reference has information for developers. This is not really useful for consumers since the functionality can change per app.
Apple description:
Core Image is an image processing and analysis technology that provides high-performance processing for still and video images. Use the many built-in image filters to process images, and build complex effects by chaining filters. For details, see Core Image Filter Reference.
Graphic Converter Implementation
You can find the Core Image as the first pullout menu item under the Filter menu. Graphic Converter includes all the effects in the Apple's Core Image library- which is very cool.
You can apply the effect to the whole image, or use the Selection Tool to pick an area on the image that you want to transform.
Simply start with one effect and the Core Image dialog box opens. Now you can easily move to a different one. It's kind of neat to see how each effect transforms your image.
Check out all the Tile effects that can be made out of your image. This is a creative way to come up with some background ideas. The Distortion Effects are pretty cool too.
Nothing gets applied until you click on the 'Apply' button.
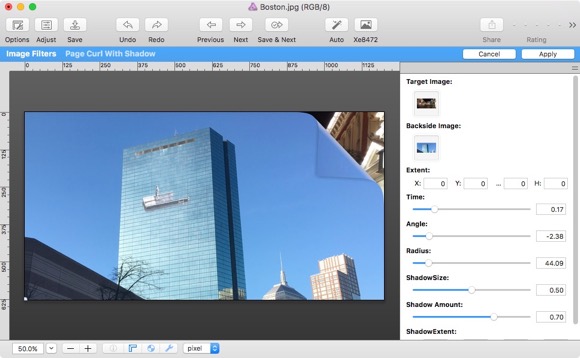
Using the Page Curl Effect
In the Transition section is the Page Curl effect, which is a pretty cool tool. It does take a bit of understanding.
To make the Target Image and Backside Image to work you need to "Drag and Drop" an image to the icon below the text. (It took me a long time to figure out how this worked!)
Simply find an image and then drag it to the preview box under the text.
Other Tips:
- Target Image is the image that you see on the other side of the Curl. (Think of Page 3 in a book)
- The Backside image is the backside of the main image. Usually, it would be the same existing image, but you can change it up to create a cool effect. (This would be page 2 in a book)
- To be effective, both the Target Image and Backside image should be the same dimension as the front image. If it's too small then you will see a checkerboard to indicate areas where it will be transparent.
- There is no way to alter or align the images. That is you can't adjust the position of the Target or Backside image. Your best bet is to do that in another GraphicConverter window. Save then 'Drag Drop' to refresh the results.
- Time is how much of a page curl that you want to apply
- Angle is which corner that you want to apply. First set the time, then move the angle to where you want to corner to appear. For the top right, it should be '-2.57' for the top left the value should be around '-0.69'
- I haven't played with the ShadowSize and Shadow Amount values much just kept the default values.
AirPort Express 802.11g
I currently have an Apple Airport Express (MB321LL/A) sitting in my desk drawer in my office. I was thinking that there must be something that I can use the device for. So I decided to investigate the capabilities of the original Airport Express.
Features of the AirPort Express 802.11g (1st Generation)
- 10/100 Ethernet WAN or LAN port
- Analog/digital audio output jack
- USB Printer Port
Ethernet WAN
By default the AirPort Express Ethernet port acts as a WAN port. This simply means that you plug in a cable from a DSL Router and then you can broadcast a wireless signal. This would be good if you wanted a special wireless for visitors.
You can set the AirPort Express Ethernet port acts as a LAN port. You need to set up the “Extend a Wireless Network.†Then simply connect any Ethernet device to the Airport Express. This would be useful if you have an old computer/Game Console that doesn’t have WiFi access. Simply connect a regular Ethernet Cable to the computer and the Airport Express.
Wireless Music Device
If your wireless can reach outside your house, you can play music using the Airport Express and some cheap outdoor speakers.
Plug in the Airport Express in the opposite wall of the office and make your computer sounds be in stereo mode.
The Operating Temperature is 32 F to 95 F (So there's no chance of putting this outside to play Christmas Music.)
USB Port Ideas
Most modern printers have built-in wireless capabilities. I am guessing it would be useful for an old printer. There's nothing really
Resources
If you have AirPort Express 802.11g (1st Generation) download Apple's Setup Guide to get you up and running.
PermalinkPhotoScape X
Great graphic utility software to touch up any image
PhotoScape X is a great photo utility to process images. Its really handy to have when you want to make a quick image change.
It also packs a lot of neat graphics enhancements that I haven't seen any place else. Things like 3D Objects, Kaleidoscope, Tiny Planet and Scissors.
I have Affinity Photo and Pixelmator and both are excellent programs. I find that PhotoScape X comes in handy when I need a quick fix, for example if I just want crop or add an effect to an image.
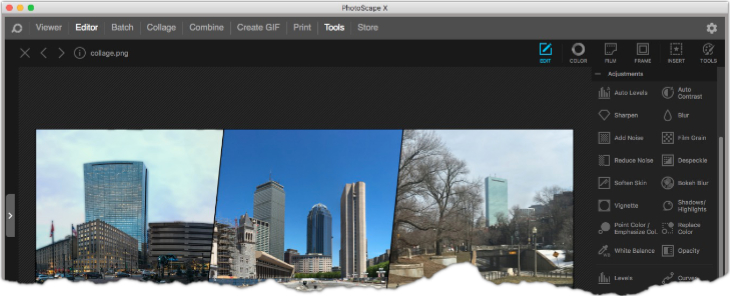
Eight Major Categories
| Viewer | View images in any directory |
| Editor | Make changes to your image. This is where I spend 90% of my time in the application. |
| Batch | Make batch mode changes, useful if you want to add a signature to your images. |
| Collage | Easy way to make any type of collage with text overlay and enhance images. You have more flexibility than Turbo Collage.(There's 350+ Collage Templates) |
| Combine | Combine screenshots to show Production/Development side-by-side comparison. |
| Create GIF | create a GIF from several images. |
| create thumbnail galleries. | |
| Tools | Screenshot, Color Picker and Rename. Nice to have but I rarely use any of these. |
| Store | Buy additional add ons. The Pro version is a good investment. Once you get the Pro package you can skip the entire store. I occasionally check to see if there's anything new. |
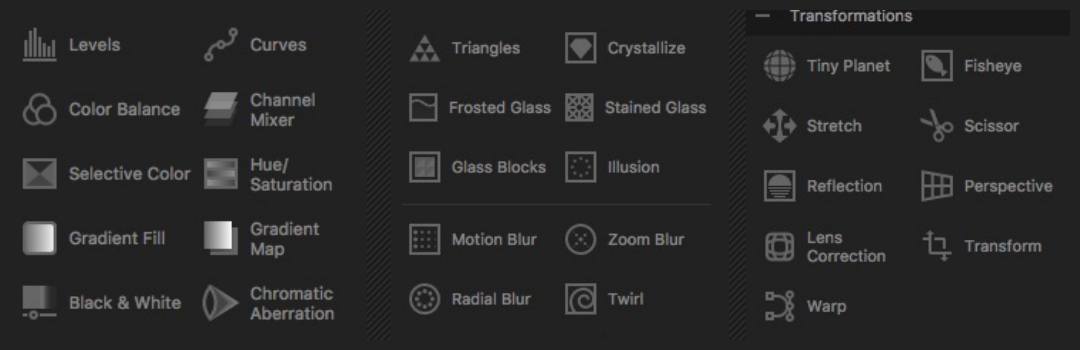
Editor Tools
There are lots of cool tools to the Editor. I recommend loading up an image and spend a few minutes clicking around all the different Effects and Transformations. Along with the standard Resize, Crop, Miniature, Bloom, HDR, and Dehaze there are:
- 32 Adjustment Options
- 26 Effects Option
- 11 Transformations Options
Check out all the different Frames effects too. You don't have as much flexibility as Frame apps like LightFrame and ImageFrame, but it's certainly good enough for a quick touch up. I like the Film and Notebook frames, they add a neat touch up. There are 170+ Frame designs to select from in PhotoScape X.
Lots of tools to inspire your creativity.
Quick Combine Image Trick
I like to combine multiple screenshots into one image. This is super simple to do in PhotoScape X - simply select the images and then the margin and spacing all done in about 5-4 mouse clicks.
Here's a neat trick after you combine the image in PhotoScape X:
After you combine the images and have it laid out the way you want - Use the keyboard shortcut Command-C. That will place the new combined image in the clipboard. You can then past that image in the 'Editor' of PhotoScape or into any other application. (Too bad you can't paste it in Jira or Slack)
Video Tutorials
Check out the 28 videos on PhotoScape X website. You don't need to purchase the software to watch them. It's a great way to learn how to use the tool. In particular pay attention to how quickly things can get done.
Cool Tool for Your Dock
Affinity Photo is still a very powerful image tool, and I use it when I need more control. For basic edits, PhotoScape X seems to be my new go-to tool. I believe that in the long run the $29.99 for the Pro Version is worth the cost.
Currently 105 people have given it 5 Star rating in the App Store.
You can learn a lot about the applications by just spending some time and seeing all the capabilities, perhaps the app will inspire you to do something different with your images.
PermalinkPhoto Size Optimizer
Effect Matrix's Photo Size Optimizer for Mac is a powerful image compression application.
I found about the application because it was one of the applications that I picked in this summer's BundleHunt.
Description from Effect Matrix's site:
Photo Size Optimizer for Mac, a powerful photo resizer, and optimizer, allows you to optimize all your photos by 80% ~ 20% compared to their originals while keeping their original resolution, quality and png, jpg, gif formats. With IMAGEmini, you can save huge space and share full-resolution photos with your friends much faster. It supports 70 types of image formats for re-sizing.
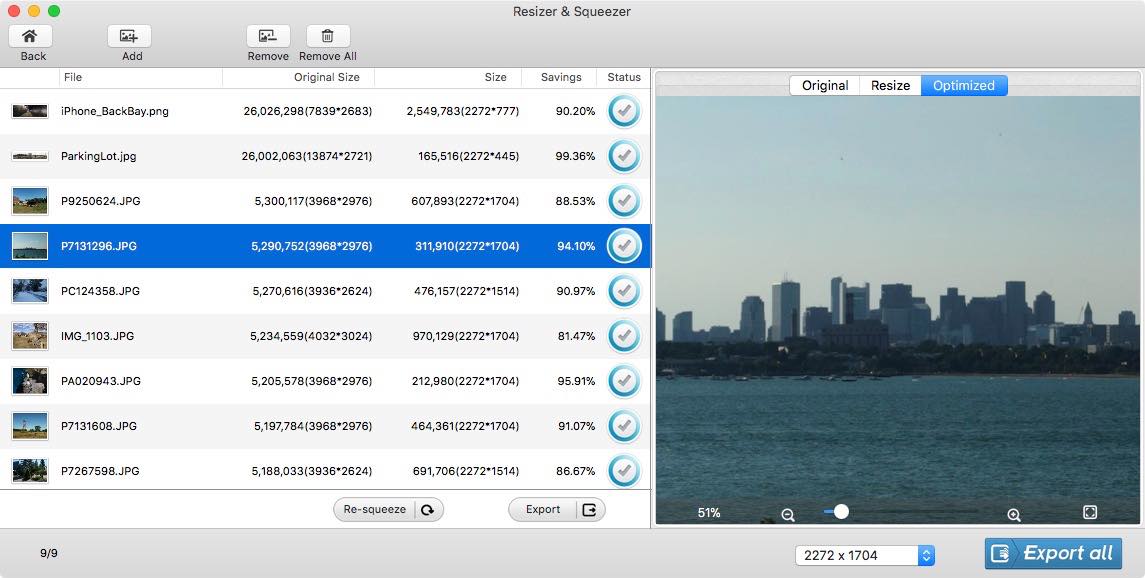
Sample Application Screenshot
Nine Things I Learned About Photo Size Optimizer
- There's no documentation or help files with the application, you basically have to play around with the application to understand how to use it. Fortunately, most of it is straight forward.
- You have no control over the compression. Basically you accept the savings that the application suggest.
- There's two functionalities, Resize & Squeezer and Lossless Photo Squeezer.
- Resize & Squeezer - will resize a bunch of images and resize them to a 10 different options. You can also add a custom option. Note: The resize option is for all the images that you dragged and drop, you can't set different demensions per image.
- Lossless Photo Squeezer - Use this when you only want to shrink the file size and not the dimensions.
- I found that Affinity Photo, GraphicConverter OmniGraffle offered better compression.
- OmniGraffle and Graphic Converter offer previews to see how stronger compression may not impact the image. I was able to get better compression using other applications.
- Some people may have problems installing the application because the application isn't registered. When I tried to open it I got a warning: "Photo Size Optimizer.app" can't be opened because it is from an unidentified developer.
- You can't compress animated GIF files with Photo Size Optimizer.
Overall Feeling
It's really hard to justify paying $29.99 for this application. You'll get better compress and more features in other applications. The application is useful when I want to quickly shrink a file and not have to play around with different settings - basically: "Set it and forget it."
In the long run, your better off buying and using GraphicConverter for $10 more.
Try Yourself
Effect Matrix offers a 10 days Free Trial with Full Features if you download it from their website.
The full version is $29.99.
PermalinkBBEdit 12
BBEdit is updated with lots of new features
Yesterday Bare Bones Software updated BBEdit to Version 12. The feedback from long term customers has been amazing.
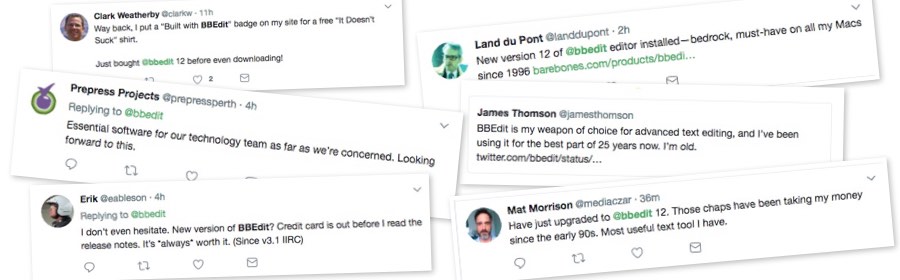
Yes, BBEdit has a very strong customer base.
Some Cool Features in Version 12
There are a lot of changes in Version 12, you would expect that with a major release, here are five some of the highlights that I like:
- Paste Using Filter - You can now apply a filter to any text you paste in. For example you can create a filter to add hyperlinks to certain company phrases.
- Columns Edit - Now its easy to remove or rearrange data in CSV files.
- FTP/SFTP Browser - Lots of code cleanup with the FTP/SFTP browser window.
- Canonize - Allows you to perform batch search replace using a reference file. This is great when you need to run the same file clean up command as part of your daily task.
- Color Scheme now carries over to the sidebar
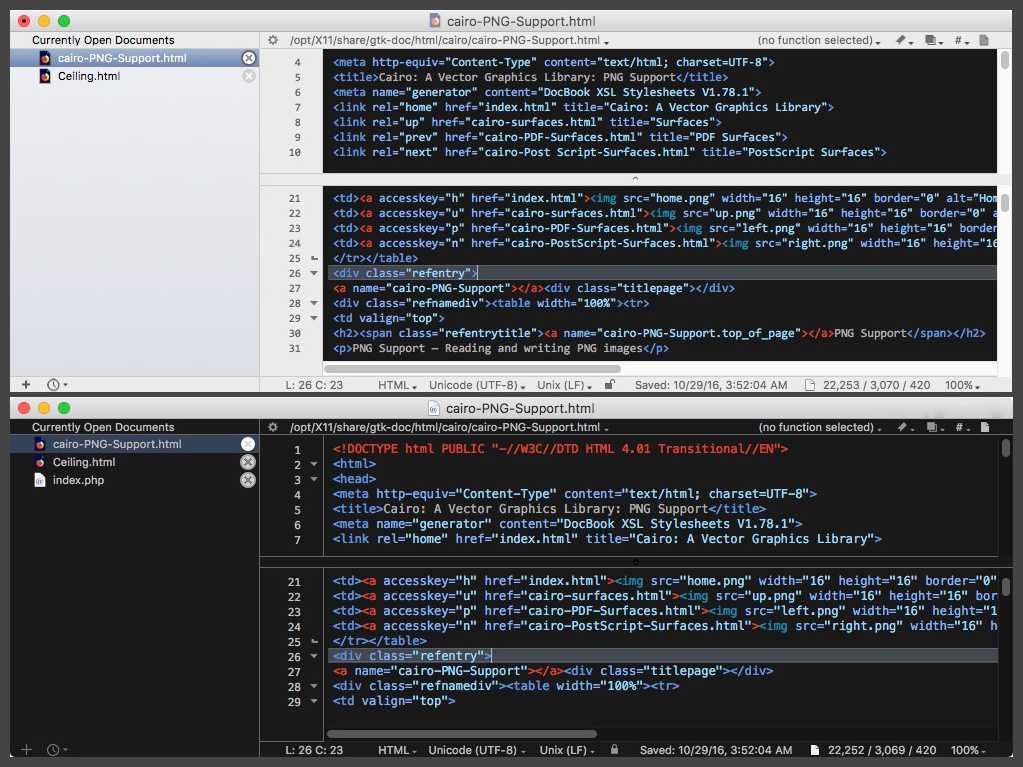
The Editor window difference between version 11 and version 12 of BBEdit.Click on image for a larger version.
Complete details are listed on theirBBEdit 12.0 Release Notes.
Are You Using Completion Correctly?
One of the Preference changes Bare Bones made was to move the Completion into its own category. I actually had it turned off because I wasn't really using it that much. Big Mistake!
BBEdit text completion makes typing HTML commands so much easier. You don't need to use the HTML Markup Tools palette. Simply type in the first few letter and then select the text completion that works for you.
For example, Typing in the words 'an' will bring up the anchor drop down. Hit Return then type the URL then Tab then the text you wish to link. It's a lot faster than bring up the anchor dialog box.
It might take a few tried to get used to it, but once you have gotten used to it, it will speed up your HTML work.
Create a BootStrap Panel Text Completion
If you do any work with Twitter's Bootstrap your probably creating a lot of panels. Here's a simple step to add a panel to BBEdit Text Completion so that it will be super easy to create panels.
To get you started, copy the following text to a BBEdit file:
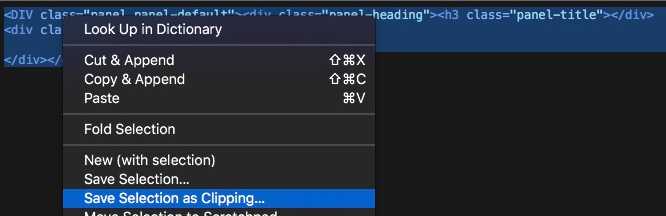
<DIV class="panel panel-default"><div class="panel-heading"><h3 class="panel-title"></div>
<div class="panel-body">
</div></div>
Highlight the text, right click and select "Save Selection as Clipping..."
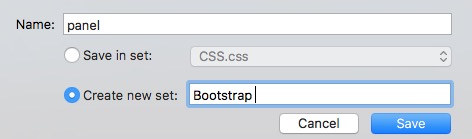
Call it whatever you want, the name is important because that's going to be your Text Completion trigger. Mine is simply: panel.
Create a new set and call it Bootstrap. This will help you organize common Clippings
Test it out! Type in the word 'panel' in any BBEdit document and you should see the drop down.
How awesome is that! Now you can create text completions for all your panel types. Don't forget to add one for Wells and responsive Tables too!
Getting BBEdit
You can download a trial version of BBEdit from their website. You'll have 30 days to try out all the features.
PermalinkFFMpeg
If your looking for a powerful multimedia framework check out FFmpeg. It's a powerful command line utility that has a strong user base and easy to learn.
ffmepg doesn’t have a fancy user interface, which may turn away some users. I believe It worth learning FFmpeg because you'll learn more about creating multimedia files.
Three Examples
Show MetaData
Find out some MetaData on your multimedia file. Here's what information that Quicktime and Finder shows:
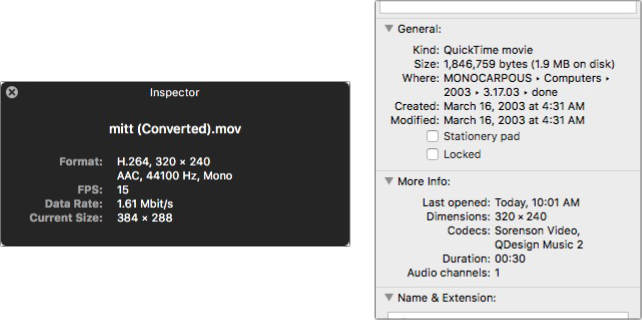
This is what FFmpeg displays when you run the command:
ffmpeg -i
Input #0, mov,mp4,m4a,3gp,3g2,mj2, from '/Volumes/MONOCARPOUS/Computers/2003/3.17.03/done/mitt.mov':
  Metadata:
    creation_time   : 2003-03-16T05:31:43.000000Z
    encoder         : Encoded with Cleaner 5
    encoder-eng     : Encoded with Cleaner 5
  Duration: 00:00:30.06, start: 0.000000, bitrate: 491 kb/s
    Stream #0:0(eng): Video: svq1 (SVQ1 / 0x31515653), yuv410p, 320x240, 442 kb/s, 15 fps, 15 tbr, 600 tbn, 600 tbc (default)
    Metadata:
      creation_time   : 2003-03-16T05:31:43.000000Z
      handler_name    : Apple Alias Data Handler
      encoder         : Sorenson Video
    Stream #0:1(eng): Audio: qdm2 (QDM2 / 0x324D4451), 44100 Hz, mono, s16, 48 kb/s (default)
    Metadata:
      creation_time   : 2003-03-16T05:31:43.000000Z
      handler_name    : Apple Alias Data Handler
Convert old .MOV to the latest .MP4 standards
This is a basic functionality of FFmpeg. The core command is:
ffmpeg -i filename.mov filename.mp4
A more advance example would be:
for FILE in *.swf; do ffmpeg -i "$FILE" "${FILE[@]/%swf/mp4}"; done;
That will convert all Flash SWF files in a directory to the industry standard h264 format. This is very useful to view Flash video if you don't have a Flash player.
As you learn more about the FFmpeg, you'll understand which compression will work for your multimedia and distribution method.
Create a Looping File
Let's say you have a howling wolf audio clip and you wanted to have a longer version. Here's an example of how you would go about doing that using FFmpeg.
ffmpeg -stream_loop 4 -i howl.mp3 -c copy howl4.mp3
Real Video Files
I thought I might be interesting to see if FFmpeg would convert some old Real Media files to MP4. I tested converting a couple of Real Video and Real Audio files, some that you can see on this site, and they converted from Real Video 10 to H264 successfully.
Stream #0:1 -> #0:0 (rv10 (native) -> h264 (libx264))
Stream #0:0 -> #0:1 (ac3 (native) -> aac (native))
The video quality was bad. However, it was probably because when I encoded it I went for the smallest file size as possible.
PermalinkSeamless Images in Affinity Designer
Someone added a comment to a previous blog post asking how I was able to make a background image in Affinity Designer. It's pretty easy to do.
Here are the steps on creating a seamless asset in Affinity Designer. To do this, I'll utilize some functionality in OmniGraffle.
A seamless background image is a pattern that looks the same no matter how big the background is. Think of it as wallpaper pattern.
Steps to create the pattern
- Open up OmniGraffle
- Drag and drop the Seamless Background image
In the Image Setting, in the Object Panel, select the 'Tile Image to fit Shape' icon.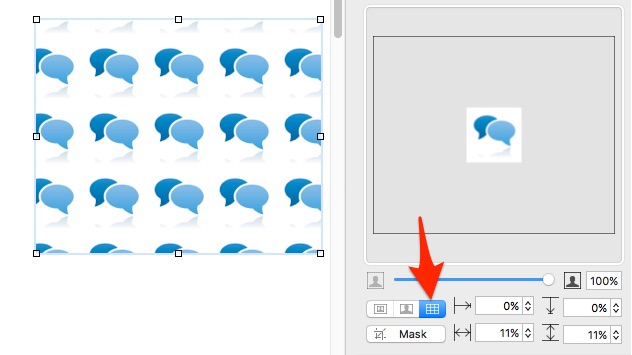
- Now reshape the shape to a large size, such as 1000 px. It's important to keep the image ratio, this is done by holding the shift key and drag the corners.
- Once done, simply copy the object.
- Open up Affinity Designer
- Create a new document.
- Paste in the file.
- Open up the Style Panel
- Right Click on the Image and select the 'Create Style'
Now you have a style that has the background image.
PermalinkAbout
A Mac veteran since 1989, I'm here to share my experience with tips and tricks every Friday. Witnessing the evolution of Mac software and hardware firsthand, I've gained a deep understanding of how these machines work and can help you troubleshoot any issues that may come up.
Check out all the blog posts.
Blog Schedule
| Saturday | Internet Tools |
| Sunday | Open Topic |
| Monday | Media Monday |
| Tuesday | QA |
| Wednesday | Veed |
| Thursday | Business |
| Friday | Macintosh |
Other Posts
- Five Finder Search Attributes
- Mission Control
- iCloud Storage
- Apple Notes
- PhotoStyler
- BBEdit 14
- How to Save and Add Your Own Preset Templates in Pixelmator Pro
- New 27-inch iMac
- Year On A Page
- Keychain Secure Notes
- Download Church Bulletin
- Open Search via LaunchBar
- Exciting New Features in macOS 15 Sequoia
- Panic.com's Transmit
- Biff App